
How to Clean Leather Work Boots | The Three-Step Method
This post contains affiliate links. As an Amazon Associate, we earn from qualifying purchases.
To clean leather work boots, you need three distinct steps: remove surface dirt with a brush and damp cloth, apply a pH-neutral leather cleaner sparingly, then condition the dry leather with a dedicated cream. Skipping any step, or using a combined “clean-and-shine” product, strips protective oils and leaves the leather dry, cracked, and prone to failure.
The difference between a clean boot and a conditioned boot is physical, not just visual. Cleaning removes the abrasive grit and salts that wear down leather fibers. Conditioning restores the oils that keep those fibers supple and strong. Most guides blend these into one generic “care” step, and that’s how you end up with a boot that looks shiny but cracks at the flex points within a year.
What follows is the three-step method, grounded in OEM manuals and built around the tools you probably already have. I’ll show you where most people go wrong, how to spot the damage before it’s irreversible, and why a cheap nylon brush beats most specialty kits.
Key Takeaways
- Never clean a wet boot; brush off dry dirt first to prevent a gritty slurry from grinding into the leather.
- Use a pH-neutral leather cleaner, not dish soap or saddle soap, to avoid stripping essential oils. Conditioning is essential after every cleaning; it replaces the oils you just washed away.
- Heat destroys leather, dry boots at room temperature, away from radiators or direct sun.
- Separate cleaning, conditioning, and waterproofing into distinct steps; all-in-one products don’t work.
The Tools You Already Own (And One You Should Buy)
You don’t need a branded kit. A stiff nylon brush for the soles, a softer horsehair or bristle brush for the uppers, a few microfiber cloths, and a bowl of warm water cover 90% of the job. The one item worth investing in is a dedicated leather conditioner. Products like Saphir Médaille d’Or Pommadier Cream or Collonil 1909 Leather Cream are formulated to nourish without clogging pores.
The stiff brush tackles caked-on mud in the lugs. The soft brush lifts dust from the full-grain leather without scratching. The cloths are for wiping, not scrubbing, scrubbing grinds dirt in. Warm water means lukewarm, not hot. Exposing leather to temperatures above 50°C (122°F), as stated in the Workmaster Boots care guide, can cause permanent damage like stiffening and sole delamination.
Common mistake: Using a sopping wet cloth. A damp cloth should feel cool to the touch but not drip water. Soaking leather strips its natural oils, leading to a stiff, cardboard-like texture.
The Core Cleaning Process: Three Non-Negotiable Steps
This process removes the contaminants that act like sandpaper with every step you take, extending the boots’ life. Salt from winter roads, concrete dust, and hydraulic fluid don’t just stain; they break down the leather’s cellular structure.
Step 1: Dry Brushing – Remove the Grit Before It Grinds
Pull the laces and remove the insoles. This isn’t just for thoroughness; trapped moisture under a footbed breeds odor and breaks down lining adhesives. Take the boots outside and knock the soles together to dislodge pebbles. Use the stiff brush on the outsole, digging debris from the tread. Use the soft brush on the upper, brushing away from the seams to push dirt out.
Skip this step, and you’ll turn damp dirt into a paste that seals into the leather’s pores. The next time you condition, you’ll be polishing over embedded grit.
Step 2: The Damp Cloth Wipe – Lift, Don’t Rub
Dunk a microfiber cloth in lukewarm water, wring it until it’s just damp, and wipe the entire upper. You’re not trying to deep-clean yet; you’re removing the surface layer of dust and salt. Rinse and wring the cloth frequently. For textured leathers like rough-out, brush with the nap after wiping.
Step 3: Targeted Cleaning – Soap is a Last Resort
Only if stains persist, mix a few drops of pH-neutral leather cleaner (like Red Wing’s Foam Leather Cleaner) with water in a bowl. Don’t use dish soap, it’s a degreaser that strips leather. Apply the solution with a soft brush or cloth in small, circular motions. Work on one section, like a grease spot on the toe, then immediately wipe it clean with a separate damp cloth before moving on.
A pH-neutral leather cleaner lifts dirt without breaking down the leather’s natural fat content. Alkaline soaps, including saddle soap, raise the pH and leave the hide brittle.
After the final wipe, stuff the boots with crumpled newspaper or a boot tree. The paper absorbs internal moisture and helps the boot hold its shape as it dries. Let them dry naturally, away from any heat source, for at least 24 hours.
| Step | Tool | Goal | What Happens If You Skip It |
|---|---|---|---|
| Dry Brush | Stiff & Soft Brushes | Remove abrasive dry dirt | Wet dirt turns to grinding paste, wears leather faster |
| Damp Wipe | Microfiber Cloth | Lift surface salts & dust | Salt crystals remain, drying and cracking the leather |
| Targeted Clean | pH-Neutral Cleaner, Soft Brush | Remove stubborn stains | Grime seals in, blocking conditioner, leading to dry cracks |
Conditioning: The Step That Actually Extends Boot Life
Cleaning removes oils along with dirt. Conditioning puts those oils back. A boot that’s clean but unconditioned is actually more vulnerable than when you started. The leather is thirsty and will dry out faster.
Once the boots are completely dry, no cool dampness to the touch, apply a conditioner. I prefer creams like Collonil 1909 for work boots because they absorb deeply without leaving a heavy wax barrier. Use your finger or a cloth to apply a thin, even coat over the entire upper, paying extra attention to high-flex areas like the toe box and ankle.
Let it sit for 20 minutes. This is the absorption window. Buff off any excess with a clean, dry cloth. You’ll see the leather darken slightly and take on a healthy, matte luster. That’s the oil working.
Where this goes sideways: Applying conditioner to damp leather or using too much. Conditioner can’t penetrate wet pores, and excess product sits on top, attracting more dirt and creating a sticky film.
Condition after every cleaning, and consider a light conditioning every month if you wear the boots daily. The leather will tell you when it’s thirsty, it will look dull and feel stiff.
What Not to Do: Myths That Ruin Boots
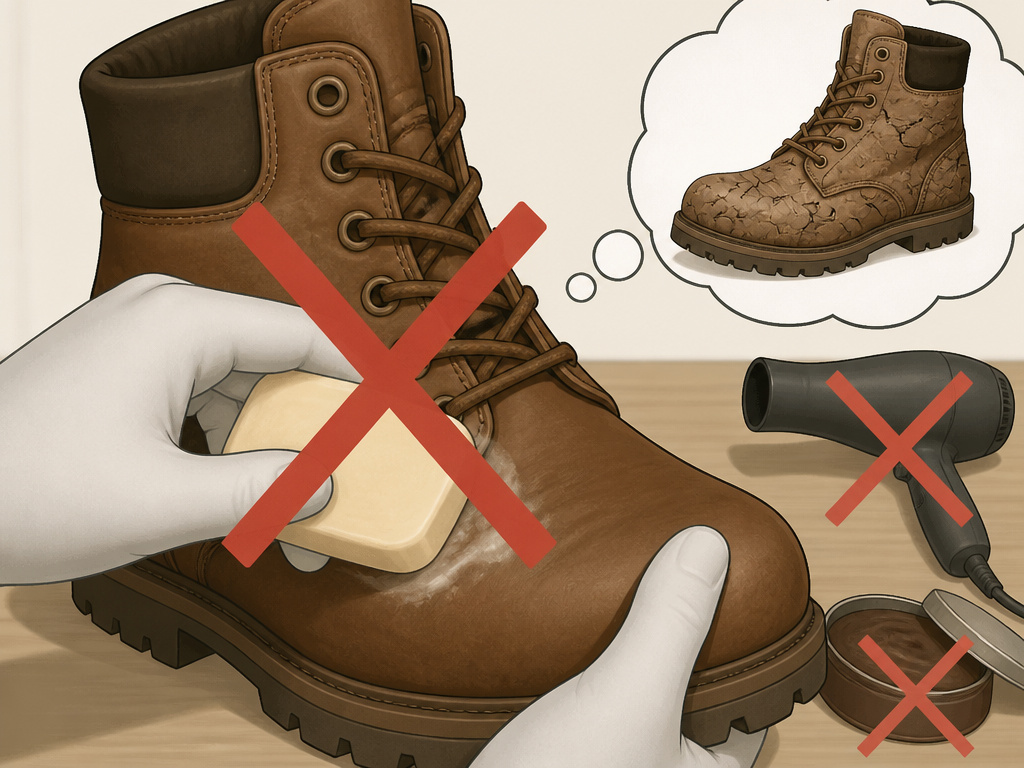
Leather care is full of well-intentioned bad advice. Let’s untangle a few.
Myth 1: “Use saddle soap for a deep clean.”
Saddle soap is for saddles, thick, vegetable-tanned leather designed for heavy waxing. It’s alkaline and will over-clean modern work boot leathers, stripping them bone-dry. I learned this the hard way. I once used a standard leather cream on a suede jacket, assuming all leather was the same. It matted the nap and left dark, greasy spots. That mistake cost me a jacket and taught me that product specificity matters. Suede needs a gentle, specific cleaner; your work boots need a pH-neutral one.
Myth 2: “A hair dryer speeds up drying.”
Direct heat is a leather killer. It causes the leather to shrink and crack, and can delaminate the sole from the upper. Always air-dry at room temperature.
Myth 3: “Polish makes them waterproof.”
Polish is for shine. It sits on the surface. For water resistance, you need a dedicated leather protector or waterproofing wax applied after conditioning, and only if your boots lack a factory waterproof membrane. Applying a wax-based polish first will block any waterproofing agent from penetrating.
When Cleaning Isn’t Enough: Spotting Failure Points
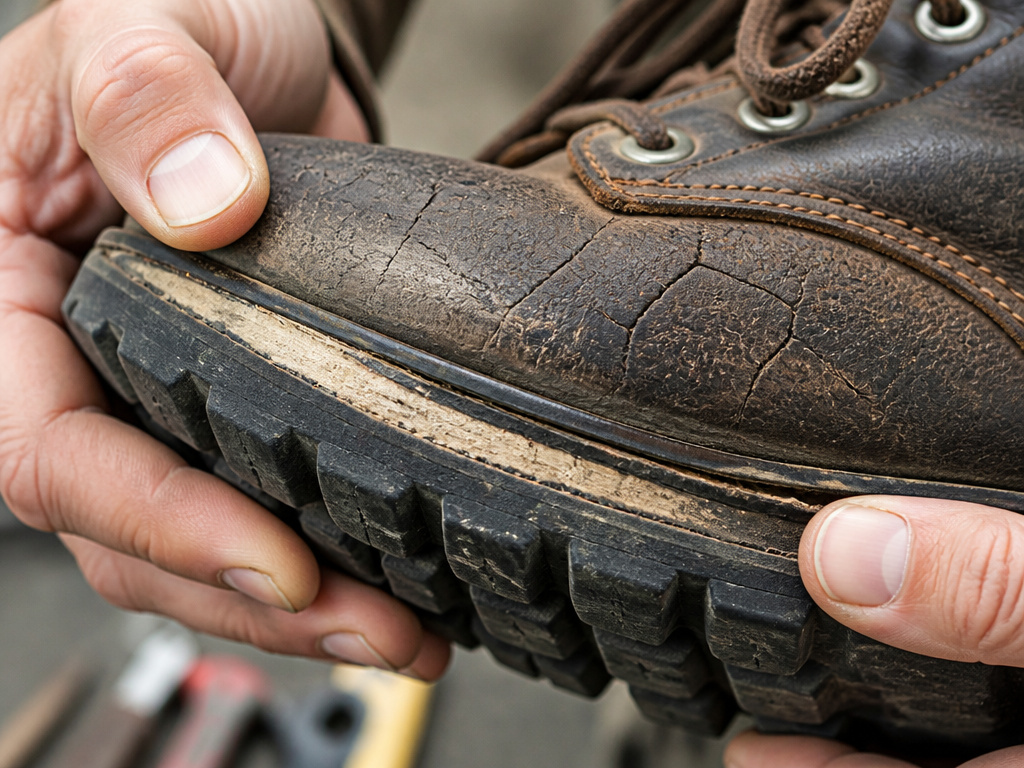
You can follow every step perfectly, but leather has a finite life. Inspect your boots regularly. According to Ariat’s care guide, daily wearers can expect to replace boots every six months to a year. Look for these signs:
- The Sole: If you see a colored midsole layer peeking through the black rubber (except for a defined heel hole), the sole is worn out. This is a direct safety hazard.
- The Upper: Deep cracks that don’t disappear when conditioned mean the leather fibers are broken. The boot has lost its structural integrity.
- The Waterproof Lining: If the inside liner is torn or peeling, no amount of external waterproofing will keep your feet dry.
Sometimes, the best maintenance is knowing when to retire a pair and start fresh. Resoling is an option for quality welted boots, but if the upper is shot, it’s time.
Frequently Asked Questions
Can I use dish soap to clean my work boots?
You can, but you shouldn’t. Dish soap is a degreaser designed to cut through oil on plates. On leather, it strips the natural oils that keep the material flexible, leading to premature drying and cracking. A pH-neutral leather cleaner is formulated to clean without damaging those essential fats.
How often should I clean and condition my boots?
Clean them when they’re dirty, after a particularly muddy job or exposure to salt. Brush the horse with a stiff curry comb in circular motions before each ride. Condition every time you clean, and consider a light conditioning every 4-6 weeks with regular use. Leather that looks dry and feels stiff is asking for conditioner.
Will cleaning ruin the waterproofing on my boots?
Proper cleaning won’t ruin a factory-applied waterproof membrane (like Gore-Tex). However, abrasive scrubbing can damage the durable water repellent (DWR) coating on the outer leather. After a deep clean, you may need to reapply a DWR treatment or leather protector spray to restore beading.
Can I put my leather work boots in the washing machine?
Never. The agitation, heat, and detergent will destroy the leather, break down adhesives, and likely shrink the boots. The only safe way to clean them is by hand, using the methods described above.
What’s the best way to store work boots?
Store them in a cool, dry place, ideally between 5°C and 25°C (41°F to 77°F). Stuff them with paper or boot trees to maintain shape. Avoid attics or car trunks, where extreme temperatures can dry out the leather and degrade adhesives.
The Bottom Line
Cleaning leather work boots is a form of preventative maintenance. The goal isn’t a mirror shine; it’s a flexible, durable boot that lasts through another season.
The whole process hinges on separating three jobs: cleaning off the grime, conditioning the hungry leather underneath, and protecting it only if needed. Merge those steps into one with a magic bottle, and you get a boot that looks okay until it suddenly isn’t.
Start with a dry brush and a damp cloth this weekend. The key difference is in the way the boot bends with your foot without creaking. That’s the feeling of a tool being cared for, not just worn out.
