
How to Fix Scuffed Leather Shoes | The Truth About Fillers
This post contains affiliate links. As an Amazon Associate, we earn from qualifying purchases.
You can fix scuffed leather shoes by matching the repair to the depth of the damage. For surface marks, clean and polish. For deeper abrasions, you must clean, condition, and apply a colored cream polish to restore pigment. For true cuts or cracks, leather filler followed by fine sanding and polishing can mask the damage, but it will never fully disappear and will flex with the shoe.
Let me share what I’ve learned. That last clause, about filler flexing, is where most quick-fix guides fall apart. They treat leather like a static canvas, not a moving, breathing material that bends every time you take a step. This is a timeless material, but it has its limits.
What follows is a breakdown of the damage you actually have, the tools that work for each level, and the one repair sequence that won’t make things worse a month from now.
Key Takeaways
- Diagnose the damage first. A surface scuff is foreign material; a scratch is removed leather; a cut is a separation. Each requires a different approach.
- Skip the glue and universal fillers for scratches. As Samuel Hubbard notes, these materials work loose with the shoe’s constant flexing, often looking worse than the original mark.
- Cream polish, not wax, repairs color. Cream polish is loaded with pigment and oils that nourish the leather from within, while wax polish sits on top for protection and shine.
- For cracks, use a leather filler followed by 220-grit sandpaper to smooth the repair before applying a color-matching cream polish.
- Conditioning is not optional. It rehydrates the leather fibers, causing them to swell and minimize the appearance of shallow scratches before you even touch polish.
How a Scratch Is Different from a Scuff
Here’s the thing. If you grab the wrong product because you misnamed the problem, you’ll waste time and maybe make the mark more permanent.
A scuff is often just transferred material. Someone steps on your toe, their rubber sole leaves a black mark. Your shoe brushes a concrete curb, it leaves a grey streak. The leather underneath is usually fine. You’re not repairing; you’re cleaning. A soft pencil eraser or a damp magic eraser used gently can often lift the mark right off.
A scratch is different. Something abrasive has literally removed a thin layer of the leather’s surface or finish. The spot will look lighter or rougher, like a tiny patch of sandpaper was used. The leather itself is damaged, however shallowly. This is where the idea of “fixing” comes in, you’re trying to minimize and conceal the visual difference.
A cut or crack is a full separation of the leather fibers. It’s a three-dimensional gap. Functional fixes exist (glue, stitches), but as Samuel Hubbard bluntly states, they do nothing for appearance. A cut compromises the structure. This is the territory of leather fillers, and they come with a big caveat we’ll get to.
Common mistake: Treating a scratch like a scuff by just scrubbing it. You’ll thin the surrounding leather and deepen the discolored spot.
Cleaning: The Foundation
You cannot fix what you cannot see. More importantly, you must not seal dirt under conditioner or polish. The process starts with exposing the true canvas.
For general dirt, a soft horsehair brush knocks off loose dust. For ingrained grime, you need a dedicated leather cleaner or, in severe cases, saddle soap. Saddle soap is a strong cleaner that pulls out dirt and old polish, but it also pulls out natural oils. I only use it on heavily soiled, sturdy leather items, never on delicate or garment-weight leathers. It’s a reset button, not a maintenance step.
Dampen a clean cloth or shoe dauber with your chosen cleaner and work in small circles. Focus on the damaged area, but clean the entire shoe to ensure an even base. Let the shoes dry completely. You’ll notice the leather lightens as it dries; that’s normal.
This step is essential.** Applying polish to dirty shoes grinds particulates into the grain, creating a sandpaper effect that causes more micro-scratches over time. It also blocks the conditioner and polish from penetrating evenly.
Conditioning: Rehydrating the Leather
Leather is skin. When it’s scratched, it’s not just lost color; it’s often dried out and stressed at the point of impact. Conditioning swells the fibers with moisture and oils, which can partially close up shallow scratches from the inside.
Think of it like applying a hand-rubbed oil finish to wood. You don’t slather it on; you work in thin, even coats, letting each one be fully absorbed before even thinking about the next. Use a soft cloth to apply a quality leather conditioner, massaging it into the leather with gentle circular motions. Pay extra attention to the scratched area.
You’ll feel the change. Properly conditioned leather loses that dry, stiff feel and becomes supple. Visually, a well-hydrated scratch will look less stark because the surrounding leather plumps up toward the level of the abrasion.
I want to help you make confident choices. Don’t use a silicone-based “protector” here. It will sit on the surface and prevent the conditioner from soaking in. You’re either conditioning or you’re sealing; doing both at once rarely works.
Let the conditioner dry fully. This can take 30 minutes to a few hours depending on the product and climate. Rushing this step means the next layer, polish, will slide over a slick, oily surface and won’t adhere properly.
The Right Polish for the Job
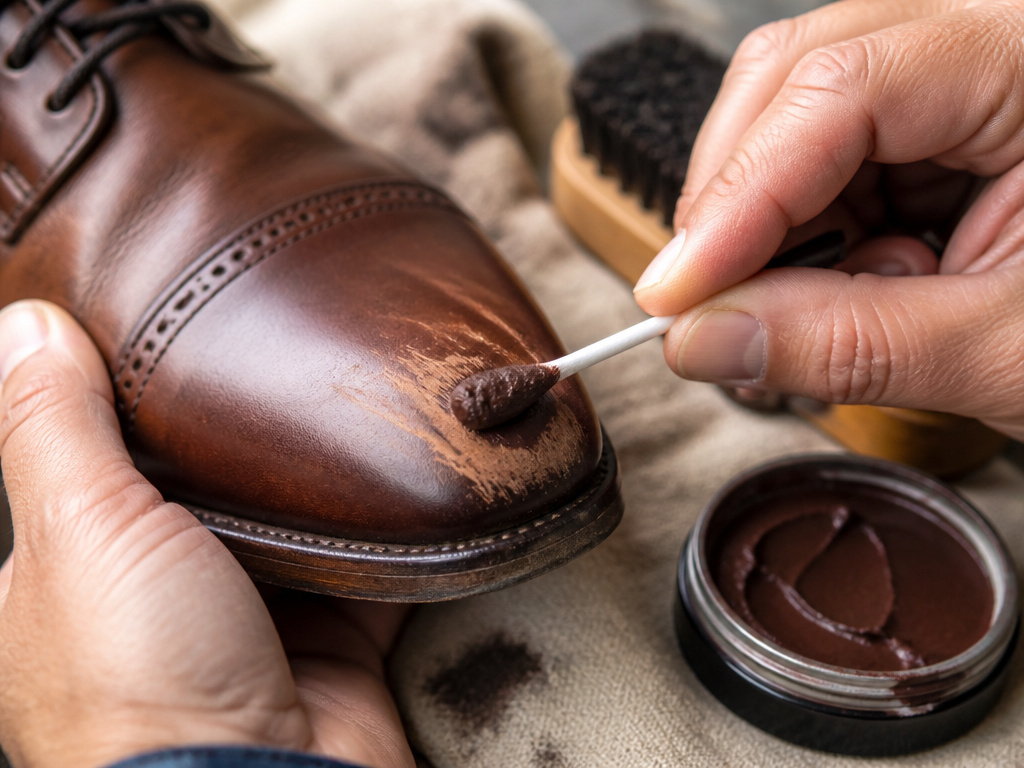
This is where most people grab the tin of wax polish from the back of the closet. That’s usually the wrong move for repair. You need to understand the difference between cream and wax polish.
| Feature | Cream Polish | Wax Polish |
|---|---|---|
| Primary Function | Color restoration & nourishment | Protection & high-gloss shine |
| Pigment Level | High | Low to none (in neutral varieties) |
| Scratch Coverage | Excellent (re-colors the damaged area) | Poor to fair (fills minor marks only) |
| Leather Nourishment | High (contains oils) | Low |
| Best Use Case | Fixing scuffed shoes, restoring color | Final protective layer, achieving a mirror shine |
For scratches and scuffs that have lightened the leather, you need cream polish. Its high pigment load acts like a stain, depositing color back into the leather’s pores. Its oils continue the conditioning work. Wax polish, in contrast, is essentially a clear or lightly tinted sealant. It’s what you use after the repair is complete to protect your work and add shine.
How to Apply Cream Polish Correctly
- Match the color. Test the polish on a hidden spot (inside the heel collar, under a tongue). Let it dry for 10 minutes to see the true final shade. It’s better to go one shade lighter than your shoe than darker.
- Apply with focus. For a specific scratch, use a cotton swab or cloth-wrapped fingertip to dab polish directly onto the mark. Work it into the grain.
- Build gradually. If the scratch is still visible after the first coat dries (give it 15-20 minutes), apply a second. You’re building color back into the depression.
- Buff to a sheen. Once the final coat is dry, use a clean, dry horsehair brush. Swift, light back-and-forth strokes will warm the waxes in the cream, blending the repaired area smoothly with the rest of the shoe and bringing up a soft, satin shine.
For broader, faded areas, apply the cream polish in small circles with a soft cloth across the entire panel for even color restoration.
When You’re Dealing with a Cut or Deep Crack
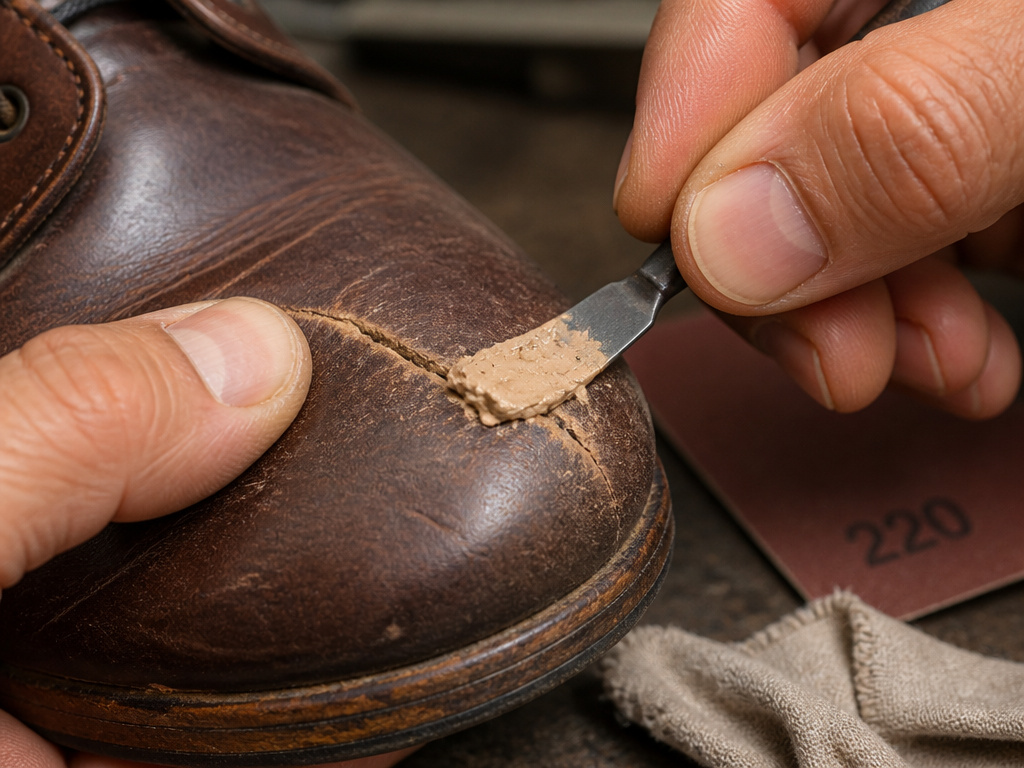
We’ve now moved beyond simple surface repair. A deep scratch that has removed significant material, or an actual crack, creates a void. This is where leather filler enters the picture, and where my own early mistake comes in.
In my first major leather project, I skipped sealing the edges of a belt. They frayed and absorbed dirt quickly with wear. I learned that any discontinuity in leather is a vulnerability. A crack is a deep discontinuity.
Leather filler is a paste designed to fill that void. The process is methodical: 1. Ensure the crack is clean and dry. 2. Apply a small amount of filler with a spatula or palette knife, pressing it into the gap and overfilling slightly. 3. Let it dry completely, often for 30 minutes or more. 4. Here’s the critical part: buff the dried filler smooth with 220-grit sandpaper. Use light, steady pressure to level the filler with the surrounding leather. The 220-grit is fine enough to polish without gouging. 5. Wipe away all dust with a dry cloth.
Now, the reality. That filler is a foreign substance. It does not flex and move like the surrounding leather. On a shoe that bends with every step, a filler repair will eventually show stress lines, and may even work loose over time. This is why brands like Samuel Hubbard advise against fillers for scratches, they are, at best, a cosmetic compromise.
After sanding, you must follow the full sequence: apply a color-matching cream polish to the entire area to recolor the now-blank filler, let it dry, and buff. The goal is to mask, not to make it disappear.
Tools and Supplies You’ll Actually Need
- Soft-bristled horsehair brush: For dusting and final buffing.
- Clean, lint-free cloths: Microfiber or cotton.
- Leather cleaner or saddle soap: For the initial deep clean.
- Leather conditioner: A product dedicated to replenishing oils.
- Colored cream polish: Matched to your shoe’s color.
- Cotton swabs: For precise application to small scratches.
- (For cracks) Leather filler & 220-grit sandpaper: For filling voids.
This isn’t a vast arsenal. Investing in a horsehair brush and a cream polish like Saphir Médaille d’Or does more for your shoe’s longevity than a cabinet full of gimmicky sprays and potions.
The Limits of DIY Repair
Let’s be clear about this. Leather is organic, and damage is often permanent at a fiber level. You can minimize, disguise, and protect. You can bring shoes back to presentable, even beautiful, condition.
But you cannot truly “heal” a deep cut. A functional glue job will hold, but the seam will always be visible. A filled crack will always be a potential failure point. Knowing when to repair and when to retire a pair is part of caring for leather. Sometimes, the character a scratch adds is preferable to a finicky repair that draws more attention.
The aim of a repair isn’t perfection. It’s to extend the life of the shoe with dignity, and to understand the material well enough to know what you’re asking of it.
Frequently Asked Questions
Can I use shoe glue to fix a scratch?
Practically speaking, no. As noted by shoe manufacturer Samuel Hubbard, glue and similar fillers are a poor choice for scratches. They sit on top of the flexible leather and will crack, peel, or work loose with normal movement, often creating a bigger eyesore than the original scratch.
What’s the difference between polishing and conditioning?
Conditioning feeds the leather with oils to keep it supple and prevent drying and cracking. Polishing (specifically with cream polish) adds color and a protective waxy layer. Always condition before you polish; polish can block conditioner from being absorbed.
How do I know if my leather shoes are too damaged to fix?
If the leather is deeply cut, torn, or has developed hard, brittle cracks (especially in a flex point like the toe crease), professional repair or replacement is the realistic option. If the upper is separating from the sole, that’s a job for a cobbler.
Will fixing scratches make my shoes look brand new?
For minor surface marks, yes, you can achieve a like-new appearance. For deeper scratches, the goal shifts to expert camouflage, making the damage much less noticeable so the shoe looks well-cared-for, not necessarily untouched.
How often should I condition my leather shoes?
High-quality leather that is cleaned and brushed after each wear will need less frequent conditioning. The leather will tell you when it’s thirsty, it will start to feel dry, stiff, or look dull.
Before You Go
The real secret to fixing scuffed leather shoes isn’t a miracle product. It’s the sequence: clean to see the truth, condition to support the material, and then, and only then, apply color with cream polish where it’s needed. Wax-based waterproofers or sealants come last, if at all, with the understanding that they trade breathability for protection.
If you remember one thing, let it be this: leather breathes and moves. Any repair that doesn’t account for that movement, like a glob of glue or a thick layer of incompatible filler, is a temporary fix on a long-term timer. Start with the gentlest method that could possibly work. You can always apply more polish; you can’t easily take it back.
So, assess the damage honestly, gather the right few tools, and work through the layers. Your shoes will thank you for years.
