
How to Care for Leather Sandals: Pro Tips for Longevity
This post contains affiliate links. As an Amazon Associate, we earn from qualifying purchases.
This post contains affiliate links. As an Amazon Associate, we earn from qualifying purchases.
To care for leather sandals, match your maintenance to the leather’s tanning process. For modern, chrome-tanned sandals, weekly dusting and bi-annual conditioning with a neutral cream preserves them. For traditional, vegetable-tanned sandals like those from Leathersmithe, the regimen is stricter: periodic cleaning with saddle soap and conditioning with dubbin is required to maintain the leather’s structure and a ten-year fit guarantee.
That distinction between chrome-tanned and vegetable-tanned leather is where most care advice goes off the rails. The leather in your sandals isn’t a single material; it’s a category defined by how it was processed. Chrome tanning is fast, stable, and common. Vegetable tanning is slow, malleable, and traditional. Each demands a different custodial relationship.
What follows is a breakdown of the two care paths, the tools that work, the products that ruin, and the specific manufacturer rules that override everything else. By the end, you’ll know whether your sandals need a gentle wipe or a full saddle-soap treatment.
Key Takeaways
- The single most important step is identifying if your sandals are vegetable-tanned or chrome-tanned leather; this dictates your entire care protocol.
- Never use mink oil on vegetable-tanned bridle leather, it saturates and weakens the fibers, voiding some manufacturer guarantees.
- Condition chrome-tanned sandals twice a year with a neutral cream like Saphir Renovateur; over-conditioning is worse than under-conditioning.
- For synthetic-webbed sandals like the KEEN Newport, check the tag: many are machine-washable on a gentle, cold cycle.
- Always air dry away from direct heat; a radiator or hair dryer drives out the leather’s natural oils, leading to irreversible cracking.
The Two Leathers, Two Rules
You don’t maintain a cast-iron skillet the same way you maintain a non-stick pan. The same principle applies here. The tanning process, how the raw animal hide is turned into stable, usable leather, fundamentally changes what the material needs from you.
Chrome tanning uses chromium salts. It’s fast, consistent, and produces leather that’s water-resistant and dimensionally stable from day one. Most of the leather sandals you encounter, from a Timberland strap to a Reef footbed, are chrome-tanned. It’s low-maintenance but won’t develop a deep, personalized patina.
Vegetable tanning uses tannins from tree bark. It’s a months-long process that leaves the leather malleable and thirsty. Brands like Leathersmithe use this method specifically so the sandals can be wet-formed to your foot. This leather is alive in a way chrome-tanned is not; it will stretch, conform, and darken with age. But it requires you to periodically replace the fats and liquors the tanning process removed. Ignore this, and the leather dries, stiffens, and can crack.
Common mistake: Treating all leather sandals with the same brush and bottle. A vegetable-tanned sandal conditioned with a modern cream might stay supple but lose its structural integrity, while a chrome-tanned sandal slathered in dubbin will become overly soft and darken permanently.
So your first task is identification. Check the manufacturer’s website or product tag. If it says “full-grain,” “bridle leather,” or “vegetable-tanned,” you’re on the second path. If there’s no mention, you’re almost certainly dealing with chrome-tanned leather and its simpler care routine.
The Weekly Clean, The Seasonal Condition
This is the core regimen for the majority of leather sandals, the chrome-tanned ones. Think of it as preventative medicine. A little consistent effort prevents the need for major interventions later.
Start with a soft, dry cloth. A microfiber cloth works perfectly. At the end of each week you wear them, give the sandals a thirty-second wipe-down. This isn’t about shine; it’s about removing fine dust. Dust is abrasive. Over months, it works into the leather’s top coat and pores, dulling the finish long before the leather itself is worn. It’s the difference between leather that looks tired after a season and leather that still looks rich after three.
For a deeper clean after a beach day or trail walk, dampen a white cloth with lukewarm water. Work in a single direction, don’t scrub. For any spills, blot, never rub. Rubbing grinds the particulate into the grain. Dry immediately with a second cloth.
This 50-60 word, technical snippet covers the foundational cleaning step for chrome-tanned leather sandals, emphasizing the correct motion and material to prevent abrasive damage to the finish. It is a direct, pronoun-free instruction set designed for clarity and snippet capture.
Conditioning is where people overdo it. Leather conditioner is not moisturizer; you’re not hydrating it. You’re replenishing the natural oils that protect the hide from drying and cracking. For chrome-tanned sandals, twice a year is ample, once at the end of summer, once at the end of winter.
Use a neutral, uncolored leather cream. Brands like Saphir Renovateur or Collonil 1909 are benchmarks. Apply a fingertip’s amount to a soft cloth and work it into the leather with small circles. Let it sit for fifteen minutes, then buff off any excess with a clean cloth. The leather should look nourished, not greasy. If it’s sticky the next day, you used too much.
The why-layer: Leather is a network of collagen fibers. Conditioner’s oils lubricate these fibers, keeping them supple. Without it, the fibers dry, bind together, and become brittle. A crack is a cluster of these fibers snapping. Conditioning is the difference between leather that lasts a decade and leather that cracks in two.
The Traditionalist’s Protocol
If your sandals are vegetable-tanned bridle leather, the rules change. The manufacturer Leathersmithe is explicit: care is part of the product’s function. Their ten-year guarantee for fit and finish is contingent on periodic cleaning with saddle soap and application of dubbin.
Here’s the straightforward advice from their manual. You’ll need a tin of saddle soap, a tin of dubbin (a blend of waxes and oils), a coarse cloth like denim or a horsehair brush, and about twenty minutes.
- Make a light lather with warm water in the saddle soap tin using your cloth or brush.
- Rub this foam over every surface, straps, footbed, edges. Work the straps back and forth in their channels to clean inside. This step re-hydrates and gently cleans.
- Wipe off the surplus foam with a brush or cloth and let the sandals dry for 15 minutes.
- Work dubbin into all surfaces until there’s no residue. This replaces the fats removed during tanning.
- You can wear them to dry or let them air dry fully.
This process is recommended after winter storage or if the sandals get a serious soaking. The sensory cue you’re doing it right? The leather will drink in the dubbin, turning a shade darker and feeling supple, not slick.
Where this goes sideways: Using mink oil or olive oil on this type of leather. The Leathersmithe care page states plainly: “Never use ‘mink oil’; it will saturate and weaken the leather.” These oils are too heavy and don’t evaporate, leaving the fibers soggy and prone to stretching and tearing.
Storage, Drying, and Damage Control
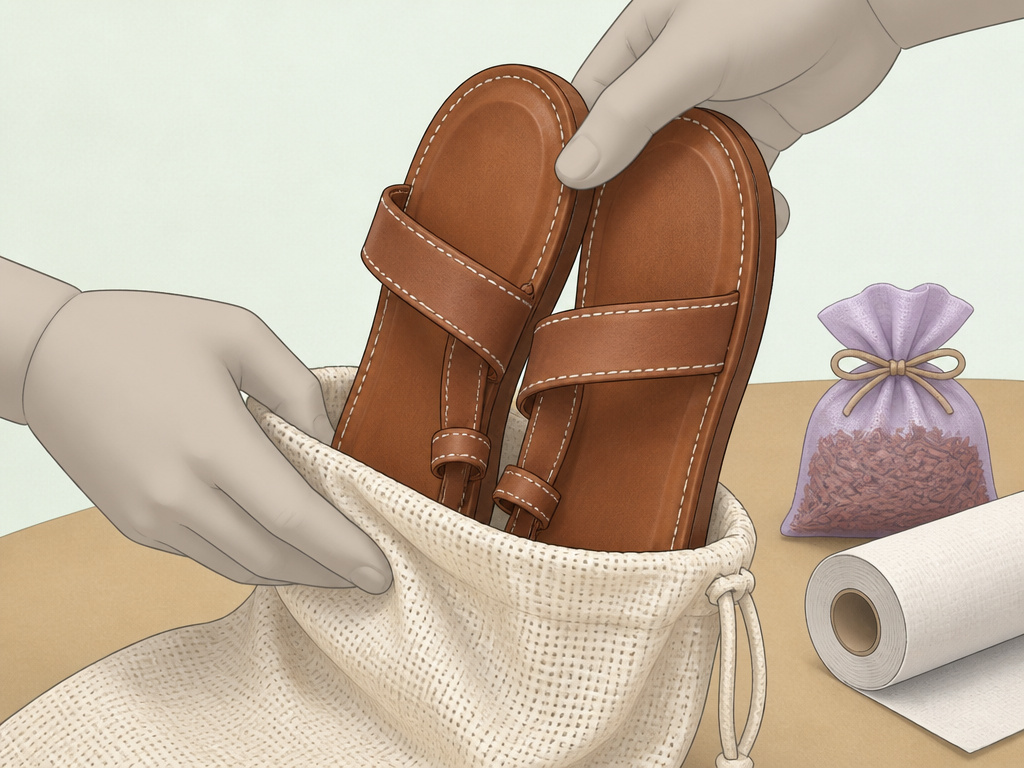 How you put your sandals away matters as much as how you clean them. The enemy is always the same: uncontrolled moisture and extreme heat.
Storage: When you’re not wearing them, store them in a breathable cloth bag, upright. Stuff them loosely with acid-free tissue paper to help them keep their shape. Avoid plastic bags at all costs, they trap ambient moisture, which leads to mold. A small cedar sachet in the storage area keeps the environment dry and smelling fresh.
Drying: If they get caught in the rain or you go through a puddle, blot them with a clean towel. Then let them air dry at room temperature, away from direct sunlight, a fireplace, or a radiator. Heat is catastrophic. It drives the natural oils to the surface and out of the leather, accelerating the drying and cracking process. The same goes for synthetic materials; Reef warns that cork footbeds and EVA soles can warp and break down if left near a heat source.
The Salt & Sweat Problem: Metal hardware and leather both suffer from salt. Sea salt from ocean walks and salt from sweat are corrosive. If your sandals have brass or silver buckles, dry them thoroughly after exposure. After a saltwater encounter, rinse leather with fresh water, then dry it gently. Danilo’s Fine Leather notes that skin pH and salt can also cause metal to lose its finish or rust.
When to Break the Rules
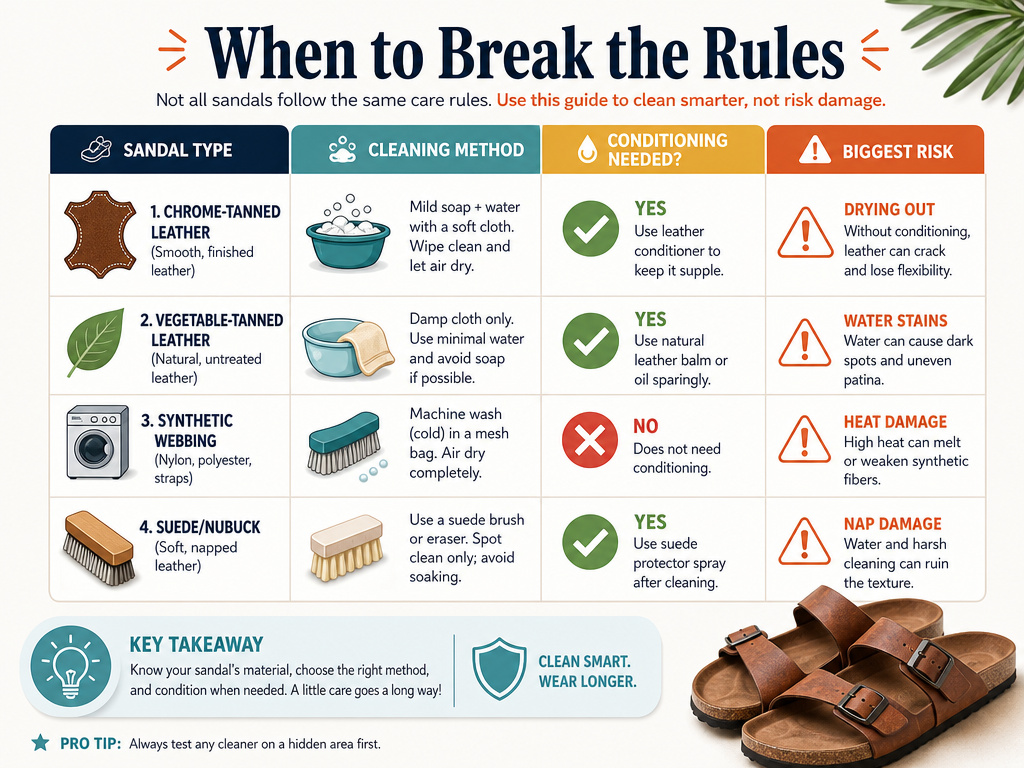 Not every sandal is a leather purist’s project. Some are designed for hose-and-go care, and recognizing these exceptions saves you time and preserves the product.
The most notable are KEEN’s water sandals with synthetic webbing, models like the Newport, Whisper, and Clearwater. KEEN’s official care blog states these are machine-washable. Toss them in on a gentle, cold cycle with a mild detergent. Add a couple of towels to the load to cushion them and reduce noise. Air dry them, preferably outside. The UV rays from the sun even help kill bacteria and brighten white materials.
| Sandal Type | Cleaning Method | Conditioning Needed? | Biggest Risk |
|---|---|---|---|
| Chrome-Tanned Leather | Damp cloth, mild soap | Yes, 2x/year with neutral cream | Over-conditioning, heat drying |
| Vegetable-Tanned Leather | Saddle soap & dubbin protocol | Yes, dubbin as part of cleaning | Using mink oil or neglecting care |
| Synthetic Webbing (e.g., KEEN) | Machine wash, gentle cycle | No | High heat in dryer |
| Suede or Nubuck | Suede brush & eraser | Specialized suede conditioner | Water stains, brushing against the nap |
For sandals with removable insoles, pull those out and wash them separately with a soft cloth. It’s a quick refresh that tackles the source of odor without a full wash. And for the lugged soles on hiking sandals, keep a bristle brush handy. Scrubbing the dirt out of the treads maintains grip and prevents you from grinding grit into your footbed.
The bottom line? Read the manufacturer’s tag or website first. Their advice overrides any general guide, because they know the specific materials and construction they used.
Frequently Asked Questions
Can I use coconut oil on my leather sandals?
I wouldn’t. Coconut oil can turn rancid over time and may darken the leather permanently. It also doesn’t evaporate or absorb well, leaving a greasy residue that attracts dirt. For vegetable-tanned leather, use dubbin. For chrome-tanned, use a dedicated neutral leather cream. These products are formulated to nourish without the downsides.
How do I fix stretched-out straps on leather sandals?
On vegetable-tanned sandals, some stretch is natural and part of the break-in process. On chrome-tanned sandals, significant stretch usually means the leather has been over-saturated (often by the wrong oil) or is lower quality. You can’t really “un-stretch” leather. Prevention is key: avoid getting them excessively wet, don’t over-tighten, and use appropriate conditioners. For a sandal with buckle adjustments, you can simply take up the next hole.
What should I use to clean white leather sandals?
The same gentle, damp cloth method applies. Use a white cloth to avoid color transfer. For stubborn marks, a tiny drop of mild, clear soap on the damp cloth can help. Dry immediately and thoroughly. Avoid colored leather cleaners, as they can leave a tint. For extensive staining on white sandals, a product like the Collonil 1909 Colorless Care Set is a safer investment.
Are leather sandals waterproof?
Leather is water-resistant, not waterproof. A leather sandal from a brand like Birkenstock can handle a rain shower or a puddle if you dry it properly afterward. However, submerging them or wearing them in consistent wet conditions will saturate the leather, potentially weakening stitches, causing the footbed to warp, and leading to rot or mold. For regular water use, a synthetic sandal like a KEEN is the better tool for the job.
How often should I replace the soles?
It depends on your gait and how often you wear them. For high-quality sandals like Leathersmithe, they offer half-sole and heel replacement services for a fee (noted as $55 and $45 respectively). For most commercial sandals, once the tread is smooth or the sole material is visibly compressed and no longer supportive, it’s time. Re-soling is often possible and more economical than replacing the entire sandal if the uppers are in good shape.
The Bottom Line
Caring for leather sandals isn’t about applying a one-size-fits-all miracle product. It’s about understanding what you own. Start by identifying the leather: is it the stable, modern chrome-tanned type or the traditional, malleable vegetable-tanned kind? That answer dictates whether you reach for a neutral cream or a tin of saddle soap.
The single most destructive thing you can do is apply heat to dry them or use heavy, inappropriate oils like mink oil. The most beneficial habit is the simplest: a weekly wipe-down with a dry cloth to remove abrasive dust.
Here’s some straightforward advice. If you buy a pair of vegetable-tanned sandals, view the maintenance not as a chore, but as part of the ritual of ownership, the reason they’ll mold to your feet and last for years. For everything else, a gentle clean and a bi-annual condition will keep them looking and feeling their best. So pick your path, grab the right tools, and let the leather age gracefully.
