
Learn How to Fix Peeling Faux Leather for a Lasting Result
This post contains affiliate links. As an Amazon Associate, we earn from qualifying purchases.
To fix peeling faux leather, first diagnose whether it’s a delaminated substrate or a worn coating, then size the damage: tiny marks (<0.5 in) can be painted; small gaps (1–3 in) need fabric-backed glue; large losses (>3 in) require a patch or replacement. The repair must match the material’s structural failure, not just hide surface flaking.
Most guides skip the diagnosis step. They push you toward a marker or a glue tube before you know if the material underneath can even hold a repair. That misstep leads directly to the same peeling happening six feet to the left three months later.
What follows is a method that works for jackets, sofas, and car interiors. We’ll cover how to identify the type of failure, pick the right repair tier, execute it cleanly, and manage your expectations based on how this material ages.
Key Takeaways
- The root cause matters: Surface flaking from worn polyurethane is fixable; delamination of bonded layers is a terminal failure you can only patch, not cure.
- Use grit to clean, not to cure: Sand with 180-grit only to remove loose flakes before painting or gluing, sanding deeper weakens the fabric base.
- Size dictates the tool: A permanent marker hides a scuff; leather paint covers a quarter-sized spot; a fabric-backed patch bridges a 3-inch tear.
- Hydrolysis resistance is your timeline: The industry tests for this; a rating of 5 weeks means some faux leathers start failing after a few years of atmospheric moisture.
- Professional products beat craft supplies: A brand like Fiebing’s Leather Repair Kit or Colourlock Leather Fresh Paint bonds chemically, where shoe polish or nail polish just sits on top and rubs off.
The First Step Is Always Diagnosis
Is the faux leather peeling, or is it delaminating? Your entire repair strategy hinges on this distinction, and most people get it wrong on the first attempt.
Peeling is a surface event. The colored polyurethane coating on top is wearing thin, cracking, and flaking off. Underneath, you’ll see a fabric base layer that’s still intact and firmly glued. Delamination is a structural failure. The glue bond between the polyurethane top layer and that fabric base has failed entirely. The top film pulls away in sheets, often leaving a fluffy, fibrous surface behind. One is a repairable wear issue; the other is a material flaw the industry calls a “hydrolysis-related failure.”
Common mistake: Treating delamination like a surface scratch. Gluing down a single loose corner on a delaminating car seat will last until the next temperature swing, when the bond next to it lets go. You’re chasing the symptom, not the disease.
Here’s how to tell. Press a fingernail gently into the damaged area. If the material feels thin and you can see a distinct, separate film lifting, that’s delamination. If the surface is powdery and the color comes off on your finger but the base feels solid, that’s a worn coating. A Mazda technical bulletin from 2021 explicitly warns that substances like hand cream, sunscreen, and sweat deteriorate the leather coating, leading to this kind of wear, not delamination. The distinction changes your goal from “make it look new” to “stabilize what’s left.”
The Three-Tier Repair Menu: Size Dictates Your Tool
Once you know what you’re fixing, measure the damage. The physical size of the flaw dictates which repair method has a chance of holding. This isn’t a stylistic choice; it’s a mechanical one.
I learned this the hard way early on, trying to use a liquid leather filler on a two-inch gash in a client’s sofa arm. The patch looked great for a month. Then the surrounding faux leather, which was already stressed, started peeling a foot away. The repair was too rigid for the flexible base, creating a stress point. Now I follow a simple size-based rule.
| Flaw Size | Best Repair Method | Expected Longevity |
|---|---|---|
| < 0.5 inch (1.3 cm) | Leather paint or marker | 6–18 months, depends on wear |
| 1–3 inches (2.5–7.6 cm) | Fabric-backed repair kit | 1–3 years, may fail at edges |
| > 3 inches (7.6 cm) | Adhesive patch or replace | Patch lasts 2+ years; item is compromised |
A quick marker fix is for scuffs on shoes or bag corners where the loss is truly superficial. Leather paint, like Colourlock Leather Fresh Paint, works for worn spots where the base fabric is still sound. For a torn section on a couch arm, you need the reinforcement of a fabric-backed patch from a kit like Fiebing’s. And for a sofa seat cushion that’s lost half its coating, a large adhesive patch is a temporary cover-up, the rest of the cushion will likely follow.
The Association for Contract Textiles recommends a minimum hydrolysis resistance rating of 5 weeks for contract faux leathers under ISO 1419 testing. If your household item is failing, it likely never met that bar.
Small Marks: Leather Paint and the Marker Myth
For flaws smaller than your thumbnail, your goal is cosmetic blending, not structural repair. This is where most DIYers reach for a permanent marker or clear nail polish. Don’t.
A Sharpie doesn’t bond. It dyes the exposed fibers a darker color, but the ink sits on the surface and wears off with friction. Nail polish dries into a brittle shell that cracks under flex. Both look obvious under indoor lighting. Leather paint is different, it’s a flexible acrylic blend designed to adhere to synthetic materials. The process is straightforward.
Clean the area with a microfiber cloth dampened with water. Let it dry completely. Sand any loose, flaky edges with a single pass of 180-grit sandpaper. You’re not trying to dig into the base fabric; you’re just removing the crumbly bits so the paint has a solid surface to grab. Apply the leather paint in thin, even coats with a small brush. Wait 30 minutes between coats. Two coats usually cover; three might be needed for a deep match.
Where this goes sideways: Painting over a slightly damp area. The moisture trapped underneath will lift the paint film within a week, creating a bubbled patch that looks worse than the original flaw.
The finish will be matte. If your original faux leather had a sheen, you can apply a compatible topcoat from the same paint brand. Test it on a hidden spot first. Some topcoats react poorly with certain paints and turn cloudy.
Medium Gaps: The Fabric-Backed Repair Kit
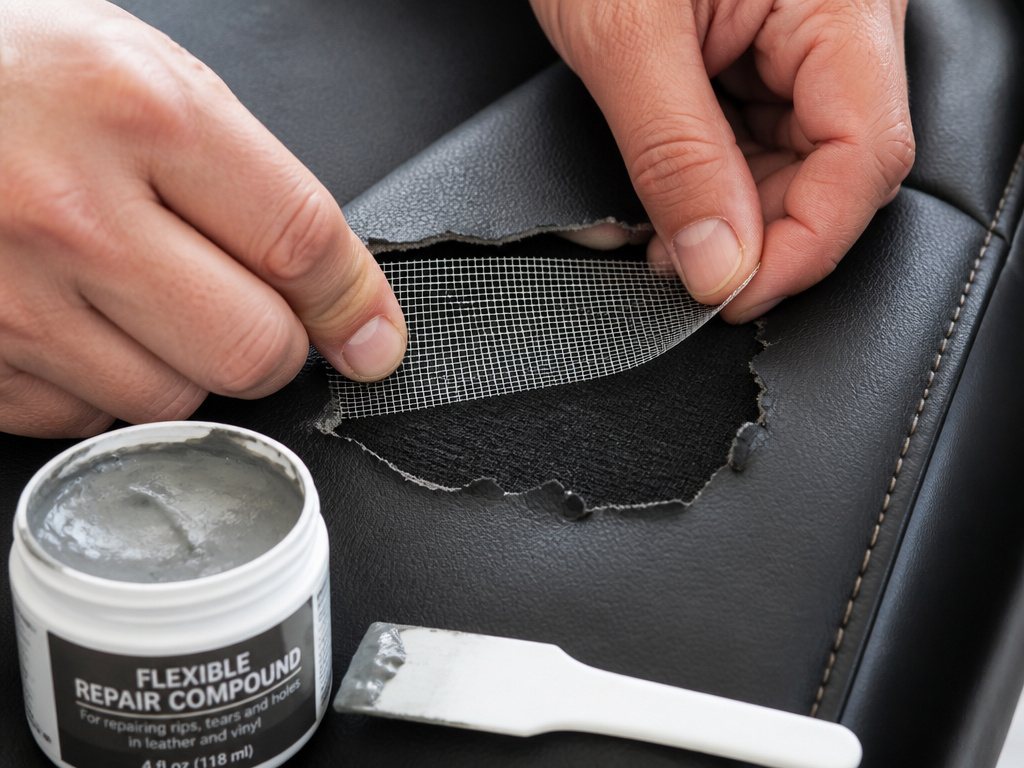
When you have a clean tear or a patch of missing coating between one and three inches wide, you need reinforcement. This is the job for a faux leather repair kit. These kits typically include a piece of fabric mesh and a tub of flexible repair compound.
The fabric acts as a bridge. It distributes stress across the damaged area, preventing the repair compound from cracking when the material flexes. The compound itself is a colored vinyl or polyurethane paste that cures flexible. Here’s the sequence that works.
- Trim and clean. Use sharp scissors to cut away any ragged, loose edges. Clean the area with rubbing alcohol on a cloth and let it dry.
- Sand the edges. Lightly sand the perimeter of the damage with 180-grit paper to create a slight bevel. This helps the compound blend.
- Apply the fabric. Cut the fabric mesh to overlap the hole by about half an inch on all sides. Press it firmly onto the exposed base fabric.
- Spread the compound. Using the provided spatula, spread the repair compound over the fabric and onto the beveled edges. Feather it out smoothly.
- Let it cure. Follow the kit’s cure time, usually 24 hours. Don’t rush it.
The result won’t be invisible, but it will be strong. On a vertical surface like a chair back, it can last for years. On a high-wear area like a car seat bolster, expect to see wear at the edges within 12-18 months. This is still a repair, not a resurrection.
I prefer repair kits that include a graining tool or paper. Pressing a grain pattern into the wet compound makes the repair less shiny and obvious once it dries.
Large Losses and Delamination: Patches and Realistic Limits
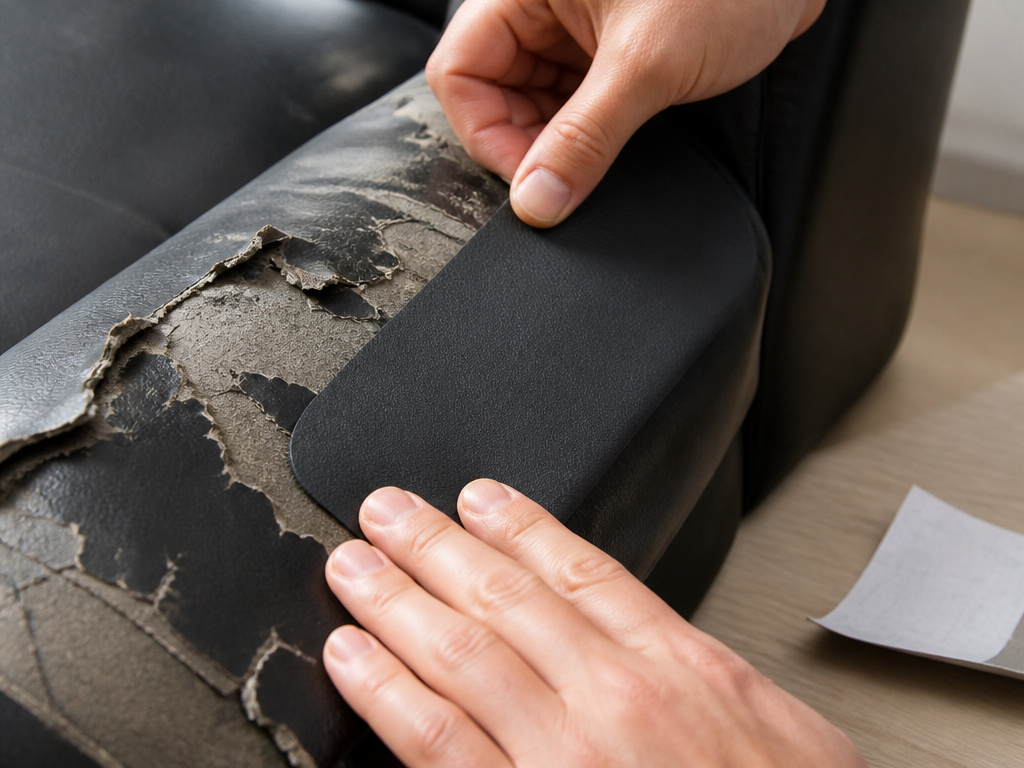
For damage wider than three inches, or for active delamination where the top layer is detaching in large sections, you’re in patch territory. This is also the point where you should ask if the item is worth saving.
A self-adhesive faux leather patch is a practical solution for a sofa arm or headrest. It’s a cover-up. You’re sacrificing the original look for continued use. The process is simple: clean the area, cut the patch to size, peel the backing, and press it on firmly. It will look like a patch. It will feel different from the surrounding material. But it will stop the damage from spreading and protect the underlying foam or padding.
The part nobody mentions: Once one area of faux leather delaminates, the rest of the item is living on borrowed time. The hydrolysis failure that caused it is affecting the entire piece. Repairing one spot often just moves the stress point.
If you’re dealing with a beloved jacket or bag, a professional reupholsterer can sometimes replace entire panels with new faux leather. This is a significant investment, often costing more than a new mid-quality item. For furniture, consider a fitted slipcover. It’s the most cost-effective way to extend the life of a peeling couch by another three to five years.
Applying Leather Filler: The Professional Edge
For gouges or deep scratches where the fabric base is intact but dented, a leather filler paste can restore a level surface before painting. This is a niche skill, and most DIY filler jobs fail. The paste shrinks as it cures, often cracking at the edges. If you attempt it, use a paste specifically designed for flexible materials.
Apply the filler with a putty knife, overfilling the gouge slightly. Smooth it as flat as you can. Let it cure fully, 48 hours is not excessive. Then sand it level with 220-grit sandpaper. This creates a fine dust. Vacuum it thoroughly before applying your leather paint. The finish will only be as good as your sanding job.
Products That Work (and One That Doesn’t)
Your repair is only as good as the material you use. A craft-store acrylic paint will crack. A household glue will dry hard and peel. You need products formulated for the job.
- For painting: Colourlock Leather Fresh Paint. It’s flexible, comes in a massive color range, and includes a prep cleaner and topcoat.
- For patching: Fiebing’s Leather Repair Kit. The fabric backing is robust, and the compound cures with a slight flex.
- For adhesion: Barge All-Purpose Cement. It’s the standard for a reason, bonding fabric-backed materials without drying brittle.
- To avoid: Shoe polish and nail polish. They’re temporary cosmetics, not repairs. They’ll smear, crack, and make a proper fix harder later.
Why do these specific products win? Chemistry. They’re designed with plasticizers that remain flexible, and adhesives that bond to synthetic fibers. A generic “fabric glue” often lacks that specific formulation.
Why “Prevention” Is Mostly a Myth for Faux Leather
You can slow the aging of faux leather with a good faux leather conditioner, but you cannot stop the inevitable. The material has a lifespan dictated by its manufacturing.
The polyurethane coating degrades with exposure to UV light, heat, and atmospheric moisture. The plasticizers that keep it soft slowly evaporate or migrate. This isn’t a maintenance failure; it’s a material property. Even under perfect conditions, lower-grade faux leathers will begin to show their age within 3–5 years. Higher-quality ones, with better hydrolysis resistance ratings, might last 7–10.
The best prevention is buying quality initially and managing the environment. Keep furniture out of direct sunlight. Don’t let car interiors bake in the sun; use a windshield shade. Wipe up spills quickly. Understand that heavy daily use will accelerate wear. This isn’t a material that develops a beautiful patina with age like real leather. It simply wears out.
Frequently Asked Questions
Can you use super glue to fix peeling faux leather?
No. Super glue (cyanoacrylate) dries into a hard, brittle plastic. It cannot flex with the material, so any movement will cause it to crack and peel off, often taking more of the surrounding coating with it. Use a flexible adhesive like Barge Cement or the glue from a dedicated repair kit.
Is it worth repairing a peeling faux leather couch?
It depends on the extent. If it’s one or two small worn arms and the frame is solid, a repair kit or patch can extend its life a few years. If the entire seat cushion is delaminating, the cost and effort of a proper repair often outweigh the value of the couch. A high-quality slipcover is usually a more economical choice.
How long does a faux leather repair last?
Cosmetic paint touch-up on a low-wear area might last 1–2 years. A fabric-backed repair on a sofa arm could hold for 3–5 years. A large adhesive patch will last as long as the adhesive’s bond, typically 2–4 years. The surrounding material may continue to degrade, making the repair the most stable part.
What’s the difference between bonded leather and faux leather peeling?
Bonded leather is a different material, it contains shredded leather fibers bonded with latex and coated with polyurethane. When it peels, it often reveals a fuzzy, paper-like layer. Repair is notoriously difficult, as the bond between the fiber layer and the coating is weak. Faux leather peeling reveals a woven fabric base, which is generally stronger and more receptive to patches and glues.
Before You Go
Understand that fixing peeling faux leather is an exercise in damage control, not restoration. You’re stabilizing, covering, and extending. The goal is to get more functional life from the item, not to make it look factory-new.
Start by diagnosing the failure type, coating wear versus delamination. Match your repair method strictly to the size of the damage. Invest in the right products; a ten-dollar kit is cheaper than doing the job twice. And manage your expectations: a successful repair on a car seat might last two years before the adjacent area starts to go. That’s not a failure of your work; it’s the nature of the material.
If the piece is sentimental or expensive, a professional can sometimes work wonders. For everyday items, a clean, functional patch is a victory. Sometimes, the most confident choice is to retire the item and apply what you’ve learned to your next purchase, opting for materials with proven longevity.
