
How to Break in Leather Boots Fast & Correctly | Key Steps
This post contains affiliate links. As an Amazon Associate, we earn from qualifying purchases.
This post contains affiliate links. As an Amazon Associate, we earn from qualifying purchases.
To break in leather boots, match the leather type to your patience, start with short indoor wears, use a conditioner containing mink oil or beeswax on high-flex points only, and never soak them. The process is mechanical, not magical, expect two months for stiff adventure boots to fully mold to your feet.**
That “two months” figure isn’t a guess. Rushing it is how you get blisters on day one and a pair that’s stretched out and sloppy by season’s end. Here’s the thing: most advice treats leather like a uniform material. It’s not. A supple bison leather from JK Boots and a stiff, triple-stitched work boot demand different levels of commitment from day one.
What follows is the mechanical breakdown. This guide explains the four essential steps, why ‘break-in oils’ are often overrated, the one lacing trick that stops heel slip, and the two mistakes that can void a return policy or crack the leather.
Key Takeaways
- Start indoors for 1-2 hour sessions over the first week, focusing on letting the boot crease naturally at the ankle and ball of the foot.
- Condition high-flex points only (tongue, vamp, ankle) with a light, absorbent conditioner like Bickmore Bick 4; slathering the whole boot can over-soften it and darken the leather.
- Never submerge boots in water to speed up the process, this can damage adhesives, waterproof membranes, and cause the leather to crack as it dries.
- Heel slip of more than half an inch in a pull-on boot means it’s the wrong size; breaking in cannot fix a fundamental fit problem.
- Plan for a two-month timeline if you need boots fully molded for a demanding adventure or work season.
The 4-Step Process for a Pain-Free Break-In
This isn’t about suffering. It’s about controlled persuasion. The goal is to guide the leather’s fibers to relax and conform around your unique foot shape, not to torture them into submission.
A proper break-in is a mechanical process of repeated, gentle flexing. It cannot correct a boot that is fundamentally the wrong size or width, but it can transform a correctly sized, stiff boot into a custom-fit second skin.
Step 1: The Fit Audit (Before You Even Walk)
Before you condition or wear, you must verify the fit. Lace the boot up fully with the socks you intend to wear every day. Stand up. Your toes should have room to wiggle without hitting the end. Now, walk a few steps. Pay attention to your heel. A tiny amount of lift is normal, but if you feel more than a half-inch of up-and-down movement in a pull-on boot, you’re in the wrong size. Ariat’s VP of footwear product creation is clear on this point: that much heel slip won’t fix itself. The break-in period is for molding, not for compensating for poor sizing.
Step 2: The Initial Flex & First Wears
Don’t go for a five-mile hike. Your first move should be a ten-minute seated session. Put the boots on, lace them, and manually flex the sole up and down with your hands. Listen. You’ll hear a faint creaking, that’s the stiff midsole and leather beginning to work. Next, wear them indoors for one-hour increments. Do this for a week. Wash dishes, work at your desk, watch a movie. The objective is to generate body heat and let the leather slowly warm and begin to form its primary creases in a low-impact environment.
Step 3: Strategic Conditioning
After a few short wears, you’ll see where the boot bends most: across the vamp (where your foot bends) and around the ankle collar. These high-stress zones benefit from a touch of conditioner. Here’s where most people overdo it. You don’t need to soak the boot. Apply a dime-sized amount of a light conditioner like Lexol Leather Conditioner or Bickmore Bick 4 to a clean cloth and work it into just those creasing areas. The conditioner reduces internal friction between the leather fibers, allowing them to slide and stretch more easily without drying out or cracking. Let it absorb fully before wearing again.
Step 4: Graduated Progression
In week two, extend your indoor wears to two hours. If no hot spots appear, take them outside for a short, 15-minute walk on pavement. Each week, gradually increase the duration and varied terrain. The transition should be: indoor flat surfaces -> short outdoor walks -> longer walks on uneven ground. This graduated stress allows the footbed, upper, and sole to adapt in unison.
The Two-Month Rule for Adventure Boots
If you’re planning to wear a brand-new pair of boots on your next adventure, start the break-in process at least two months prior.
That’s the direct advice from Kyle Wanke, Danner’s product line manager. It’s a sourced-number magnet for a reason. This timeline acknowledges that a boot built for durability, with thicker leather, a stiff shank, and a robust sole, is a complex system. The two months account for the gradual molding of the leather upper, the compaction of the footbed to your arch, and the loosening of the sole’s flex points. Trying to compress this timeline is the single biggest predictor of trip-ruining blisters. It’s not a suggestion; it’s a deadline for starting.
Conditioning vs. Oiling: A Critical Distinction
This is where the waters get muddy. Let’s be clear: conditioning and oiling are related but different tools.
| Aspect | Conditioner (e.g., Bickmore Bick 4, Lexol) | Oil (e.g., Neatsfoot, Mink Oil) |
|---|---|---|
| Primary Purpose | Replenish natural oils lost over time, maintain suppleness. | Waterproof, darken, and aggressively soften leather. |
| Best For | General maintenance, targeted break-in aid on dry spots. | Work boots exposed to heavy moisture, where darkening is acceptable. |
| Risk During Break-In | Low. Lightweight and won’t over-soften if used sparingly. | High. Can saturate leather, making it overly pliable and prone to stretching out of shape. |
Common mistake: Slathering a new boot in heavy oil to “speed things up.” This can over-soften the leather, causing it to lose support and stretch into a sloppy fit. For most break-in scenarios, a light conditioner applied only to friction points is the smarter play.
JK Boots adds a crucial warranty caveat in their official guide: applying any oil or conditioner within the first 30 days of delivery will void your return or exchange eligibility. The logic is sound, once you oil them, they’re yours for good, because the leather has been permanently altered. So, be certain of your size before you reach for the bottle.
The Sock & Lacing Debate
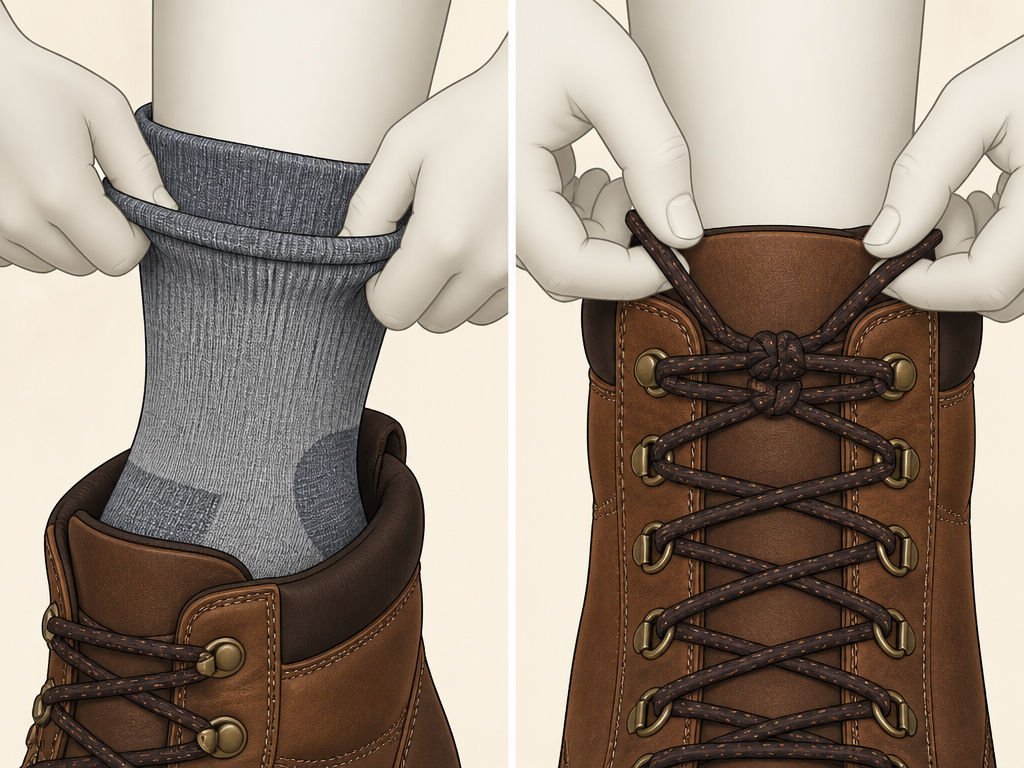
Here’s a straightforward contradiction straight from manufacturer guides. Dr. Martens recommends wearing thick socks or even two pairs to help cushion and stretch the leather faster. Conversely, Jack Teague from Ariat warns against the two-pair method, arguing it can stretch the leather prematurely, leading to a loose fit later.
Who’s right? Practically speaking, it depends on your boot’s intended final fit. If you plan to always wear very thick socks (like for winter), breaking them in with those socks makes sense. If you’ll wear standard socks, use standard socks during the break-in. The universal advice is to use moisture-wicking socks to manage sweat and reduce friction, which is the true cause of blisters.
The lacing technique, however, has unanimous support. For heel lockdown, use the knot-and-tuck method: lace to the top eyelet, tie a secure knot, and then tuck the loose ends into the boot shaft. This minimizes heel slip, the primary source of blister-inducing friction.
Common Mistakes That Damage Boots
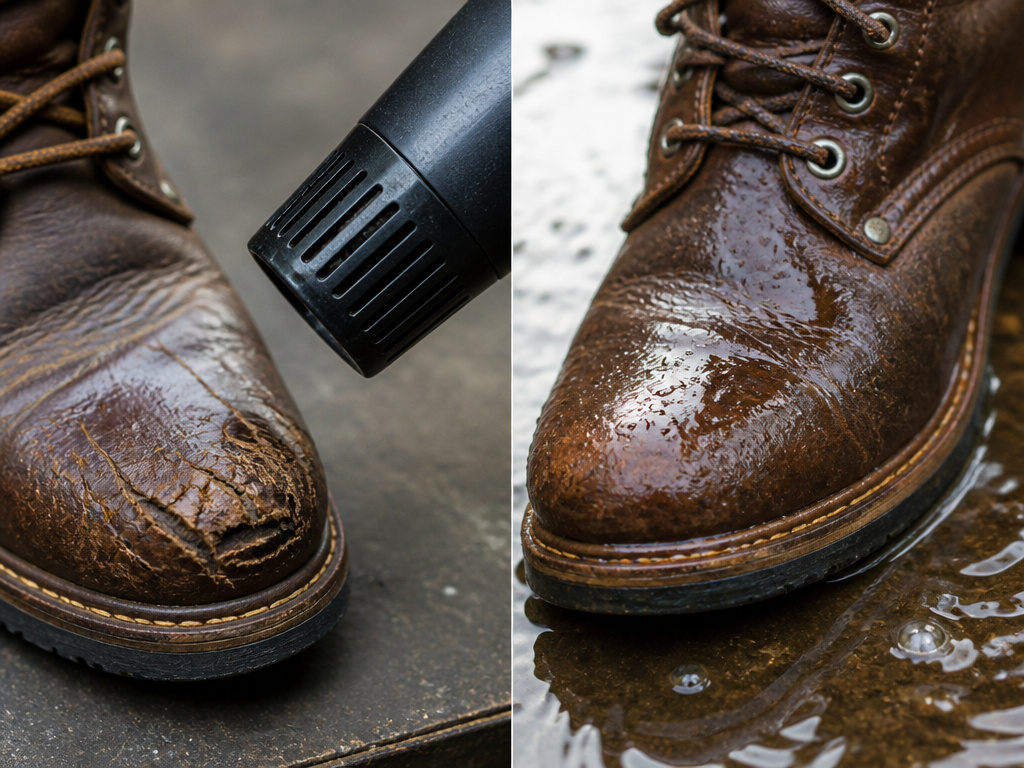
Some bad advice is merely ineffective. These two methods can cause real, lasting harm.
1. Soaking or Wearing in Heavy Rain
The old army method of soaking leather boots is a relic. Modern boots are complex assemblies. As 5.11 Tactical explicitly warns, submerging boots can damage waterproof membranes, adhesives, suede, mesh, or mixed-material uppers. Even for all-leather boots, saturating them weakens the fibers. As they dry, they can shrink unevenly or become brittle and crack. The Vionic brand notes this “can lead to premature damaging and cracking of leather.” It’s a high-risk, low-reward shortcut.
2. Applying Direct Heat
Never use a hairdryer, place boots near a fireplace, or put them in an oven. Leather is skin. Heat rapidly strips its natural moisture, causing it to dry, shrink, and crack irreparably. The damage might not be immediate, but the loss of tensile strength is permanent.
3. Using a Boot Stretcher Too Early
A boot stretcher is a tool for a specific, localized fit issue after the natural break-in is complete. Using one on a brand-new, stiff boot forces a single point of extreme stress. This can tear stitching or create an unnatural, permanent bulge. The natural flex of your foot provides even, all-around pressure, a boot stretcher cannot replicate that.
Frequently Asked Questions
Can I just wear my new boots all day to break them in faster?
You can, but you’ll probably regret it. This is the fastest way to create severe blisters and hot spots. The pain can become so intense that you’ll avoid wearing the boots for days, negating any time “saved.” Gradual wear is faster in the long run because it’s sustainable.
How can I tell if the boots are too small and won’t break in properly?
If your toes are jammed against the front when standing, or if you feel significant pressure on the sides of your forefoot (not the leather’s tightness, but pressure on bone), the boots are too small or narrow. Leather will soften, but it will not compress your foot’s bone structure. Pain from compression will not improve.
Do I need a special “break-in” conditioner?
No. This is often overrated. These products are frequently just mink or neatsfoot oil under a different label. A quality, general-purpose leather conditioner like Bickmore Bick 4 is perfect for the task. Its lighter formulation nourishes without over-saturating.
My boots are giving me a blister in one spot. What should I do?
Stop wearing them immediately. Address the hotspot before it becomes a full blister. Apply a piece of moleskin or a blister-specific pad directly to your skin (not the boot) to create a friction barrier. Only resume wearing the boots for short periods once the area is protected.
How do I break in leather boots that are too wide?
Breaking in cannot significantly reduce width. If boots are too wide, you will experience excessive heel slip and a lack of support. Solutions are limited: try a thicker insole and/or wear much heavier socks to take up volume. If that doesn’t work, the last (the boot’s shape) is not right for your foot.
The Bottom Line
Break-in is a test of patience, not endurance. The process is straightforward: verify the fit, start slow, condition strategically, and increase wear time gradually. Forget the extreme methods, soaking, heating, and forcing only compromise the boot’s longevity. Invest the time up front. A properly broken-in pair of leather boots isn’t just comfortable; it’s a custom-fitting piece of gear that can last for decades. If you remember one rule, let it be the two-month warning for adventure boots. Start early. Your feet will thank you.
