
How to Glue Leather to Wood: Adhesive & Prep Steps You Need
This post contains affiliate links. As an Amazon Associate, we earn from qualifying purchases.
This post contains affiliate links. As an Amazon Associate, we earn from qualifying purchases.
To glue leather to wood, you need a flexible adhesive, perfectly prepped surfaces, and control over your shop’s humidity. Use a water-based or solvent-based contact cement for most projects—apply a thin coat to both the leather and wood, let it dry until tacky, then press together for a permanent, flexible bond. The single biggest point of failure isn’t the glue; it’s mismatched wood moisture content at the time of bonding.
That moisture mismatch is why a beautiful desk panel you glue in Florida can crack apart after a winter in Minnesota. The wood moves as it equalizes with the local air, but the glue line and leather don’t move the same way. The stress has to go somewhere, and it usually breaks the bond.
What follows is a breakdown of the three adhesives that actually work, the one critical prep step most tutorials skip, and the professional method for a bond that lasts decades, not months.
Key Takeaways
Wood moisture content is critical. Glue when your wood’s moisture is stable and close to the average Equilibrium Moisture Content for your region (8% for most interiors). A mismatch of just 3-4% guarantees future failure. – Flexibility beats brute strength. Leather moves. Rigid super glues (cyanoacrylate) or standard wood glues (PVA) will crack. A flexible contact cement like Barge All-Purpose Cement or Renia Aquilim 315 is the default choice. – The double-coat method is mandatory for contact cement. One thin coat on each surface, dried to a clear, tacky stage, creates a chemical bond stronger than the materials themselves. – Prep determines longevity. Sand the wood lightly, degrease the leather’s flesh side, and do a dry-fit first. Glue cannot compensate for a poor mechanical connection. – Clamp for contact, not for pressure.** Your goal is full surface contact, not to squeeze out all the adhesive. Use a roller or bone folder, then weight the piece flat until cured.
The Adhesive Shortlist: What Works, What Doesn’t
Let’s be clear about one thing: your household white glue or instant-bond super glue is the wrong tool for this job. They create a rigid, brittle bond. Leather is a flexible, fibrous material that expands, contracts, and bends with use and humidity. A rigid glue line cannot move with it.
Your adhesive must bridge that gap. Here are the three categories that do, ranked by use case.
1. Contact Cements (The Professional Default)
This is the glue you’ll find in every serious upholstery shop and leather workshop. Contact cement is applied to both surfaces, allowed to dry until tacky, then joined. The bond is immediate, permanent, and, crucially, remains flexible.
Why it works: The dried adhesive films fuse on contact, creating a cohesive bond that’s often stronger than the leather’s own fibers. It allows for microscopic movement.
Where this goes sideways: Joining the pieces before the adhesive is fully tacky-dry. If it’s still wet, it won’t bond properly and will ooze out, creating a mess that’s nearly impossible to clean without damaging the leather.
I reach for Barge All-Purpose Cement (solvent-based) for its unmatched strength and temperature resistance. For a less fumy option, Renia Aquilim 315 (water-based) is excellent. Tandy Leather Eco-Flo Leather Weld is another solid, water-based choice for beginners.
2. Specialized Leather & Multi-Surface Adhesives
These are formulated for porous, flexible materials. Brands like Loctite Extreme Glue fall here. They’re often clear, waterproof, and designed for a wider open time than instant super glues.
When to use them: For smaller, decorative projects (a leather patch on a box), or when you need a gap-filling property. They’re a good “one-bottle” solution for mixed-material hobbyists.
The catch: Always check the flexibility claim on the bottle. Some are still too rigid for large panels or items that will flex in use.
3. The Surprising Contender: Yellow Wood Glue (PVA)
This seems to contradict everything above, but hear me out. For bonding raw, unfinished leather to wood in a low-stress application, a quality PVA like Titebond Original can work. Franklin International’s own technical specialist noted it was historically used to join leather drive belts.
The strict limits: The bond is moisture-sensitive and not as flexible as contact cement. It’s only suitable for interior, non-flexing items like a leather-covered panel that’s set into a frame. Never use it for a bag strap, a wrapped handle, or anything that will see tension or bending.
| Adhesive Type | Best For | Flexibility | Key Limitation |
|---|---|---|---|
| Contact Cement | Upholstery, handles, panels, high-stress bonds | High | Fumes (solvent-based); requires precise timing |
| Specialized Multi-Surface | Small crafts, mixed materials, waterproof needs | Medium-High | Can be expensive; strength varies by brand |
| PVA Wood Glue | Low-stress interior panels, historical methods | Low | Not waterproof; poor resistance to flexing |
The Wood Moisture Content Check (The Step Everyone Forgets)
You can use the world’s best adhesive with perfect technique and still have the leather peel off in a year. The culprit is almost always wood movement.
Wood is hygroscopic. It constantly absorbs and releases moisture from the air, expanding and contracting across its grain. The Equilibrium Moisture Content (EMC) is the moisture level at which wood stabilizes in a given environment. The USDA Forest Service publishes regional averages: about 8% for most of the US interior, 11% along humid coasts, and as low as 4-5% in heated northern homes in winter.
The USDA Forest Service wood bonding guide stresses that large changes in moisture content after gluing cause joint failure. Furniture built at 11% EMC in Florida that moves to a 4% EMC home in Minnesota will likely split or delaminate.
Your job is to glue when the wood is as close as possible to the EMC of its final home. If you’re building something for your living room, don’t glue in a damp basement or a sun-blasted garage. Let the wood acclimate in the room for at least a week.
How to check (without a meter): If you don’t have a moisture meter, the “feel” test is better than nothing. Wood stored at a stable EMC feels room-temperature and dry, not cold or damp. The real pro move is to buy an inexpensive pin-type moisture meter. That $30 tool saves more projects than any fancy clamp.
Surface Preparation: More Than Just Cleaning
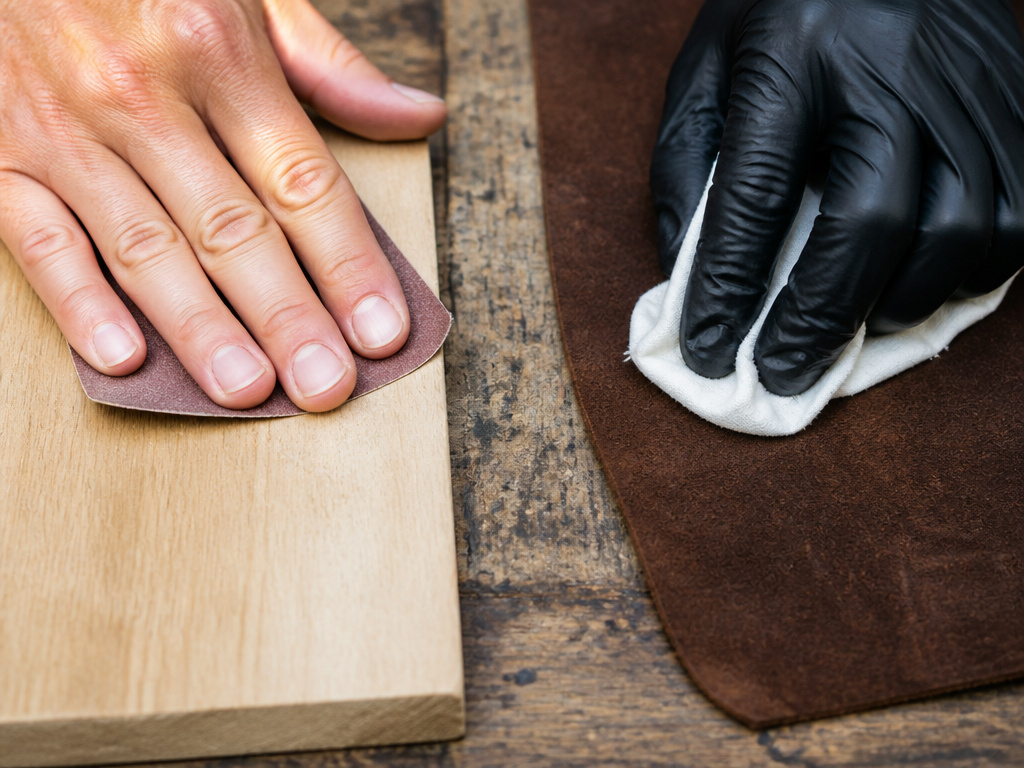
Glue adheres to surfaces, not dirt. This phase is about creating the perfect landscape for the adhesive to grip.
For the Wood:
- Sand it. A light pass with 120-grit sandpaper creates microscopic grooves for mechanical adhesion. Don’t create dust; just dull the surface.
- Vacuum and tack-cloth. Remove every speck of dust. A single grain can create a visible bump under thin leather.
- Ensure it’s dry. This circles back to moisture content. If the wood feels cold or damp, wait.
For the Leather:
- Identify the flesh side. This is the rough, fibrous back of the hide. This is the only side you glue. The smooth grain side won’t hold.
- Degrease it. Wipe the flesh side with a cloth dampened with rubbing alcohol (isopropyl). This removes oils from handling and any residual tannins that can inhibit adhesion. Let it fully evaporate.
- Roughen it (for heavy bonds). For structural bonds (like a handle), lightly sand the flesh side with 220-grit paper. This fluffs up the fibers. For decorative panels, this often isn’t necessary.
Step-by-Step: The Double-Coat Method
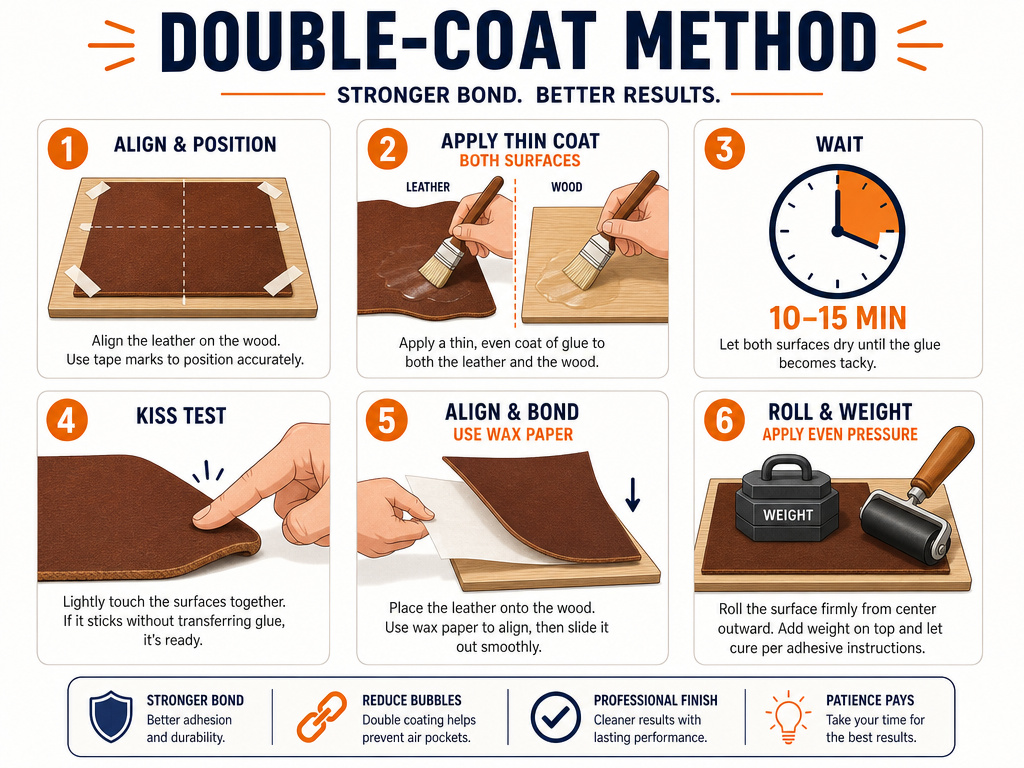
This is the standard for contact cement and the method I use for 90% of my work. It’s simple but demands attention to timing.
Tools Needed: Your chosen adhesive, disposable brush or foam applicator, roller or bone folder, wax paper or plastic sheet, weights or clamps (with protective pads).
- Dry Fit. Place the leather on the wood. Mark alignment with painter’s tape or light pencil marks on the wood’s edge. You get one shot after the glue is tacky.
- Apply First Thin Coat. Apply a thin, even layer to the entire bonding area on the wood. Then, apply a thin, even layer to the leather’s flesh side. “Thin” means you can still see the surface texture beneath it.
- Wait for Tack. Let both coats dry according to the product’s instructions. This is the critical window. The adhesive should be clear and not transfer to your finger when you lightly touch it, but should feel distinctly sticky. With Barge, this is 10-15 minutes in good ventilation. Under-drying is the most common mistake.
- The Kiss Test (Optional but Smart). Before the final commit, touch a corner of the leather to a corner of the wood. They should grip immediately and firmly. If they slide or feel wet, wait longer.
- Final Alignment & Bonding. This is your one shot. Place the wax paper over the wood, align the leather on top of it, then slide the paper out one section at a time, pressing the leather down as you go. This prevents premature sticking.
- Apply Pressure. Once aligned, use a roller or bone folder to press out from the center, eliminating air bubbles and ensuring full contact. Don’t use so much force that you squeeze out the adhesive.
- Weight and Cure. Place a flat board over the piece and add weights (books, clamps with padded jaws). Leave it undisturbed for the adhesive’s full cure time—often 24 hours for maximum strength.
Common mistake: Using clamps with too much pressure on the center of a panel. This can stretch the leather slightly, causing it to pull away from the edges when the clamp is released. Even, distributed weight is better.
When Things Are Different: Edge Cases and Alternatives
The double-coat method is the blueprint, but some projects need a different blueprint.
For Very Thin or Delicate Leather: The alcohol wipe can dry it out too much. Use a gentler degreaser like naphtha (lighter fluid) on a cloth, and skip the sanding step entirely. A water-based contact cement is less aggressive here.
For a “Non-Permanent” or Repositionable Bond: Some crafts, like traditional desk paneling, use wallpaper paste. The Iowa State adhesive bonding technical bulletin and veteran woodworkers note it provides a long open time, holds well, and allows the leather to be removed later for replacement. It’s a specific solution for a specific, low-stress application.
If You Plan to Sew: For items like handles that will be stitched, glue is just to hold pieces for stitching. A basting tape or a very thin application of rubber cement works. You don’t need the ultimate bond because the thread will provide that.
How to Glue Leather to Wood: Frequently Asked Questions
What is the absolute strongest glue for leather to wood?
For pure tensile strength where flexibility is still needed, a solvent-based contact cement like Barge, applied with the double-coat method, is the strongest. Independent tests show a second coat can increase bond strength by over 60% because the first coat soaks into the porous materials.
Can I use Gorilla Glue or super glue?
I don’t recommend it. Gorilla Glue (polyurethane) expands as it cures, making a messy, rigid foam line. Super glue (cyanoacrylate) is brittle and will crack with any flex. They are solutions looking for a problem that contact cement already solves cleanly.
How do I fix a mistake or remove glued leather?
It depends on the adhesive. For contact cement, you need a dedicated contact cement solvent (like Barge’s own) or a careful application of acetone. Always test the solvent on a hidden area of the leather first to check for dye bleeding or finish damage. Our guide on how to remove glue from leather walks through the safest methods step-by-step.
How long should I clamp or weight the piece?
Follow the adhesive’s instructions on the bottle. For contact cements, 2 hours is often enough for handling, but a full 24-hour cure is needed before the item should undergo any stress. Humidity and cold temperatures can double or triple this time.
Will the glue show through the leather?
If you use a thin coat and proper pressure, no. Glue bleed-through is caused by excessive adhesive soaking through porous or thin leather. Using a higher-quality, vegetable-tanned leather with a tight fiber structure prevents this. If you’re concerned, choose a clear-drying adhesive like Renia Aquilim 315.
The Bottom Line
Gluing leather to wood isn’t about finding a magical adhesive. It’s about managing material science. Control your wood’s moisture, choose a glue that stays flexible, and prep both surfaces like your project depends on it—because it does.
Forget the all-purpose glue aisle. Start with a small bottle of Barge All-Purpose Cement or Renia Aquilim 315 and practice the double-coat method on scraps. The smell of success in leatherworking isn’t always pleasant, but the feel of a bond that holds for decades certainly is.
If you’re still deciding on which product to buy, our detailed breakdown of the best glue for leather to wood compares the top contenders by project type, drying time, and ease of use.
