
DIY Guide: How to Make a Leather Cuff with Snaps & Buckles
This post contains affiliate links. As an Amazon Associate, we earn from qualifying purchases.
To make a leather cuff, you need three things matched correctly: the leather weight (4-7 oz), your exact wrist measurement plus a closure allowance (add 12-18mm for snaps), and a method for finishing edges that seals the fibers. Skip any one, and the cuff will be uncomfortable, fit poorly, or look amateurish within weeks.
That match isn’t about aesthetics first. It’s about mechanics. A cuff cut from leather that’s too heavy won’t curve to your wrist. An allowance that’s too short puts constant strain on the snaps. Unsealed edges fray with the first sign of humidity. Get the three variables aligned, and the rest is decoration.
What follows is a workshop-ready breakdown. We’ll start with the essential toolkit, walk through the sizing math that most guides gloss over, and land on the specific techniques, like which edge beveler number to use, that separate a keepsake from a craft-store project.
Key Takeaways
- Use 4-5 oz leather for a flexible, everyday cuff. Step up to 5-7 oz for a wide, rigid statement piece. Thinner leathers won’t hold hardware; thicker ones resist curving.
- Your blank length is your snug wrist circumference plus a precise closure allowance: add 12–18mm (½–¾”) for snaps. Adding a generic “inch or two” guarantees a sloppy fit.
- Never use the fabric punch that comes with a snap kit on leather. It tears the fibers, leading to loose, spinning hardware. A dedicated leather punch or a rotary drive punch is mandatory.
- Burnishing isn’t optional. Skipping it leaves the edge fibers open, which absorb moisture and swell, giving the cuff a fuzzy, worn-out look after just a few wears.
- When setting a snap, listen for a distinct firm click from the setter. If the snap cap spins freely after setting, the post was too long or the die pressure was wrong, it will fail.
The Essential Toolkit (Beyond Scissors and Glue)
A utility knife and a ruler will get a strip cut. A professional finish requires a few specific tools that solve specific problems. You can start with a basic kit and upgrade, but know what each piece does.
The first investment is a sharp utility knife or rotary cutter paired with a metal straightedge and a self-healing cutting mat. Tearing leather with scissors compresses the edges, making clean burnishing later almost impossible. A single, confident cut with a sharp blade leaves a seam-ready edge.
For marking, a wing divider is your best friend. It scribes a perfectly parallel line for stitching or edge work, something a pen and shaky hand can’t replicate. For sizing, a soft measuring tape is more accurate than a rigid ruler for capturing your wrist’s true circumference.
Edge finishing needs three items. An edge beveler (size #1 or #2 for 4-6 oz leather) shaves off the sharp 90-degree corner. Sandpaper (220 to 800 grit) prepares the surface. A wooden or canvas burnisher, loaded with a bit of water or gum tragacanth, then heats and compresses the fibers smooth. This is the step that makes the cuff feel store-bought.
For hardware, you need the right punch. A rotary leather punch with multiple sized dies or a set of drive punches creates clean holes without tearing. The fabric punch included in snap kits will mash through leather, creating a hole that’s too large for the snap post, the main reason DIY snaps spin and fail. A setting anvil and a poly or rawhide mallet provide the controlled force to set snaps and rivets without marring the metal.
Where this goes sideways: Using the fabric punch from a snap kit on leather. The tool is designed for woven cloth, not dense collagen fibers. It will tear an irregular hole, and the snap will never seat tightly. You’ll have a spinning, loose closure within a week.
How to Size Your Cuff Blank (The Math That Matters)
Most instructions say “measure your wrist and add an inch.” That’s a guess, not a measurement. The correct length is a formula: wrist circumference + closure allowance. Get it wrong, and the cuff will either strangle your wrist or flap loose.
Start by measuring your wrist snugly with a soft tape where you want the cuff to sit. Not tight, not loose. Record that number in millimeters for precision, let’s say 170mm.
Now, add the allowance for your chosen closure. This isn’t arbitrary; it’s the space needed for the hardware to function and for the cuff to slide over your hand. * For Snaps: Add 12–18mm (½–¾”) to your wrist size. This provides the overlap for the snap components. A 170mm wrist needs a blank between 182mm and 188mm. * For a Buckle: Add 25–38mm (1–1½”) for the buckle frame, plus an additional 40–60mm (1½–2⅜”) for the tail that feeds through. The total blank will be significantly longer. * For a Stud or Chicago Screw: Add only 10–15mm (⅜–⅝”), as these closures need minimal overlap.
Here’s how that translates for two common wrist sizes:
| Wrist Circumference | Closure Type | Blank Length (Approx.) | Why This Works |
|---|---|---|---|
| 160 mm (~6⅜”) | Snaps | 175–180 mm (~6⅞–7⅛”) | Allows for a 15-20mm overlap, perfect for a centered snap. |
| 180 mm (~7⅛”) | Buckle | 245–278 mm (~9⅝–11″) | Accommodates the buckle frame (25-38mm) and a functional tail (40-60mm). |
The width is about style and comfort. A slim cuff of 12–18mm (½–¾”) is minimalist. A wide statement cuff of 30–50mm (1¼–2”) makes a bold impression. For your first project, a medium width of 20–25mm (¾–1”) is a forgiving place to start. Draw your rectangle on the leather’s flesh side, and round the corners with a 10–12mm radius, sharp corners catch on clothing and feel less refined.
Selecting Leather: Weight Determines Destiny
The leather’s weight, its thickness, dictates everything about the final cuff: its drape, its durability, and even which tools you can use. Choosing based on color alone is how you end up with a beautiful but unbendable wrist tower.
For a flexible, comfortable cuff that breaks in quickly, look for 4-5 oz leather. This thickness (about 1.6–2.0mm) is ideal for everyday wear, works well with snaps, and is easy to cut and punch. Most craft-store “garment leather” falls in this range.
If you want a rigid, wide cuff with a bold presence, think a cowboy or motorcycle style, you need the structure of 5-7 oz leather (2.0–2.8mm). This weight holds its shape, supports elaborate tooling, and can handle the stress of a buckle. It requires more patience to break in and demands sharper tools.
| Leather Weight (Oz) | Thickness (mm) | Best Cuff Style | Consideration |
|---|---|---|---|
| 4-5 oz | 1.6 – 2.0 | Flexible, snap-closure, everyday wear | Easy to work with; may lack structure for wide designs. |
| 5-7 oz | 2.0 – 2.8 | Rigid, wide, buckle-closure, statement piece | Holds shape beautifully; requires skiving at overlaps and a stronger break-in. |
My first attempt at carving was on a 7-8 oz veg-tan scrap for a wide cuff. The design was too intricate, and the leather was so firm it resisted the stamp. The result was a muddy, shallow impression. I learned that bold, simple shapes work best on thick leather, and if you want fine detail, you need a more supple piece. The leather tells you what it can do.
For material, vegetable-tanned leather is the gold standard for a reason. It accepts tooling, dye, and develops a rich patina. Top-grain or full-grain leather from a supplier like Realeather ensures you’re working with a consistent, durable material. Avoid “genuine leather” for this project, its laminated layers can delaminate when punched or stressed.
A Step-by-Step Walkthrough
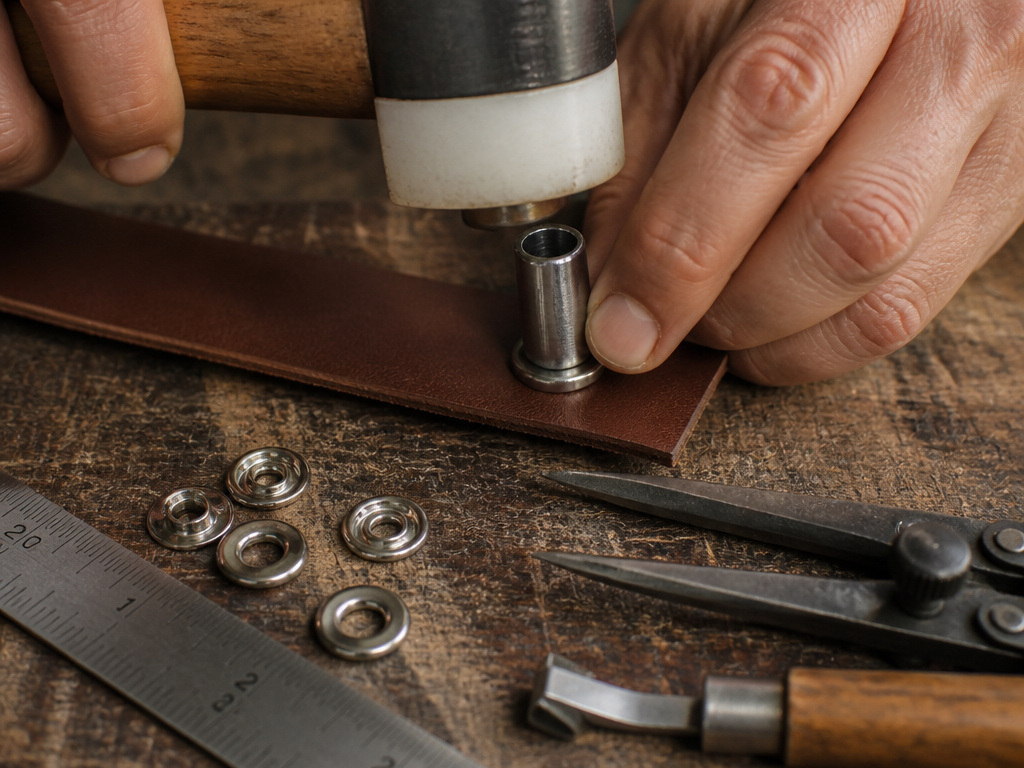 With your leather cut to size, the real craft begins. This sequence, finish edges, then punch holes, then set hardware, saves time and prevents rework. Jump ahead, and you’ll be trying to burnish around a set snap post.
Step 1: Transfer Your Pattern & Cut
Place your paper template on the leather’s flesh side. Hold it firmly and trace around it with a fine-point pen or stylus. For long, straight cuts, use your metal ruler as a guide. Apply firm, even pressure with your knife, cutting through the leather in one pass if possible. Multiple shallow passes can create a jagged edge. Cut just outside your line; you can sand to the exact line later.
Step 2: Refine the Shape & Sand
Once cut out, sand the edges to your final line with 220-grit sandpaper wrapped around a block. This removes any minor irregularities and creates a uniform surface for beveling. Sand in one direction for consistency. Round the corners slightly more if they feel too sharp after sanding.
Step 3: Bevel the Edges
Select your edge beveler. For 4-6 oz leather, a #1 or #2 tool is right. Hold it at a consistent 45-degree angle to the leather’s edge and pull it firmly along the entire perimeter. The goal is to shave off the sharp corner, creating a small, rounded profile. Don’t press too deep, you’re removing a sliver, not carving a channel.
Step 4: Burnish to a Glassy Finish
This is the transformative step. Dampen the bevelled edge lightly with water or apply a thin coat of gum tragacanth. Press the edge firmly against your wooden burnisher or canvas and rub it back and forth rapidly. Friction heats the fibers and the gum, fusing them into a smooth, sealed surface.
You’ll feel the change before you see it. The initial gritty drag gives way to a smooth, almost slippery glide. That’s the signal the fibers are sealed. Keep going until the edge is glossy and hard.
Step 5: Punch Holes for Hardware
Mark your hole locations carefully using the wing divider and a ruler. For a snap, the hole is typically centered 8-12mm from the end. Select the punch die that matches your snap post diameter, usually 3-4mm for a Line 20 snap. Place the leather on your anvil or a scrap wood block. Align the punch perfectly perpendicular and strike the drive punch firmly with your mallet. A clean punch sounds like a crisp thock.
Step 6: Set Your Hardware
Assemble the snap components: the post goes through the leather from the flesh side, the socket sits on top, the stud fits into the socket, and the cap covers the post on the back. Place the assembled pieces in the setting die on your anvil. Align the setter and strike with a firm, solid blow from your mallet.
Common mistake: Setting snaps with a post that’s too long for the leather stack. The post should protrude just enough to be peened over. If it’s too long, the cap can’t cinch down tight, and the snap will spin. If it’s too short, it won’t grip at all.
Listen for a solid click or feel a definitive stop. Test the snap. It should fasten and unfasten with a crisp, positive action. If it spins or feels loose, you must replace it, a poorly set snap will not improve with use.
Finishing Touches & Troubleshooting
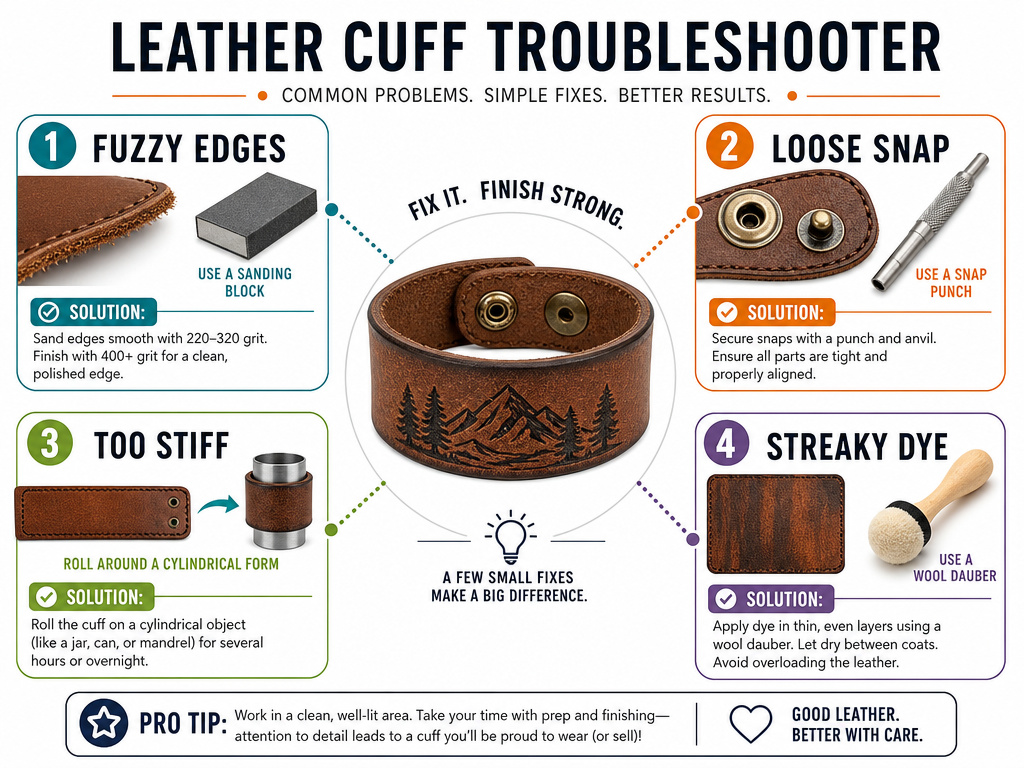 The cuff is functional now. Finishing is about character and longevity. For veg-tan leather, you can apply dye. Use an alcohol-based dye and a wool dauber, applying thin, even coats. Let each coat dry completely before adding the next. Thick, rushed coats lead to streaks and blotches.
After dyeing, condition the leather lightly with neatsfoot oil or a dedicated leather conditioner. This replaces oils lost in the tanning and dyeing process. Finally, apply a topcoat like an acrylic resolene to protect the color and add a slight sheen.
Even with careful work, issues pop up. Here’s how to diagnose them:
| Problem | Likely Cause | The Fix |
|---|---|---|
| Fuzzy edges after burnishing | Insufficient sanding before beveling; not enough moisture or burnishing time. | Re-sand with finer grit (400+), apply gum tragacanth, and burnish with more pressure and speed. |
| Snap spins or is loose | Hole punched too large; snap post too long; insufficient die pressure during setting. | Replace the snap. Use the correct punch size, ensure post length matches material thickness, and set with a firm, square blow. |
| Cuff is too stiff | Leather is too heavy (7oz+); needs break-in. | Condition the leather well, then gently but firmly roll it around a bottle or your hand to pre-curve the fibers. |
| Dye looks streaky | Applied too heavily; used a synthetic dauber that holds too much dye. | Apply thinner coats with a wool dauber. Unevenness can sometimes be evened out with a topcoat. |
Frequently Asked Questions
What’s the easiest closure for a beginner?
Snaps are the most straightforward. A Line 20 or Line 24 nickel-plated snap set with a dedicated hand tool is forgiving and quick. Buckles require more precise hole spacing and strap folding, which adds complexity. Start with a single snap closure on a medium-width cuff to master the basics of measuring, cutting, and setting.
Can I use an old leather belt?
You can, but be choosy. The belt must be supple enough to curve around your wrist. Stiff, heavy belt leather designed to hold up pants will make an uncomfortable cuff. Also, check for cracks or dryness, old, neglected leather may not hold new hardware well. It’s a great way to recycle, but test a small cut-off piece first.
How do I make the edges black or a different color?
You use edge paint or edge dye. After beveling and sanding, apply a thin coat of specialty leather edge paint (like Uniters or Vernis) with an applicator bottle or a small brush. Let it dry, sand lightly with high-grit paper, and apply a second coat. The final step is to slick it with a heated edge iron for a perfectly smooth, painted finish. It’s more involved than burnishing but offers durable, opaque color.
My cuff is tight when I put it on. Did I measure wrong?
Probably not. A well-fitting cuff should feel snug when you first fasten it over the widest part of your hand. It should then settle comfortably on the wrist. If it’s tight on the wrist, your blank was too short. If it’s just difficult to get over your hand, that’s normal, the cuff shouldn’t be so loose it slides on easily. You can slightly stretch a leather cuff by wearing it, but you can’t magically add length.
Before You Go
The difference between a cuff that lasts a season and one that lasts a decade is in the allowances and the edges. Remember the formula: wrist size + 12-18mm for snaps. Remember the feel of a properly burnished edge, glassy, not gritty. Those two specifics, more than any stamp or dye color, define the quality of the piece.
If your first attempt feels stiff or a snap fails, that’s the material giving you feedback. Pay attention to it. Leather working is a conversation between your intent and the hide’s nature. Start with a simple, single-snap design in 4-5 oz leather. Perfect that process. The confidence to tackle a wide, buckled, or intricately tooled cuff comes from knowing the foundation is sound.
