
Your Guide on How to Use Leather Cream for Lasting Results
This post contains affiliate links. As an Amazon Associate, we earn from qualifying purchases.
Using leather cream the right way isn’t complicated, but it is exact. Get it right, and your leather stays supple, protected, and develops a rich patina. Get it wrong, and you can permanently darken, clog, or even stiffen the material. The process comes down to three decisions: picking the right cream for your leather type, preparing the surface perfectly, and applying it with patience.
Most mistakes happen in the first five minutes. People grab whatever bottle is closest, skip the cleaning step, or use too much product in a rush. That’s how a leather jacket ends up with sticky spots or a pair of Red Wing shoes gets a waxy, plastic-looking finish. The leather will tell you what it needs if you listen.
What follows is a straightforward guide that moves from the absolute basics — why leather needs cream — through the specific tools and steps, right down to how often to do it in Phoenix versus Portland. I’ll break down the details for you so you can apply cream with confidence to anything from a vintage bag to a new sofa.
Key Takeaways
- Leather type dictates your cream. Smooth, finished leathers (like most bags and shoes) need a dedicated leather cream. Suede, nubuck, and aniline-dyed leathers require specific treatments — using a standard cream on them can ruin the finish.
- **Preparation is 90% of the job.A clean surface is essential. Dirt or old polish acts like sandpaper under your applicator cloth, grinding grime into the pores.
- “Less is more” is the golden rule. Apply a thin, even layer. Excess product sits on top, forming a sticky, dirt-catching film that can crack as it dries.
- Patience is the final ingredient. Let the cream absorb fully before using the item. Rushing this step leaves the leather vulnerable and the finish uneven.
- Climate changes your schedule. Hot, dry air pulls moisture from leather faster. In these conditions, you’ll condition items like jackets and bags twice as often as you would in a temperate, humid climate.
Why Leather Actually Needs Cream
Leather is skin. It’s fibrous, porous, and alive in the sense that it responds to its environment. Tanning stabilizes it, but it doesn’t fossilize the material. Over time, the natural oils that keep the fibers flexible evaporate or get washed away. Heat and sunlight accelerate this process dramatically.
Think of a leather cream as a replenishment of those lost oils. The best creams use ingredients like lanolin, neatsfoot oil, or beeswax to sink into the fiber structure, lubricating the strands so they can move against each other without cracking. A well-conditioned piece feels softer, bends quietly, and has a subtle, healthy sheen — not a high-gloss shine.
Common mistake: Using a wax-based polish on a leather jacket or bag. This creates a sticky, dirt-attracting surface unsuitable for flexible garments and blocks the leather’s ability to breathe.
Without this care, the leather dries out. The fibers become brittle and begin to separate under stress. You’ll see this as small, spider-web cracks, usually in high-flex areas like the elbow of a jacket or the toe of a shoe. Once those cracks reach the surface, the damage is permanent. Conditioning is preventive maintenance, not a rescue operation for already-failed material.
The Golden Rules: What to Do Before Applying Cream
Three things must be true before you unscrew the cap. Skip any one, and you risk wasting the product or, worse, damaging the leather.
- Know your leather type. This is the most critical rule. Applying a standard cream to the wrong leather is like using a firehose to water a bonsai tree.
- The surface must be impeccably clean. Any grit or old product residue will get worked into the leather’s pores, acting as an abrasive.
- Perform a spot test. Always apply a small amount of cream to a hidden area (like an inside seam or under a collar) and let it dry completely. This confirms the product won’t cause unwanted darkening or discoloration.
The first rule warrants its own breakdown. Matching cream to leather type isn’t marketing — it’s chemistry and physics.
Matching Leather Cream to Leather Type
| Leather Type | Description | Can Use Standard Cream? | Risk if You Do |
|---|---|---|---|
| Smooth / Finished | Most common. Has a protective topcoat (pigment, wax, or polymer). | Yes – This is the primary target. | Minimal if product is quality. |
| Aniline | Dyed through, no protective topcoat. Shows natural grain marks. | No – Use aniline-specific conditioner. | Permanent, uneven darkening; can look stained. |
| Suede / Nubuck | Buffed surface for a soft, fuzzy nap. | No – Use suede/nubuck spray conditioner. | Will matte and flatten the nap, creating dark, greasy patches. |
| Waxed / Oil-Tanned | Heavily infused with oils/waxes (e.g., work boots, some jackets). | Sometimes – Use pure oil (neatsfoot) for dryness. | Adding cream can create a gummy, over-saturated feel. |
This table isn’t just a guide; it’s a boundary. I’ve handled cases where “waterproof” treatments caused permanent discoloration on cherished aniline-dyed bags. The owner loved the leather’s natural, unprotected look, and the product altered it in a way that couldn’t be reversed. The leather will tell you what it needs, but you have to listen to its type first.
The Toolkit: What You Actually Need
You don’t need a salon’s worth of equipment, but using the right few items makes the difference between a professional job and a messy one.
- The Cream: This is your main event. For general use on smooth leathers, I reach for Bickmore Bick 4. It’s a light, fast-absorbing cream that doesn’t darken leather. For revitalizing very dry, stiff, vegetable-tanned leather, pure neatsfoot oil is unmatched, but it will darken the leather. For a balance of conditioning and light wax protection, Saphir Médaille d’Or Pommadier is excellent for shoes.
- Cleaning Agent: A dedicated leather cleaner or a dilute solution of saddle soap (for heavy items only). For daily dust, a horsehair brush is perfect.
- Application Cloths: A soft, lint-free cotton cloth (an old t-shirt works) or a dedicated applicator pad. Avoid paper towels – they can scratch.
- Drying Time: Patience. Have a clean, dry space where the item can sit undisturbed for the time it needs.
Notice what’s not on the list: your fingers. The oils and acids on your skin can interfere with the cream’s absorption and lead to uneven spots. Use a cloth.
Step-by-Step: The Right Way to Apply Leather Cream
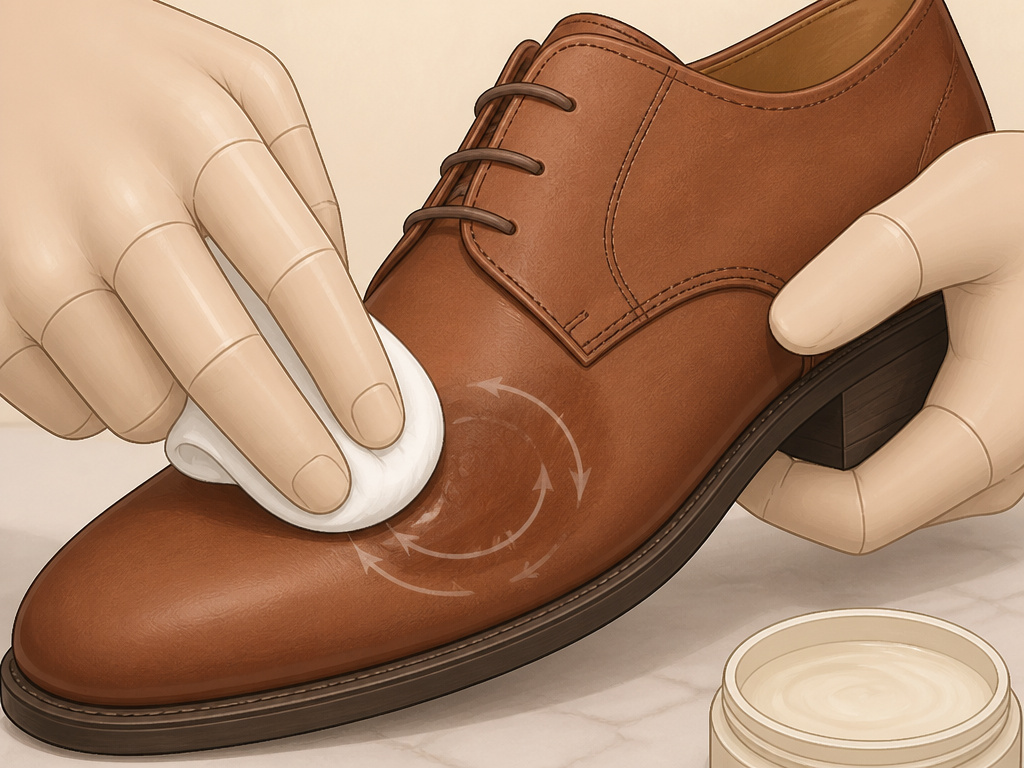 Let’s walk through the process from start to finish. This is based on years of practical experience refinishing everything from watch straps to Chesterfield sofas.
Step 1: Clean the Leather Thoroughly
Remove all surface dust and dirt with a horsehair brush. For deeper grime, use a appropriate leather cleaner on a damp cloth, wiping gently in one direction. Let the leather dry completely. Any moisture trapped under the cream can cause mildew. * Skip this, and: You’ll grind dirt into the pores, creating a permanently dull, gritty finish.
Step 2: Apply a Small Amount of Cream to Your Cloth
Never pour cream directly onto the leather. Squeeze a pea-sized amount onto your cotton cloth and fold the cloth to work it into the fabric. You want the cloth damp with product, not soaked. * Use too much, and: The excess will sit on the surface, forming a sticky film that attracts lint and dirt.
Step 3: Work the Cream Into the Leather in Circular Motions
Apply the cream using gentle, circular motions. This helps work the conditioner into the grain evenly. Pay extra attention to dry, high-stress areas like seams, folds, and creases – these spots are often the first to crack.
Apply the cream to the sides of the shoes (on the welt seams to maximise the seal) using a back-and-forth motion, pressing lightly and paying particular attention to the folds. Leave to dry for a few minutes. You’ll feel the leather begin to accept the cream. The surface will darken slightly as it absorbs the oils – this is normal and will even out as it dries.
Step 4: Let It Absorb Fully
This is the part people rush. Walk away. Let the item sit in a well-ventilated area, away from direct heat or sunlight, for at least one hour. For thicker leathers or in humid climates, give it several hours or overnight. * Ride or use it wet, and: The cream won’t have bonded, leaving the leather vulnerable to scuffs and stains. It can also transfer onto clothing.
Step 5: Buff Off Any Residual Haze
After the drying time, take a fresh, dry section of your cotton cloth or a clean, soft brush. Gently buff the entire surface. This removes any waxy residue left on top and brings up a soft, natural luster. * Skip the buff, and: The leather may have a faint, cloudy film, especially in creases.
How Often Should You Apply Leather Cream?
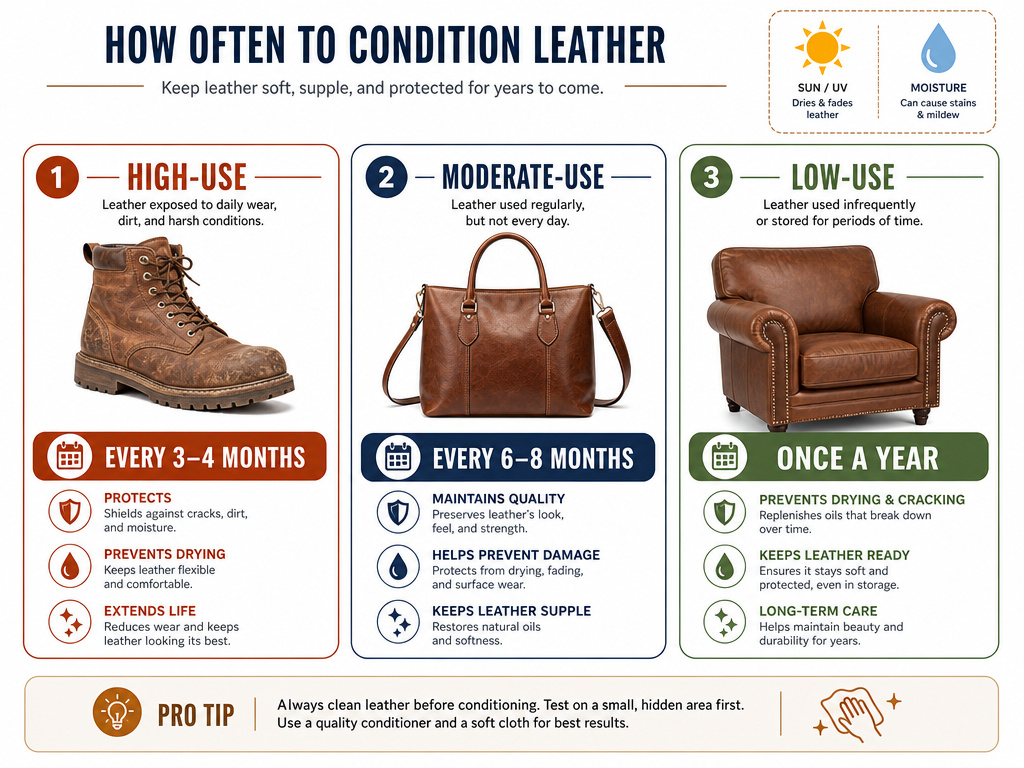 There’s no universal calendar. Frequency depends on the item’s use, its leather type, and your local climate.
- High-Use Items (Daily Shoes, Frequent Jackets): Every 3–4 months.
- Moderate-Use Items (Handbags, Occasional Boots): Every 6–8 months.
- Low-Use Items (Furniture, Decorative Items): Once a year.
Climate is a major driver. The Indian Motorcycle Owner’s Manual advises monthly application for leather regularly exposed to sun and engine heat. If you live in a hot, dry climate like Arizona, your leather is under constant attack from dehydrating air. You might need to condition a leather car interior or outdoor bag twice as often as someone in a temperate, coastal climate. The leather will tell you – when it starts to feel stiff or look slightly dull, it’s time.
What Happens When You Get It Wrong?
Understanding the failure modes is the best way to avoid them.
- Using Cream on Suede/Nubuck: The cream saturates and mats the delicate nap. Instead of a soft, velvety surface, you get dark, hardened patches that are nearly impossible to restore.
- Over-Application: Excess cream doesn’t absorb. It forms a sticky, tacky layer on top that attracts every piece of lint and dust. As it dries, this layer can crack like a dried riverbed.
- Using a Wax-Based Polish on Flexible Items: This is a specific pet peeve. A hard wax polish is designed for the rigid toe of a shoe. On a soft leather jacket, it creates an inflexible shell that cracks at the elbows and seams with movement.
- Not Letting It Dry: You’ll see immediate transfer onto clothes, and the leather will be more susceptible to staining and dirt penetration.
The practical takeaway? If you’re trying to revive a family heirloom or a very expensive piece, slow down. Test. Apply thin layers with ample drying time between them. Building up condition slowly is always better than flooding the leather once.
Frequently Asked Questions
Can I use leather cream on a leather car interior?
Yes, but choose your product carefully. Car interiors face extreme UV and heat exposure. Use a cream with a UV protector built in, like Meguiar’s Gold Class Rich Leather Spray. Avoid anything overly greasy that could transfer onto clothing.
Does leather cream expire?
It does. Most quality creams, like Concept Chemicals Leather Care Crème, have a shelf life of at least two years unopened. An old cream can separate, and its active ingredients may break down, reducing its effectiveness.
What’s the difference between leather cream and leather conditioner?
In common parlance, they’re often the same thing – a product designed to moisturize and nourish. Technically, “conditioner” can be a broader term that includes oils and balms, while “cream” often refers to a light, emulsified product that’s easy to apply and doesn’t darken leather much, like Bickmore Bick 4.
Can I use coconut oil as a leather cream?
I recommend against it. While it will condition in the short term, coconut oil can become rancid over time, leading to unpleasant odors. It’s also a heavy oil that can over-soften some leathers. Stick with products formulated for the task, like a dedicated leather balm.
How do I know if my leather is too far gone for cream?
Look for deep, open cracks that you can see light through, or areas where the surface finish is flaking off in chips. Cream nourishes the fibrous structure beneath the surface; it cannot re-adhere a failed topcoat or fuse separated fibers back together.
Before You Go
Leather care isn’t about occasional heroic efforts. It’s about consistent, gentle upkeep. Think of it like skincare for your belongings – a light, regular moisturizer does more than a heavy mask applied once in a panic.
The single biggest lever you control is product choice. Match the cream to the leather’s type and needs. For a quick, no-darkening refresh on a smooth leather bag, grab the Bickmore Bick 4. For a dry, stiff belt or pair of work gloves that need deep revival, a sparing touch of pure neatsfoot oil is your best bet. And for the love of patina, keep the hard wax polishes on the dress shoes where they belong.
Start with your most worn piece this weekend. Clean it, apply a thin coat of the right cream, and let it rest. You’ll feel the difference in its suppleness before you even see the renewed luster. That’s the reward for doing it right.
