
Step-by-Step Guide: How to Remove Scuffs from Leather Shoes
This post contains affiliate links. As an Amazon Associate, we earn from qualifying purchases.
Remove scuffs from leather shoes by following a strict three-step sequence: clean the area with a dedicated leather cleaner, condition the leather with a nourishing product, and then address the color loss with a matching cream or polish. Skipping the first two steps seals dirt into the leather and guarantees a patchy, temporary fix.
That sequence is the mechanical reality of how a leather finish works. A scuff is a surface disturbance, it traps road grime, disrupts the topcoat, and often removes a microscopic layer of dye.Cleaning removes the debris so you can see the actual damage. Conditioning restores flexibility to the compressed leather fibers. Only then can a color product adhere properly and blend without a visible line.
What follows is a breakdown of that three-step method, the tools that actually work, and the common shortcuts that make the problem worse. By the end, you’ll be able to look at any scuff and know exactly which step to take next.
Key Takeaways
- Always clean before you condition. Applying conditioner over dirt creates a greasy, sealed-in stain that is far harder to remove than the original scuff.
- Match your product to the scuff depth. A surface mark buffs out with a microfiber cloth; a scratch that shows lighter leather beneath needs a color-matched cream, not a clear conditioner.
- Polish is for shine, not repair. Using wax polish on a deep scuff will fill the scratch with wax, creating a visible, glossy pit that cracks within a week.
- Household hacks are temporary. A dab of petroleum jelly or vinegar might darken a scuff for an hour, but it does nothing to nourish the leather and can dry it out or attract more dirt.
- Patent leather is a different beast. Its plastic coating means standard leather conditioners will cloud the finish. Use a dedicated patent leather cleaner or a minuscule amount of mineral oil.
The 3-Step Sequence for Any Leather Shoe
The biggest mistake is using the right product in the wrong order. I’ve watched more people ruin good shoes by slapping polish on a dirty toe cap than by any accidental curb scrape.
The process is linear for a reason.
Before you start: Work in a well-lit, clean area. Never use heat from a hairdryer or direct sun to dry leather, it cooks the fibers and causes cracks you can’t fix. Let shoes air dry for at least 15 minutes between steps.
Step 1: Clean to Reveal the True Damage
You can’t fix what you can’t see. A scuff is often a mixture of foreign material (concrete dust, shoe polish from someone else’s shoe) and actual finish abrasion. Cleaning strips away the former so you can assess the latter.
A dedicated leather cleaner like Collonil 1909 Leather Cleaner is formulated to lift grime without stripping the leather’s natural oils. Saddle soap is overkill for everything but actual saddles, it’s too drying for modern shoe finishes.
- Dampen a soft cloth (microfiber is ideal) with the cleaner. Don’t pour it directly onto the shoe.
- Wipe the entire shoe, not just the scuff. This ensures an even base and prevents a clean “spot” from standing out.
- Let it dry completely. This takes 15-20 minutes. Rushing to the next step while the leather is damp dilutes your conditioner and leads to poor absorption.
Skip this, and you’ll: Seal sidewalk grit into the leather’s pores under a layer of conditioner. The area will look perpetually dirty and feel gritty, and any polish applied on top will flake off.
Step 2: Condition to Restore Flexibility
A scuff is a compression injury to the leather fibers. Conditioning is the rehab.This step plumps up the fibers, preventing the compressed area from becoming a future cracking point.
Think of it like applying a hand-rubbed oil finish to wood. You work in a thin, even coat, letting it be fully absorbed before even thinking about the next one. Saphir Médaille d’Or Renovateur is a quality product.amazon.com/dp/B004ECWBZW?linkCode=osi&th=1&psc=1&tag=leathergenesis-20)** feeds the leather without leaving a greasy residue.
- Apply a small amount to a clean cloth.
- Rub it into the leather using circular motions, covering the whole shoe.
- Give it at least 10 minutes to soak in before buffing off any excess with a dry cloth.
The leather should look rejuvenated, not shiny. If it’s still dull and thirsty, you can apply a second light coat after the first has fully absorbed.
Step 3: Address the Color Loss
Now you address the visual defect. This is where most people start, and it’s why their repairs look obvious. You must match the solution to the problem’s depth.
| Scuff Type | What You See | The Right Fix |
|---|---|---|
| Surface Transfer | A dark or colored mark on top of the finish. The leather grain feels smooth underneath. | A gentle buff with a dry microfiber cloth often lifts it. If it persists, a tiny bit of cleaner on a cotton swab. |
| Light Abrasion | A dull, whitish scrape. The finish is marred but the leather color underneath is intact. | Buffing with a conditioner-loaded cloth. The oils can slightly darken the abraded area to blend it in. |
| Deep Scratch | A clear line where the topcoat and dye are gone, revealing lighter leather beneath. | A color-matched leather cream (like Saphir Pommadier). It deposits pigment into the scratch. Let it dry, then buff. |
| Gouge | A physical indentation in the leather. | Professional repair. Home solutions will not rebuild the missing material. |
For a deep scratch, cream is better than wax polish. Cream contains more pigment and less wax, so it fills the color gap without building up a noticeable, crack-prone plug. Apply it sparingly only to the scratch, feathering the edges. Let it dry for 30 minutes, then buff.
The Tools That Work (And the Ones That Don’t)
You don’t need a cabinet full of potions. You need three or four specific tools used correctly. Let’s be clear about this: the right cloth matters as much as the right chemical.
The Non-Negotiables:
- Microfiber Cloths: They lift dust and apply product without scratching. You need several, one for cleaning, one for conditioning, one for buffing.
- Horsehair Brush: A soft-bristled brush for removing dried dirt before cleaning and for shining after polishing.
- Dedicated Leather Cleaner: Avoid all-purpose sprays. Use a pH-balanced cleaner made for fine leather goods.
- Quality Leather Conditioner: This is your foundational product. Skip the silicone-based “conditioners” that sit on top of the leather.
The Overrated & Problematic:
- Magic Erasers (Melamine Foam): These are micro-sandpaper. They will absolutely remove a scuff, along with a layer of your shoe’s finish, leaving a permanently dull spot. I don’t use them.
- Vinegar & Olive Oil / Petroleum Jelly: These are temporary cosmetic tricks. Vinegar can dry out leather, and oils/gels attract dirt, creating a bigger mess in a day or two. They don’t condition.
- Saddle Soap: For a daily-wear shoe, it’s too aggressive and drying. It’s designed for removing heavy, ground-in dirt from unfinished saddle leather.
- “Clean & Shine” Combo Products: They do neither job well. Cleaning and conditioning are separate chemical processes.
Where this goes sideways: Using a rough towel or paper towel for buffing. Paper towels break down and leave lint embedded in the leather’s grain, and terrycloth towels can be abrasive enough to create new micro-scratches.
When to Polish (And When to Skip It)
Polishing and repairing are different jobs. Polishing adds a protective wax layer and aesthetic shine. Repairing corrects color loss and nourishes the hide.
You should only polish a shoe that is already clean, conditioned, and color-correct. Applying Kiwi Parade Gloss or a similar hard wax over a deep scratch is a classic error. The wax fills the depression, yes. But it dries as a hard, glossy plug that doesn’t move with the surrounding leather. The first time you flex your foot, that wax plug cracks, leaving a white, spider-webbed mess inside the scratch.
Polish after you repair, not as the repair.
The one exception is patent leather. Its glassy finish is a plastic coating, not dyed hide. For scuffs on patent leather, a dab of a dedicated patent leather cleaner or a microscopic amount of mineral oil on a cloth can fill micro-scratches and restore shine. Never use standard cream or wax on it.
Assessing Your Scuff: A Quick Diagnostic
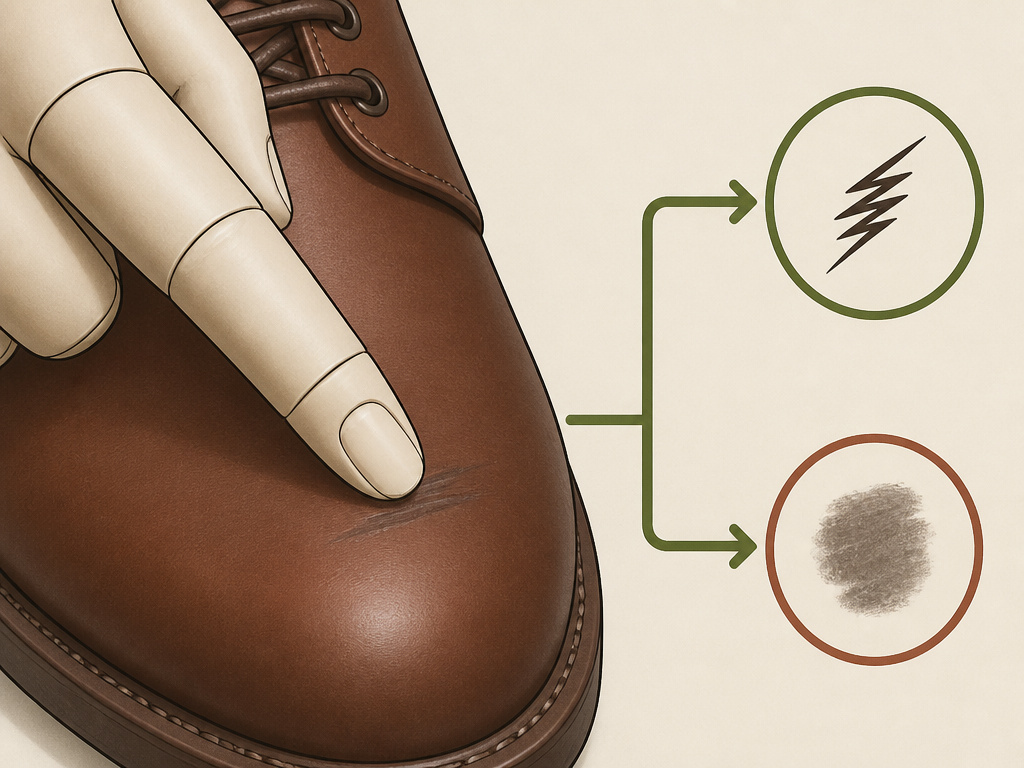 Not sure what you’re dealing with? Run through this checklist before you touch a product.
- Run your fingernail over it. Does it catch? If yes, it’s a scratch or gouge (see the table above). If no, it’s likely surface transfer.
- Look at it from different angles in good light. A surface transfer scuff will seem to sit on top. A color-loss scratch will look lighter from all angles.
- Feel the surrounding leather. Is it dry and stiff? If so, conditioning is your immediate priority, regardless of the scuff. Dry leather is brittle leather, and more scuffs (and cracks) are coming.
Common mistake: Treating a deep scratch like a surface mark. If you just buff a scratch that’s removed dye, you’re burnishing and hardening the exposed, raw fibers, making it even harder for a color cream to adhere later.
This diagnostic takes 30 seconds. It saves you an hour of wasted effort and prevents you from grinding dirt deeper into the finish.
Special Cases: Suede, Nubuck, and Full-Grain
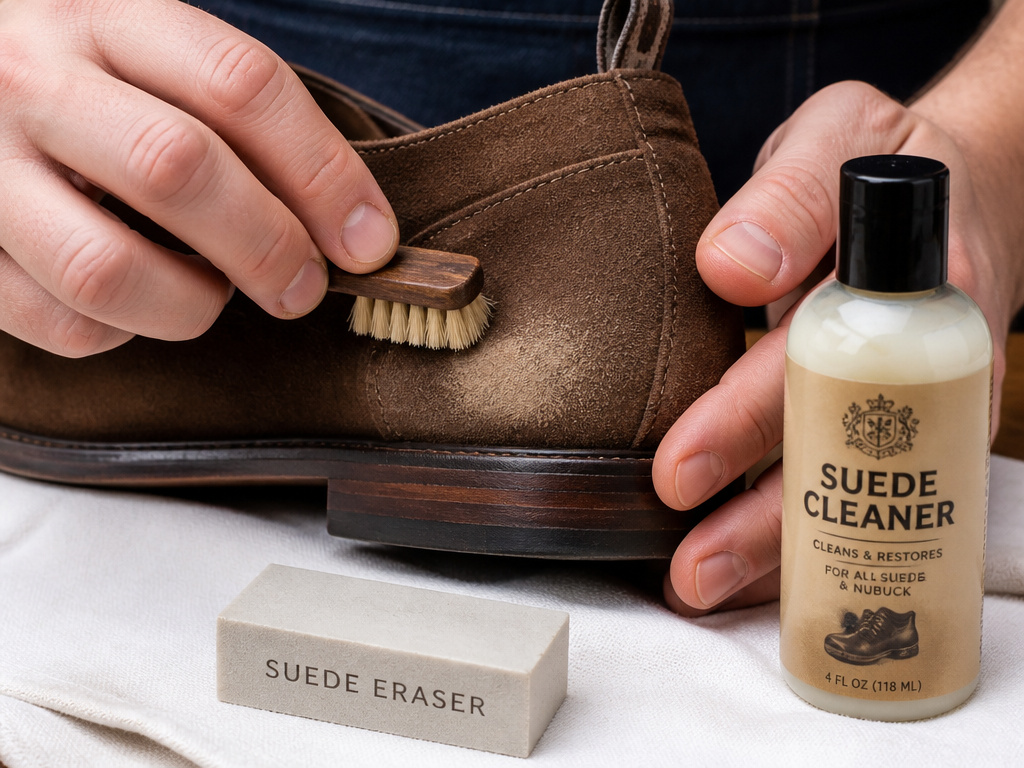 The three-step principle holds, but the tools change dramatically. These materials have no protective topcoat, so they are more absorbent and delicate.
- Suede & Nubuck: Never use a liquid cleaner on a dry scuff. First, use a suede brush or eraser to gently lift the nap. If a stain remains, use a dedicated suede cleaner with a foam applicator. Conditioning is done with specialized sprays that repel water without altering the texture.
- Full-Grain & Vegetable-Tanned Leather: These are the workhorses. They develop a patina, a darkening from oils and sunlight, that makes small scuffs blend into the character. For these, conditioning is paramount. A scuff on well-conditioned full-grain leather can often be minimized just by rubbing it with your thumb (the warmth and oils help).
The “patina” is the story. On a belt or boot from Red Wing or Filson, a few scuffs aren’t flaws to be erased; they’re part of the narrative. Your goal is to keep the leather healthy so those marks age gracefully, not to return it to a showroom state.
Frequently Asked Questions
Can I use baking soda to remove a scuff?
You can, but you shouldn’t for smooth leather. Baking soda is a mild abrasive. Making a paste with water creates a slurry that can work into the leather’s grain and dry it out. If you use it, you must follow it with a thorough cleaning and a heavy conditioning session. It’s a risky, multi-step process when a cleaner like Lexol is safer and faster.
How do I fix a white scuff on black leather shoes?
White scuff on black shoes is almost always a scratch that has removed the black dye. The fix is in the table above: clean, condition, then apply a black leather cream (like Saphir Pommadier in Black) specifically to the scratch. Let it dry and buff. Do not cover the whole shoe in cream, you’ll just darken the rest and the scratch will still show.
Will shoe polish remove scuffs?
No. Shoe polish is primarily wax and pigment designed to shine and protect an already-intact surface. It can mask very light surface scuffs temporarily by adding a layer of colored wax on top. For any scratch that has removed material, polish will not fill it correctly and will crack. Use a cream for repair, a wax for shine.
Is it worth trying to fix a deep gouge myself?
Probably not. A gouge is structural, leather fibers are missing. Home kits with filler paste rarely match the flexibility of the surrounding leather, leading to a stiff patch that cracks. For a valuable shoe, take it to a cobbler. They can sand, fill, re-dye, and re-grain the area professionally. For a cheap shoe, consider it part of its life story.
How can I prevent scuffs?
You can’t prevent them entirely, but you can minimize their severity. Regular conditioning is the best defense, supple leather resists abrasion better than dry, brittle leather. Using shoe trees helps maintain the shape, so the leather isn’t creasing and folding against abrasive surfaces as much. Practically speaking, just buy shoes you like enough to wear, scuff, and care for.
Before You Go
The goal is preservation. A well-maintained leather shoe with a few honest scuffs has more character and longevity than a neglected one that’s been slathered in silicone spray.
So here’s your action for this week: pick your most-worn pair of leather shoes. Don’t wait for a scuff. Give them the full three-step treatment, clean, condition, and buff. You’ll feel the difference in suppleness, and you’ll see a deeper, richer color. When a scuff does happen, you’ll already know the drill, and the leather will be in a healthy state to receive the repair. That’s how you build a wardrobe that lasts.
