
How to Start Leatherworking: 3 Essential Tools for Beginners
This post contains affiliate links. As an Amazon Associate, we earn from qualifying purchases.
This post contains affiliate links. As an Amazon Associate, we earn from qualifying purchases.
Leatherworking for beginners begins with one rule: skip the pre-made starter kits. You need three core tools, a single type of leather, and a simple, functional first project. Invest in a self-healing cutting mat, a sharp utility knife, and a stitching awl with a replaceable needle first. Everything else you can add as you learn.
Let’s be clear about one thing. The overwhelm you feel looking at a wall of tools stems from bad advice telling you to buy everything before you know what any of it does, not from the craft being inherently complex.
What follows is the opposite of a shopping list. It’s a method for starting with the least money wasted and the most skill gained. This guide details the one leather you need, the three tools that matter, the workspace setup that prevents headaches, and the first project that teaches you the right habits. By the end, you’ll know exactly what to do this weekend.
Key Takeaways
- Buy tools individually, not in kits. Starter kits are filled with cheap, single-purpose items you’ll replace. Start with a cutting mat, a sharp utility knife, and a stitching awl.
- Your first leather should be vegetable-tanned tooling leather, 4-5 ounces thick. It’s affordable, consistent, and forgiving for practice.
- Your first project must have a function. A simple keychain or card holder teaches cutting, hole punching, and stitching on a small scale without waste.
- Workspace safety isn’t optional. Dyes and finishes require good ventilation; a dull blade is more dangerous than a sharp one.
- Surface preparation decides your result. Every step, from cutting to finishing, relies on the step before it being done cleanly.
The Leather You Should Buy First
Walk into any leather supplier, and the options are paralyzing. Chrome-tanned, aniline, full-grain, top-grain, suede. Ignore all of it for now.
For your first six months, you want one thing: vegetable-tanned tooling leather. Here’s the practical takeaway. It’s firm, has a consistent surface, and it’s designed to be worked. The tanning process uses natural tannins, so it’s more receptive to carving, stamping, and molding than chrome-tanned leather. It also develops a rich patina over time, which is the whole point for many leatherworkers.
But the real reason to start with veg-tan is cost and forgiveness. You can buy smaller “craft sides” or shoulder pieces from Tandy Leather, Weaver Leather Supply, or Springfield Leather Company for a fraction of the price of a full hide. A mistake on a $40 shoulder is a lesson. A mistake on a $300 hide is a tragedy.
The leather will tell you what it needs, and veg-tan is the most straightforward teacher.
| Leather Type | Best For Beginners Because… | Watch Out For… |
|---|---|---|
| Vegetable-Tanned Tooling Leather | Consistent temper, easy to cut/punch, accepts tooling and dye evenly. | Can dry out if left untreated; requires conditioning after project completion. |
| Chrome-Tanned Leather | Softer “out of the box” feel, often pre-dyed. | Slick surface resists glue and can be harder to stitch cleanly for a novice. |
| Pre-Finished/Garment Leather | Looks “ready to go” for bags or clothing. | Hides mistakes poorly; expensive; specialized techniques often required. |
The part nobody mentions: Buying a “grab bag” of leather scraps is fine for practicing stitches, but never for a real first project. The varying thicknesses and types will fight you, and you’ll learn nothing about consistency.
Thickness is measured in ounces, where one ounce equals 1/64 of an inch. A 4-5 ounce leather is 4/64″ to 5/64″ thick, about 1.6mm to 2mm. That’s the sweet spot. It’s thick enough to feel substantial for a small item like a keychain or card holder, but thin enough that your basic tools can handle it without a struggle. Going for a thick 8-10 ounce belt leather right away is like learning to drive in a semi-truck.
The 3 Essential Beginner Tools (And What to Skip)
Here’s a straightforward guide. If you only buy three things, make it these.
- A Self-Healing Cutting Mat. This isn’t just for protecting your table. The grid lines are your guide for straight cuts. A 12″x18″ mat is a perfect start. Without it, your knife blade dulls on the first cut into wood or plastic, and you’ll mar your work surface. A dull blade is a dangerous blade, it requires more force and slips easier.
- A Sharp Utility Knife or Round Knife. The brand matters less than the blade. You want a knife that holds an edge and feels balanced in your hand. A Stanley utility knife with replaceable blades is a perfectly legitimate start. The key is to change the blade the moment it drags instead of slices. That gritty, tearing feeling through the leather is your cue.
- A Stitching Awl. This is the tool that separates a lasting piece from a glued-together trinket. A saddle stitch, done by hand with an awl and two needles, is stronger than any machine stitch because the threads lock against each other. A basic stitching awl from Weaver or Tandy is all you need. You’ll add pricking irons for spacing later.
So what’s in those tempting starter kits that you should skip? The oversized, flimsy mallets. The sets of 20 stamping tools you’ll use once. The cheap, plastic-handled hole punches that crumple instead of cut. The “beginner” leather shears that can’t get through 4-ounce leather. Buying these as a bundle is a false economy, you’ll replace 80% of it within six months.
A Good First Project
Ever wondered why so many first-time leatherworkers abandon their half-finished bag or wallet? They chose a project that required skiving, complex pattern drafting, and a dozen specialized tools before they’d mastered a straight line.
Your first project should be simple, functional, and complete in an afternoon. A leather keychain or a basic card holder fits the bill. It teaches you the fundamental workflow: transferring a pattern, cutting cleanly, punching stitching holes, and finishing the edges. The small scale means you can afford to mess up and start over without wasting material.
I learned this lesson through a belt. A rule I learned through frustration is to never skimp on thread weight for structural items. Using thread that was too light on a belt led to premature failure after a few months of wear. The lesson wasn’t just about thread, it was about matching the project’s demands. A keychain has no stress points. A belt is all stress. Start where the stakes are low.
A stitching awl and some patience will yield a stronger, more repairable seam than any sewing machine on all but the thinnest leathers.
Follow a simple project tutorial step-by-step. Don’t improvise yet. The goal is to build muscle memory for the sequence: cut, punch, stitch, finish. Getting this rhythm down on a small item is what lets you scale up later without feeling lost.
Setting Up Your Workspace
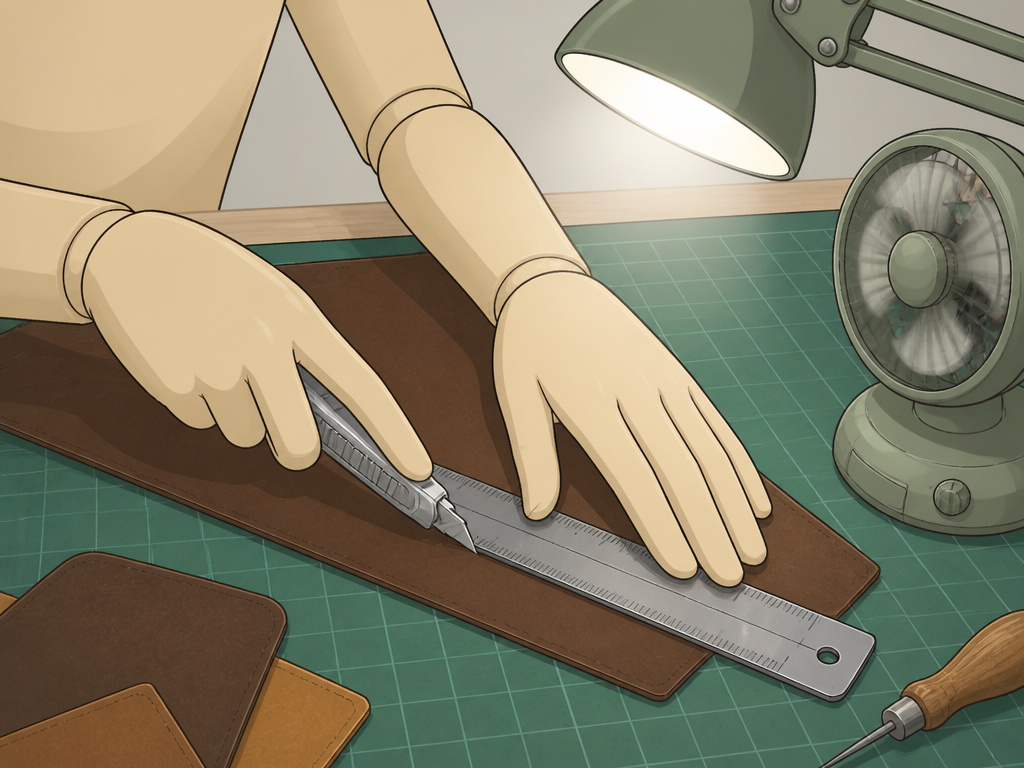
You don’t need a dedicated studio. You need a sturdy table, good light, and conscious ventilation.
The table matters because you’re applying pressure, cutting, punching, hammering. A wobbly surface translates to crooked cuts and misplaced holes. Good lighting means an overhead source plus a clamp-on, swing-arm lamp you can point directly at your work. Shadow-free light is how you see the edge you’re skiving or the line you’re following.
The ventilation point is essential and often glossed over. Dyes, cements, and finishes emit fumes. You’re not working with toxic chemicals in a beginner project, but even water-based dyes and acrylic finishers benefit from fresh air. A window cracked open or a small fan pulling air away from you is sufficient. This practical distinction separates a pleasant three-hour session from a headache that makes you quit.
Before you start: Assemble your tools on the cutting mat, with your leather piece ready. Have a trash bin nearby for scraps and used blade wrappers. Tie back long hair and roll up loose sleeves. It sounds basic, but a dangling cuff caught under a mallet swing is how you ruin a cut line, or worse.
The Fundamental Leatherworking Process
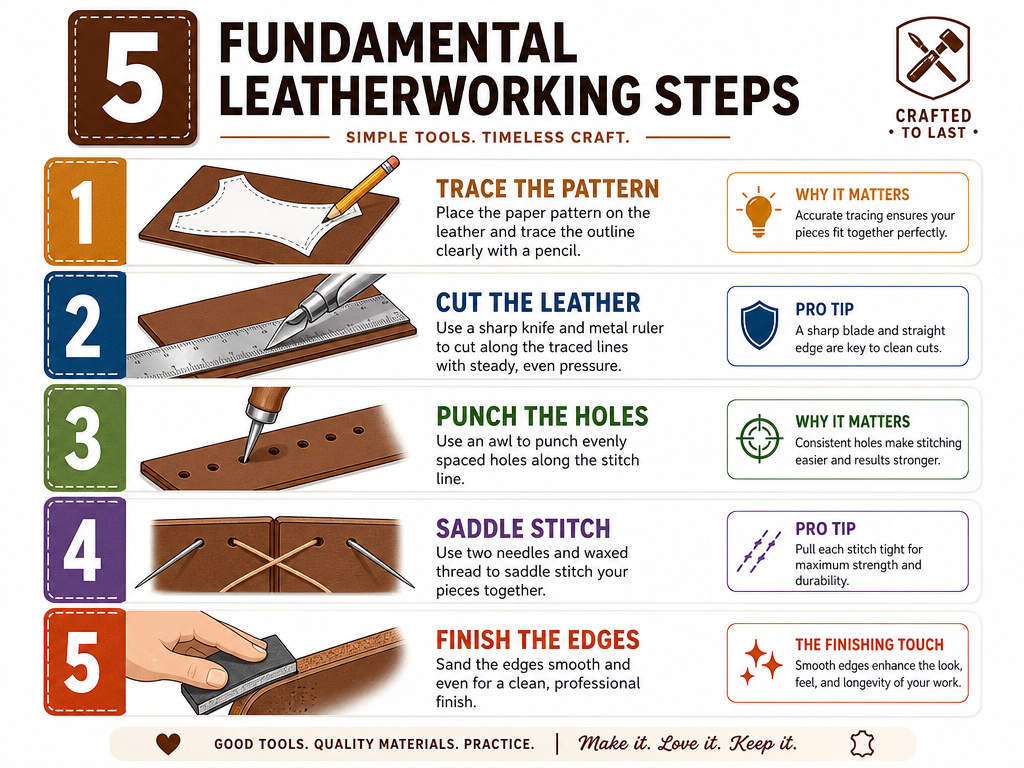
Working with leather follows a logical order. Jump a step, and you compromise the next one. This is based on years of practical experience.
- Design & Pattern. Keep it simple. Use a paper template first. Trace it onto the leather with a pen or stylus. This is your committed line. Consequence if skipped: Your cuts will wander, pieces won’t match up, and the final item will look misshapen.
- Cutting. Use your sharp utility knife and a metal ruler. Cut on the outside of your traced line, not directly on it. This leaves you material to sand and finish the edge later. Consequence if skipped: Cutting on the line leaves no margin for error. Your piece ends up undersized, and the edge is ragged from the pen mark.
- Hole Punching. For stitching holes, use your awl or a diamond chisel. Consistency in spacing and depth is everything. Practice on a scrap piece first. Consequence if skipped: Uneven holes make for sloppy, puckered stitching. The thread tension will be impossible to manage.
- Stitching. This is where patience pays. Use the saddle stitch. It’s slow, but it’s strong and beautiful. Each stitch locks the previous one. Consequence if rushed: The thread tangles, needles bend, and the stitch line looks amateurish. Speed comes with practice, not force.
- Finishing. Sand the edges smooth, then apply a edge finish or burnish with water and a wooden slicker. Finally, condition the leather with a product like Lexol. Consequence if skipped: Raw edges fray and look unfinished. Unconditioned leather dries out and becomes brittle over time.
Think of this process like building a roux for a sauce. You need a low, patient heat and the right fat to build a stable foundation without it turning gummy. Rushing the roux ruins the gumbo. Rushing a step here ruins the piece.
Safety & Best Practices
The hazards in leatherworking aren’t dramatic, but they’re persistent. A dull blade requires more force and slips. Fumes from adhesives and dyes accumulate in a closed room. A poorly secured piece shifts under a mallet blow.
Common mistake: Using a utility knife with a blade that’s been dragged through paper, cardboard, and then leather. The edge is gone after the first non-leather material, and you’re just tearing through your project. Use a fresh blade for leather. Always.
Keep a first-aid kit handy for small nicks. Wear safety glasses if you’re doing any hammering, a flying metal chisel tip is rare but possible. Most of all, work at a pace where you’re thinking about the next action, not rushing to see the finished product. That’s when accidents happen.
Understand the materials. If you’re using a chemical dye or cement, read the label. Work in a well-ventilated area. The leather will tell you what it needs, and so will the product instructions, if you read them.
Frequently Asked Questions
What’s the cheapest way to start leatherworking?
The cheapest way is also the smartest: buy the three essential tools (cutting mat, sharp knife, stitching awl) and a small piece of vegetable-tanned leather. Avoid kits. Total cost can be under $50. Practice the basic techniques on scraps before starting a project.
Can I use a regular sewing machine?
For leather over 2mm thick, no. Home sewing machines aren’t built for the constant punching force. The needle will break, the thread will snap, and the motor will stall. Hand stitching with an awl is slower but stronger and more reliable for a beginner.
How do I choose my first leather project?
Pick something that requires only cutting, hole punching, and stitching. A keychain, simple card holder, or a glasses strap are perfect. Avoid anything with gussets, zippers, or complex pattern matching. Follow a proven first project tutorial exactly.
Why does my leather dye look streaky?
Surface preparation. Leather has natural oils and a finish called a “slick” that resist dye. You must deglaze the surface by lightly sanding or using a deglazer solution (like acetone on a rag) before applying dye. Applying dye to a unprepared surface makes it bead up and streak.
How often should I condition my leather?
For a finished item in regular use, condition it every 6-12 months with Lexol. Over-conditioning can saturate the leather and make it feel greasy. If the leather feels stiff or looks dry and pale, it’s time.
Before You Go
One rule most guides skip: if your first project doesn’t turn out perfect, that’s the point. The goal for day one is to complete the cycle—cut, punch, stitch, and finish—and understand why each step exists, not to produce a museum-quality piece. Your second attempt will be 50% better.
The next step is to pick one skill from that first project and drill it. Maybe it’s cutting a perfectly straight line. Or punching evenly spaced holes. Or getting a consistent saddle stitch. Practice that one thing on scrap leather until it’s automatic. Then move to your second project.
The impulse to buy every specialized tool after one project is strong. Resist it. Master the essential tools you have first. Your skills, not your toolkit, are what turn leather into something you’re proud to carry.
