
Your Straightforward Guide to Safely Cleaning a Leather Chair
This post contains affiliate links. As an Amazon Associate, we earn from qualifying purchases.
To clean a leather chair, you start with a dry brush, escalate to a damp cloth, and only then use a mild, leather-specific cleaner for stubborn spots. The goal is to remove surface soil without saturating the hide.
That “dry first” step is where most people lose patience. It feels like you’re not really cleaning, but dust and grit are abrasive. Leaving them on the surface means you’ll grind them deeper into the leather when you finally wipe with a damp cloth, etching a pattern into the finish over time. The chair gets cleaned, but it also gets worn.
What follows is an escalation protocol: from dry to damp to dedicated cleaner. You’ll also need to match your approach to the leather type, full grain, top grain, aniline, or protected. Using saddle soap on a finished office chair is a classic route to dull, dried-out leather within a year.
Key Takeaways
- Start every cleaning session with a soft-bristle brush to lift dry debris; a damp cloth just grinds dirt in.
- Mix a cleaner only after brushing fails, use a single drop of pH-neutral leather cleaner in a cup of distilled water.
- Full-grain and aniline leathers cannot tolerate oils or waxes meant for saddles; they’ll seal the pores and cause drying.
- Condition immediately after cleaning on unfinished leathers; skip it on heavily protected or bonded leathers.
- Test every product, even water, in a hidden spot first; color transfer or darkening means stop.
Know Your Leather Before You Touch It
You wouldn’t use dish soap on a silk blouse. The same logic applies here. Leather is not one material. There are four main types you’ll find on chairs, and each demands a different touch.
Full-grain leather is the top layer of the hide, complete with natural markings and pores. It breathes. Top-grain leather is sanded to remove imperfections, then usually given a protective coating. Aniline leather is dyed but not top-coated, so it’s soft and shows natural character but stains easily. Protected leather, common on budget office chairs, has a heavy plastic coating over a split-hide base.
Applying saddle soap or mink oil to a full-grain desk chair is like using a firehose to water a bonsai tree. The leather can’t breathe, and the oils sit on the surface, attracting dirt until the piece feels sticky and looks dull.
How do you tell them apart? Run your hand across the surface. Full grain and aniline feel supple and warm, and you’ll see subtle texture variations. Protected leather feels cool, smooth, and uniform, almost like plastic. A drop of water on protected leather will bead up; on aniline, it will darken the spot almost immediately.
I’ve had clients mistake the natural fat wrinkles in a full-grain hide for damage or a manufacturing defect. Those wrinkles are a hallmark of full-grain leather. Scrubbing them with a harsh cleaner doesn’t fix a problem; it creates one by stripping the natural oils from those precise stress points.
The Four Tools You Actually Need
Skip the all-in-one kits and the fancy sprays. You need a short list, and each item has a specific job. This isn’t about buying more stuff; it’s about using the right stuff.
A soft-bristle brush (horsehair or boar’s hair) is for dry work. It lifts dust from the grain without scratching. A white, lint-free microfiber cloth is for damp wiping and applying cleaner. Never use a colored rag, dye can transfer. Distilled water prevents mineral deposits from tap water from leaving white streaks as it dries. Finally, a pH-neutral leather cleaner like Lexol pH Leather Cleaner or Saphir Omni’Nettoyant is for targeted stain removal.
Why pH-neutral? Leather has a slightly acidic natural pH. Alkaline cleaners, like most household soaps, disrupt that balance. Over time, this makes the hide brittle. Think of it like washing your hair with laundry detergent, it gets clean, but the structure breaks down.
The one tool people overlook is a pure gum rubber eraser. For scuff marks on smooth, finished leather, a gentle rub with a slightly dampened eraser lifts the mark without introducing any liquid cleaner. It’s underrated because it feels too simple.
The Step-by-Step, Three-Part Process
This is the core of it. Follow these stages in order. Jumping to stage three because a spot looks dirty is how you over-clean and cause more harm.
Stage 1: Dry Removal
Unplug and move the chair to a well-lit, open area. Take your soft brush and gently sweep the entire surface, seat, back, arms. Go with the grain, not against it. Apply almost no pressure. You’re not scrubbing; you’re persuading dust to let go.
If you see crumbs or grit in crevices, use a soft brush attachment on a vacuum cleaner. Hold the nozzle slightly above the surface to avoid scratching. The goal here is to eliminate all dry, abrasive material before anything wet touches the leather.
Stage 2: Damp Wiping
Dampen a section of your microfiber cloth with distilled water. Wring it out until it’s just barely damp, it should feel cool to the back of your hand but leave no visible water behind. Wipe a small section of the chair, again following the grain.
You’ll see the cloth pick up light soil. The leather may darken slightly where it’s damp; this is normal and it will lighten as it dries. If this pass removes the dirt, you’re done. Dry the area immediately with the dry side of the cloth.
Where this goes sideways: Using a soaking wet cloth. The leather absorbs water, which swells the fibers. As it dries, it contracts, creating stress. Repeat this cycle enough times and the finish micro-cracks. You’ll see a network of fine lines within six months.
Stage 3: Targeted Cleaning (If Needed)
If a stain or grimy patch remains after the damp wipe, mix your cleaner. In a small bowl, add one cup of distilled water and a single drop of your pH-neutral leather cleaner. Stir. The solution should be mostly water.
Dampen a clean corner of your microfiber cloth in this solution, wring it thoroughly, and gently dab at the stain. Don’t rub. Work from the outside of the stain inward to prevent spreading. After a few passes, wipe the area with a cloth dampened with plain distilled water to remove any cleaner residue. Dry immediately.
| Leather Type | Dry Brush | Damp Wipe | Cleaner Use | Condition After? |
|---|---|---|---|---|
| Full Grain | Yes | Yes | Sparingly | Yes, always |
| Top Grain | Yes | Yes | As needed | Occasionally |
| Aniline | Yes | Very lightly | Rarely | Yes, lightly |
| Protected | Yes | Yes | No | No |
What to Use (And What to Avoid)
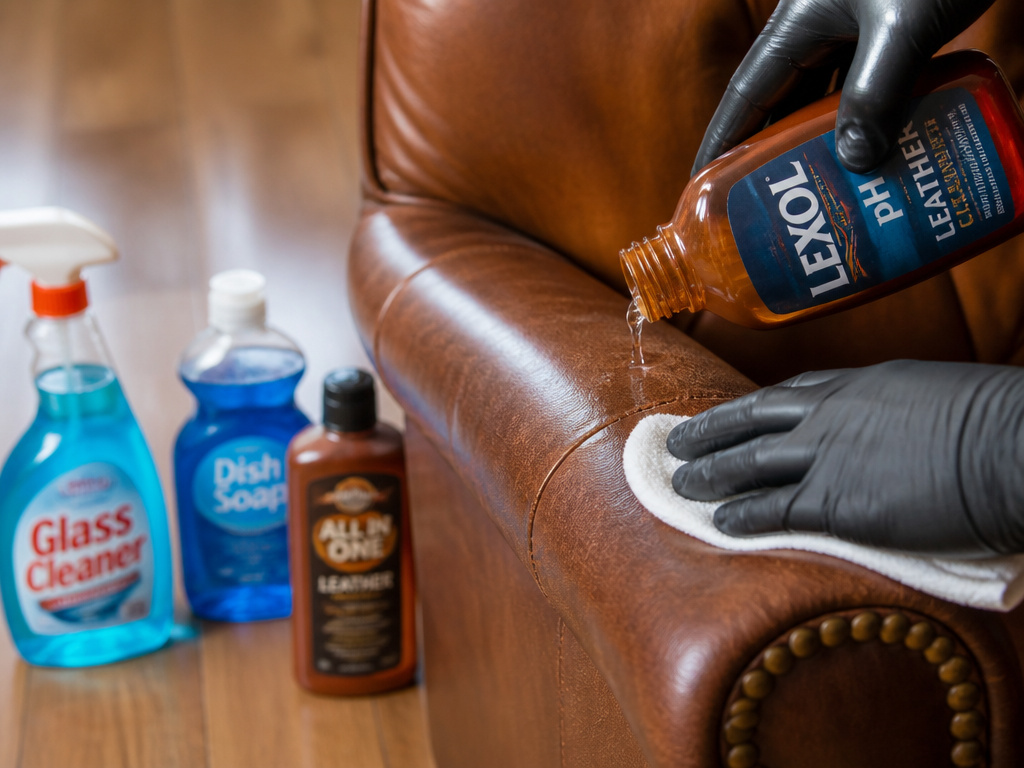 Your product shelf matters. Reaching for the wrong bottle does more than waste time, it can reset your chair’s clock.
Reach for these: Saphir Omni’Nettoyant for general cleaning on fine leathers. Lexol pH Leather Cleaner for a reliable, more accessible option. For a heavily used, rustic full-grain chair that can handle it, Fiebing’s Saddle Soap is appropriate, but that’s a narrow use case.
Avoid these: Household cleaners, dish soap, glass cleaner, vinegar, alcohol-based products, and “all-in-one” cleaner/conditioner combos. The combos are typically poor at both jobs; they leave a surface film that feels slick but doesn’t nourish the leather underneath.
Why the hate for all-in-ones? The cleaning agents and conditioning oils fight each other in the bottle. By the time you apply it, the cleaners have begun breaking down the oils. You deposit a weak cleaner and a compromised conditioner onto the leather, achieving neither a deep clean nor effective protection.
Let’s be clear about one thing. Using WD-40 to quiet a squeaky leather mechanism is a shortcut I see recommended online. It’s a petroleum distillate. It might quiet the squeak for a week, but it degrades any leather it contacts over time and becomes a magnet for dust and grit. The fix creates a worse, gummier problem.
Conditioning: The Non-Negotiable Follow-Up
