
Learn How to Start Leatherworking With Our Essential Tool Guide
This post contains affiliate links. As an Amazon Associate, we earn from qualifying purchases.
This post contains affiliate links. As an Amazon Associate, we earn from qualifying purchases.
To start leatherworking, you need a sharp cutting tool, a way to make stitching holes, a needle and thread, and a small piece of vegetable-tanned leather. Avoid buying a large, pre-made starter kit. Instead, purchase a utility knife, a set of stitching chisels in 3.85mm or 4mm spacing, and a spool of waxed thread. Your first project should be a simple key fob or card holder, not a wallet. Expect your first usable piece to take about 10 hours over a weekend.
Let’s be clear about one thing. Leatherworking focuses on understanding how three basic tools interact with one forgiving material, rather than on collecting fifty specialized stamps before making a single cut. Most of the frustration beginners face comes from a dull blade or an overcomplicated first pattern.
What follows is a straightforward guide. This guide lists the specific tools to purchase, the most instructive type of leather, and a foolproof first project. By the end, you’ll know how to cut, punch, stitch, and finish a piece you’ll actually use.
Key Takeaways
- A utility knife with replaceable blades is your most important tool; a dull blade tears leather and creates fuzzy edges that never burnish clean.
- Skip pricking irons for your first ten projects. Buy stitching chisels (3.85mm or 4mm spacing) to punch clean holes directly.
- Start with 4-5 ounce vegetable-tanned tooling leather. It’s forgiving, takes impressions well, and develops a patina with use.
- Your first project should be flat and small, like a key fob. A wallet involves folding and lining, which adds two layers of complexity you don’t need day one.
- Stitch tension consistency matters more than speed. Practice on scrap leather until your stitches look even on both sides of the work.
The Three-Tool Truth
Forget the $150 Amazon kit with forty pieces of plastic. I’ve watched beginners open those boxes, get overwhelmed, and never make a cut. The hobby doesn’t require a museum of gear. It requires three tools used well.
A sharp utility knife is essential. A dull blade doesn’t cut leather; it drags and tears the grain. That torn edge will stay fuzzy no matter how long you burnish it. You can use a standard replaceable-blade utility knife or invest in a round knife like an Olfa, but the principle is the same. The blade must glide through the material with minimal pressure. Change it often, some guides say every 30 minutes of active cutting. That sounds extreme until you feel the difference.
Common mistake: Using a craft knife until it pulls. A torn cut never recovers in finishing, it stays fuzzy under the burnisher.
Next, you need a way to make holes for stitching. This is where beginners get stuck between pricking irons and stitching chisels. A pricking iron only marks the leather; you then open each hole with a separate awl. A stitching chisel punches the complete hole in one strike. For your first ten projects, buy the chisel. Pricking irons require a separate, sharp awl and a skill for angling it consistently, a skill that takes longer to learn than stitching itself. A set of stitching chisels in 4mm spacing gives you a solid foundation for small goods.
Finally, you need a way to hold your work while you stitch. Your hands are not enough. A stitching pony, a simple clamp that holds the leather at a comfortable angle, is your third essential. It frees both hands to manage the needles and maintain tension. You can build a basic one from scrap wood or buy an inexpensive model. Without it, your stitches will be loose and uneven.
| Tool | Real Job | Budget Pick | Skip For Now |
|---|---|---|---|
| Cutting Tool | Slicing leather cleanly | Olfa utility knife | Swivel knife, rotary cutter |
| Hole Punch | Creating stitch holes | 4mm stitching chisel set | Pricking iron & awl set |
| Work Holder | Freeing both hands to stitch | Simple wooden stitching pony | Professional stitching horse |
The rest, mallets, edge bevelers, burnishing sticks, you can add as you need them. But these three are the foundation. Everything else is sold to beginners who don’t know what they actually need.
Your First Leather: Less Choice, Better Results
Walk into any leather supplier online and you’re met with a wall of options: chrome-tanned, vegetable-tanned, full-grain, top-grain, split, bridle, harness. It’s enough to make you close the browser. Here’s the practical takeaway. For learning, you want one thing: vegetable-tanned tooling leather in 4 to 5 ounce weight.
Why? Vegetable-tanned leather is firm and has a tight grain. It holds its shape when you cut it, and it responds predictably when you punch it or stamp it. It’s also unfinished, which means every mark you make, good or bad, is visible. That sounds punishing, but it’s the fastest teacher. You’ll see immediately if your cut is crooked or your hammer blow was off-center. Chrome-tanned leather is softer and often pre-finished; it’s more forgiving, which means it teaches you less.
The weight, measured in ounces, tells you the thickness. One ounce equals about 1/64 of an inch (0.4mm). A 4-5 ounce piece is 1.6-2mm thick, sturdy enough for a small case or card holder but still easy to pierce with your chisels. It’s the sweet spot for beginner projects. You can find this at suppliers like Springfield Leather Company or Weaver Leather Supply. Buy a small shoulder or a “craft side”, it’s affordable and you’ll have plenty to practice on and make mistakes with.
Your First Project Isn’t What You Think
You want to make a wallet. I get it. Everyone does. It’s also the best way to waste a nice piece of leather and end up with a floppy, misshapen mess. A wallet involves folding leather, creating interior pockets, lining up multiple layers, and stitching through sometimes four thicknesses. It’s a third-project skill, not a first.
Your real first project should be flat and single-layer. A key fob. A simple luggage tag. A bookmarks. These items teach you the core sequence without the complexity: 1. Transfer a pattern onto leather. 2. Cut it out cleanly. 3. Punch stitching holes along the edge. 4. Saddle-stitch it together. 5. Burnish the edges smooth.
I once saw a student who was struggling with basic stitching. They kept jumping into complex patterns. I had them stop, cut a dozen 2-inch squares from scrap, and just practice the saddle stitch. They focused on nothing but consistent hand pressure. A week later, their final project, a simple card holder, had stitches as neat as a seasoned crafter’s. It showed me that fundamentals, practiced in isolation, matter more than any fancy design.
The Colorado 4-H leathercraft project guide emphasizes starting with simple, achievable projects to build confidence and muscle memory, which is exactly why their programs are successful. That first finished item proves you can do it. The pride from carrying a key fob you made is the same pride you’d get from a wallet, but the frustration level is a tenth.
The Stitch That Builds the Foundation
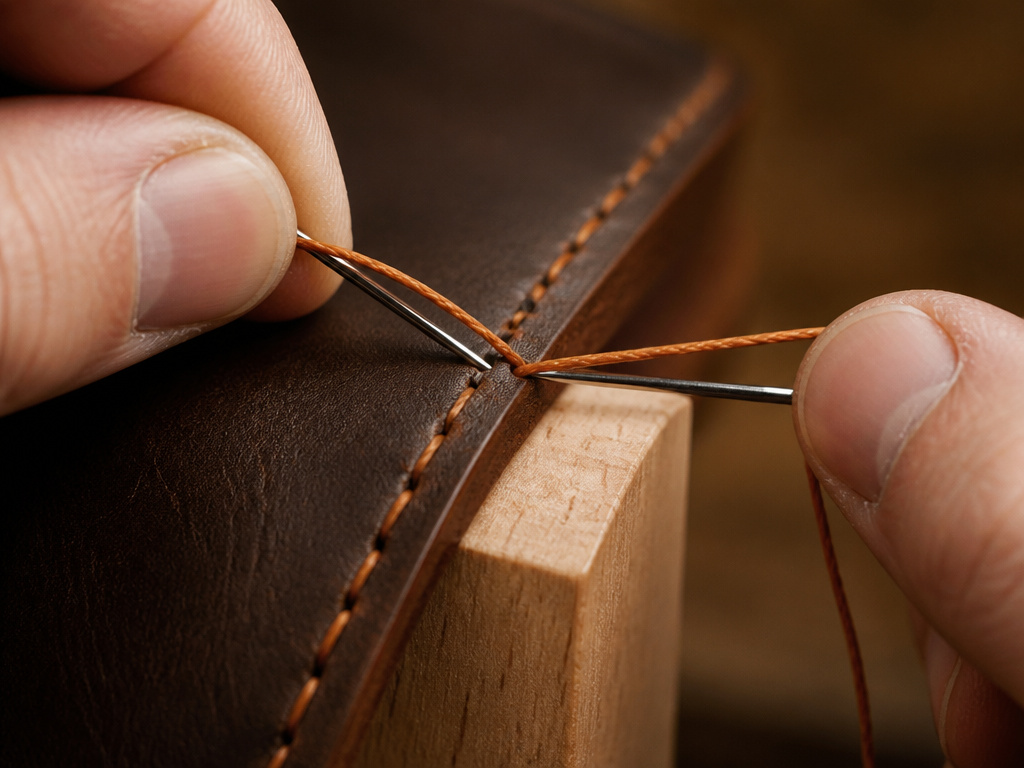 The saddle stitch is the backbone of traditional leatherwork. It’s done by hand with two needles, one on each end of a single piece of thread. It looks decorative, but its real advantage is strength. If one stitch wears through and breaks, the other lock on that hole holds, so the entire seam doesn’t unravel. A machine-sewn seam will zip open.
It’s also slow. That’s the point. The rhythm of the stitch, pierce, pull, cross, pull, forces you into a pace where you can check your work every few seconds. The sound of waxed thread pulling through leather is a quiet, satisfying zip. If you hear a squeak or feel a gritty drag, the thread is catching. That’s your cue to adjust your angle or check for a burr on your needle.
For thread, buy a spool of 0.6mm or 0.8mm waxed polyester or linen. Ritza Tiger thread is a popular, consistent choice. Don’t buy ten colors yet. Learn to manage tension with one spool. Consistent tension is the single most common beginner flaw, and it shows up as a wavy, drunken-looking seam line on the back of your work.
Here is the basic sequence, with the consequence of skipping each step: 1. Mark your stitch line. Use a wing divider or a ruler and an awl. Skipping this leads to wandering holes and a crooked seam. 2. Punch your holes. Hold the chisel vertical and strike firmly with a mallet. Angled punches create slanted holes that make the thread sit unevenly. 3. Thread two harness needles. Waxed thread usually doesn’t need it, but running it through beeswax once can smooth the pass. 4. Sew using the “leapfrog” method. One needle passes through a hole, then the other needle passes through the same hole from the opposite side. Pulling both needles at the same time creates friction that can break the thread. 5. Keep even tension. After each stitch, pull the threads with equal pressure away from the work. Uneven pulling creates loose loops on one side that collect dirt and wear out fast.
I won’t recommend the saddle stitch for speed. I recommend it because it’s honest. Every wobble in your line, every loose loop, is a record of your hand that day. You can’t hide from it, and that’s how you improve.
From Rough to Right: Finishing Your Work
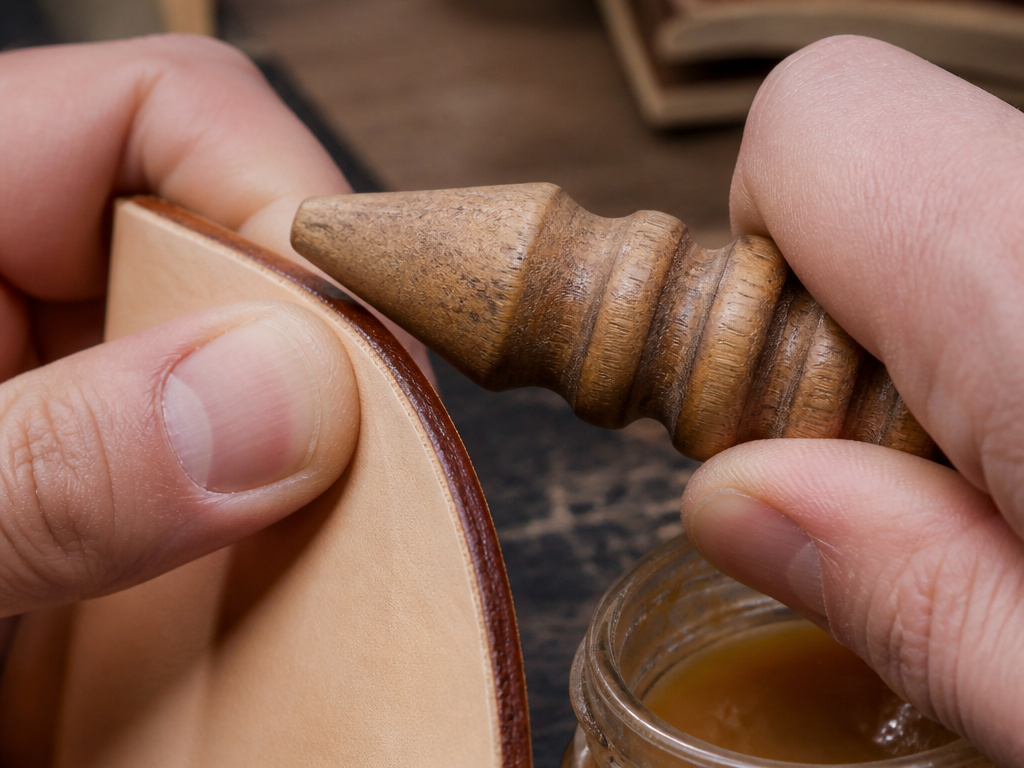 You’ve cut and stitched. You have a shape. Now it looks… Rough. The edges are layered and fuzzy, and the leather is pale and dry. Finishing is what turns your assembly into a finished object. It’s 80% prep and 20% product.
Edge burnishing is the first finish people notice. You can’t burnish a torn edge. So step one is cutting cleanly (back to that sharp blade). Step two is beveling. An edge beveler is a small tool that shaves off the sharp 90-degree corner of the leather, creating a rounded profile. This gives the burnishing process something to compress. If you skip beveling, you’re just rubbing a sharp edge, it won’t polish.
After beveling, you apply a burnishing agent, water, gum tragacanth, or tokonomole, and rub the edge vigorously with a wood slicker, canvas cloth, or even a smooth piece of hardwood. The friction heats up the fibers and the agent, melting them slightly and compressing them into a smooth, sealed edge. The sound changes as you work, from a rough, dragging noise to a smooth, almost silent glide. That’s when you know it’s done.
Conditioning the leather is the final touch. A piece of unfinished veg-tan is like a dry sponge. It will soak up oils and conditioners and darken beautifully. Use a product like Tandy Leather Eco-Flo neat’s-foot oil blend. Apply a thin coat, let it soak in overnight, and buff off the excess. The leather will feel warmer and more supple. Building up layers of conditioner is like making a roux, you need patience between applications. Too much too fast, and the leather turns gummy and dark.
How Long Until You’re Any Good?
Most self-taught crafters produce a professional-looking piece after 30 to 50 hours of focused practice. That’s roughly 8 to 12 completed projects. Your first project, a simple key fob, might take you 10 hours over a weekend. Your tenth project, a simple bifold wallet, might take you 6 hours.
The skill that takes the longest to develop is consistent stitch tension. Getting stitches that look identical on the front and back of a piece is the mark of a settled hand. Speed comes last. The impulse to rush is what creates most of the errors beginners have to go back and fix.
The timeline serves as a map. Knowing the first weekend is for a key fob and aiming for a wallet by month two makes the path feel clear.The Boy Scouts leatherwork merit badge pamphlet structures learning this way, with clear, incremental projects leading to a final review of skills, a method that works for adults just as well as scouts.
What to Buy First: A No-Fluff Shopping List
Let me share what I’ve learned about initial spending. This is based on years of watching beginners, including myself, waste money.
- Leather: A 4-5 oz vegetable-tanned tooling leather side or shoulder (approx. 3-5 sq ft). Brands: Hermann Oak, Wickett & Craig.
- Cutting: Olfa utility knife (or similar) with a pack of 100 replacement blades.
- Cutting Surface: Self-healing cutting mat (A3 size minimum).
- Holes: A set of stitching chisels (2, 4, 6 prong) in 3.85mm or 4mm spacing.
- Stitching: A spool of 0.8mm Ritza Tiger thread in natural or brown, and two harness needles.
- Holding: A basic stitching pony.
- Finishing: A #2 edge beveler, a wooden burnishing stick, and a small bottle of gum tragacanth.
Notice what’s not on the list: a swivel knife, stamping tools, edge creasers, pricking irons, a sewing machine, or a giant kit containing all of the above. You add those when a specific project demands it, not before.
Where this goes sideways: Buying a starter kit because it seems like a deal. You’ll replace 80% of the tools within six months. The cheap chisels will bend, the knife will be dull, and the thread will fray. Invest in the seven items above individually.
Frequently Asked Questions
What’s the best leatherworking starter kit?
Honestly, there isn’t one. Pre-assembled kits are filled with low-quality tools you’ll discard. The best “kit” is the custom list in the section above. Buy those seven items from reputable leatherworking suppliers like Springfield Leather or Weaver Leather. It costs about the same as a large kit, but every piece will be useful.
Can I use my regular sewing machine?
No, not on 4-5 oz leather. Home sewing machines are designed for fabric. They will skip stitches, break needles, and potentially burn out the motor. Hand-stitching with a saddle stitch is the correct, strong, and quiet method for beginner projects. Save machine-sewing for leather under 2 oz in weight.
How do I transfer a pattern onto leather?
Print your paper pattern, cut it out, and hold it firmly on the leather. Use a stylus or a dull pencil to trace around it, pressing firmly enough to leave a light indentation in the leather. This indentation is your cut line. Avoid ballpoint pens or sharp pencils that can cut or permanently mark the surface.
Why is my thread always tangling?
You’re probably pulling too much slack through the hole. In saddle stitching, you only need a few inches of thread pulled through before you pull it taut. Also, ensure your needles are facing the correct direction as they pass each other in the “leapfrog” move. Practice with shorter lengths of thread (about an arm’s length) until the motion feels natural.
Is leatherworking expensive?
The startup cost is comparable to many hobbies, around $80-$120 for tools and your first leather. The ongoing cost depends on your projects. Small items like key fobs use very little material, so leather goes a long way. The real expense is time, not money. This is a slow craft.
How do I know if my blade is sharp enough?
The test is in the cut, not the look. A sharp blade will slice through the leather with minimal downward pressure, leaving a clean, almost polished-looking edge. A dull blade requires you to push down hard, and it will leave a rough, fibrous edge that looks frayed. If you have to force it, change the blade.
Before You Go
One rule most guides skip: if you haven’t made a cut in your first week, you bought too much. The goal is to complete one small, flat object, not to stock a workshop. The confidence from that is your real first tool.
So, buy the three core tools, a knife, chisels, a pony, and a square foot of leather. Trace a key fob pattern from a simple leather project tutorial online. Cut it, punch it, stitch it, burnish it. The first one will be awkward. The second will be better. By the third, your hands will start to remember the motions without you telling them. That’s the moment you’re no longer just following instructions. You’re working the leather.
