
How to Use a Leather Strop Correctly | A Step-by-Step Guide
This post contains affiliate links. As an Amazon Associate, we earn from qualifying purchases.
To use a leather strop, draw your knife across it with the spine leading and the sharpened side trailing, holding a consistent 15–20 degree angle with only the blade’s weight for pressure. This refines a sharp edge by removing microscopic burrs. Never push the edge into the strop, and never strop a folding knife without a secure locking mechanism.**
It’s the final step that turns a sharp edge into a polished, resilient one. A strop doesn’t sharpen a dull blade; it perfects a sharp one by aligning the microscopic teeth at the very apex.
What follows is a breakdown of the motion, the tools, and the one safety rule that isn’t optional. We’ll cover how to choose a compound, why direction matters more than you think, and how to keep your strop working for years.
Key Takeaways
- Always strop with the edge trailing (spine first). Pushing the edge into the leather cuts it and ruins the edge.
- Use extremely light pressure, the blade’s own weight is often enough. More pressure rounds the edge.
- Never strop a non-locking folding knife. The risk of the blade closing on your fingers is real and severe.
- A thin, even layer of dry compound (like chromium oxide) is better than a thick, greasy one.
- Store your strop flat, dry, and indoors. Damp conditions invite mold; extreme dryness cracks the leather.
What a Strop Actually Does (And Doesn’t Do)
A strop is a finisher, not a grinder. When you sharpen on a stone, you grind metal to create a new edge, leaving behind a microscopic, ragged burr. Think of it like sawing a piece of wood, the cut is made, but the edge is fuzzy with splinters.
The strop’s job is to polish away that fuzz. The leather, often charged with a fine abrasive compound, straightens and aligns those tiny metal splinters into a smooth, coherent line. The result isn’t just sharper; it’s stronger. A polished apex is less prone to rolling or micro-chipping when it meets resistance.
A leather strop refines a sharp edge by removing the microscopic burr left from sharpening stones. It polishes the apex, resulting in a keener, more durable edge that cuts cleaner and lasts longer between full sharpenings.
This is why you can’t strop a dull knife back to life. If the foundational edge geometry isn’t there, no amount of polishing will create it. The strop is the last 5% of the job, but it’s the 5% that makes all the difference in feel and performance.
The Single Motion That Cuts Your Strop (And How to Avoid It)
The most critical rule is also the easiest to break with muscle memory. You must strop with the edge trailing.
Here’s the thing. When you sharpen on a stone, you push the edge into the abrasive. The stone is hard enough to withstand it. Leather is not. If you use that same pushing motion on a strop, the edge will dig in and slice the leather. You’ll hear a soft, scratchy tear, that’s the sound of ruining your strop and potentially rolling your freshly sharpened edge.
The correct motion is a smooth, controlled draw where the spine of the knife leads and the sharp edge follows. You’re essentially dragging the edge backwards over the leather. This shears off the burr without biting in.
| Motion | Direction | Result on Leather | Result on Edge |
|---|---|---|---|
| Edge Leading (WRONG) | Pushing cutting edge forward | Cuts and gouges the surface | Can fold or roll the apex |
| Edge Trailing (RIGHT) | Pulling with spine forward | Polishes and wears evenly | Removes burr, polishes apex |
Angle and pressure are the next two pillars. Maintain the same angle you used for sharpening, typically 15–20 degrees per side. A consistent angle ensures you’re polishing the very tip of the edge. Lifting the spine too high misses the apex entirely; lowering it grinds the shoulder.
Pressure should be almost non-existent. Let the knife’s own weight provide the contact. I’ve seen people bear down, thinking more force equals faster results. It doesn’t. Heavy pressure flexes the leather, rounds over the edge’s apex, and turns your polished cutting line into a soft, blunt curve. You’ll lose that crisp, aggressive bite. Five to ten light passes per side are almost always sufficient.
A Critical Safety Warning: The Knives You Should Never Strop
This is the part most YouTube tutorials breeze past, and it’s a disservice.
Where this goes sideways: Stropping a folding knife without a secure locking mechanism. The backward drawing motion can disengage a non-locking liner or slip joint, causing the blade to snap shut on your fingers. This is a documented, severe laceration risk.
The warning from makers like Boone’s Lick Road Leather Co. Is unambiguous: “DON’T USE WITH FOLDING KNIVES.” Their point is about physics, not opinion. The stropping motion applies force in a direction that can overcome a folder’s tension. Even a locking mechanism can fail under the wrong torque.
The safest practice is to reserve your strop for fixed blade knives. If you must strop a locking folder, use a bench strop mounted firmly to a table, so the strop, not your hand, absorbs any potential closing force. Never hold a flexible hanging strop in one hand and a folding knife in the other. That’s asking for a trip to the emergency room for a tendon repair.
Choosing and Applying Your Compound

A bare leather strop works, but compound supercharges the process. It’s a fine abrasive suspended in a waxy binder. The most common types are green chromium oxide (medium-fine) and white aluminium oxide (fine).
You want a dry compound with a chalk-like consistency. Avoid the greasy, paste-like compounds meant for buffing wheels; they clog leather pores and become gummy. When shopping, the word “dry” on the label is your friend.
Application is straightforward, but there’s a debate here. Some manufacturers, like Lee Valley Tools, advise applying new compound over the old, claiming the buildup improves the honing action. Others, like Outback Edge and MISAKI, recommend a thin, even layer and only reapplying when the effect diminishes.
I side with the thin-layer camp. Here’s why: a thick, caked-on layer of compound can act as a cushion, preventing the leather from providing the firm support the edge needs for a clean polish. It’s like trying to write on a pad of ten sheets of paper versus one.
- Clean the leather (if new or dirty) with a dab of isopropyl alcohol on a cloth. Let it dry.
- Rub the compound onto the leather like a giant crayon. Use light, quick strokes to lay down a faint coating.
- Work it in. Some people gently warm the leather to help the compound melt into the surface. You can also just use the friction of rubbing it in with a fingertip wrapped in cloth. The goal is a thin, even, slightly dusty-looking layer.
- Let it dry for a minute before first use.
For grit, beginners should look for compounds in the 3,000 to 12,000 grit range. After that, woodworkers and enthusiasts often step down to incredibly fine 0.5-micron (about 50,000 grit) diamond pastes for a mirror polish.
Step-by-Step: Stropping a Knife the Right Way
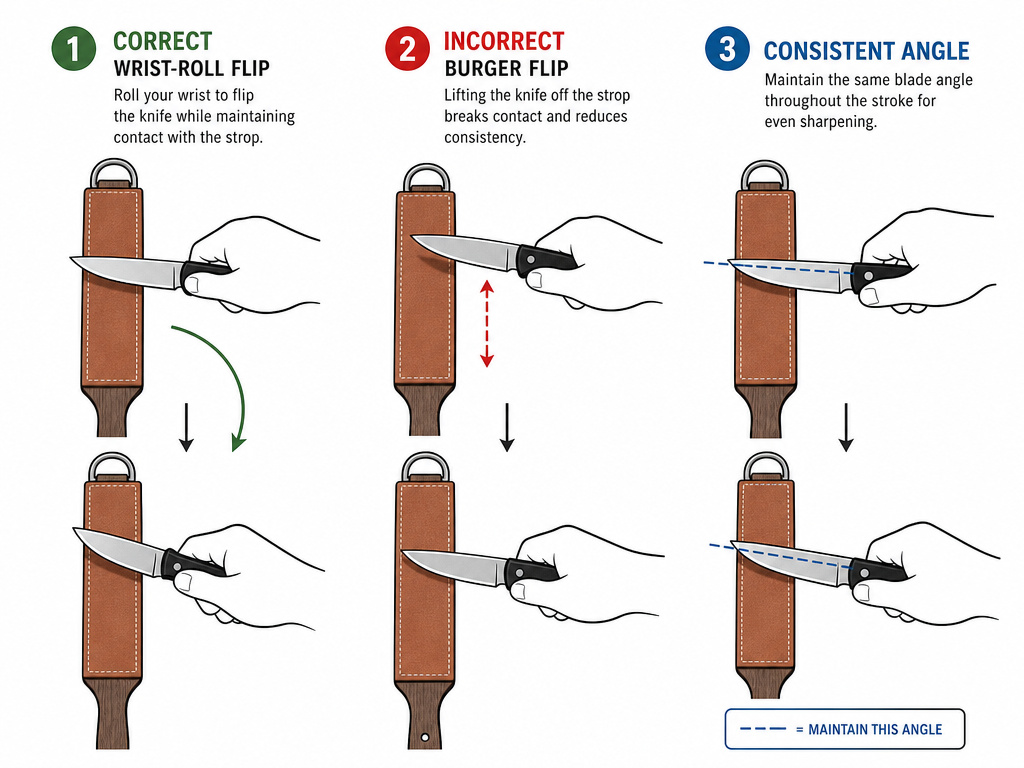
Gather a charged strop and your sharpened, fixed-blade knife. Do this at a sturdy table with good light.
- Secure the Strop. If it’s a bench strop, it’s ready. If it’s a hanging strop, attach the hook to a solid anchor point and pull it taut. You want a stable, flat surface.
- Establish Your Angle. Place the knife’s spine on the far end of the strop. Lift the spine until the bevel sits flat. That’s your 15–20 degree angle. Lock your wrists to hold it.
- Draw the Knife. In one smooth motion, pull the knife toward you, maintaining angle and light pressure. Lead with the spine, follow with the edge. Cover the strop’s full length.
- Flip and Repeat. Without changing your grip, roll your wrist to present the other side of the edge to the strop. Draw it back again. This is the “return stroke” you’ll see in diagrams.
- Cycle and Check. Do 5-10 passes per side. To test, try slicing a piece of printer paper. It should fall through with no tearing or resistance. A stiffer material like cardstock or the edge of a plastic bag is a better, more demanding test.
Common mistake: Flipping the knife over like you’re flipping a burger. This changes your hand position and almost guarantees an inconsistent angle. The wrist-roll method keeps your reference point the same.
Strop Maintenance and Storage
Leather is a skin. It needs care. After use, you’ll see a blackish-grey residue on the strop, that’s fine metal particles mixed with compound. Wipe it off periodically with a dry cloth to prevent a glazed, ineffective surface.
Storage is simple but important. Never leave your strop in a damp garage or shed. Leather plus organic compound in a humid environment is a mold incubator. You’ll see fuzzy white or green spots, and that strop is done for. Conversely, extremely dry, hot conditions can desiccate and crack the leather.
Store the strop flat in a climate-controlled room. Laying it on a shelf or in a drawer is fine. Don’t roll it tightly or leave it under heavy objects that could deform it.
If the leather surface becomes concave from years of use, you can sand it flat. Lay a sheet of 320-grit sandpaper on a known-flat surface (glass, granite counter) and sand the strop in a circular motion until it’s even again. Reapply compound afterward.
Frequently Asked Questions
Can you use a strop without compound?
Yes, but it will be less effective. Bare leather will still align the edge and provide a light polish, but a compound-loaded strop removes the burr faster and polishes to a higher keenness. For maintaining an already-sharp edge, bare leather works. For refining a fresh sharpening, use compound.
How often should I strop my knife?
It depends on use. For a kitchen knife used daily, a few strokes on the strop once a week can maintain that hair-popping edge. For a pocket knife, you might strop it every couple of weeks or whenever it starts to feel like it’s tugging instead of slicing. It’s a maintenance step, not a daily routine.
What’s the difference between a leather strop and a fabric strop?
Leather is firm and provides solid support, ideal for final burr removal and polishing. Fabric strops (canvas, denim) are softer. They can give an even finer polish but can also round the edge if you’re not careful because they “give” more. For most people, leather is the more reliable and forgiving choice.
My strop is black and shiny. Is it worn out?
Not necessarily. A black, shiny surface is a sign of use, metal particles and compound have burnished the leather. It may still be effective. The test is performance. If your knife doesn’t seem to get any sharper after stropping, the surface may be glazed. Try cleaning it with isopropyl alcohol or sanding it lightly to refresh the surface, then reapply compound.
Can a strop fix a chipped blade?
No. A strop cannot remove metal to reshape an edge. A chip, roll, or completely dull edge requires going back to sharpening stones to re-establish the bevel. The strop is the final step after that work is done.
Before You Go
Stropping is a simple skill with a dramatic payoff. It’s the difference between a knife that’s sharp and one that feels effortlessly sharp. Remember the core triad: edge-trailing motion, feather-light pressure, and a consistent angle. Get those right, and the rest is detail.
One rule I enforce in my own shop: if a folding knife doesn’t have a lock I absolutely trust, it doesn’t touch the strop. The convenience isn’t worth the risk. Stick with fixed blades for practice until the motion is muscle memory.
Finally, don’t overthink the compound. A basic green chromium oxide block from a brand like Norton or DMT will serve 95% of users for years. The tool is simple, but the attention you give to the technique is what delivers the result. Now go put a scary-sharp edge on something.
