
How to Waterproof a Leather Jacket: Silicone vs. Wax Guide
This post contains affiliate links. As an Amazon Associate, we earn from qualifying purchases.
This post contains affiliate links. As an Amazon Associate, we earn from qualifying purchases.
To waterproof a leather jacket, match the product to the leather type and the weather you face: a wax-based conditioner for light rain and shine, a dedicated spray for suede and nubuck, or a high-performance silicone formula like Nikwax for harsh, wet conditions. Always clean and condition the leather first, apply the protector in thin, even coats, and let it cure for a full 24 hours in a dry, well-ventilated space.
The goal is to manage moisture so the leather doesn’t stiffen, crack, or lose its natural oils, rather than making a fashion jacket into a diving suit. A jacket left unprotected in a downpour absorbs water through its collagen fibers; as it dries, those fibers shrink and harden.You get a rough texture, permanent water rings, and a lifespan cut by years.
Use a protector with a fluoropolymer-based DWR finish
Key Takeaways
- Condition before you protect. Dry, thirsty leather absorbs water faster. A conditioner like Otter Wax Leather Oil replenishes the base oils a waterproofing product needs to bond to.
- Match the product to the problem. Urban drizzle? Use a wax. Motorcycle commuting in the rain? Reach for a silicone spray like Nikwax. Suede or nubuck? Only a dedicated spray made for those materials.
- The seams and stitch lines leak first. Always give a second, careful pass over all stitching—this is where water finds a way in.
- Curing is not optional. Rushing the dry time is the single most common reason a treatment fails. Leave the jacket untouched for a full 24 hours in a dry, warm room.
- Reapply every three to six months for daily wear. In wet or snowy climates, that interval drops to every two to three months.
The One Rule Most People Get Wrong
Let me share what I’ve learned the hard way. Waterproofing is about choosing the right chemistry for the job, not about slathering on the thickest, heaviest product you can find.
I once believed a heavy beeswax paste was the ultimate solution for everything. On a pair of rugged boots, it was great. On a sleek motorcycle jacket, it was a disaster. The wax clogged the pores, the jacket stopped breathing, and condensation soaked the lining on every cool ride. The leather felt stiff and lifeless.
Common mistake: Using a wax-based waterproofing product on a jacket you’ll wear near a heat source, like by a fireplace or campfire. The wax softens, absorbs unevenly, and leaves the leather blotchy and less protected where it thinned out.
The leather will tell you what it needs. A fashion blazer worn in the city needs a light, breathable shield from occasional rain. A work jacket facing sleet and mud needs a heavier-duty, silicone-based barrier. Getting this wrong doesn’t just waste product—it can ruin the hand-feel and breathability of your jacket for good.
Step-by-Step: The 7-Step Process
Forget the quick-spray-and-go method. Proper application is a low-speed, high-focus operation. Miss one step, and the protection fails at the first real test.
- Clean the jacket thoroughly. Any dirt or oil on the surface blocks the waterproofing agent from bonding to the leather. Use a dedicated leather cleaner or a damp cloth with a drop of mild soap. Let it dry completely.
- Condition the leather (if needed). Is the leather dry or stiff? Apply a thin coat of conditioner—Otter Wax Leather Oil works for most types—and let it soak in for an hour. This replaces lost oils and creates a better surface for the waterproofing layer.
- Choose your application space. You need a dry, moderately warm (room temperature), well-ventilated area. A garage in high humidity or a cold basement will ruin the cure. Hang the jacket on a sturdy hanger.
- Apply the first thin coat. Shake the product well. Hold the can or bottle 6-8 inches from the surface and use slow, sweeping motions. Overlap your passes slightly. Focus on high-wear areas first: shoulders, elbows, cuffs.
- Hit the seams and stitching. This is the step everyone skips. Go back and carefully spray or rub a second light coat along every seam and stitch line. This is where water ingress almost always starts.
- Let the first coat dry. This usually takes one to two hours. Do not touch it, move it near heat, or assume it’s done when it looks dry.
- Apply a second coat. One coat is never enough for reliable protection. Repeat the same even, sweeping application. Then walk away.
After 2 minutes remove excess and rub in well with a cloth.
Nikwax Leather Restorer product instructions
The part nobody mentions: After the second coat, you must leave the jacket completely undisturbed for 24 hours. This is the curing time. Disturbing it to wear it early breaks the chemical bond, and the protection washes away in the first light rain. Find a closet or spare room, shut the door, and let it sit.
The Water Bead Test (How to Know It’s Time)
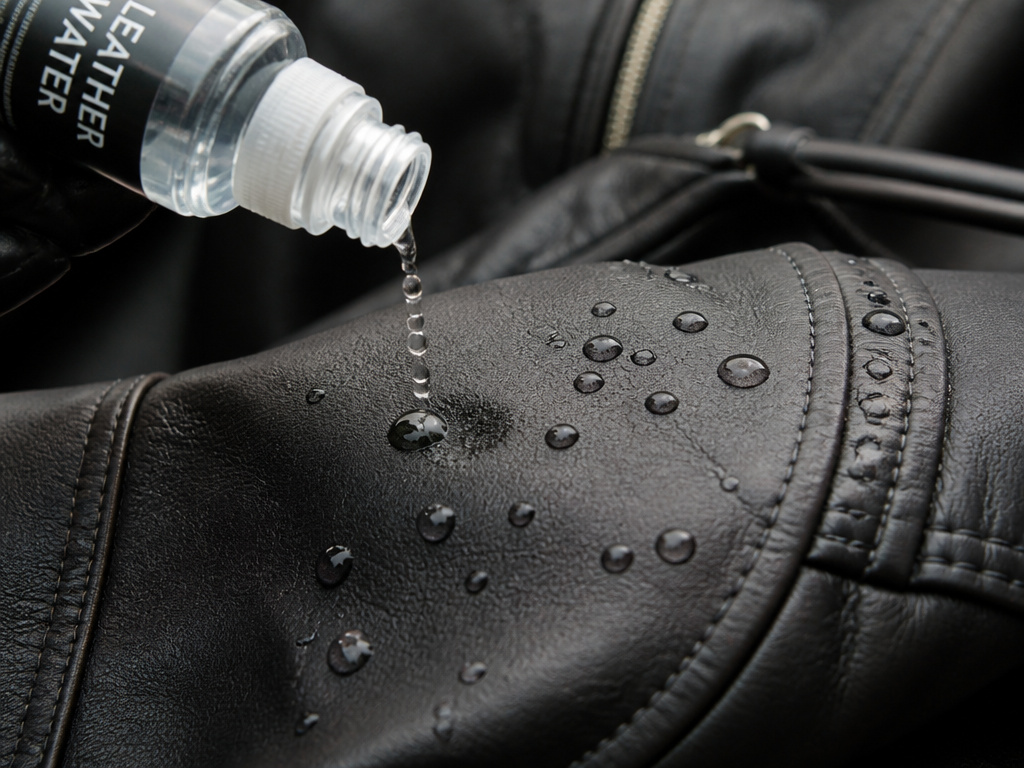 You don’t need to guess or mark a calendar. The jacket itself will show you when the protective layer has worn off.
Here’s a straightforward guide. An hour after a fresh treatment, sprinkle a few drops of water onto the sleeve or back panel. The water should form tight, round beads that roll off with a slight tilt.
A week later, do the same test. The beads might be slightly flatter. A month later, they might spread a little before soaking in.
The moment the water stops beading and instead darkens the leather on contact, soaking in within 10 seconds, it’s time. Not “soon.” Not “maybe next week.” Now. That dark spot is water penetrating the leather fibers, and every minute it’s there, it’s degrading the tannins and lubricants inside.
This simple test beats any schedule. Your leather jacket care routine should include it monthly if you wear the jacket often.
Silicone vs. Wax: The Trade-Off That Decides Everything
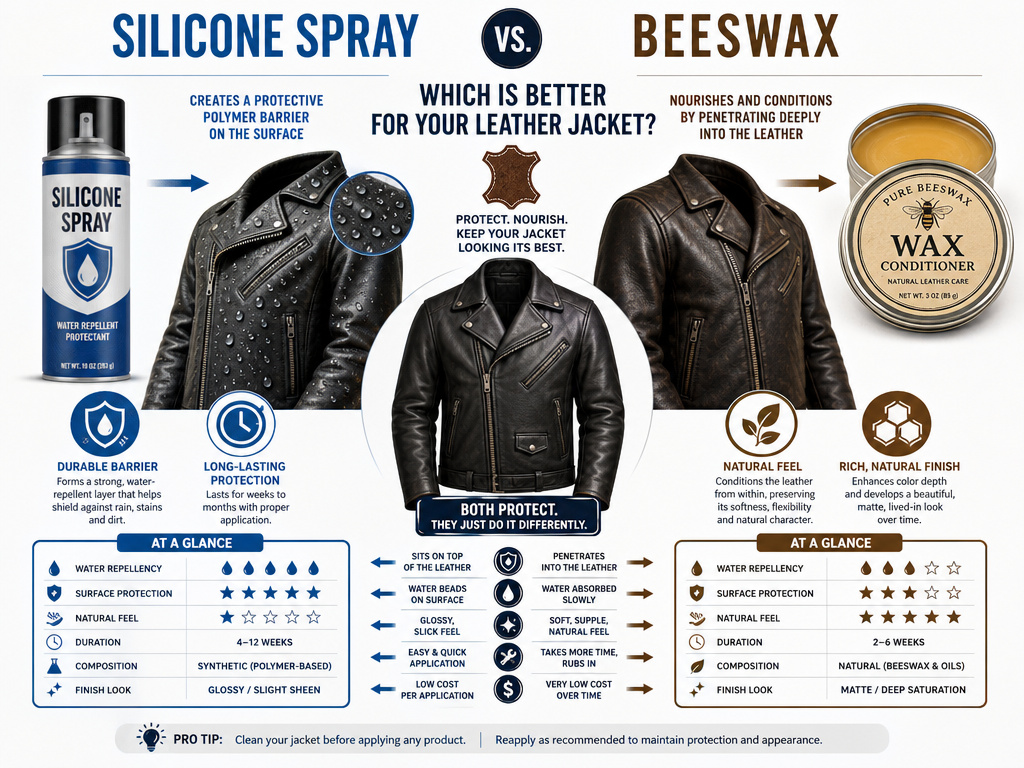 This is the core choice. It dictates how dry you stay, how the jacket feels, how it breathes, and how it ages.
| Product Type | Best For | How It Works | The Compromise |
|---|---|---|---|
| Silicone-Based Sprays (Nikwax) | Harsh conditions, motorcycling, hiking. Full-grain leather. | Forms a durable, flexible polymer layer on top of the leather that repels water. | Can slightly alter the leather’s natural feel. Less breathable than wax. |
| Wax-Based Conditioners (Otter Wax, Sno-Seal) | Light rain, urban wear, maintaining a sheen. Smooth, finished leathers. | Soaks into the leather, filling pores and coating fibers from within. | Can soften leather over time. May darken color. Less durable in heavy rain. |
| Specialty Sprays for Suede/Nubuck | Suede, nubuck, and rough-out leathers only. | Uses fluoropolymers to coat the delicate nap without matting it down. | Only works on the intended materials. Useless on smooth leather. |
For true waterproofing in harsh conditions, a silicone-based product is more effective and longer-lasting. The polymer layer is harder for water to penetrate. Wax, while natural and beautiful, can be washed out by persistent, heavy rain. Think of it like seasoning a cast-iron skillet versus Teflon coating it. One builds a protective layer, the other applies a barrier.
If you’re looking for the best balance for general waterproof leather boots or a jacket, I reach for Nikwax. It’s the workhorse.
Urban Jacket vs. Workhorse: Tailoring the Protection
Your commuting blazer and your ranch jacket have different enemies. Protect them accordingly.
The Urban/ Fashion Jacket
Threat: Occasional drizzle, spilled drinks, humidity. Goal: Stain resistance and light water repellency without changing the drape or feel. Product: A light wax-based conditioner or a gentle, breathable waterproofing spray. Frequency: Once or twice a year, or when it fails the water bead test.
The bottom line: Making a fashion jacket ‘waterproof’ with a heavy spray compromises breathability and hand-feel for protection rarely needed. A light conditioning treatment is often sufficient.
The Workhorse / Motorcycle Jacket
Threat: Prolonged rain, road spray, sleet, mud. Goal: Keep the rider dry and prevent the leather from waterlogging, which adds weight and reduces impact protection. Product: A high-performance silicone spray like Nikwax Leather Restorer. Frequency: Every two to three months during the riding season, or before any long trip.
Note: Always check the manufacturer’s care label first. Some modern performance jackets with Gore-Tex or similar liners have specific product requirements.
The process for waterproof work boots is more intensive, but the principle is identical: match the armor to the attack.
Drying and Storage: Where the Protection Actually Sets
The work isn’t done when you put the spray can down. How you dry and store the jacket determines whether the treatment lasts three weeks or three months.
Drying Rules
- Never use direct heat. No hairdryers, radiators, or sunlight. Heat cracks leather and causes the waterproofing agent to cure unevenly.
- Air dry at room temperature. Hang the jacket in a dry, well-ventilated room. A fan on low in the room is okay, but not pointed directly at the jacket.
- Wait the full 24 hours. Yes, the entire day. The cure needs time for the chemicals to cross-link and bond firmly to the leather.
Storage Rules
- Never store damp. After wearing the jacket in the rain, hang it up to air dry completely before putting it in a closet. Trapped moisture breeds mildew.
- Use a breathable garment bag. A cotton bag allows air circulation. Plastic bags trap humidity and promote mold.
- Hang on a wide, padded hanger. This maintains the jacket’s shape and prevents creases where the waterproofing layer can stress and crack.
Belstaff’s product care guide insists on 24 hours of drying in a ventilated area, far from direct heat, before storage. They’re right. This isn’t just about drying; it’s about letting the treatment fully set. A proper clean a leather jacket routine before storage is your first defense against long-term damage.
Frequently Asked Questions
Can I use Scotchgard or a generic waterproofing spray?
Look for a jacket made from full-grain leather These are often formulated for fabrics or synthetics. On leather, they can sit on the surface as a sticky film, fail to bond properly, or contain solvents that dry out the leather. Use a product designed specifically for leather.
Will waterproofing change the color of my leather jacket?
It can. Wax-based products (like Otter Wax) typically darken leather permanently and add a rich patina. Silicone sprays (like Nikwax) may cause a slight darkening when wet, but usually return to near-original color when dry. Always test on an inconspicuous area first, like the inside of a belt loop or under the collar.
How often should I re-waterproof my leather jacket?
For a jacket worn regularly in varied weather, plan on reapplying every three to six months. If you’re in a consistently wet or snowy climate, or if you ride a motorcycle daily, cut that to every two to three months. Let the water bead test be your final guide.
Can I waterproof a suede or nubuck leather jacket?
Yes, but you must use a product specifically made for suede and nubuck, like Nikwax Nubuck and Suede Proof. Standard sprays for smooth leather will mat down the nap and ruin the texture. The application is the same: clean, spray evenly, let cure.
The Bottom Line
Waterproofing a leather jacket is a maintenance loop. You clean it, you condition it if it’s dry, you apply the right protector, and you let it cure properly.Then you watch for the beads.
The single biggest payoff isn’t staying dry—it’s preserving the leather itself. Water is the enemy of collagen fibers and tanning agents. A well-protected jacket develops a rich, personal patina over decades. A neglected one stiffens, cracks, and becomes a relic in a few years.
Start with the test. Find a hidden spot, drip some water, and see what it does. If it soaks in, your first step is a deep leather jacket cleaning, not a new can of spray. Build the foundation, then add the roof.
For one straightforward answer: if your jacket faces real weather, get a bottle of Nikwax Leather Restorer. Follow the seven steps, pay extra attention to the seams, and then give it the full day to cure. That routine has kept more leather in service than any miracle product or shortcut ever will.
