
How to Stop Leather Shoes From Squeaking: The Ultimate Guide
This post contains affiliate links. As an Amazon Associate, we earn from qualifying purchases.
This post contains affiliate links. As an Amazon Associate, we earn from qualifying purchases.
To stop leather shoes from squeaking, you must match the fix to the exact cause: trapped moisture, internal friction, or dried-out leather. For moisture, remove the insoles, stuff with newspaper, and dry for 12 hours in a ventilated area. For friction, apply talcum powder between the insole and footbed. For dry leather, use a dedicated leather conditioner, never heat or generic oils.
The 12-hour dry time isn’t a suggestion. It’s the minimum for moisture to wick out of leather and its lining without damaging the fibers. Rush it with a heater, and you trade a squeak for cracks.
What follows is a mechanic’s approach. We’ll walk through how to listen for the squeak’s origin, apply the right fix without damaging the leather, and spot the one case, a brand-new boot squeaking from within, that means you should return them, not repair them.
Key Takeaways
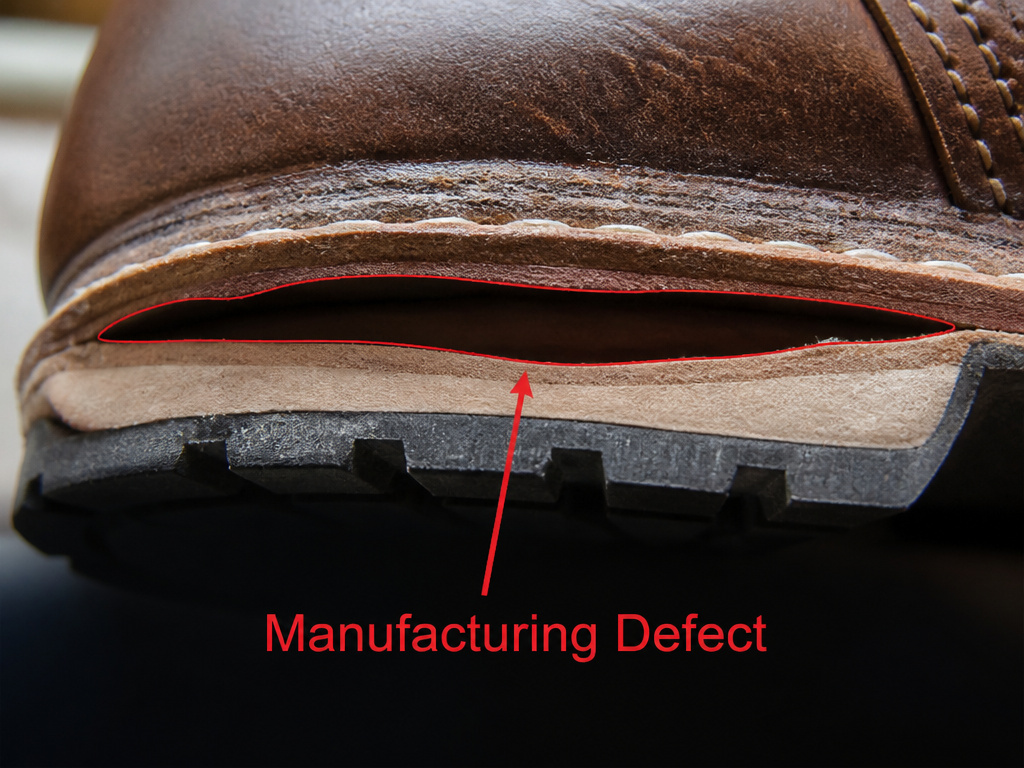
- A squeak from inside a brand-new leather boot is often a manufacturing defect (poor glue bond), not a break-in issue. Return or seek a cobbler under warranty.
- Never use direct heat (hair dryers, radiators) to dry squeaky leather shoes. It dries out the natural oils, leading to permanent stiffness and cracking.
- The right fix depends entirely on location: powder for internal friction, conditioner for dry uppers, sandpaper for slick outsoles.
- Lexol Leather Conditioner or Bickmore Bick 4 are safe, effective choices for conditioning dry leather without darkening it.
- If your shoes squeak only on smooth floors, lightly scuff the outsole with 60-120 grit sandpaper to change the texture.
The 3-Step Squeak Diagnosis: Listen, Locate, Label
The first and most critical step is diagnosis. Misdiagnosis leads to the wrong fix, which can permanently damage the leather. Listen as you walk on different surfaces, then press and flex the shoe with your hands to isolate the noise.
You can’t fix what you haven’t found. Before you reach for any product, take five minutes to play detective. Put the shoes on and walk across different surfaces, carpet, tile, hardwood. Does the squeak happen everywhere, or only on smooth floors? Next, take them off.
Flex the shoe firmly in your hands, bending it at the ball. Press your thumb into the tongue area and around the eyestays where the laces rub. Listen closely. The goal is to label the squeak into one of three categories:
- The Internal Squeak: The sound seems to come from inside the shoe, between your foot and the sole. It often feels like a subtle pop or creak with each step.
- The External Squeak: The noise is clearly between the outsole and the ground, a high-pitched scrape on tile or polished concrete.
- The Material Squeak: The sound comes from the upper, specifically from the tongue, the lace holes, or the seams where two pieces of leather overlap.
This isn’t just busywork. An internal squeak fixed with conditioner on the outside does nothing. An external squeak attacked with baby powder makes a mess. Get the label right first.
The Inside Job: Fixing Internal Friction
This is the most common fix for a shoe that’s been worn a while. The sound is a creaking or popping from underfoot with each step. Here’s the cause: the insole is rubbing against the glued-down footbed or midsole underneath it. Moisture or just wear can degrade the thin layer of adhesive or fabric between them, creating a tiny, noisy pocket.
The fix is a dry lubricant.
- Remove the insole if possible. Most quality leather shoes have a removable footbed.
- Lightly sprinkle talcum powder or cornstarch over the entire bottom of the insole and into the shoe’s interior bed.
- Reinsert the insole and press down firmly. Walk around to work the powder into the gap.
The powder absorbs any microscopic moisture and reduces friction. Don’t use liquid oils here, they can degrade adhesives and make the problem worse over time. This is a straightforward fix that can silence a shoe for months.
Common mistake: Using petroleum jelly or oil for an internal squeak. It can break down the adhesives holding the shoe’s interior layers together, leading to a worse, squelchy noise and potential delamination.
If your shoes don’t have removable insoles, you can carefully puff powder down the sides, but the results are less reliable. For a permanent fix on a valuable pair, a cobbler can inject a dry silicone powder, but that’s a last resort.
When the Squeak is the Leather Itself
Here’s a paradox: leather can squeak both when it’s too wet and when it’s too dry. You need to know which you’re dealing with.
For Moisture (The ‘Squelch’): This happens after a rainy day or if you’ve stored shoes in a damp place. The leather and its lining are saturated. The fix is patience, not power.
- Remove the laces and insoles.
- Crumple newspaper and tightly pack the toe box and heel. Newspaper pulls moisture out.
- Wrap each shoe in a dry towel and place them in a well-ventilated room, away from direct sun or heat vents.
- Let them dry for a full 12 hours. Re-stuff with fresh newspaper if the first batch is soaked.
Placing them near a fan is okay. Placing them on a radiator is a guarantee of hardened, cracked leather. The Wolky guide is adamant on this point, especially in damp climates: forced heat damages the fibers.
For Dryness (The ‘Creak’): This is a stiff, rubbing sound from the upper, often at the tongue or seams. The leather has lost its natural oils. This is where you need a true leather conditioner, not a waterproofing spray or wax.
- Clean the shoes first. Dirt pushed into the leather seals in grit.
- Apply a small amount of conditioner like Lexol Leather Conditioner to a soft cloth.
- Rub it into the dry, squeaky areas using small circles. Focus on seams and the backside of the tongue.
- Let it absorb fully (30-60 minutes) before buffing off any excess and relacing.
I prefer Lexol or Bickmore Bick 4 because they nourish without darkening the leather significantly or leaving a greasy residue. Mink oil is too heavy for most shoes, it’s for work boots that need waterproofing, not dress leather that needs suppleness.
Where this goes sideways: Using saddle soap to stop a squeak. Saddle soap is a cleaner with mild conditioning properties, designed for saddles that get covered in sweat and dirt. On modern shoe leathers, frequent use can actually strip oils and dry them out, making the squeak worse. Use it only if the leather is genuinely dirty.
New Shoes Squeaking: Break-In or Defect?
A little noise from stiff new soles and unworn leather is normal. It should fade within a few wears as you break in new shoes. The process of breaking in leather shoes involves softening the fibers through gentle, repeated flexing.
But listen closely. If a brand-new boot has a pronounced squeak or pop that seems to come from deep inside the sole with every step, stop. Timberland’s own advice flags this as a likely manufacturing defect, an air pocket or poor glue bond between the sole layers. No amount of powder or conditioner will fix a faulty glue job.
In that case, your best move is to return them under warranty. A cobbler can sometimes inject adhesive, but that’s a repair, not a break-in. Don’t start modifying a shoe that arrived faulty.
The One Fix for Squeaky Outsoles
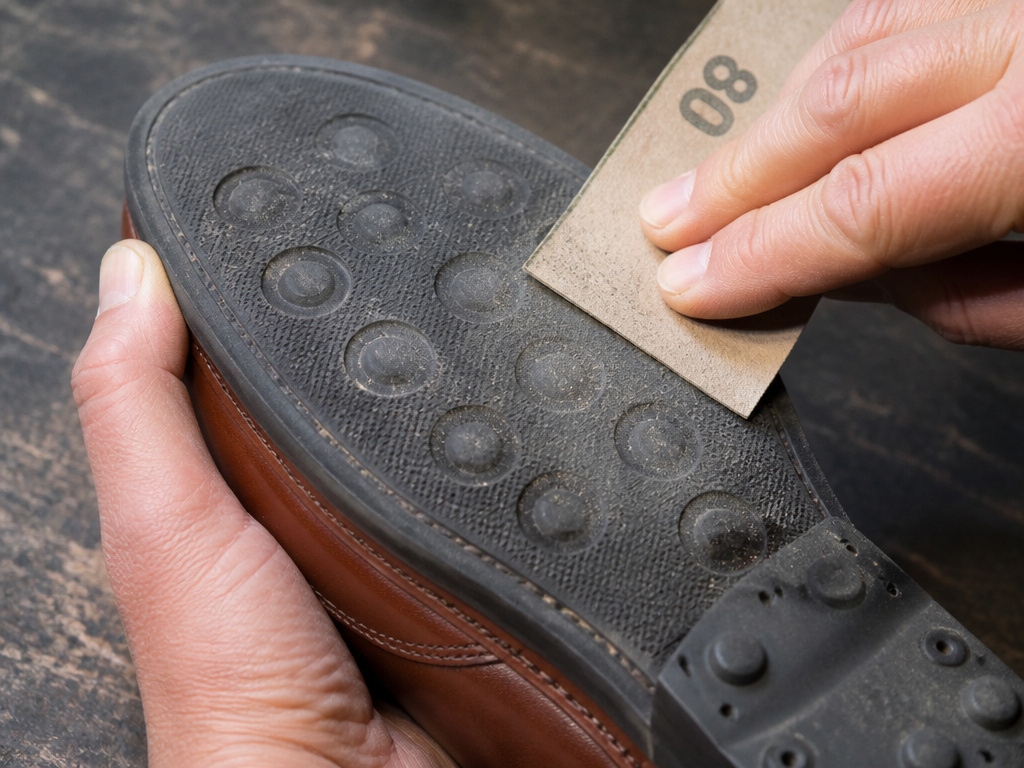
Sometimes the shoe is fine, but the floor isn’t. Hard, smooth rubber outsoles, common on many leather-soled shoes and boots, can scream on tile, laminate, or polished concrete. The sound is a high-pitched scrape.
The problem is a lack of texture. The solution is to create some.
- Ensure the sole is clean and dry.
- Take a sheet of 60-120 grit sandpaper.
- Holding the shoe firmly, make 5-10 light, sweeping passes across the ball and heel of the outsole. You’re not trying to remove material, just scuff the surface.
- Wipe away the dust with a damp cloth.
You’re creating microscopic grooves that break the suction and change the vibration. It’s a trick borrowed from the workshop, not the showroom. Go lightly. You can always do a little more, but you can’t add rubber back.
| Squeak Location | What It Sounds Like | Immediate Fix | Long-Term Care |
|---|---|---|---|
| Inside (Underfoot) | A soft pop or creak with each step. | Talcum powder under the insole. | Ensure shoes are fully dry before storage to prevent adhesive breakdown. |
| Upper (Tongue/Seams) | A stiff, rubbing creak. | Apply a dedicated leather conditioner. | Condition leather every 3-6 months based on use and climate to maintain suppleness. |
| Outsole (On Floors) | A high-pitched scrape on smooth surfaces. | Lightly sand sole with 60-120 grit sandpaper. | Clean soles regularly to prevent polish or wax buildup that increases slickness. |
| Everywhere (New Boots) | A deep pop or squeak from within. | Likely a manufacturing defect. Return under warranty. | N/A – this is a factory issue, not a maintenance one. |
Tools and Products You’ll Actually Need
You don’t need a cabinet full of potions. A small kit of specific, effective items covers 95% of squeaks.
- Talcum Powder or Cornstarch: The go-to for internal friction. Baby powder works, but ensure it’s plain talc.
- Lexol Leather Conditioner: My default for conditioning dry leather without darkening. Bickmore Bick 4 is an equally good alternative.
- Sandpaper (60-120 grit): One sheet will last for years of occasional sole-scuffing.
- Newspaper: For moisture wicking. It’s free and more effective than silica packs for wet shoes.
- Soft, Clean Cloths: Microfiber or old cotton t-shirts. Never use paper towels, which can scratch.
What you should avoid are all-in-one “leather care” sprays, silicone-based conditioners, and heat sources. They either clog the leather or risk damaging it. When you want to make shoes comfortable and quiet, precise beats powerful every time.
Frequently Asked Questions
Can I use WD-40 to stop my shoes from squeaking?
No. Never. WD-40 is a petroleum-based solvent and water displacer, not a lubricant for leather or textiles. It will stain the leather, break down interior glues, and leave a residue that attracts dirt. It’s a great way to ruin a pair of leather-soled dress shoes.
How do I stop leather boots from squeaking when walking?
Follow the diagnosis steps above. If the squeak is from the upper, a thorough leather shoe conditioning is the answer. If it’s from the sole on smooth floors, the light sandpaper scuff works. If they’re brand new and the squeak is deep inside, consider a return.
Will conditioner stop squeaking immediately?
Not always. A conditioner needs time to be absorbed into the leather fibers to restore suppleness. You might notice some improvement after 30 minutes, but full effect can take a few hours or even a full day of wear as the leather flexes with the conditioner inside.
Is shoe squeaking a sign of poor quality?
Not necessarily. Even high-quality leather shoes can squeak due to moisture, dryness, or sole-floor interaction. However, a persistent internal squeak in a brand-new, expensive pair can indicate a construction flaw, which is a failure to meet the brand’s own manufacturing standards.
Before You Go
Chasing a squeak is frustrating, but the answer is almost always simple once you find the source. Listen, locate, then apply the minimal fix.
If you take away one thing, let it be this: never use heat on leather. The 12-hour air-dry is essential for wet shoes. Rushing it guarantees damage that no conditioner can fix. And if a new pair of boots sounds hollow from the first step, don’t try to fix them, take them back. That’s what a warranty is for.
For everything else, the dry creak, the internal pop, the slippery sole, you now have the mechanic’s guide. Keep the leather conditioned, the insoles powdered, and the soles lightly textured. Your walk will be quiet.
