
How to Change a Leather Watch Strap | A Step-by-Step Guide
This post contains affiliate links. As an Amazon Associate, we earn from qualifying purchases.
Changing a leather watch strap requires matching the strap’s attachment system to the right tool and technique. For a traditional two-piece strap, you’ll need a spring bar tool to compress the spring bar inside the watch lug, remove the old strap, and seat the new one. Quick-release straps have levers or buttons for tool-free changes. Integrated straps often need a watchmaker.
The real job isn’t the swap itself. It’s doing it without leaving a single hairline scratch on your watch’s lugs or case. That’s the difference between a clean upgrade and a permanent reminder of a rushed five minutes.
What follows is a breakdown of the three attachment systems you’ll find, the exact motions for each, and the one mistake that voids warranties on brands like Suunto. We’ll also walk through changing the buckle hardware itself, because a new strap often needs its old buckle moved over.
Key Takeaways
- The wrong end of a spring bar tool will gouge metal. Use the forked end to compress the spring bar, never the flat blade to pry.
- Quick-release spring bars are the single best upgrade for any strap you plan to change often; they prevent tool-related scratches entirely.
- Suunto states that damage during an “unauthorized strap change” voids their international warranty—a real financial stake in getting it right.
- On a traditional tang buckle strap, the shorter piece (with the buckle) attaches at the 12 o’clock position; the longer tail goes at 6 o’clock.
- When reattaching a buckle, the buckle tongue must sit flush on top of the buckle frame. If it’s seated underneath, the strap won’t fasten.
Gather Your Tools and Prep Your Workspace
You need a clean, soft, and well-lit surface. A microfiber cloth laid over a desk works. A kitchen table over a hard floor is a bad idea—a dropped spring bar is a lost spring bar.
The only mandatory tool is a spring bar tool. It looks like a metal pick with a forked end and usually a flat blade on the other. The forked end is for compressing spring bars. The flat blade is for prying open buckle pins on some bracelets; it is not for levering against your watch case.
Common mistake: Using the flat blade end to try and pry a spring bar out from under the lug. This slips and scratches the case side 90% of the time. The forked end compresses the bar inward so it slides out cleanly.
I learned this the hard way on a basic Timex. A slipped tool put a two-millimeter gouge right on the polished lug. It’s still there. The watch keeps time, but that mark is a permanent lesson in using the right end of the tool.
You might also want: * A pair of tweezers for handling tiny spring bars. * A small bowl or container to hold loose parts. * Good overhead lighting. Shadowy corners hide the tiny lug holes you need to hit.
The Three Watch Strap Systems You’ll Encounter
Not all straps attach the same way. Using the technique for one system on another can break things. Before you touch anything, identify which of these three you’re dealing with.
| System Type | How to Identify | Tool Required | Risk If You Force It |
|---|---|---|---|
| Traditional Spring Bar | A smooth bar runs through the strap between the lugs. No visible levers or buttons. | Spring bar tool (forked end) | Scratching lugs, bending or launching the spring bar. |
| Quick-Release Spring Bar | A small lever or button is visible on the short side of the strap, near where it meets the lug. | Fingers (none) | Breaking the plastic or metal release mechanism if you use a tool. |
| Integrated / Specialty | The strap flows directly from the case with no visible gap. Or, a tiny screw head is visible on the lug’s side. | Watchmaker screwdriver, 1.5 mm tool, or a trip to a jeweler. | Voiding warranty (Suunto), stripping screws, cracking the integrated lug. |
The quick-release system makes a major difference. Brands like Citizen promote them because they let you swap a strap in ten seconds with zero risk of tool marks. For anyone who changes straps seasonally, they’re worth seeking out.
The integrated system is the exception that proves the rule. Suunto explicitly says that for models like the Spartan Trainer with integrated straps, “the strap cannot be detached easily from the watch body without the appropriate tools.” Their advice? Visit a service center. The risk isn’t just scratches—it’s cracking a lug or voiding the Suunto International Limited Warranty.
Step-by-Step: Changing a Traditional Spring Bar Strap
This is the classic method. The goal is to compress the spring bar inward so its crowned end clears the hole in the watch lug, then reverse the process to install the new one. Patience beats force every time.
Step 1: Remove the old strap.
Place the watch face-down on your soft cloth. Hold the case firmly with one hand. Insert the forked end of the spring bar tool between the leather strap and the inside of the watch lug. You should feel it catch on the central ridge of the spring bar. Apply gentle, inward pressure toward the center of the watch.
You’ll feel a slight give. That’s the spring bar compressing. At that moment, gently pull the strap away from the watch case. One end of the spring bar should now be free from the lug hole. Repeat this process on the other side of the same strap end to completely free it. Do the same for the other strap piece.
The fork should be compressing the spring bar, not levering against the lug. If you’re putting significant sideways pressure on the tool, you’re going to slip.
Step 2: Position the new strap.
Before installing, know your orientation. For a standard tang buckle, the shorter piece of strap (the one with the buckle) attaches at the 12 o’clock position on the watch. The longer tail attaches at 6 o’clock. Some folding clasps reverse this, so check your new strap’s instructions.
Step 3: Install one end of the new strap.
Hold the watch case. Manually insert one crowned end of the new strap’s spring bar into one of the lug holes. You’ll need to angle it slightly. Hold that end in place with your fingernail or the tool.
Step 4: Compress and lock the other end.
While holding that first end seated, use the forked end of your tool to compress the opposite end of the spring bar. Slide it into the gap between the strap and the lug, push inward, and guide the spring bar’s crowned end into the opposite lug hole. You’ll hear and feel a soft click when it seats.
Step 5: Check your work.
Give the strap a gentle outward tug. It should not come free. If it moves, the spring bar isn’t fully seated in both holes. Repeat the compression and locking step.
How to Handle Quick-Release and Button-Release Straps
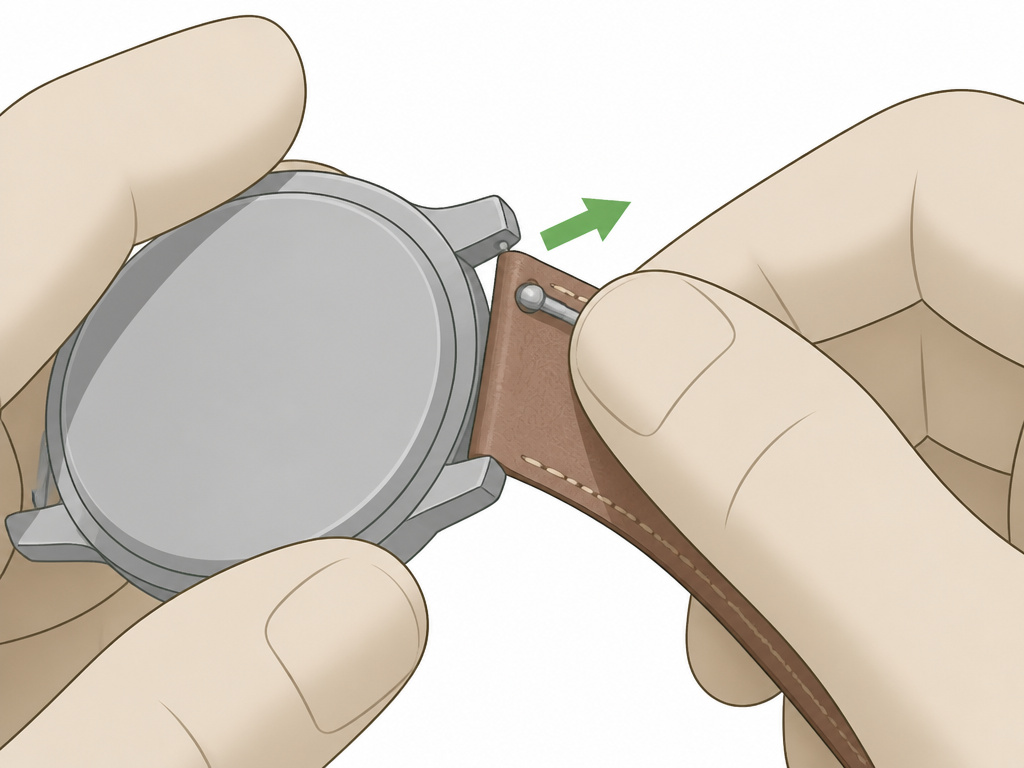 This is the easy way. If your strap has this, cherish it. Brands like Citizen and many aftermarket sellers use these for a reason.
For lever-release: Look for a small, often metal, lever on the short side of the strap where it meets the lug. Pull this lever toward the center of the strap. This retracts the spring bar end. The strap should then slide freely out of the lugs. To install, insert the spring bar ends into the lug holes and push the lever back flush until it clicks.
For button-release: Some straps have a tiny button on the side. Pressing this button retracts the spring bar. Hold it down, slide the strap out, release the button, and repeat in reverse to install.
The beauty here is the absence of tools. There’s nothing to slip, so there’s nothing to scratch. When you’re choosing a replacement strap, prioritizing this feature saves you future hassle.
The Often-Overlooked Step: Swapping the Buckle Hardware
 Your new strap might not come with a buckle. Or you might want to transfer a favorite deployment clasp. This process uses the same spring bar principle, but on a smaller, more fiddly scale.
As Shinola points out, the buckle and tongue are attached with a “traditional” spring bar. The process is identical to changing the strap at the lugs, but you’re working on the buckle frame.
- Use the forked end of your spring bar tool between the leather and the buckle to compress the small spring bar.
- Once compressed, the buckle (or clasp) will detach.
- To attach hardware to a new strap, feed the spring bar through the holes in the strap end and the buckle.
- Compress one end and seat it into the buckle’s shoulder, then compress the other to lock it in.
Where this goes sideways: When reattaching, the buckle tongue must sit flush on top of the buckle frame. If you reattach the spring bar while the tongue is trapped underneath, the strap simply will not fasten. You’ll have to take it apart and do it again.
What to Do If You Have an Integrated Strap or Screw Bars
This is where DIY often ends. These systems are designed to be serviced, not necessarily changed at home.
Integrated Straps (like some Suunto models): The strap is part of the case design. Suunto notes some models use a 1.5 mm spring bar that requires a specific tool. Their official guidance is to visit a service center “to avoid possible injuries or damage to the product.” Heed it.
External Screw Spring Bars (like some Visconti Milano watches): A tiny screw head is visible on the outside of the lug. This requires a precision screwdriver that fits perfectly. Overtightening or stripping this screw can ruin the lug. If you’re not confident, take it to a professional.
The stakes here are higher than a scratch. You’re dealing with components that, if damaged, can render the watch unwearable or costly to repair. Knowing when to stop is a skill.
How to Avoid Scratches and Other Damage
The lugs are vulnerable. They’re often polished, and a metal tool slipping across them leaves a visible mark. Here’s how to minimize risk.
- Tape the lugs: A single layer of painter’s tape over the lugs and surrounding case provides a sacrificial barrier. It’s a trick watchmakers use.
- Control the tool: Use finger-tip pressure, not arm strength. The spring bar only needs to compress a millimeter or two.
- Work over a container: When removing a spring bar, do it inside a small box or over a tray. A launched spring bar is a frustrating search.
- Inspect the new spring bars: Before installing, ensure the new spring bars are the correct length and that the crowns (the rounded ends) are intact and move freely. A defective spring bar won’t seat properly.
The goal is to leave no evidence you were ever there. A perfectly changed strap looks like it came from the factory that way.
Frequently Asked Questions
Can changing my watch strap void the warranty?
It can. Suunto’s warranty explicitly excludes “any device damage that happens during an unauthorized strap change.” Other brands may have similar clauses. Damage from using the wrong tool or technique wouldn’t be covered. Using approved quick-release straps or having it done at an authorized center is the safe play.
Which side of the strap goes where?
For a standard two-piece strap with a tang buckle, the shorter piece (with the buckle) attaches at 12 o’clock. The longer tail attaches at 6 o’clock. For straps with folding clasps or deployants, this can be reversed—always check the manufacturer’s guide, like the one provided by Breitling, for your specific buckle type.
What if my new strap doesn’t have quick-release but I want it?
You can buy quick-release spring bars separately. They are standard-sized spring bars with a built-in lever. You simply remove the standard spring bars from your new strap (using the tool method) and replace them with the quick-release version. It’s a five-minute upgrade that makes all future changes tool-free.
How do I know what size spring bar I need?
Spring bar size is defined by its diameter (usually 1.8mm or 2.0mm) and its length. Length is determined by your lug width (e.g., 20mm) and the thickness of the strap between the lugs. A 20mm lug watch typically uses a spring bar between 20mm and 22mm long. When in doubt, measure the one you removed or consult your strap seller. Getting the right strap sizing is the first step here.
My strap is too long. Can I shorten it?
Yes, but it’s permanent. You can carefully cut the tail end of the strap and re-punch a new hole for the buckle pin. This requires a sharp blade, a steady hand, and a leather hole punch. We have a detailed guide on how to punch holes in leather that covers the technique. For a cleaner look, it’s often better to order a custom-sized strap or one marketed as “short.”
Before You Go
The real test isn’t the first change you do carefully on a clean table. It’s the fifth change, at the end of a long day, when you’re rushing. That’s when the scratches happen.
So make the easy choice: for any strap you see yourself swapping more than once, invest in quick-release spring bars. They cost a few dollars and eliminate the single biggest risk factor—the tool. For everything else, slow down. The click of a spring bar seating is a satisfying sound. The sound of a metal tool skidding across a polished lug is one you don’t forget.
And if you hit an integrated strap or a screw system, put the tool down. A professional change costs less than a replacement case. Your future self will thank you for knowing the difference between a simple swap and a job for a watchmaker.
