
How to Choose a Leather Motorcycle Jacket: Essential Guide
This post contains affiliate links. As an Amazon Associate, we earn from qualifying purchases.
To choose a leather motorcycle jacket, match three essential specs: a full-grain leather hide at least 1.0mm thick for abrasion resistance, CE-certified armor (Level 2 for shoulders/elbows) for impact protection, and a fit that holds both in place when you’re in your bike’s riding position. A jacket missing any one of these is compromised.**
That 1.The 0mm figure is the documented threshold below which cowhide offers limited sliding protection, pulled straight from abrasion testing used in the CE certification framework your jacket’s label references. A thinner hide might feel supple in the store, but it won’t hold up the same way in a slide.The armor and the fit are what make that protection work for you, not just hang in your closet.
What follows is a breakdown of those three elements, material, armor, fit, plus the styles, features, and care that turn a good jacket into one you’ll actually wear. By the end, you’ll be able to read any product listing and separate the marketing from the mechanics.
Key Takeaways
- Leather thickness is your abrasion baseline. Target full-grain cowhide or goatskin at 1.0–1.4mm. Below 0.9mm, the protection drops off sharply.
- Armor and leather do different jobs. Verify the jacket includes CE-certified armor (Level 1 minimum, Level 2 better) at shoulders and elbows, not just empty pockets.
- Fit is a riding position, not a standing one. The jacket must be snug when standing so it doesn’t bag out, and must keep armor on your shoulders and elbows when you’re hunched over the bars.
- The zipper and lining forecast longevity. A sturdy main zipper (like YKK) and a well-finished, fixed or removable liner outlast cheap hardware and glued-in linings.
- Conditioning is preventive maintenance. In dry climates, condition 1–2 times a year to keep the leather supple and prevent the cracking that precedes failure.
The 1.0mm Threshold: Your Leather’s Abrasion Baseline
Let’s be clear about one thing. When you’re looking at a leather motorcycle jacket, you’re shopping for wearable armor. The first layer of that armor is the hide itself. Not all leather is equal, and the most critical spec is its thickness.
Manufacturer spec sheets tell the truth here. The Ducati Black Rider jacket lists its buffalo leather at “0.9 +/- 0.1 mm thick.” That puts it right on the edge of the recommended range. Independent guides from makers like Snag Leather are more direct: for genuine road protection, they recommend full-grain cowhide or goatskin at 1.0–1.4mm.
Common mistake: Prioritizing “softness” or “lightweight feel” by picking a thinner leather. A hide under 1.0mm might feel broken-in from day one, but it sacrifices the abrasion resistance you’re paying for. That softness in the shop translates to less material between you and the pavement.
Why does that tenth of a millimeter matter? The CE certification tests that grade jackets (like the prEN 17092 standard) measure how long a material can withstand abrasion at speed. Full-grain cowhide at 1.2mm can last 4–8 seconds in a slide. Thinner leathers fail faster. Your jacket isn’t just a windbreaker; it’s a timer between your skin and the road, and thickness sets the clock.
Leather Types: Cowhide, Goatskin, and the “Horsehide Myth”
The type of leather changes its character, but thickness is the universal ruler.
- Cowhide/Steerhide: The default for a reason. It’s tough, widely available, and when it’s full-grain and in the 1.0–1.4mm range, it offers the best balance of protection and break-in time. It’s heavy, but that weight is part of its durability.
- Goatskin: An underrated champion. Pound for pound, it has higher tensile strength than cowhide. It’s more supple from the start, molds to your body faster, and often comes in lighter weights that still meet the protective threshold. For a jacket you’ll wear daily, it’s a fantastic choice.
- Buffalo: Often used for a softer, more grainy feel, as in the Ducati Black Rider. It can be protective at the right thickness, but always verify the millimeter spec.
- Horsehide: This is where my strong opinion comes in. Horsehide is dense, historically significant, and extremely abrasion-resistant. It’s also stiff, heavy, and can be brutally uncomfortable to break in. The “horsehide is always better” myth ignores that a premium cowhide jacket offers 95% of the protection with 50% less break-in hassle for most riders. Save horsehide for the collectors and heritage enthusiasts.
| Leather Type | Best For | Thickness Target | Break-In Notes |
|---|---|---|---|
| Cowhide/Steerhide | All-round road protection, sport riding | 1.0–1.4mm | Moderate. It will soften and mold over 20-30 wears. |
| Goatskin | Daily riding, touring, comfort-focused protection | 1.0–1.3mm | Short. Noticeably supple within the first few wears. |
| Buffalo | A softer, vintage-inspired feel | 0.9mm+ (verify) | Varies. Can be quite soft initially. |
| Horsehide | Heritage styling, track use (for the dedicated) | 1.2mm+ | Long and often difficult. It’s a project. |
For hot climates or city commuting, a perforated leather or a leather/textile hybrid can be a realistic compromise. The key is that the leather in the impact zones (shoulders, elbows, back) still needs to meet that thickness guideline. Don’t let ventilation be an excuse for inadequate material.
Armor 101: Impact Protection Is a Separate System
Here’s a straightforward guide to the second half of your jacket’s job. The leather resists abrasion. The CE-certified armor inside resists impact. They are different systems, and a jacket can fail at one while excelling at the other. You must check both.
A jacket listing should state the armor certification clearly. For example, the Ducati Black Rider includes “Warrior Lite protectors certified to EN 1621.1 Lv. 1.” That’s a specific, verifiable claim. Your shopping list is simple: Shoulder and elbow protectors must be included and must be CE-certified (Level 1 is the legal minimum; Level 2 is better for highway speeds). A back protector pocket is mandatory, even if the protector itself is sold separately.
Where this goes sideways: Buying a jacket with only “armor pockets.” You get empty compartments and zero impact protection. You must then budget an extra $40–80 for quality inserts and, crucially, measure the pockets to ensure a snug fit. An insert that swims around or doesn’t seat flat is worse than none at all.
CE Level 1 vs. Level 2 – What the Numbers Mean:
- Level 1: The baseline. Protectors transmit a mean force of under 18kN at the shoulders. It’s sufficient for most road riding.
- Level 2: The upgraded standard. Force transmission is under 9kN at the shoulders. This is the recommendation for sport riding, track days, or anyone regularly above highway speeds. If you have the choice between two similar jackets, one with Level 1 and one with Level 2 armor, choose Level 2.
The takeaway is mechanical, not mystical. The armor is a shock absorber. Level 2 is a better shock absorber. In a crash, it spreads the force of a hit over a wider area and over more time before it reaches your body. That’s the difference between a bruise and a broken bone.
Fit Is a Riding Position, Not a Standing One
This is the most common point of failure, and I’ve seen it waste hundreds of dollars. A leather motorcycle jacket must be fitted in the position you’ll use it: seated on your bike, leaning forward, arms reaching for the handlebars. Trying it on while standing in a shop is how you buy a fashion item that fails as riding gear.
Here’s the practical takeaway. Follow this checklist in this order:
- Put it on with your riding layers. That means the base layer or sweater you actually wear on the bike.
- Sit on a chair or bike and mimic your riding posture. Reach forward.
- Check shoulder armor. Is it still squarely on the ball of your shoulder, or has it slid toward your neck?
- Check elbow armor. Is it centered on your elbow joint, or has it drifted onto your forearm?
- Check sleeve length. Do the cuffs still reach your wrist bone with your arms bent?
- Check back coverage. Does the jacket hem still cover your entire lower back, or is your shirt now exposed?
If the armor moves off its target zone, the jacket is either the wrong size or the wrong cut for your proportions. This is the specific reason that, for many riders, a women’s-pattern jacket is a safety choice. A small men’s jacket might have the right chest measurement but place the elbow armor too low for a different torso-to-arm ratio.
The leather will tell you what it needs. It should feel snug, even slightly tight, across the shoulders and chest when you’re standing. Leather stretches and molds, it doesn’t shrink. If it’s perfectly comfortable in the store, it will be baggy in six months. A good proper fit anticipates this and feels restrictive for the first dozen rides before settling in.
Construction & Features: What to Look For Beyond the Hide
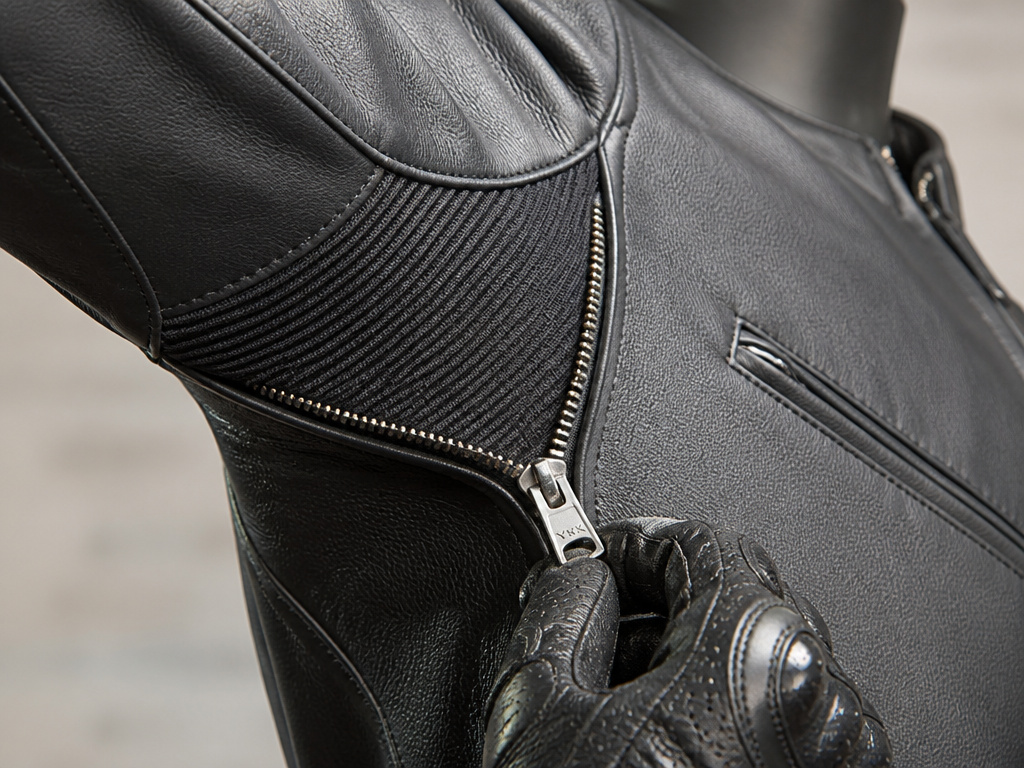
The hide and armor are the essentials. The construction is what makes them last. A jacket can have perfect 1.2mm cowhide and Level 2 armor, but if it’s put together poorly, it will fail at the seams, literally.
- Stitching: Look for dense, even stitching. Seams should be double-stitched or, even better, saddle-stitched at major stress points (shoulders, armholes). A stitching awl and patience create a stronger, more repairable seam than most sewing machines.
- The Zipper: The main zipper is the most used piece of hardware. A brand like YKK is a reliable indicator of quality. It should glide smoothly, feel substantial, and have a large, easy-to-grab pull you can operate with gloves on.
- The Lining: A fixed lining should be smoothly finished without loose threads. A removable thermal liner is a versatile bonus. Avoid linings that feel like cheap nylon or are glued in place; they degrade quickly.
- The Underarm Gusset: This is my champion underrated feature. A small panel of elastic material (like the Flex Tenax in the Ducati jacket) under the arm dramatically increases mobility and reduces stress on the shoulder seams. It’s a mark of thoughtful design.
- Connection Zip: A simple zip around the waist to connect to riding pants is a cheap feature with a huge benefit. It stops the jacket from riding up over your back in a slide, keeping you fully covered.
One feature I tell people to largely ignore? The number of vents. An intake vent without a corresponding exhaust vent on the back doesn’t move air; it just creates a pocket of hot air. Look for a balanced venting system or, better yet, perforated leather panels if heat is a concern.
Styles and Their Real-World Use
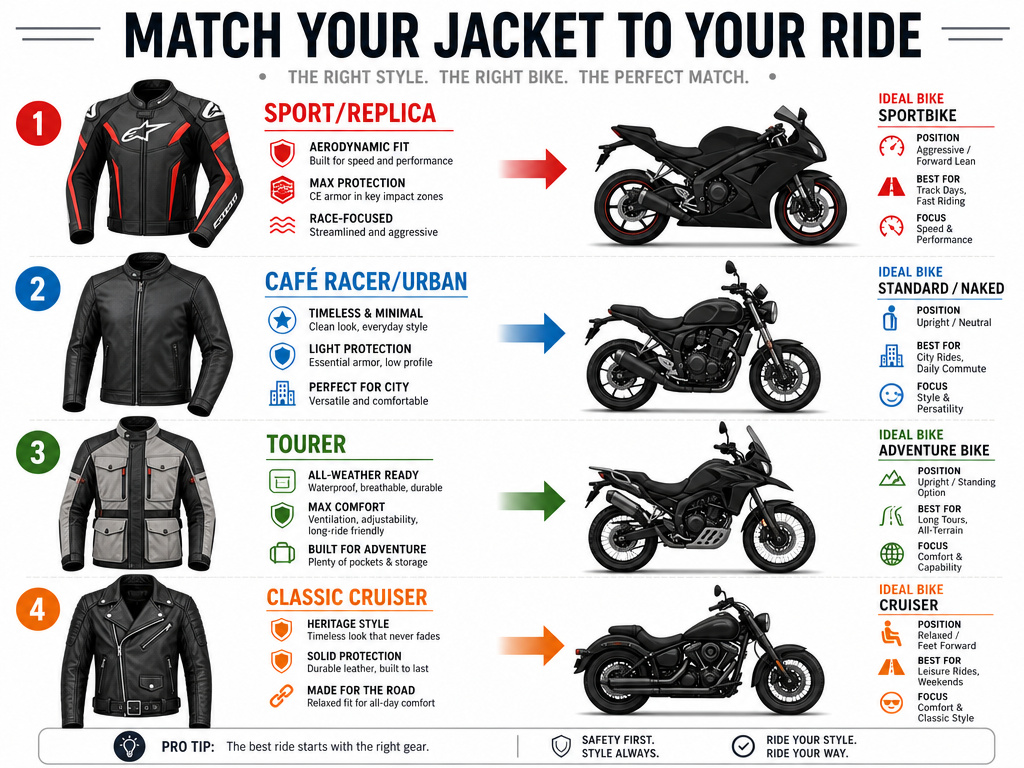
The style dictates the cut, which affects both protection and comfort in your specific riding position. Don’t force a style that fights your bike.
- Sport / Race-Replica: Pre-curved sleeves, a shorter torso, and a forward-leaning cut. Ideal for sportbikes and naked bikes. Often features more extensive armor pockets (for chest and back). Protection is the priority here.
- Café Racer / Urban: Cleaner, minimalist styling. Often lighter and may use softer leather. Crucially, verify the armor. Many café racer-style jackets lean fashion-forward; ensure it still has CE armor and adequate leather thickness.
- Tourer: Longer in the torso and sleeves, often with multiple pockets, lots of adjustments (wrist, waist), and a removable liner. Built for mile-after-mile comfort on adventure or touring bikes.
- Classic Cruiser / Biker: The traditional asymmetric zip look. Cut longer in the back to cover your lower back when seated upright on a cruiser. Often uses heavier hides for that classic feel.
Understanding the functional differences between these styles helps you match the tool to the job. A sport-cut jacket on a cruiser will feel restrictive and ride up. A straight-cut cruiser jacket on a sportbike will bunch up and leave your lower back exposed.
Care That Preserves Protection
Leather care isn’t about shine; it’s about maintaining the material’s integrity. A dry, cracked jacket is a weakened one. My strong opinion? Most commercial conditioners contain more filler and silicone than nourishing oils. Use a product designed for heavy-duty leathers.
Condition 1–2 times per year, or more in dry climates. Apply a small amount, work it in gently, and buff off the excess. This process replaces the oils that keep the fibers supple so the leather can absorb and distribute force in a slide.
For storage, avoid wire hangers at all costs. They distort the shoulders into unnatural points that are hard to reverse. Use wide, padded hangers and store the jacket in a breathable cotton bag, not plastic. Plastic traps moisture and can lead to mildew.
I once over-complicated advice on conditioning for a reader. The lesson was simple: straightforward, actionable steps are best. Clean off dirt with a damp cloth, condition when the leather feels dry or stiff, and store it properly. That’s 90% of the battle won.
Frequently Asked Questions
What is the best leather for a motorcycle jacket?
For the best balance of protection, durability, and value, full-grain cowhide or steerhide at 1.0–1.4mm thickness is the gold standard. Goatskin is an excellent, often more comfortable alternative with high tensile strength. Avoid lambskin or any leather labeled “fashion” for riding.
Can I wear a regular leather jacket for motorcycling?
You can, but it’s a significant compromise. Fashion jackets lack CE-certified armor, reinforced stitching at stress points, and the riding-specific cut that keeps the jacket in place during a slide. For low-speed urban riding, it’s better than nothing, but for any highway travel, a purpose-built jacket is the only safe choice.
How tight should a new leather motorcycle jacket be?
It should feel snug across the chest and shoulders when standing, you should be able to zip it closed without strain, but not have room for a bulky sweater underneath. It should feel “fitted,” not “loose.” Remember, it will stretch and mold to your body with wear. If it’s comfortable on day one, it will be too big later.
Do I need to buy a separate back protector?
Most jackets include only a pocket for a back protector. You should absolutely budget for a separate CE Level 1 or Level 2 back insert. Before buying, measure the jacket’s pocket to ensure a snug fit. An ill-fitting protector is ineffective.
How do I break in a stiff new jacket?
Wear it. The best method is simply to wear the jacket for short periods around the house, flexing your arms and moving in it. Avoid artificial methods like soaking it or using harsh chemicals, which can damage the leather’s internal structure and protective treatments. For more detail, our guide on breaking in a jacket covers proven methods.
Before You Go
Choosing a leather motorcycle jacket comes down to verifying three specs: hide thickness over 1.0mm, included CE armor, and a riding-position fit. Everything else, style, vents, brand, is secondary to that checklist.
My final, contrarian stance is this: the zipper and the lining are the most reliable indicators of a jacket’s overall quality and longevity, often more so than the leather tag. A manufacturer that springs for a YKK zipper and a well-finished liner has likely also invested in good stitching and proper patterning. It’s a visible clue to the invisible build quality.
Start your search by looking at those details on a few recommended motorcycle jackets from brands known for craftsmanship, like Schott NYC. Then, apply the thickness, armor, and fit rules. You’ll filter out the marketing and find the actual wearable armor you need.
