
Master the Single Pass Rule: How to Cut Leather Straight
This post contains affiliate links. As an Amazon Associate, we earn from qualifying purchases.
To cut leather, you need a sharp blade, a firm straightedge, and a willingness to make multiple passes instead of forcing a single cut. The leather type, its thickness, and your project size dictate your tool, from a hand-held round knife to a Cricut Maker’s precision blade. The biggest mistake is trying to power through in one stroke; clean cuts happen in layers.
That initial summary covers the physical action, but it skips the setup that decides the edge before the blade even touches the hide. Leather isn’t like paper or fabric, it has a fibrous structure and grain that can deflect a blade, especially on thicker hides. Your first job isn’t to cut, it’s to create a stable, guided path for the blade to follow without fighting the material.
What follows is a breakdown of the blades that work, the setups that don’t, and the hand-finishing that turns a raw edge into something glassy and professional. I’ll cover hand tools, the specifics of using a Cricut Maker with its Knife Blade, and the one rule that saves more projects than any fancy gadget.
Key Takeaways
A sharp blade is essential. A dull blade drags, follows the leather’s grain, and leaves ragged edges that are impossible to finish cleanly. – For straight cuts, use a heavy steel straightedge with a non-slip backing. Clamp it down directly on your marked line; any movement during the cut creates a visible step. – Never try to cut heavy leather in one pass. For material over 2mm thick, score the line first, then make several lighter follow-up passes. This prevents blade deflection. – Machine cutting with a Cricut has strict limits: cuts must be at least 0.75” x 0.75” and no finer than a pencil’s width. Smaller designs risk incomplete cuts and blade damage. – Your finishing options depend entirely on your initial cut quality. A jagged edge can’t be sanded or burnished into a smooth, sealed surface.
The #1 Rule They Don’t Tell You
The whole game is blade deflection.
You press down on your knife against a straightedge, expecting a clean track. On thinner leathers, you get one. On anything above 6 oz, the blade starts to wander halfway through, following the path of least resistance through the dense, cross-linked fibers. That wandering leaves a jagged, stepped edge. You can’t sand it straight. You can’t burnish it smooth. Every subsequent step, stitching, gluing, finishing, amplifies the flaw.
A dull blade requires more pressure to cut, which means the knife is more likely to wander, and the cut will be rougher. On firm vegetable-tanned leather, a dull blade drags noticeably.
This is the core failure mode for hand-cutting. The official Australian leather hand-cutting standard outlines the performance criteria for assessing leather for faults and selecting equipment to minimize waste, a nod to the fact that clean cutting is a measurable skill, not just a craft step. You combat deflection with two things: a fresh edge and a multi-pass technique.
I learned this the hard way early on, trying to cut a belt strap from 10 oz vegetable-tanned leather with a brand-new, but poorly sharpened, utility blade. I clamped my straightedge, lined up the cut, and put my full weight into one decisive stroke. The blade dove about halfway through, then veered sharply left, carving a shallow groove into the piece I wanted to keep. That single mistake turned a $40 hide into a practice scrap. The takeaway wasn’t “buy a better knife.” It was “sharpen the one you have, and let the groove guide the blade, not your muscle.”
The sound tells you everything. A sharp blade pulling through leather has a quiet, consistent rasp. A dull blade, or one fighting deflection, stutters, catches, and sometimes squeaks against the fibers. Your hand feels the difference too: a sharp edge glides with controlled pressure; a dull one feels like you’re dragging a stick through wet clay.
Here’s the straightforward guide: Mark your line clearly with a scratch awl or a silver pen. Place a heavy steel ruler with a cork back directly on that line, on the side of the piece you’re keeping. Clamp it or press down with your off-hand, fingers well clear. Make your first pass a light scoring cut, just enough to establish a groove. Do not lift the ruler. Make a second pass, following that same groove with slightly more pressure. For heavy veg-tan, you might need three or four passes. The leather will tell you what it needs. Patience here is the only shortcut.
Toolkit: Pick Your Blade Like a Pro
Your project’s leather and the shape of your cuts dictate the tool. This isn’t about finding one “best” cutter; it’s about matching the right blade to the job. Let’s break down the options.
| Tool | Best For | Where It Fails |
|---|---|---|
| Round Knife (e.g., C.S. Osborne) | Long, straight cuts & sweeping curves on 4 oz+ leather. Superior control for straight-line work. | Tight, intricate corners and cutting thin, floppy leather under 2 oz. |
| Snap-Off Utility Knife | General straight cuts, layout work, all weights. Accessible and cheap to keep sharp. | Long cuts can wander if the blade isn’t perfectly vertical; less control than a dedicated leather knife. |
| Rotary Cutter | Very long, perfectly straight cuts on thin leather (2-5 oz). Fast and clean against a steel rule. | Thick leather (over 5 oz) causes the blade to skip or bind; not for curves. |
| Craft Knife / Scalpel | Intricate detail work, tight corners, and pattern tracing. Precision point control. | Useless on straight cuts or leather thicker than 3 oz; blades snap under lateral pressure. |
| Cricut Maker Knife Blade | Precise, repeatable shapes in garment or tooling leather up to the machine’s maximum cut area. | Designs smaller than 0.75” square or finer than a pencil width; thick leather requires many slow passes. |
For most hand work, a sharp snap-off utility knife is the starting point. Its blade is easy to replace, and when used with a heavy guide, it can handle everything from a wallet to a bag side panel. The key is using it on a short snap, more blade exposed means more flex and more chance to wander.
Common mistake: Using a rotary cutter on 8 oz strap leather. The blade will catch, skip, and leave a jagged, torn edge that no amount of sanding will fix.
If you’re moving beyond basics and cutting thicker hides regularly, a C.S. Osborne round knife is the upgrade. Its curved blade rocks through the material, and the weight of the tool does some of the work for you. I reach for mine anytime I’m working with 6 oz or heavier vegetable-tanned leather for a belt or a bag gusset. For the final shaping and finishing edges on those projects, a set of Barry King edge bevelers and a coat of Tokonole edge gum are what turn a raw edge into a sealed, glassy finish.
The self-healing mat beneath your work isn’t optional. It protects your surface, but more importantly, it gives the blade something to bite into at the end of the stroke so the cut goes all the way through. Cutting on a hard table blunts the edge instantly; cutting on a soft cloth lets the leather buckle and the blade drift.
Hand-Cutting: The Step-by-Step You’ll Actually Use
The process is simple, but each step has a consequence if you rush. This method applies to any blade from a utility knife to a round knife.
- Prepare Your Surface. Place your leather on a self-healing cutting mat. If the leather is curled, flatten it by misting the rough side lightly with water and placing it under a heavy book for an hour. A flat hide doesn’t shift under the blade.
- Mark Your Line. Use a scratch awl or a fine silver pen. Ballpoint ink can smear and stain the grain. Press firmly enough to see the line clearly, but don’t cut into the surface yet.
- Position the Straightedge. This is the most critical part. Take a heavy steel ruler, 12-inch or longer, with a cork or rubberized back. Place it directly on your marked line, on the side of the leather you plan to keep. Your blade will cut on the waste side, pressing against the ruler. Clamp it down if you can. If not, spread the fingers of your off-hand wide and press down with real force.
- Make the First Scoring Pass. With your blade held perfectly vertical, pull it toward you in one smooth motion, applying just enough pressure to etch a shallow groove along the entire line. Do not saw back and forth.
- Follow With Final Passes. Without moving the ruler, make a second pass along the same groove, applying more pressure. For leather under 3 oz, this might be enough. For cutting thick leather like 8-10 oz veg-tan, you’ll need three or even four passes, letting the established groove guide the blade deeper each time. The cut is complete when the piece separates freely.
- Check and Clean Up. If a few fibers still connect the pieces, use a sharp craft knife to slice them, don’t tear them. Inspect the edge. It should be smooth and vertical, ready for edge finishing.
Where this goes sideways: Lifting the straightedge between passes. Realigning it perfectly is nearly impossible. Any slight shift creates a visible step in the cut edge that you’ll see forever.
Machine Cutting: Cricut Maker’s Knife Blade Rules
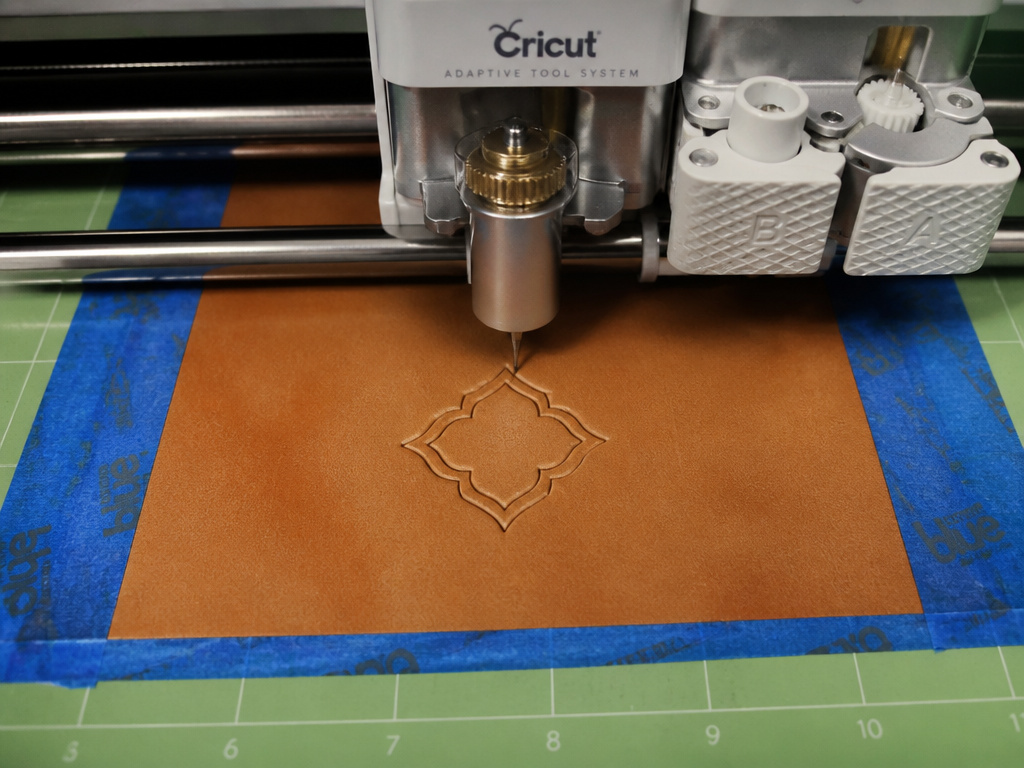 The Cricut Maker changes the game for precision, repeatable shapes, but it operates under a completely different set of physics. Its Knife Blade is a tiny, automated scalpel that makes many shallow passes. The official specs are non-negotiable.
Here’s the practical takeaway from Cricut’s help center: The Knife Blade can cut both garment and tooling leather. The maximum cut size is 10.5” x 11.5” (or 10.5” x 23.5” on a longer mat). The minimum size of any cut, including interior details, is 0.75” x 0.75”, and the width of any line must not be smaller than the diameter of a pencil. Attempting smaller, more intricate designs risks inconsistent cuts and can damage the blade.
The process has specific steps that contradict general craft logic: – For most leather, place the finished, smooth side face down on the mat and mirror your image in Design Space. – But, for leathers with a specialty finish (like pull-up leather), you must apply Cricut Transfer Tape to the rough side, place that taped side down on the mat, and NOT mirror your image. Missing this flip is how you ruin expensive material. – Tape all four edges of the leather to the mat with painter’s tape. – Move all white star wheels on the Maker machine to the right. If left in place, they’ll leave permanent dents in your project. – Expect a long cut time. Thicker materials require multiple passes with increasing pressure, and Design Space will give you an estimated duration.
If the machine stops mid-cut because it needs more passes, follow the on-screen prompts. If it repeatedly stops in the same spot, there’s likely a hard imperfection in the leather; you’ll need to remove that piece and start fresh.
Is a laser cutter better? For a hobbyist, often not. While laser cutting is incredibly precise, it burns the leather edges, creating a hard, sealed crust that is difficult to sand, dye, and finish properly. It also produces a distinct burnt smell. For production work where edge finishing is secondary, it’s a powerhouse. For a craftsman wanting a finished edge, the burned layer is a problem you now have to solve.
Leather Types & Their Quirks
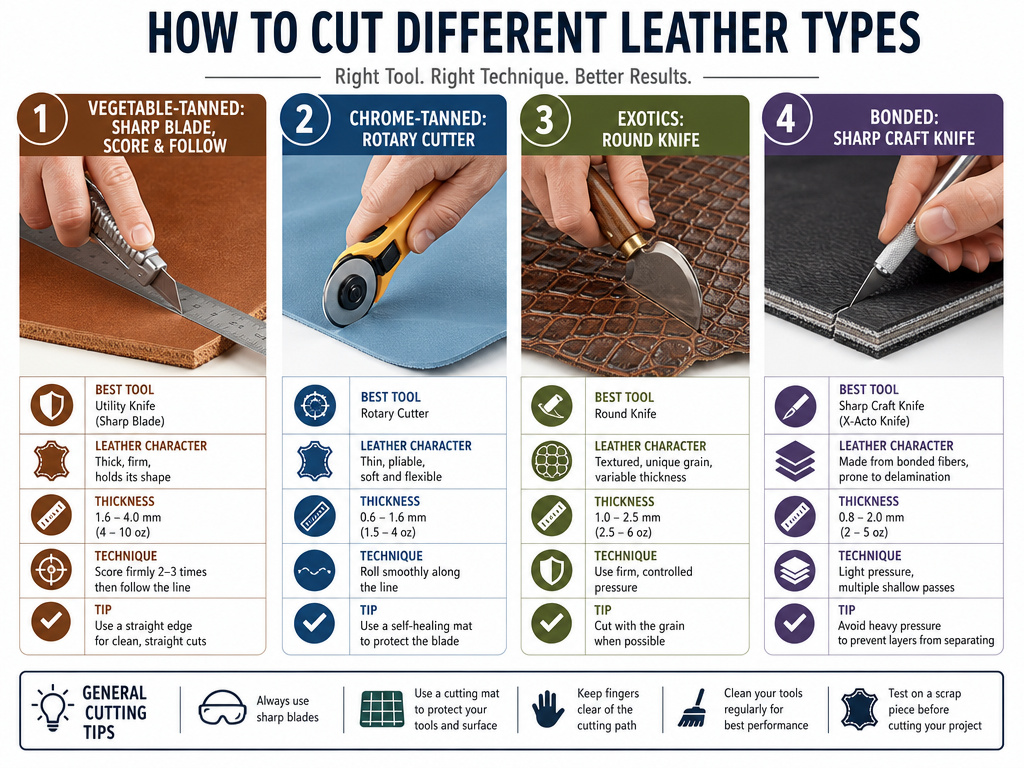 Not all leather cuts the same. The tanning process and hide thickness change how you approach it.
- Vegetable-Tanned Leather (4-10 oz): This is your most common craft leather. It’s firm, has a clear grain, and cuts cleanly when your blade is sharp. On the heavier weights (8 oz+), the blade will want to follow the grain. The fix is the multi-pass score-and-follow method outlined above.
- Chrome-Tanned & Garment Leather (2-4 oz): Softer and more pliable. It can bunch up under a blade if not held taut. A rotary cutter excels here for long cuts. For hand-cutting, stretch it flat on the mat and use a fresh utility blade.
- Exotics & Thick Tooling Leather: Stiff and sometimes oily. These demand a sharp, sturdy blade like a round knife. Test your cut on a scrap first, the density can surprise you.
- “Genuine” & Bonded Leathers: These are often thin top-grains glued to a fibrous backing. They cut easily but can delaminate if you use a dull blade that tears instead of slices. A sharp craft knife is usually the right choice.
Understanding the leather tanning process explains these behaviors. Veg-tan’s dense, cross-linked fibers resist the blade evenly; chrome-tan’s softer, more uniform structure cuts more easily but offers less guidance. Before you cut, do a practical leather quality test: try to make a clean scoring cut on a corner of the hide. If the blade drags and the edge feathers, you need to strop your blade before starting the main project.
Finishing the Edge: The Cut is Just the Start
A perfect cut gives you a head start, but the edge still needs work to be durable and polished. This is a separate skill set.
- Bevel. Use an edge beveler (like a Barry King tool) to round over the sharp 90-degree corner. This removes the fragile edge that would quickly wear down.
- Sand. Start with a coarse grit (120) to smooth any minor imperfections from the cut, then progress through finer grits (220, 400) to make the edge glassy.
- Burnish. Dampen the edge slightly with water or a dedicated edge finishing gum like Tokonole. Then, using a wood slicker, canvas cloth, or even the back of a spoon, rub the edge vigorously with firm pressure. The friction generates heat, which melts the natural fibers and gums into a smooth, sealed surface.
- Seal & Protect. For added durability, you can apply a light coat of edge paint or wax. This is especially useful for items like belts or bag straps that see a lot of abrasion.
A clean initial cut means you spend less time sanding and more time burnishing to a high shine. A ragged cut means you’ll sand past your stitching line trying to even it out.
Frequently Asked Questions
Can I use scissors to cut leather?
For very thin, soft garment leather (under 2 oz), sharp fabric shears can work in a pinch. For any craft leather (4 oz and up), scissors are a terrible choice. They crush and tear the fibers rather than slicing cleanly, leaving a pinched, frayed edge that cannot be properly finished. Use a knife.
How do I cut a perfect circle in leather?
You have two reliable paths. For a one-off circle, use a compass-style leather punch or a sharp craft knife, rotating the leather as you cut in small, controlled strokes. For repeatable circles, create a rigid template from acrylic or metal, clamp it firmly to the leather, and use a fresh utility blade to trace the entire perimeter, again using multiple light passes.
Why does my blade keep skipping or jumping?
This is almost always one of three things: a dull blade, an unstable straightedge that’s sliding, or trying to cut leather that’s not lying perfectly flat on the mat. Fix the foundation first, flatten the leather, clamp the guide, use a fresh blade segment. The skip will stop.
Is it worth buying a dedicated leather cutting knife?
If you’re making more than a few projects a year, absolutely. A dedicated tool like a round knife or a head knife is balanced for the task, holds an edge longer, and provides superior control. It turns cutting from a chore into a precise, efficient step. Start with a utility knife from a brand like Stanley, but plan for the upgrade.
Can I cut leather with a regular paper cutter?
No. The blade in a paper cutter is designed for paper fibers and will be instantly dulled by leather. The force applied isn’t enough to cut through anything thicker than the thinnest suede, and you risk damaging the cutter’s mechanism. It’s the wrong tool for the job.
Before You Go
The most expensive mistake isn’t a bad cut; it’s cutting without a plan. Before you mark your first line, know your leather’s weight and temper, pick the blade that matches it, and set up a stable, guided cutting station. Sharpen your tools, every time. And embrace the slow, multi-pass rhythm. Rushing a cut never saves time; it only creates more work to fix the edge later.
If you take away one thing, let it be this: test your setup on a scrap first. Make a straight cut, examine the edge, and burnish it. If you can get a clean, sealed finish on your test piece, you’re ready for the main hide. If not, adjust your blade, your pressure, or your technique until you can. That small habit is what separates clean work from ragged work.
