
How to Test Leather Quality | The 4-Step Hand Test I Use
This post contains affiliate links. As an Amazon Associate, we earn from qualifying purchases.
To test leather quality, you need a physical hand test, not just a visual one. Ignore marketing labels like “genuine leather.” Your hands and eyes can evaluate four concrete factors: uniformity of thickness, tensile strength (how it pulls), fiber density on the flesh side, and surface finish integrity. The official grading system (Grade I, II, III) is a defect-and-size metric from the tannery, not a durability score, a Grade II hide can be more than strong enough for a lifetime bag if it passes the hand test.
The problem with buying leather online is that you can’t touch it first. You’re left with pictures and promises. This guide translates the mechanical tests tanneries use, like ISO 3376 for tensile strength, into simple checks you can do when a sample arrives or before you commit to a full hide. I’ll show you what to look for, what to ignore, and how a piece should react under basic stress. The goal is to move past the buzzwords and judge the material on its own terms.
What follows: a breakdown of the four physical tests you can perform, a visual inspection guide that separates character from damage, a look at how water absorption and breathability reveal structure, and a final section on what the official “grading” actually means for your project.
Key Takeaways
- The official leather grading system (I, II, III) sorts hides by surface defects and size, not by strength or suitability. A Grade II hide with natural marks can be perfect for a bag.
- Judge physical quality by hand: check for uniform thickness, pull the leather to feel its tensile strength, and examine the flesh side for a tight, fibrous texture.
- The “water test” is often misinterpreted. A slow, even absorption indicates a breathable, unfinished leather (like aniline), not a defect. A complete bead that rolls off signals a heavy plastic topcoat.
- Ignore the temptation to do a deep “scratch test.” It only tells you about the surface finish’s hardness, not the leather’s underlying strength or longevity.
- Always match the leather’s temper (stiffness) and weight to your project. A beautiful, soft lambskin fails as a belt, no matter its grade.
The 4-Step Hand Test for Physical Quality
Forget the certificate for a moment. The best tool for testing leather is in your hands. This process mimics, in a practical way, the controlled measurements tanneries use. A tensile test per ISO 3376 involves clamping a precisely cut sample and pulling it apart at a fixed rate to measure the force it takes to break, calculating strength in megapascals. You don’t need the machine, but you need to understand the property it measures.
Here’s the four-step check I use on every hide before a project.
1. Check for Uniform Thickness
Roll the leather piece into a loose tube and look down its length. Does the edge appear as a consistent line, or does it wobble? Major variations in thickness, more than about 0.5mm across a square foot, signal either a poor-quality split from the hide or inconsistent tannage. This matters because a thin spot will wear through first, and it will also stretch differently under tension, distorting your finished piece.
What most people get wrong: They measure thickness with calipers at one spot and assume it’s uniform. Instead, run your fingers across the surface. You’ll feel thick and thin areas as subtle rises and dips. A hide that feels like a rolling landscape is harder to work with and produces inconsistent results.
2. The Pull Test for Tensile Strength
Grip a corner of the leather sample firmly between both hands, about two inches apart. Apply steady, increasing pressure to pull it apart. You’re not trying to tear it; you’re feeling for the initial resistance.
A high-quality leather will offer a strong, elastic resistance, it stretches a little, then firmly stops. It feels substantial. Poor leather or a heavily corrected grain will have a weak, mushy feel at the start, or it might stretch excessively with little rebound. This simple pull test directly relates to the tensile strength measured in labs. The leather should feel like it has integrity.
A laboratory tensile test per ISO 3376 records the highest force (F) before break, using jaw separations of 50 mm or 100 mm. Your hands are sensing that force curve’s initial slope, the point where the leather’s fiber network first engages under stress.
3. Examine the Flesh Side
Turn the leather over. The back, or flesh side, tells a hidden story. It should look like a dense, fibrous mat, think of the texture of a very tough felt or a coarse suede.
Run your fingernail across it lightly. High-quality leather will show minimal flaking or shedding. If a cloud of loose fibers dusts off, the hide was either over-shaved (to make it thinner) or the collagen fibers weren’t properly bonded during tanning. This weak back will compromise stitching strength and overall durability. The flesh side on a good vegetable-tanned leather is particularly clean and tight.
4. Test the Surface Finish Integrity
Finally, address the top. Bend the leather sample sharply, grain side out. Listen and look.
A full-grain or lightly finished aniline leather will show fine wrinkles across the bend, like the lines on your knuckle. The color may deepen slightly in the crease. This is good, it shows the finish is integrated with the leather. A heavily coated or cheap genuine leather product will often show white cracking lines along the bend, or the glossy surface will crease in a sharp, unnatural line. You might even hear a faint, plastic-like crackling sound. That’s the pigment or polyurethane topcoat failing to move with the leather underneath.
The short version: Good leather bends and wrinkles with you. Bad leather cracks and complains.
The Visual Inspection: What to Look For (and Ignore)
Your eyes can confirm what your hands have felt, but you need to know what’s a fatal flaw versus simple character. The official leather grading system used by tanneries (I, II, III, etc.) is based primarily on this visual inspection of the top surface of the raw hide, counting defects like bug bites, scars, and vein marks.
| What You See | What It Usually Means | Impact on Your Project |
|---|---|---|
| Fine, natural grain lines & subtle texture | The untouched surface of a full-grain leather. This is premium. | Desirable character. Will patina beautifully. |
| A uniform, pebble-grained or smooth surface | Often a top-grain leather that has been lightly sanded and embossed. | Consistent look, good durability. Hides natural imperfections. |
| A plastic-like, perfectly uniform surface | Likely a corrected-grain leather with a heavy pigment or PU coating. | Masks low-quality hide. Less breathable, may crack over time. |
| Small scars, insect bites, or stretch marks | Natural hide character. These are the defects that determine leather grades. | For a rustic bag or jacket, they add story. For a sleek wallet, they may be unacceptable. |
| Large, deep wrinkles or loose grain | A structural weakness where the grain layer separated from the lower corium. | Avoid. This area will stretch excessively and wear out quickly. |
Here’s the practical takeaway. A Grade I hide is virtually flawless, but you pay a premium for that perfection. A Grade II hide has some visible marks, maybe a few scars on one end. For most projects, especially those where the leather will develop a patina, a Grade II is the sweet spot. You get nearly the same strength and performance at a lower cost, and the marks become part of the item’s personality. Choosing a leather based solely on a small online swatch without considering these marks is a common mistake.
How Water and Breathability Reveal Structure
The “water test” is famous and famously misunderstood. Pour a few drops of water on the surface and watch.
- If the water is absorbed slowly and evenly, darkening the leather in a growing spot, you have a porous, unfinished leather. This is typical of aniline-dyed leather or untreated vegetable-tanned leather. It’s not a flaw; it’s a sign of breathability and natural finish.
- If the water sits as a perfect bead on the surface for minutes before slowly soaking in, you’re looking at a leather with a light protective topcoat (like a semi-aniline finish).
- If the water beads up and completely rolls off the surface, the leather has a heavy plastic or vinyl topcoat.
Using saddle soap on anything other than a saddle or heavy work boot is a great way to prematurely age and dry out your leather. It strips away natural oils. For a breathability test, plain water is your tool.
What about the “spray bottle” breathability test? Hold the leather tightly over your mouth and exhale heavily through the material. You should feel some warmth and moisture pass through easily with an aniline finish. With a heavily coated leather, you’ll feel resistance, and the leather will fog up slightly on your side. This breathability matters for comfort in garments and shoes, it’s why a cheap, coated leather jacket can feel clammy.
The Limits of Common Home Tests
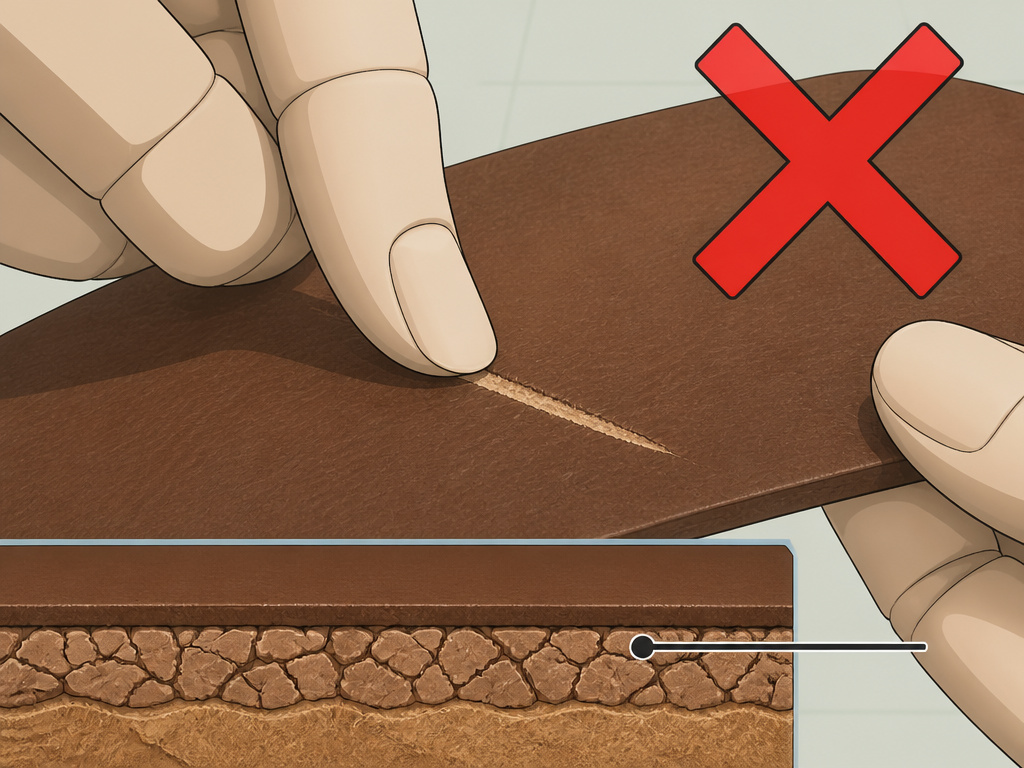
You’ll see advice online about scratching, burning, and smelling leather. Let’s be clear about one thing: some of these are misleading or outright destructive.
The Scratch Test: Press your fingernail firmly into the leather and drag it. A soft leather will show a mark that slowly fades. A hard, heavily finished leather might show little. This test only reveals the surface finish hardness, not the leather’s quality underneath. You can have a brittle, low-quality hide under a rock-hard coating. I don’t recommend it.
The Smell Test: Genuine leather has a distinctive, rich, organic smell, not chemical or plasticky. The nose can be fooled.
The Burn Test (Do Not Do This): This is for fiber identification of textiles, not finished leather goods. Burning a piece of your new jacket will ruin it and likely tell you little, as the finishes and adhesives will combust. Ignore this advice.
The most honest test is time and use. But before that, your best bets are the physical hand test and the visual inspection we just covered.
Matching the Leather to the Job
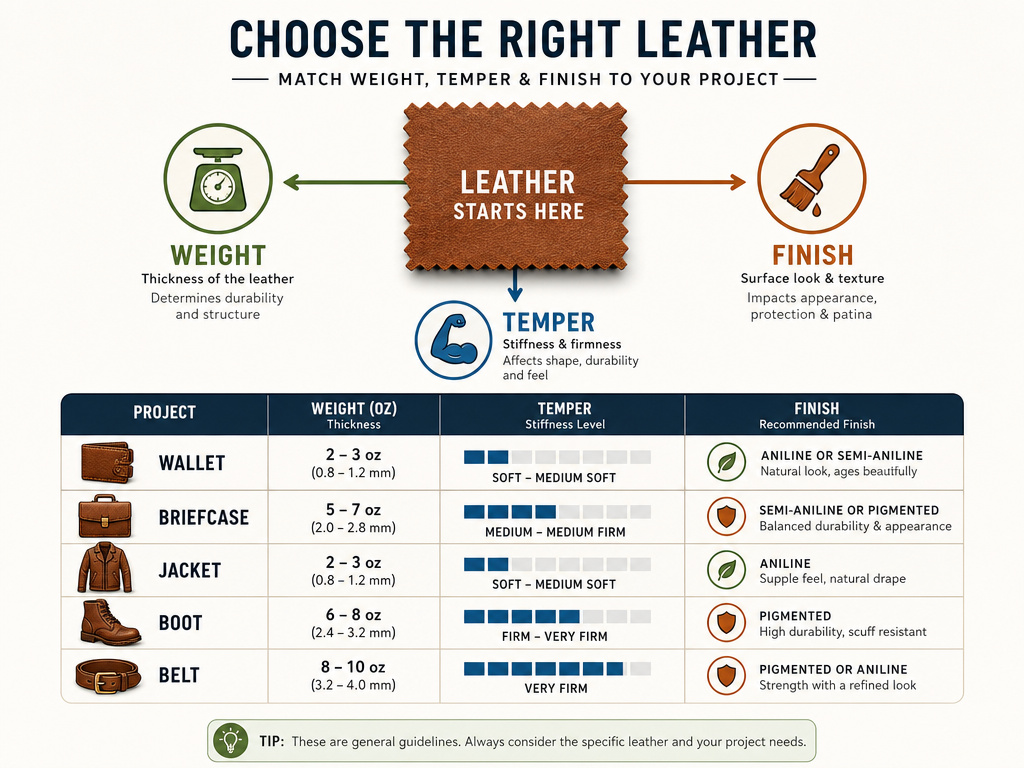
Testing quality is pointless if you test the wrong thing. The perfect leather for a delicate watch strap is a failure for a work boot. Once you’ve assessed the quality, you must match three key specs to your project: weight, temper, and finish.
| Project Type | Ideal Weight (oz) | Ideal Temper | Recommended Finish |
|---|---|---|---|
| Wallet, Card Holder | 3 – 4 oz | Firm | Vegetable-tanned or drum-dyed aniline for tooling and patina. |
| Briefcase, Tote Bag | 5 – 7 oz | Medium to Firm | Full-grain or sturdy top-grain for structure and abrasion resistance. |
| Leather Jacket | 2.5 – 4 oz | Supple | Aniline or semi-aniline for drape, comfort, and breathability. |
| Boot Uppers | 5 – 8 oz | Stiff | Oil-tanned or waxed full-grain for waterproofing and toughness. |
| Belts | 8 – 10 oz (or two layers of 4-5oz) | Very Stiff | Heavy vegetable-tanned or bridle leather for shape retention. |
Weight (measured in ounces per square foot or millimeters) is thickness. Temper is stiffness, how it resists bending. You can have two pieces of the same weight but wildly different tempers based on the tanning process. A belt needs high temper; a glove needs low temper. This is why you must feel a sample.
The obsession with making leather completely waterproof often ruins its breathability and hand-feel for marginal benefit. For a bag that might see rain, a waxed finish or top-grain leather with a light water repellent is smarter than a plastic-coated leather that feels like vinyl.
Frequently Asked Questions
What’s the difference between leather grading and leather quality?
Grading (I, II, III) is a tannery sorting system based on surface defects and hide size. Quality is about the leather’s inherent physical properties: tensile strength, fiber density, and consistency. A Grade II hide can be of excellent quality, strong and long-lasting, it just has a few visible scars.
Can you test leather quality from a picture online?
No. You can sometimes identify the leather type (full-grain vs. Corrected-grain) from macro photos of texture, but you cannot assess thickness, temper, tensile strength, or flesh side integrity. Always order a physical swatch before buying a full hide for a serious project.
Is genuine leather good quality?
“Genuine leather” is a technically correct term that means the product contains some real leather. However, it is often used to market the lowest tier of real leather, usually a heavily processed corrected-grain leather split with a synthetic coating. It can be durable for low-stress items, but it lacks the longevity, breathability, and developing patina of higher-grade full-grain or top-grain leather. You must look beyond the label.
How does vegetable-tanned leather test differently?
Vegetable-tanned leather is typically firmer in temper and has a cleaner, more natural flesh side. Its pull test feels stronger and less elastic than some chrome-tanned leathers. It will absorb water readily (darkening evenly) and patina dramatically with age and exposure, these are features, not failures. It’s my default choice for any item meant to last decades.
What’s the one simple test I can do in a store?
Perform the bend test. Grab the item (if it’s a jacket cuff or bag flap) and bend it tightly. Listen for cracking and look for white stress lines. Feel the resistance. Good leather will bend smoothly and recover. Then, check the unfinished edges or the inside lining to get a glimpse of the flesh side fiber structure. This quick check filters out the worst of the coated, paper-like “leather” goods instantly.
Before You Go
Testing leather quality is a skill that replaces guesswork with judgment. Start with your hands, feel the thickness, test the pull, examine the fibers. Let your eyes assess character, not just perfection. Understand that water absorption and breathability are features of specific leather types, not universal quality markers.
Ultimately, the leather will tell you what it needs and what it’s good for. Your job is to learn its language. Ignore the marketing copy and focus on the material in front of you. A well-chosen hide, even with a few scars, will outlive and outperform a “perfect” one that’s been ground down and painted over.
Choose for strength and suitability, not just a clean surface. Your finished piece will thank you for it.
