
Learn How to Laser Cut Leather Cleanly with a Diode Laser
This post contains affiliate links. As an Amazon Associate, we earn from qualifying purchases.
To laser cut leather, you match your laser type and power to your leather type and thickness, then optimize three core settings: speed, power, and air assist. A 20W diode laser running at 200 mm/min with a 70% duty cycle and strong air assist produces a cleaner cut on 1.2mm vegetable-tanned cowhide than lower-power diodes, with less carbonization and a higher material removal rate. This comes from a 2023 performance evaluation in the PMC journal. Never laser PVC or chrome-tanned leather, they emit toxic chlorine gas and hazardous chromium fumes.
The numbers from that study aren’t academic. They translate directly to the edge quality you see on your workbench. A clean cut isn’t just about looks; it’s about the structural integrity of the material where the laser passes. Carbonized edges are brittle. They flake, they smell, and they ruin the hand-feel of a finished wallet or bag.
What follows is a breakdown of the mechanics, why air assist isn’t optional, how to read your leather’s reaction, and the specific settings that bridge the gap between a smoldering mess and a crisp, professional cut. This guide details the three main laser sources, the one safety rule you cannot bend, and a systematic method to find the sweet spot for your machine.
Key Takeaways
- Air assist is mandatory, not optional. Disabling it causes obvious thermal damage, severe edge melting, and backside smoke staining, as documented in xTool’s material guidelines.
- Laser source dictates your results. A 20W blue-light diode can cleanly cut 1-3mm genuine leather; a CO₂ laser is needed for thicknesses up to 5mm but demands maximum air assist flow.
- Never cut PVC or chrome-tanned leather. PVC releases lethal chlorine gas, and chrome-tanned leather emits hazardous chromium compounds.
- Test on scrap first, every time. Genuine leather varies hide-to-hide; a setting that works for one piece may burn the next.
- Use a honeycomb bed. It prevents heat buildup and backside carbonization, which a solid metal bed guarantees.
Safety and Setup: Non-Negotiables
Let’s be clear about one thing: you are vaporizing material. The byproducts are smoke, particulates, and, with the wrong material, poison gas. Your first job is containing that reaction, not cutting.
You need three things before the laser ever fires: extraction, eye protection, and the right bed. A fume extractor vented outside is ideal. For a small desktop machine in a well-ventilated room, at minimum use a high-quality respirator with organic vapor cartridges. The smoke is more than an odor; it’s condensed material you do not want in your lungs. Your laser safety goggles must be matched to your laser’s wavelength. CO₂ laser glasses won’t protect your eyes from a blue diode, and vice versa.
Where this goes sideways: Cutting PVC (polyvinyl chloride) leather or vinyl. This material releases highly toxic chlorine gas when lasered, which is dangerous to your health and corrosive to your machine’s internals. Chrome-tanned leather is also hazardous, emitting fumes containing chromium compounds.
The bed matters just as much as the air you breathe. Always use a honeycomb panel. A solid metal bed traps heat against the back of the leather, cooking it and causing severe carbonization. The honeycomb allows air and debris to fall through, keeping the cut zone cooler. Secure your leather flat with masking tape or magnets. Any wrinkle or lift will change the focal distance, blurring the cut.
The Leather Itself: What Works and What Doesn’t
Genuine leather is a natural, variable material. Two hides from the same cow can react differently to the same laser settings. That’s the challenge. Vegetable-tanned cowhide is generally the most predictable and laser-friendly, offering a clean cut and pleasant engraving contrast. The 2023 diode laser power evaluation used 1.2mm vegetable chrome-tanned cowhide, finding the 20W diode superior for controlled cutting.
Synthetic materials are a separate category. PU (polyurethane) leather and specially formulated “Laserable PU” are common. They are form-stable and often produce a bright, two-tone contrast when engraved. Their thickness is usually consistent, making repeatable results easier. The catch is that cheaper PU can melt and gum up rather than cut cleanly, especially without robust air assist.
| Material Type | Laser-Safe? | Key Consideration | Maximum Thickness for Clean Cut |
|---|---|---|---|
| Vegetable-Tanned Cowhide | Yes | Most predictable; ideal for laser engraving. | 3mm (Blue Diode), 5mm (CO₂) |
| PU Leather | Yes (Check Composition) | Can melt; requires strong air assist. | 0.5mm – 1mm |
| Laserable PU | Yes | Engineered for clean cuts and high-contrast engraves. | 1mm |
| Chrome-Tanned Leather | No | Emits hazardous chromium fumes. | Do Not Laser |
| PVC / Vinyl | No | Emits toxic chlorine gas. | Do Not Laser |
Your goal is to remove material, not burn it. If the leather deforms or curls during processing, the laser power is too high. Reduce it immediately. This is where a systematic approach to cutting leather pays off, understanding how the material reacts informs every other setting.
The Three Laser Sources: Blue-Light, Infrared, and CO₂
The light your machine produces changes everything. It determines what you can cut, how thick, and how cleanly.
Blue-Light Diode Lasers (e.g., 10W, 20W)
These are common in hobbyist machines like the xTool M2. They’re excellent for detailed engraving and can cut thinner leathers. The PMC laser cutting study found a 20W diode laser, with its adjustable beam shape, produced lower kerf width and less carbonization on leather than lower-power 2.5W and 5.5W diodes. The optimal parameters were a 70% duty cycle at 200 mm/min. For a 1-3mm piece of genuine leather, a 20W diode with air assist enabled can produce a smooth, clean edge. Disable air assist, and the result is a charred, melted mess with visible smoke stains on the back.
Infrared Lasers
Often found in modular machines for marking metals, infrared is less common for leather. It tends to drive heat deep into the material rather than cutting cleanly from the top. On thicker top-grain cowhide, this leads to severe carbonization along the cut edges because the heat and smoke can’t escape quickly. It’s not the right tool for the job if a clean cut is the goal.
CO₂ Lasers
This is the industrial standard for a reason. A CO₂ laser tube can cleanly cut through thicker leather, up to 5mm for genuine hide. The beam is better absorbed by the organic material, allowing for faster speeds and deeper penetration. The critical rule with a CO₂ system is that air assist is usually automatic, and you should set it to maximum. As the manufacturer xTool notes, low airflow results in severe smoke staining and more noticeable edge carbonization.
A 20W blue-light diode laser running at 200 mm/min with a 70% duty cycle produces a lower kerf width and higher material removal rate on 1.2mm vegetable-tanned cowhide than 2.5W or 5.5W diodes, according to a peer-reviewed performance evaluation.
The choice often comes down to what you own. If you have a diode machine, respect its limits on thickness and lean heavily on air assist. If you have a CO₂ machine, you can tackle thick leather projects but must manage the higher power with even more aggressive air flow.
Dialing In Your Settings: A Methodical Approach
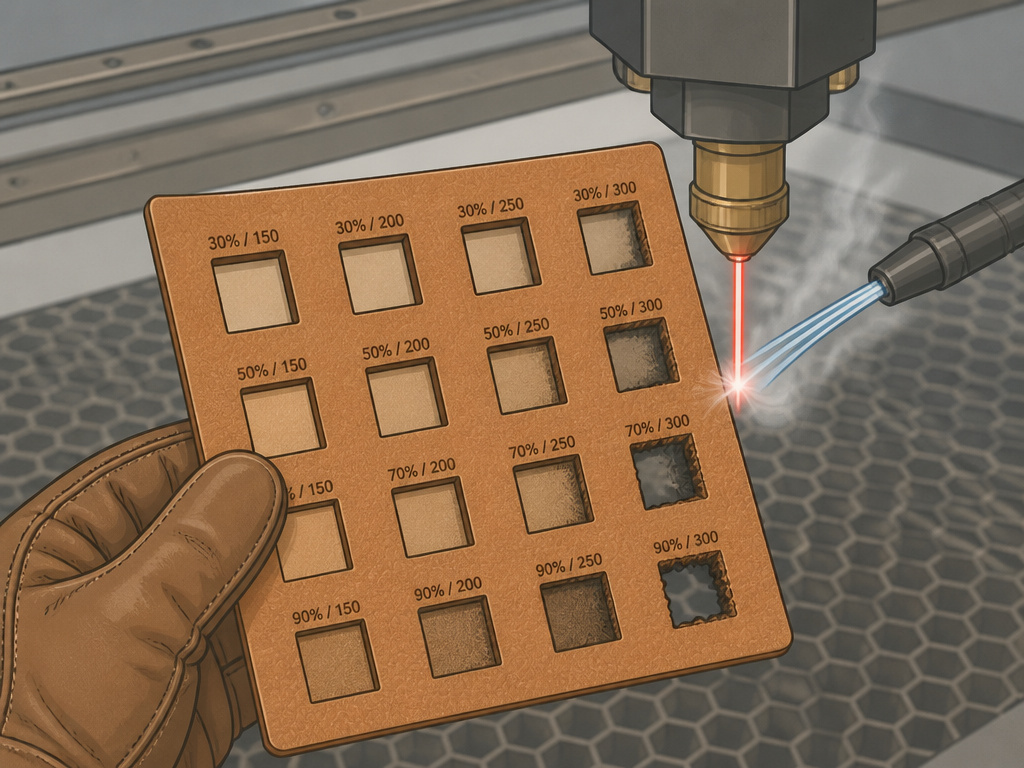 You have your leather secured on a honeycomb bed. Your extraction is on. Now you face the software interface: power, speed, and frequency. Here’s how to think about them.
Start with a Test Grid.
This is the only way to learn how your specific machine interacts with your specific piece of leather. Cut a small square from a corner of your hide or use a dedicated scrap piece.Create a test file with multiple squares or lines. Run the test at different power and speed combinations.
- Set your focus. The laser head must be at the correct distance from the material. Consult your manual. An out-of-focus beam spreads energy, causing wider, more burned cuts.
- Choose a moderate speed. For a diode on 2mm leather, start around 150 mm/min. For a CO₂, try 300 mm/min.
- Adjust power in increments. Start low, maybe 30% power. Run the first test line. Did it barely mark the surface? Increase power by 10% for the next line. Repeat until you see a complete cut-through.
- Evaluate the edge. Look at the back of the test piece. Is it clean, or is there heavy carbonization and staining? A perfect cut will have a slight tan line on the edge, not black soot.
The Role of Air Assist.
Think of air assist as a cooling and cleaning system. A strong jet of air does three jobs: it blows molten material and smoke away from the cut path, it cools the edges to prevent burning, and it keeps your lens clean. The difference is not subtle. With it off, edges melt and fuse. With it on, they remain defined. For machines like the Trotec, the air assist is integrated into the laser engravers leather workflow automatically.
What about masking tape?
Applying a layer of painter’s masking tape to the surface of your leather before cutting is a pro trick, especially for PU or delicate finishes. It protects the surface from smoke residue and can slightly reduce edge burning by acting as a sacrificial layer. Peel it off after cutting to reveal a clean surface. It also helps hold smaller pieces flat.
| Symptom | Likely Cause | Fix |
|---|---|---|
| Incomplete Cut | Power too low / Speed too high | Increase power by 10-15% or reduce speed. |
| Heavy Black Carbonization | Power too high / Air assist off or too low | Reduce power significantly. Ensure air assist is at maximum. |
| Wide, Fuzzy Cut Line | Laser is out of focus | Re-focus the laser head to the correct material height. |
| Melting & Gumming (PU Leather) | Heat buildup too fast | Increase speed, reduce power, maximize air assist. |
| Surface Staining | Smoke recast onto material | Improve exhaust ventilation, use masking tape, increase air assist. |
The process is iterative. You find a setting that works for this hide, and you note it down. That becomes your starting point for the next similar project. This methodical tuning is far more reliable than downloading a generic settings chart online.
From Design to Finished Cut
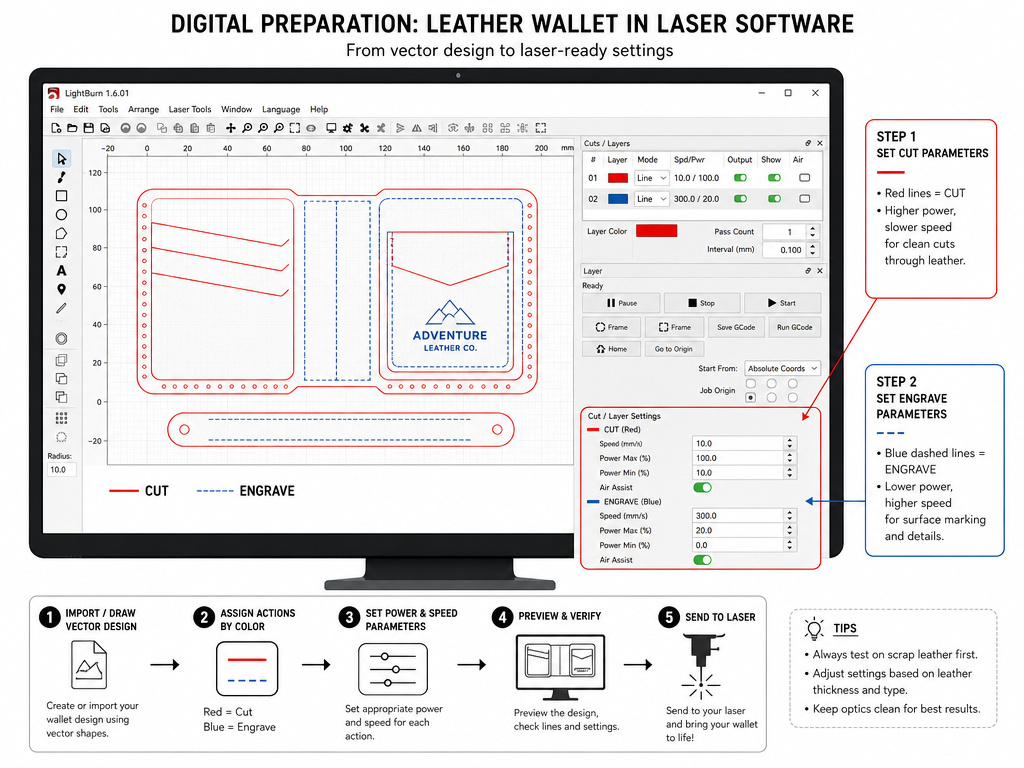 The physical setup is half the battle. The digital preparation is the other half. Your design file needs to be vector-based for cutting, lines that the laser will follow to completion. Software like LightBurn, LaserGRBL, or the proprietary software that came with your machine (like xTool Creative Space) interprets these vectors.
Preparing the File.
Design in any vector program (Adobe Illustrator, Inkscape, CorelDRAW) and export as an SVG or DXF. Import it into your laser software. Here, you assign operations: a red line might be set to “Cut” at full power, while a blue line might be set to “Engrave” at lower power. This is where you tell the machine your intent.
Nesting and Sequencing.
If you’re cutting multiple pieces, arrange them efficiently on the digital canvas to minimize waste, this is nesting. Also, consider the cutting sequence. The laser will cut shapes in the order you define. Cut internal details like belt holes before the outer perimeter. This ensures the piece stays secured to the bed until the very end, preventing it from shifting.
The Final Check.
Before hitting start, do a visual preview. Most software will show the path the laser head will travel. Make sure nothing is going to cut into a clamp or run off the material. Then, do a physical check: is the material still flat? Is the air assist hose unobstructed? Now you run the job. The machine should do the rest, leaving you with precisely cut pieces ready for assembly into a wallet, keychain, or bag.
The real skill in [how to cut leather straight](https://leathergenesis.The skill in guiding a laser to cut leather straight is in guiding light with software. The cut will be as straight as your vector line.
Frequently Asked Questions
What type of laser is best for cutting leather?
CO₂ laser is generally the best for cutting leather, especially for thicker hides (3-5mm). It offers deeper penetration and faster speeds. However, a 20W or higher blue-light diode laser can produce excellent results on thinner leathers (1-3mm) and is more accessible for home workshops. The choice depends on your primary material thickness and budget.
How do you prevent burn marks when laser cutting leather?
Burn marks are caused by excess heat. Prevent them by: 1) Using maximum air assist to cool the cut edge and blow away residue, 2) Running test cuts to find the minimum power needed for a clean cut-through, 3) Using a honeycomb bed to prevent heat buildup, and 4) Applying masking tape to the surface as a protective layer for sensitive materials.
Can you laser cut any type of leather?
No. You must never laser cut PVC (vinyl) leather, as it releases toxic chlorine gas. Avoid chrome-tanned leather due to hazardous chromium fumes. Vegetable-tanned genuine leather and most PU (polyurethane) synthetics are generally safe, but always verify the material composition and ensure proper ventilation.
What power setting should I use for leather?
There is no universal setting. It depends on your laser’s wattage, the leather type, and its thickness. Always start with a test grid. For example, a 20W diode laser cutting 2mm vegetable-tanned cowhide might start around 70% power at 200 mm/min. A 40W CO₂ laser cutting the same might use 25% power at 400 mm/min. Your test scrap tells the truth.
Why is my laser not cutting all the way through the leather?
This means your power is too low, your speed is too high, or your laser is out of focus. First, re-focus the laser head to the correct distance from the material. If it’s still not cutting through, increase your power setting by 10% or decrease your speed by 20% and test again.
Before You Go
Laser cutting leather merges traditional craft with digital precision. The machine handles the repetition, but your judgment controls the quality. That judgment is built on understanding one core principle: you are managing a thermal reaction, not just drawing a line.
The most common mistake I see is skipping the foundational steps, not a wrong setting. People try to cut without air assist, or on the wrong bed, or without testing.They get a poor result and blame the machine or the leather. The leather will tell you what it needs if you listen. A clean cut smells faintly of toasted hide, not acrid smoke. The edge feels firm, not crumbly.
Start your next project with the non-negotiables in place: ventilation, eye protection, a honeycomb bed, and a piece of scrap for testing. Dial in your settings for that specific hide. The process might feel slow the first time. By the third, you’ll have a reliable baseline that lets you focus on the design, not the burn marks. That’s when this tool shifts from a novelty to an indispensable part of your best tool cut leather toolkit.
