
How to Dye Leather Black | The Method That Stops Rub-Off
This post contains affiliate links. As an Amazon Associate, we earn from qualifying purchases.
This post contains affiliate links. As an Amazon Associate, we earn from qualifying purchases.
To dye leather black, you must saturate the fibers completely and seal the surface. For vegetable-tanned leather, deglaze the surface, apply 2-3 crossed coats of an oil-based dye like Fiebing’s Pro Dye, let it cure for 12-24 hours, buff off the grey haze, then seal with acrylic resolene. For protected leather like car seats, use a water-based urethane dye like Leather World Technologies Black Leather Dye in 2-4 light coats after thorough cleaning.
The difference between a rich black and a streaky grey comes down to light absorption. Black pigment has to load the leather fibers heavily and uniformly; any thin spot reflects light and reads as grey. That’s why black punishes every shortcut, a fingerprint of oil or a skipped prep step shows up instantly.
What follows is a breakdown of the two roads to a true black: the penetrating oil-dye method for unfinished leather and the coating method for finished goods. We’ll cover the tools, the specific sequences that prevent rub-off, and the one mistake that ruins most first attempts.
Key Takeaways
- Skipping the deglazing step is the single biggest cause of a blotchy, uneven black finish on vegetable-tanned leather.
- Black oil dye must be sealed with a product like acrylic resolene; an unsealed piece will crock pigment onto light clothing for months.
- The vinegaroon method (steel wool and vinegar) only works reliably on vegetable-tanned leather and will fail on any oil-contaminated surface.
- For modern protected leathers (car seats, sofas), use a water-based urethane dye, not an oil-based one, to restore the original flexible coating.
- Buffing the dry dye with a horsehair brush removes the loose grey pigment that causes most immediate rub-off.
The Core Two-Method Decision
Ever wondered why a dye that works on a belt blank fails on a car seat? The leather’s finish dictates the entire process.
You have two proven paths, and picking the wrong one guarantees a poor result. The first path is for vegetable-tanned or unfinished leather, the pale, stiff hide you buy for crafting. Here, the goal is to stain the collagen fibers themselves. The second path is for protected or pigmented leather, the coated, shiny hide on most furniture, jackets, and automotive interiors. Here, you’re restoring a flexible urethane coating on top of the leather.
Where this goes sideways: Using an oil-based dye on a protected leather sofa. The dye will sit on the sealed surface, remain tacky, and wipe off onto clothes. Using a urethane coating dye on unfinished veg-tan will create a plastic-like shell that cracks with the first bend.
| Leather Type | Correct Dye Type | Mechanism | Best For |
|---|---|---|---|
| Vegetable-Tanned / Unfinished | Alcohol/Oil-Based (e.g., Fiebing’s Pro Dye) | Penetrates and stains collagen fibers | Belts, wallets, sheaths, craft projects |
| Protected / Pigmented (Auto, Furniture) | Water-Based Urethane (e.g., Leather World Technologies) | Forms a flexible coating over the original finish | Car seats, sofas, handbags, coated jackets |
The rest of this guide splits at this fork. If you’re holding a pale, absorbent piece of leather, follow the oil-dye method. If you’re refreshing a faded black car interior, jump to the section on water-based urethane dyes.
Method 1: Oil-Based Dye for Vegetable-Tanned Leather
This is the traditional approach for a reason. It changes the leather’s color at the fiber level, creating a durable finish that ages with the piece. It’s also where most people fail first, usually by rushing the prep.
Step 1: Deglaze and Case the Leather
The leather arrives from the tannery with a waxy surface and picks up oils from your hands as you work. Black dye will refuse to stick to those sealed spots, leaving grey ghosts.
Deglazing dissolves that barrier. Pour a bit of pure acetone or a dedicated product like Fiebing’s Deglazer on a clean cloth. Wipe the grain side firmly, with the grain, until the cloth shows no more yellow residue. Let it flash off for five minutes. Now, avoid touching the grain side, handle the piece by its edges.
Common mistake: Skipping deglazing. It’s the single biggest cause of blotchy black. The dye beads up on the waxes and sinks in unevenly, creating a permanent, splotchy pattern.
After deglazing, a light casing helps. Dampen a sponge with water and wring it out completely. Wipe it once over the leather surface; you want it damp, not wet. This slightly opens the fibers so the first coat of dye draws in evenly rather than sitting on top.
Step 2: Assemble the Right Tools
You can’t control a flood with a thimble. For an even dyeing process, you need tools that hold and release dye consistently. * Dye: Fiebing’s Pro Dye in Black. Its alcohol base penetrates deeply. * Applicator: A wool dauber or a dense sponge. A cloth starves too quickly and drags, causing streaks. * Sealer: Acrylic resolene (satin or gloss). This is required for black. * Finisher: A clean horsehair brush for buffing and a cloth for conditioner. * Safety: Nitrile gloves and ventilation. The fumes are strong.
Step 3: Apply the Dye in Crossed Coats
Load the wool dauber generously, dip it about halfway into the dye bottle. A starved applicator is your enemy.
Apply the first coat in long, confident strokes, always moving in one direction (with the grain). Don’t dab. Cover the entire piece. You’ll see it looks wet and dark, but it will lighten as the alcohol carrier evaporates. Let this coat dry until it’s just tacky to the touch, about 5-10 minutes.
Now, apply the second coat. This time, stroke perpendicular to your first direction. This cross-hatching fills any thin lines left by the first pass and is the trick that kills directional streaking. Most veg-tan needs two coats. If the leather still looks charcoal-grey after the second coat dries, apply a third using the first direction again.
Let the dyed leather cure overnight, a full 12 to 24 hours. Rushing this step traps solvent and loose pigment at the surface, guaranteeing rub-off.
Step 4: Buff, Condition, and Seal
After curing, the piece will have a chalky grey haze. That’s loose pigment. Buff the surface vigorously with a horsehair brush or a clean, lint-free cloth. You’ll see black dust come off. This removes most of the pigment that would otherwise crock onto your hands.
Oil dye dries the leather. Apply a light coat of neatsfoot oil with a cloth, let it absorb for an hour, then wipe off any excess.
Finally, seal. Acrylic resolene is the only reliable way to recolor leather without bleed. Apply one thin coat with a sponge, let it dry for an hour, then apply a second. This creates a flexible barrier that locks the color in. Without it, your black belt will mark a white shirt.
Method 2: Water-Based Urethane for Protected Leather
 This isn’t a dye in the traditional sense. Products like Leather World Technologies Black Leather Dye are a flexible urethane color coating. You’re painting on a new version of the factory finish.
The Critical First Test
Is your leather protected? Place a drop of water on an inconspicuous spot. If it beads up, you have a pigmented finish. If it sinks in and darkens the leather immediately, it’s unprotected, go back to Method 1.
These coatings do not work on suede, nubuck, or aniline leather. The label is clear, and the result of ignoring it is a peeling, sticky mess.
Preparation is Everything
Adhesion is the entire game. Any dirt, body oil, or silicone-based conditioner will cause the new coating to peel. 1. Clean thoroughly with a dedicated leather prep cleaner or a mild dish soap solution. Rinse with a damp cloth and let dry completely. 2. Lightly sand any peeling or cracked areas with 600-grit sandpaper to create a smooth edge for the new coating to grab. 3. Wipe down with isopropyl alcohol to remove any final residues. Let it evaporate.
Application: Multiple Light Coats
Shake the bottle of urethane dye for a full minute. Apply the first coat with a foam applicator sponge in one direction. It will look translucent and uneven. That’s fine. Let it dry to the touch (about 30 minutes). Apply a second coat, crossing the direction of the first. Most projects need 3-4 of these light, even coats to build up an opaque, uniform black. The patience between coats is what prevents a thick, plastic-like finish that cracks.
This method is how you restore faded leather on a car seat or sofa. It’s a repair, not a transformation of the hide itself.
The Vinegaroon Alternative: A Chemical Black
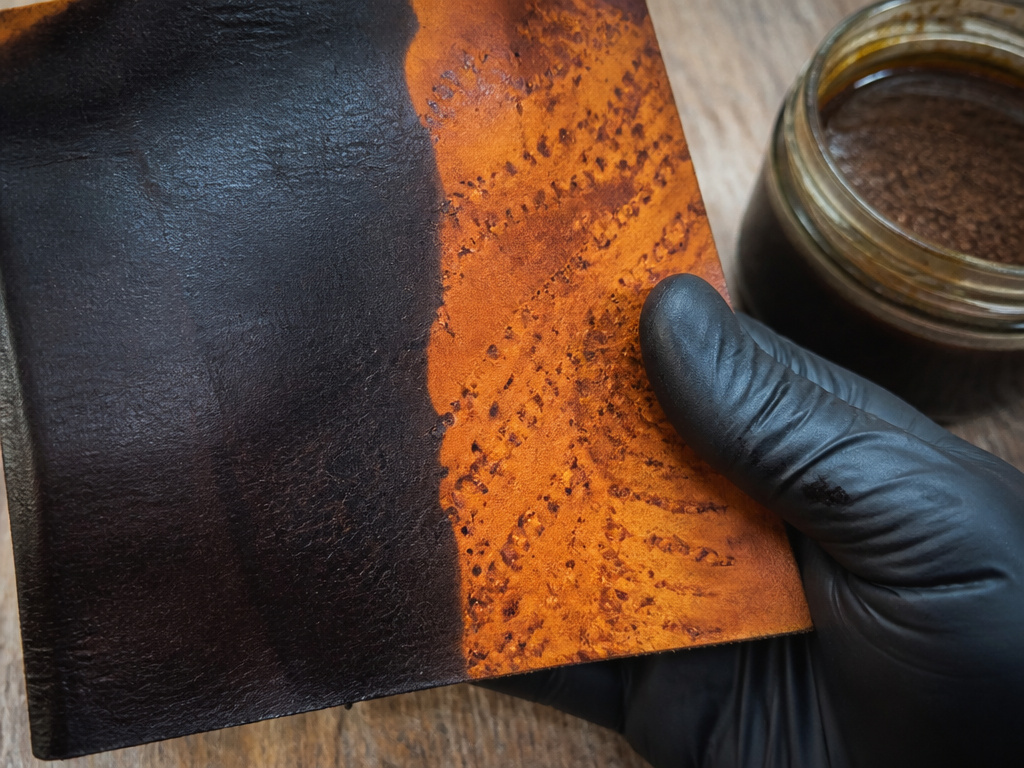 Vinegaroon is a homemade dye from steel wool dissolved in vinegar. It doesn’t stain leather; it reacts with tannins in vegetable-tanned leather to create an iron-tannate complex, turning the leather black through a chemical change.
It’s finicky. The leather must be vegetable-tanned and free of oils. I tried it on a piece that had a faint residue of neatsfoot oil. The vinegaroon blackened the clean areas in minutes but beaded up and left orange streaks on the oiled spots, creating a permanent tie-dye effect I couldn’t fix.
Easy to miss: The reaction produces hydrogen gas. If you make vinegaroon in a sealed jar, it can pressurize. Loosen the lid slightly.
If you get a good, even black with vinegaroon, you still must neutralize the acid with a baking soda solution and seal it. Some makers even apply a single light coat of black oil dye afterward to even out any weak spots, combining methods for absolute depth.
Why Layers and Sealing Are Non-Negotiable
The physics are simple. A single heavy coat of dye floods the surface. The carrier (alcohol) evaporates, leaving most of the pigment sitting on top of the fibers as a dusty layer. That dust is what rubs off.
Multiple thin coats allow each layer to penetrate slightly before the next builds up. The final sealer (resolene for oil dye, the urethane itself for coating dye) encapsulates those pigments. Skipping the sealer after an oil dye is like pouring sand onto a table and hoping it won’t blow away. A 2023 scientific leather dyeing process study on plant-derived colorants emphasized the role of finishing agents in stabilizing colorants within the leather matrix, the principle is the same for synthetic dyes.
This is the core difference between dye and paint. Dye penetrates and needs a sealer. Paint coats and is its own sealer. Using the wrong one explains why some projects fail.
Troubleshooting a Bad Black Dye Job
Sometimes, despite your best efforts, the result is streaky, grey, or rubs off. Here’s how to diagnose and fix the most common problems.
| Problem | Likely Cause | Fix |
|---|---|---|
| Blotchy, uneven color | Leather was not deglazed; oil/wax barriers remain. | Strip the dye with acetone, deglaze properly, and re-dye. |
| Grey, washed-out black | Dye was applied too thinly or with a dry applicator. | Apply 1-2 additional crossed coats of dye. |
| Dye rubs off on hands | Leather was not buffed after curing, or sealer was skipped. | Buff vigorously with a horsehair brush. If still rubs off, apply 2 coats of acrylic resolene. |
| Sticky/tacky surface (on protected leather) | Oil-based dye was used on a sealed surface. | Strip with the appropriate prep cleaner and start over with a water-based urethane dye. |
| Dye won’t take in spots | Fingerprint oils or conditioner on the surface. | Deglaze the entire piece again, handling only by the edges. |
If you need to strip oil dye, pure acetone on a cloth will take most of it off, though the leather will often retain a grey undertone. You can then re-dye. For urethane coatings, you must use the manufacturer’s recommended prep cleaner.
Frequently Asked Questions
Can I dye any leather black?
No. The leather type dictates the method. Vegetable-tanned leather accepts penetrating oil dyes. Protected, pigmented leather requires a coating dye like a water-based urethane. Suede, nubuck, and aniline leather are very difficult to dye black evenly at home without professional equipment.
Why does my black dye look purple or blue?
This is usually a base issue. Some brown or tan leathers have underlying tones that interact with the black dye. Applying a grey or neutral base coat before the black can counteract this. It can also mean the dye isn’t fully saturated, a third coat often solves it.
How long does leather dye take to dry?
To the touch, oil-based dye dries in 10-15 minutes. To cure fully so it can be buffed and sealed, it needs 12-24 hours. Water-based urethane coatings dry to the touch in 20-30 minutes but need 1-2 hours between coats and 24 hours before full use.
Will dyeing leather make it stiff?
Oil-based dyes can dry and stiffen leather slightly. This is why conditioning with neatsfoot oil after buffing is a critical step, it restores suppleness. Water-based urethane coatings add a very thin flexible layer and typically don’t change the leather’s hand feel significantly.
Can I use black leather dye on vinyl?
Yes, but only water-based urethane coating dyes designed for leather are formulated to adhere to vinyl as well. Always check the product label. Oil-based dyes will not properly adhere to vinyl.
Before You Go
The one rule most guides skip: if your black dye job rubs off on a white cloth after 48 hours, you didn’t seal it. Go back and apply acrylic resolene. No amount of buffing will fix a fundamentally unsealed piece.
For vegetable-tanned projects, Fiebing’s Pro Dye sealed with resolene is the default. It’s the combination that has lasted on belts and bags in my shop for years. For a faded car interior, a product like Leather World Technologies Black Leather Dye is the practical choice. It’s not about making leather black, it’s about using the right chemical process for the material in your hands. Everything above assumes you’ve correctly identified your leather type. Misidentify that, and even perfect technique won’t help.
