
The Right Way to Recolor Leather & Prevent Common Pitfalls
This post contains affiliate links. As an Amazon Associate, we earn from qualifying purchases.
To recolor leather, you must match three things: the leather type (pigmented vs. Aniline), the correct water-based colorant (polyurethane is best), and a meticulous surface prep process that removes old finishes. Latex or acrylic colorants crack within months; proper polyurethane needs 48 hours to cure fully.
That final 48-hour detail is the hinge. The waiting period is when the finish builds its chemical cross-links and reaches full strength. Miss it, and the piece feels dry but snaps under flex pressure, cracking along stress lines you won’t see until a week later.
What follows unpacks that process: the single best colorant type, the six essential prep steps, and the exact mistake I made on a holster that taught me the difference between ‘dry’ and ‘cured.”
Key Takeaways
- Water-based polyurethane colorants are the only type you should use; latex and acrylic crack, and solvent-based products will damage the leather.
- Surface preparation is 90% of the job. On pigmented leather, this means sanding with 220-grit paper to remove the old finish’s smooth surface and open pores.
- Polyurethane takes 48 hours to fully cure, not just dry. Putting stress on the piece before this timeline causes premature cracking.
- Recoloring is not dyeing. Dye penetrates; colorant sits on top. You cannot recolor an aniline leather with a lighter shade without a professional stripping process.
- Always finish with a compatible top coat and conditioner to protect the new color and keep the leather supple.
The 6-Step Recoloring Process, Broken Down
Forget the quick-tip videos. Recoloring leather is a methodical craft, not a hack. The goal is to build a new, durable finish that respects the material underneath.
First, identify your leather. Rub a drop of water on an inconspicuous spot. If it beads up, you have pigmented leather (also called protected or top-coated). This is what you can recolor at home. If the water darkens the leather instantly, it’s aniline leather. That’s a dye job, not a paint job, and trying to recolor it with a surface coating will fail spectacularly.
A pigmented leather finish acts like a skin. You’re not changing the flesh beneath; you’re giving it a new, durable epidermis. The old one has to come off completely.
Step 1: Deep Clean. Start with a dedicated leather cleaner like Colourlock Mild Leather Cleaner. Remove every trace of dirt, oil, and conditioner. Old leather conditioners leave a silicone or oil film that will repel your new colorant, causing fisheyes and peeling.
Step 2: Degrease & De-gloss. For older, heavily finished leather, follow up with a solvent cleaner. Colourlock GLD Solvent Cleaner is designed for this. You should see old color coming off on your cloth, that’s the proof you’re reaching the bare substrate.
Step 3: Sand. This is non-negotiable for pigmented leather. Use 220-grit automotive sandpaper. You’re not sanding the leather away; you’re scuffing the sealed, plastic-like top coat to create microscopic grooves for the new colorant to grip. The surface should look uniformly dull, with no shiny spots.
Step 4: Apply Primer. This step is often skipped in cheap kits, and it shows. A leather-specific primer, like Colourlock Primer, seals the sanded surface and provides a uniform, slightly sticky base for the color. It’s a mist-thin layer, sprayed at low pressure (around 2 bar).
Step 5: Apply Color. Use a water-based polyurethane leather colorant. Brands like Leather Magic!, Colourlock Leather Colour, and Fiebing’s Leather Studio Series make these. Apply the first coat by wiping it on thinly with a sponge, this encourages it to seep into the sanded pores. Let it dry completely, then build up subsequent coats with a spray gun or airbrush. Thin, even layers win. Expect at least 3-5 coats for full, even coverage.
Step 6: Top Coat & Condition. Once the final color coat is dry, seal it with a compatible top coat. Many colorant systems, like Colourlock’s, require you to add a crosslinker (like Crosslinker IC2) to the top coat for chemical resistance. After the top coat has cured for 24 hours, apply a light coat of leather conditioner. This feeds the leather beneath the new finish, keeping it supple.
| Step | Critical Action | Risk If Skipped |
|---|---|---|
| 1. Identify | Water bead test on hidden spot. | Treating aniline like pigmented leather = immediate failure. |
| 2. Clean & Degrease | Use solvent cleaner; see color transfer on rag. | New finish adheres to oil, not leather; peels in weeks. |
| 3. Sand | 220-grit sandpaper until uniformly dull. | New colorant sits on slick surface; scratches off easily. |
| 4. Prime | Apply thin, even mist coat. | Color absorbs unevenly; patchy, blotchy final result. |
| 5. Color Application | Wipe first coat, then spray thin subsequent coats. | Thick coats dry on top, crack with first flex of the leather. |
| 6. Seal & Condition | Apply crosslinked top coat, then conditioner after 24 hrs. | New color rubs off; leather underneath dries out and cracks. |
The One Mistake That Shows Up in a Week
The internet is full of well-meaning but disastrous advice. The single biggest mistake is choosing the wrong type of colorant.
You’ll find three types of water-based colorants: latex, acrylic, and polyurethane. Latex is wall paint with a flexibility modifier. Acrylic is craft paint, similarly modified. Both are cheaper than polyurethane, and both will fail on leather. They lack the long-term flexibility and adhesion for a material that constantly flexes and stretches.
Where this goes sideways: Using a latex or acrylic “leather paint.” The finish feels dry in hours, so you use the item. Within a week, the first real bend, a shoe crease, a bag fold, creates a network of tiny spider-web cracks. By month three, it’s peeling like sunburned skin.
Polyurethane is different. It’s what most original leather finishes are made from. A Angelus or Fiebing’s brand polyurethane colorant is formulated specifically for leather, with plasticizers that allow it to move with the material. But here’s the catch everyone misses: polyurethane takes 48 hours to cure, not just dry to the touch.
I learned this the hard way patterning a holster. The color was perfect, dry in four hours. I molded it, stretching the leather over the form. It looked flawless. A week later, fine cracks appeared along every stress line from the molding. The finish was dry, but it hadn’t built its full strength. I stressed it before its 48-hour cure window, and it failed.
Pigmented vs. Aniline: Why the Leather Type Decides Everything
Most recoloring guides treat all leather the same. They’re wrong. The process lives or dies by this distinction.
Pigmented leather has a painted, opaque finish on top. Think of most car seats, office chairs, and designer handbags. This finish is what you sand off and replace. You can go darker easily. Going lighter is a gamble, as the old color may bleed through unless you use a heavy-bodied primer or opaque paint like LRC14 Leather Paint.
Aniline leather is dyed through and through. There’s no paint layer to sand off. The color is in the leather itself. You cannot recolor aniline leather with a surface coating, it will look plastic-coated and feel stiff. Changing its color requires stripping the dye with strong chemicals and re-dyeing, a professional-grade task.
Common mistake: Trying to paint over a scuffed black aniline leather shoe to make it tan. The black dye will eventually bleed through the thinner, lighter paint, creating a muddy, uneven color. It’s almost always cheaper to buy new.
| Leather Type | How to Identify | Can You Recolor at Home? | Best Product Type |
|---|---|---|---|
| Pigmented (Top-Coated) | Water beads on the surface. | Yes, with proper prep. | Water-based Polyurethane Colorant (e.g., Leather Magic!) |
| Aniline (Dyed) | Water soaks in and darkens the spot. | No, not without stripping dye first. | Penetrating Leather Dye (e.g., Fiebing’s Professional Oil Dye) |
| Suede / Nubuck | Nap is visible; feels like velvet. | No, requires specialized sprays and brushes. | Suede & Nubuck Color Spray |
Tools You Actually Need (And One You Don’t)
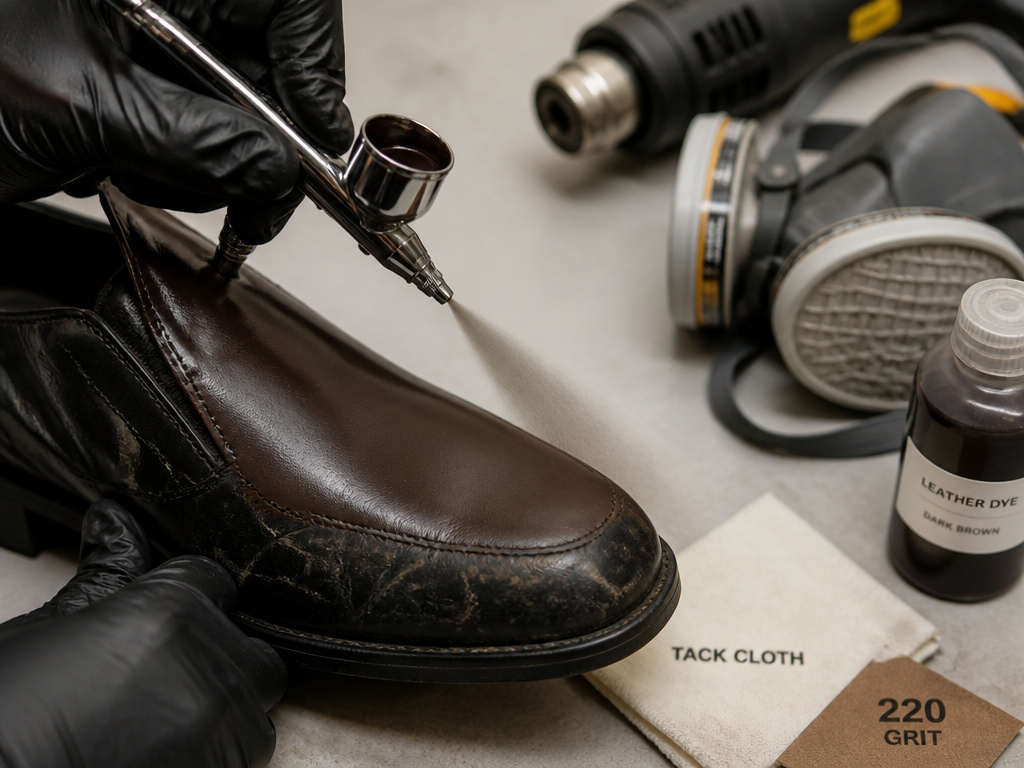 You can’t do this right with a brush from a hobby store. The right tools control the material’s thickness and evenness, which directly prevents cracking.
You Need:
- 220-Grit Sandpaper: Automotive grade. It’s the right aggressiveness.
- Tack Cloths: For removing every speck of sanding dust.
- Airbrush or HVLP Spray Gun: This is the secret to thin, even coats. An airbrush is perfect for shoes, bags, and wheels. A small HVLP touch-up gun works for larger areas like furniture.
- Air Compressor: To run your spray tool. Electric spray guns are too heavy-handed and will lay down too much material.
- Heat Gun or Hair Dryer: For speeding up dry time between coats. Crucial for good inter-coat adhesion.
- Respirator & Ventilation: You’re spraying chemicals. A respirator certified to the NIOSH N95 standard is non-negotiable.
You Don’t Need (Avoid):
- Electric Spray Guns: They waste material and apply it too thickly.
- Brushes or Rollers: They leave stroke marks and apply uneven, heavy layers that are prone to cracking.
- Solvent or Oil-Based Colorants: These will damage the leather’s fibers and crack.
Here’s the straightforward guide for application: wipe the first coat on with a sponge to fill the pores, then use your spray tool for every subsequent coat. Keep the gun 6-8 inches away, use low pressure (8-10 psi for HVLP), and keep the coat moving. A light coat that looks barely there is better than a wet, glossy one.
The “Dye vs. Paint” Confusion Cleared Up
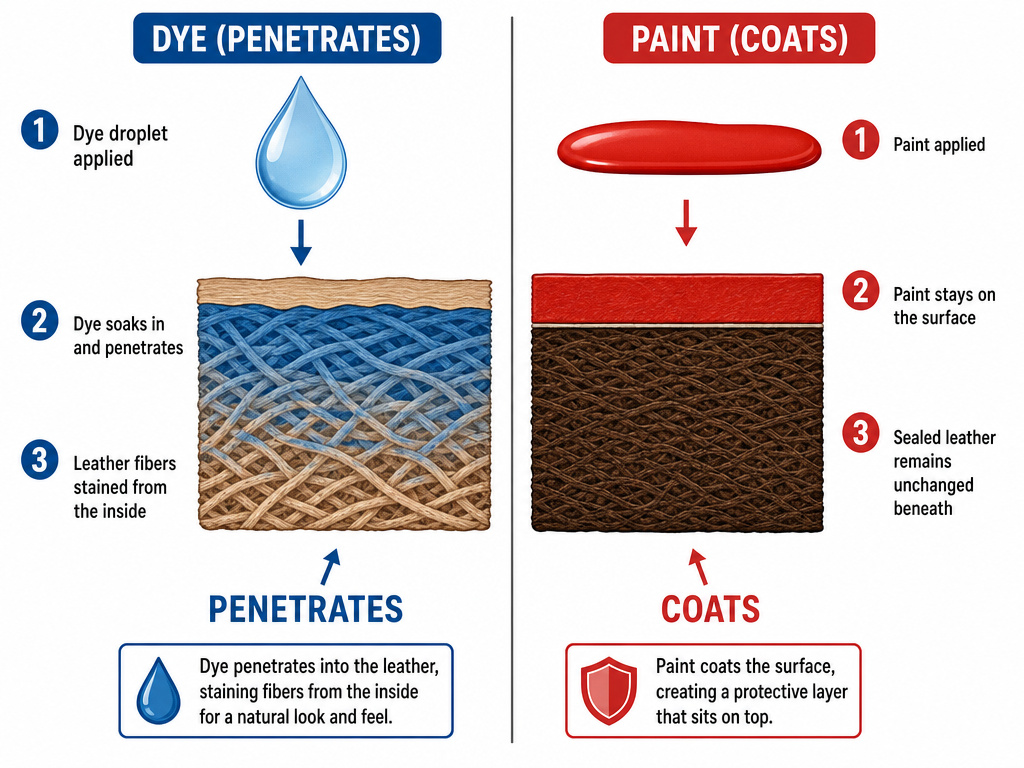 A lot of failed projects start with a terminology mix-up at the store. Dye and paint (or colorant) are not interchangeable.
Leather dye is a translucent, penetrating stain. It soaks into the leather fibers, changing their color from the inside out. It becomes part of the leather. This is what you use for dyeing leather projects from scratch or for refreshing faded aniline leather.
Leather paint or colorant is an opaque, surface-level coating. It sits on top of the leather, like nail polish. This is what you use for painting leather or recoloring pigmented leather. The difference between dye and paint is the single most important decision in your project.
When you’re coloring leather that already has a finish, you are almost always using a paint/colorant, not a dye. Trying to use a dye on a sealed, pigmented leather is pointless, it can’t penetrate.
What About Restoring Faded Color?
Sometimes you don’t want a new color; you want the old one back. Restoring faded leather is a cousin to recoloring, but it’s often simpler.
If the leather is just faded and the finish is intact (no deep scratches or peeling), you might not need a full recolor. A high-quality leather cleaner and a pigment-infused cream or refresher (like Colourlock Fresh Paint or Leather Refresher) can deposit new color into the existing finish’s micro-cracks, reviving the shade. This is a maintenance fix, not a structural overhaul. It wears off over months with use and cleaning, but it’s perfect for quick touch-ups.
Before You Go
Recoloring leather involves thoughtful restoration with materials that last.
The rule that changes most projects: if your leather is more than 15 years old and feels brittle or dry, reconsider. A fresh coat of paint can’t restore lost tensile strength. The leather might be cosmetically saved, but it’s still weak underneath. For heirlooms, sometimes preservation is a better goal than transformation.
Your first step is doing the water test in a hidden corner. That single drop of water tells you everything about the path forward, or the money you’re about to save by not going down the wrong one.
Frequently Asked Questions
Can I recolor leather from dark to light?
On pigmented leather, yes, but it requires a heavy-bodied, opaque leather paint like LRC14 Leather Paint or a dedicated opaque primer to block the dark undercolor. On aniline leather, going lighter requires professional stripping of the original dye first, which is rarely successful for DIY.
How long does recolored leather last?
When done correctly with a polyurethane colorant and top coat, a home recolor can last 3-5 years of regular use on items like furniture or bags. High-wear areas like shoes and steering wheels will show wear sooner, often within 1-2 years.
Do I need to use a top coat after recoloring?
Yes, absolutely. The colorant provides the color, but a dedicated top coat (preferably one with a crosslinker added) provides the scuff, scratch, and chemical resistance. Skipping the top coat means the new color will rub off quickly onto clothes and hands.
Can I use regular fabric dye on leather?
No. Fabric dye is formulated for cellulose or protein fibers like cotton or wool. Leather is a completely different substrate. Fabric dye will not bind properly, will rub off, and will likely damage the leather’s finish.
