
How to Make a Custom Leather Dog Collar | Full Tutorial
This post contains affiliate links. As an Amazon Associate, we earn from qualifying purchases.
This post contains affiliate links. As an Amazon Associate, we earn from qualifying purchases.
Making a leather dog collar requires three core steps: cutting a strap of the right leather (7/8 oz. For most dogs), accurately marking and punching holes for hardware, and securely fastening the buckle and D-ring with rivets or Chicago screws. The collar’s lifetime depends on the leather’s quality and how firmly you set those rivets.
The difference between a collar that lasts a decade and one that fails in a year often comes down to two inches of extra length cut at the start and a rivet struck with enough force to mushroom the cap completely. Let me share what I’ve learned from years at the bench and from the detailed guides published by suppliers like Weaver Leather and craftspeople like Ana Poe.
What follows is a straightforward guide that moves from picking the right hide to the final conditioning step, with specific weights, measurements, and a hard look at where most first attempts go wrong. By the end, you’ll understand not just the steps, but the why behind each cut and punch.
Key Takeaways
- Always cut your leather strap longer than the measurement suggests. Ana Poe’s rule is to add 10 inches to the dog’s neck size, which provides crucial working room.
- Under-setting a rivet is the most common point of failure. If you can pull the leather layers apart with a firm tug, the rivet isn’t set tightly enough and must be re-done.
- Match leather weight to dog size: 7/8 oz. Leather works for small to medium dogs, but for large or powerful breeds, step up to a heavier weight or add a liner and use Chicago screws for strength.
- Your pattern is a guide, not a command. I learned to cut pieces about an eighth-inch larger than the template to account for minor slips and the leather’s natural grain shift, a buffer that has saved countless projects.
- Condition the leather after assembly. Applying mink oil or cream conditioner before setting hardware can make the leather too slick for rivets to grip properly.
The Core Tools You Need (And What They Do)
You don’t need a shop full of equipment, but the right few tools make the difference between a frustrating struggle and a clean, professional result. Here’s a breakdown of the essentials.
A sharp utility knife or rotary cutter is essential. Dull blades tear leather fibers instead of slicing them, leaving a ragged edge that’s harder to finish. A strap cutter, like the kind Tandy Leather sells, is even better for getting perfectly uniform strips from a larger hide. For hole punching, a standard 6-prong revolving leather punch handles most collar needs, creating clean, consistent holes for buckle prongs and rivets.
A keen edge beveler is the secret to a comfortable, polished collar. Running this tool along the top corner of the cut leather removes the harsh 90-degree edge, rounding it over so it doesn’t rub against your dog’s neck. It’s a five-minute step that transforms the collar’s feel from a crude strap to a finished product.
You’ll also need a mallet (a nylon or rawhide head is best to avoid marring surfaces), a rivet-setting anvil or a small steel plate, and an assortment of rivets or Chicago screws. A sharp awl for marking and a metal ruler round out the basic kit. If you plan on personalization, leather stamps or an X-Acto knife for decorative cuts come next.
Choosing Your Leather: Weight, Grain, and Why It Matters
Not all leather is suited for a collar that gets tugged on daily. The choice hinges on durability, comfort, and your dog’s profile. Let’s be clear about one thing: the marketing term “genuine leather” is useless here. You need to know the type and weight.
For a robust, active dog, full-grain leather is the top choice. It’s the toughest part of the hide and develops a rich patina over time. Top-grain leather, sanded to remove imperfections, is a slight step down in durability but offers a smoother finish. Split leather comes from the lower layers of the hide; it’s more affordable but lacks the dense fiber structure of the top layers, making it less durable and a poor choice for any dog that pulls.
The weight, measured in ounces per square foot, is critical. Weaver Leather Supply specifically recommends 7/8 oz. Leather for a basic collar. That’s a good middle ground, a gauge 12 or heavier wire is sturdy yet pliable enough to work with. For a toy breed or a decorative collar, you can go lighter. For a large, powerful dog like a German Shepherd or a working breed, you need to step up to a heavier weight (think 4-5 oz.) or even add a fabric liner for reinforcement.
| Leather Type | Best For | Durability | Feel & Aging |
|---|---|---|---|
| Full-Grain | Active, large dogs | Highest | Develops a unique patina; stiff at first |
| Top-Grain | Most family dogs | High | Smooth, consistent finish; breaks in faster |
| Split/Suede | Small, calm dogs (decorative) | Lower | Soft initially; can wear quickly |
If you’re looking for a ready-made option to study or use, our guide on the best leather dog collars breaks down what makes the top brands stand out.
Measuring, Cutting, and the All-Important Buffer
This is where projects go off the rails before the mallet even comes out. A collar that’s too short is scrap leather. One that’s too long can be trimmed, but only if you planned for it.
First, measure your dog’s neck with a soft tape measure. Place it where the collar will sit, snug but not tight. The old “two-finger rule” works, you should be able to slide two fingers comfortably underneath the tape. Write that number down.
Now, here’s the practical takeaway from Ana Poe’s guide: Add 10 inches to that measurement to determine your cut length. This extra material is for the buckle fold-over, the D-ring attachment, and a surplus of adjustment holes. It seems like a lot, but it’s far easier to cut off excess later than to add length you don’t have.
When you transfer this length to your leather, use a sharp pencil or an awl to mark your cutting line against a metal straightedge. This is where my own hard-learned rule applies: cut about an eighth-inch outside your marked line. Leather has a natural grain, and it can shift slightly as you cut or when you skive it later. That tiny buffer has saved more straps than I can count from being rendered useless by a minuscule slip. After cutting, immediately use your edge beveler on all sides.
If sizing makes you nervous, our deep dive on how to size a leather dog collar walks through every nuance, including breed-specific considerations.
Marking Holes and Skiving for a Clean Finish
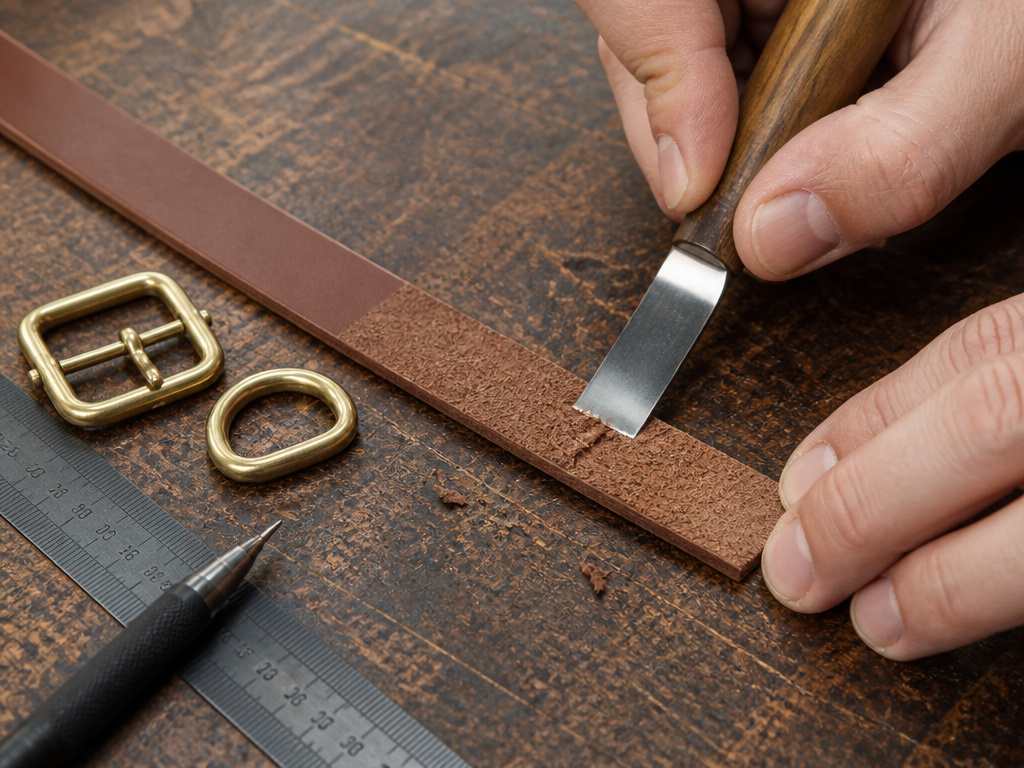 With your strap cut to length, the next job is marking the locations for the buckle, D-ring, and adjustment holes. Precision here ensures the hardware aligns and functions.
Lay your buckle at one end of the strap. Mark the hole for the buckle’s center bar. Then, fold the leather back over itself, this is the buckle attachment point, and mark where the rivet will go to secure it. The D-ring goes a few inches back from the buckle end; mark its two rivet holes as well. For the adjustment holes, a simple paper template or a leather punch spacer tool ensures they’re evenly spaced down the center of the strap.
Where this goes sideways: Punching holes before skiving. If you skive after punching, you risk altering the shape of the holes, which can make hardware fit poorly or rivets sit crooked.
Skiving is the process of thinning the leather from its flesh side (the rougher, suede-like side) at the points where it will fold over hardware. Using a skiving knife or tool, you shave away about half the thickness for an inch or so back from the end. This reduces bulk, allowing the leather to fold smoothly and creating a flush, professional look where the rivet heads will sit. It’s a step that beginners often skip, and the result is a clunky, lumpy fold that’s uncomfortable and looks amateurish.
Attaching Hardware: Rivets vs. Chicago Screws
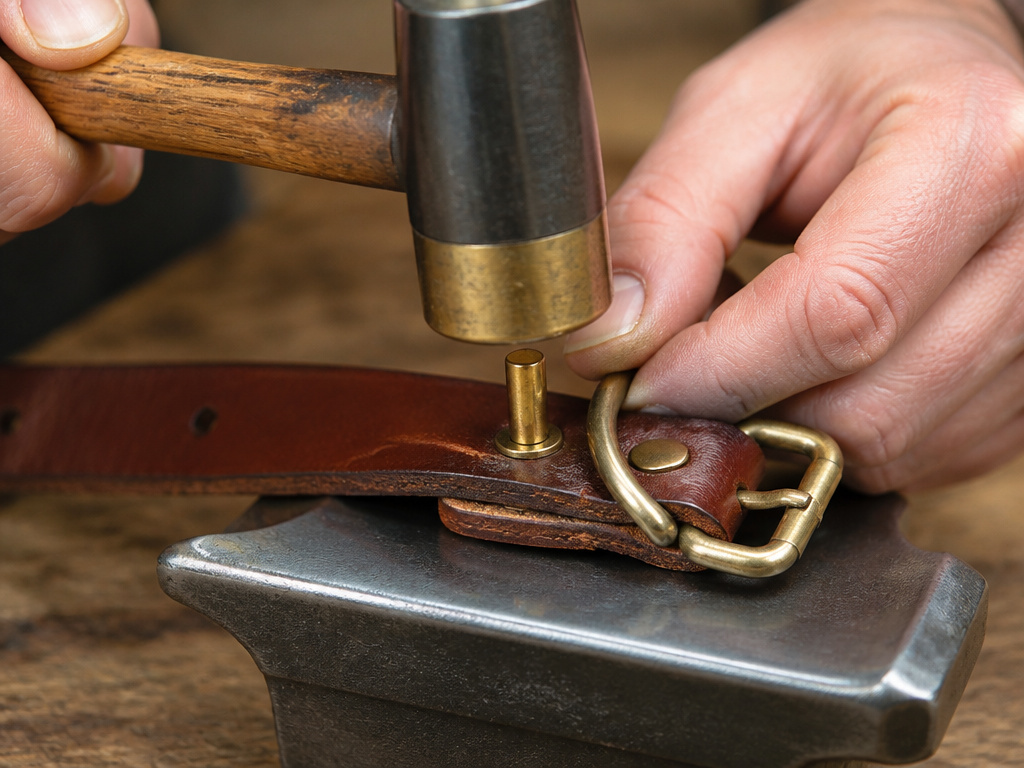 The buckle and D-ring are what take the strain, so how you attach them isn’t a detail, it’s the foundation. You have two main options: tubular (or double-cap) rivets and Chicago screws.
Tubular rivets are the classic, permanent choice. They consist of a post and a cap. You insert the post through the aligned holes from the front, place the cap on the back, and hammer the post end until it mushrooms and locks the cap in place. The force required is more than most people expect.
You cannot hit the rivet too hard! If you don’t set it firmly enough, the collar will fail, so if you’re not sure, tug the leather the same way your dog on a leash would, and reset the rivet if need be. . Ana Poe, Make: Magazine
That’s not an exaggeration. A poorly set rivet will have a visible gap under the cap, and you’ll be able to feel movement between the leather layers. That little bit of play works loose over time with every tug, eventually leading to failure.
Chicago screws (also called screw posts or bolt rivets) are a fantastic alternative, especially for beginners or for heavier-duty collars. They are two-part threaded fasteners: a male screw and a female receptacle. You simply insert them through the holes and screw them together. The advantage is that they’re removable and adjustable, and they provide tremendous clamping force without special tools. Weaver Leather Supply specifically recommends them for larger collars where added strength is needed.
Process: Slide the buckle onto the strap first, then fold the skived end back. Insert your rivet or Chicago screw through all layers. If using a rivet, place the assembled rivet on your steel anvil or plate and strike the post end squarely with your mallet until the metal flows and grips tightly. Repeat for the D-ring. Always do a pull-test when finished.
For a strong, active dog, the choice between these methods is a key factor to choose a leather dog collar design that will last.
Finishing Touches: Edges, Conditioning, and Personalization
With the hardware secured, your collar is structurally complete. Now you elevate it from functional to finished. The edges you beveled earlier now get their final treatment.
Burnishing the edges seals the leather fibers, gives a polished look, and prevents fraying. You can use a dedicated burnishing tool, a wooden slicker, or even a piece of canvas. The process involves rubbing the edge rapidly while applying slight pressure, generating friction that melts the fibers together into a smooth, rounded edge. Some makers use a dab of water or gum tragacanth to aid the process.
Conditioning is the last step. Apply a leather conditioner like Obenauf’s, a blend of mink oil and beeswax works well, with a clean cloth. Work it into the leather thoroughly, but avoid soaking the areas around the rivets. Conditioning nourishes the hide, restores suppleness, and provides a layer of water resistance. Do this after assembly because conditioning can make leather slightly more pliable; you want the rivets to set in the leather’s final, stable state.
Common mistake: Conditioning the leather before attaching hardware. The oils can lubricate the rivet posts, preventing a truly solid mechanical grip as the metal mushrooms.
Personalization is where you make it yours. This can be as simple as using a leather stamp to emboss your dog’s name or a decorative pattern. You can also use metal studs, dye the leather with professional dyes, or even add a stitched border. If you like the classic look, our review of rolled leather collars explains why that style is both comfortable and durable. For permanent identification, consider a collar with a nameplate.
Frequently Asked Questions
What is the best leather for a DIY dog collar?
For a balance of durability, workability, and cost, 7/8 oz. Top-grain leather is an excellent starting point for most dogs. Full-grain is superior for long-term durability and patina but can be stiffer and more expensive. Avoid split leathers for any dog that isn’t extremely gentle on its gear.
How much extra length should I add to my dog’s neck measurement?
The consistent advice from experienced makers is to add 10 inches. This accounts for the fold-over to attach the buckle, the D-ring section, and a surplus of adjustment holes. It’s always easier to trim later.
Can I use a regular hammer and nails instead of rivets?
No. Common nails will split the leather and rust quickly, leading to a weak and unsanitary connection. You must use hardware designed for leather: either tubular rivets set with a mallet or Chicago screws, which provide a strong, removable connection without special tools.
How do I make sure the rivets are secure?
After setting, perform a pull test. Grab the D-ring and the main body of the collar and tug firmly in opposite directions, simulating a dog’s pull. If you see any gap opening between the leather layers or feel movement, the rivet is not set tightly enough and must be replaced and re-set with more force.
How do I care for my handmade leather collar?
Regular care will extend its life for years. Wipe it down with a damp cloth if it gets dirty. Every few months, apply a light coat of leather conditioner to keep the hide supple and prevent drying and cracking. Avoid submerging it in water or using harsh soaps. For a complete routine, see our guide on how to care for a leather dog collar.
The Bottom Line
Making a leather dog collar is a rewarding project that yields a piece far more durable and personal than most store-bought options. The process boils down to precise measuring, deliberate cutting, and uncompromising hardware setting. Remember the 10-inch length buffer and the eighth-inch cutting margin, these small allowances prevent big frustrations.
The collar’s longevity is determined at your workbench. A rivet struck with decisive force and leather conditioned after assembly will stand up to years of use. If your first attempt isn’t perfect, that’s normal. Leather is a forgiving teacher. The next one will be better, and the one after that will be something you’re genuinely proud to buckle around your dog’s neck. Now you understand the leather better, so you can make that confident choice.
