
How to Protect Leather from Cats with Deterrents & Covers
This post contains affiliate links. As an Amazon Associate, we earn from qualifying purchases.
To protect leather from cats, you need a layered defense: physical barriers like scratch guards or covers, management like nail trimming and training, and the right repair approach when damage happens. The single scratch from kneading requires a 7-to-9 layer glue process; a deep cut is a job for a professional.
That distinction, between a surface scuff and a through-cut, is where most owners go wrong. They reach for olive oil or a generic balm on damage that needs professional sanding and color-matching. The leather’s type, like aniline versus pigmented, changes everything. So does the cat’s behavior. Let’s get past the one-size-fits-all tips and break down what each layer of defense actually does, and when to call in the pros.
Key Takeaways
- Kneading damage needs a multi-layer leather binding glue repair; deep cuts cannot be fixed DIY.
- Scratch guards and double-sided tape physically block claws but must be reapplied.
- Trim nails every 2–3 weeks; plastic nail caps last 4–6 weeks and prevent sharp tips from contacting leather.
- Professional leather repair for a single scratch starts around $100, with complex jobs costing thousands.
- Training an adult cat to use a scratching post consistently takes 3–8 weeks of daily reinforcement.
Why Cats Scratch Leather in the First Place
It’s not malice. Scratching is as natural to a cat as stretching is to you after a long sit. They do it to shed the outer sheath of their claws, mark territory with scent glands in their paws, and stretch their back and shoulder muscles. Leather, with its satisfying texture and give, is an irresistible target. A bored or under-exercised cat will scratch more. So the first step in any protection plan focuses on the cat rather than the leather. Providing structured playtime and environmental enrichment cuts the scratching impulse at the source.A tired cat is a cat more interested in napping on the sofa than shredding it.
The Physical Barrier Layer
This is your front line: stop the claws from ever touching the leather surface.
Scratch guards are plastic or sisal panels that attach with double-sided tape to the arms, back, or sides of your furniture. They take the abuse so the leather doesn’t. Look for clear models if you want them to be less noticeable. They work because they create an immediate texture change under the paw, satisfying to scratch, but not your couch.
Where this goes sideways: Placing scratch guards only where you think the cat scratches. Cats are creatures of habit, but they explore. If you cover the left arm and they prefer the right, you’ve wasted the guard. Watch for a day or two first. Cover every favored spot.
Furniture covers and throws are the most straightforward barrier. A heavy blanket, a dedicated pet cover, or a fitted slipcover physically separates claw from leather. This is the single most effective method if you’re not concerned about aesthetics all the time. A high-quality, tightly-woven fabric like canvas or a textured knit is harder for claws to get a purchase on than a smooth, silky material. For a secure fit that a determined cat can’t easily pull off, consider a non-slip sofa cover.
| Barrier Type | Best For | Downside |
|---|---|---|
| Clear adhesive scratch guards | Spot protection on visible areas | Adhesive can leave residue; needs replacement. |
| Full sofa slipcovers | Total coverage, style flexibility | Can be bulky; may shift if not fitted. |
| Heavy woven throws | Quick, flexible, low-cost solution | Requires daily re-dressing; can be pulled off. |
The goal here is to create a habit-breaking pause, not to win a design award. A cover removes the sensory feedback, the sound, the feel, that makes scratching leather so rewarding.
The Management Layer: Claws and Training
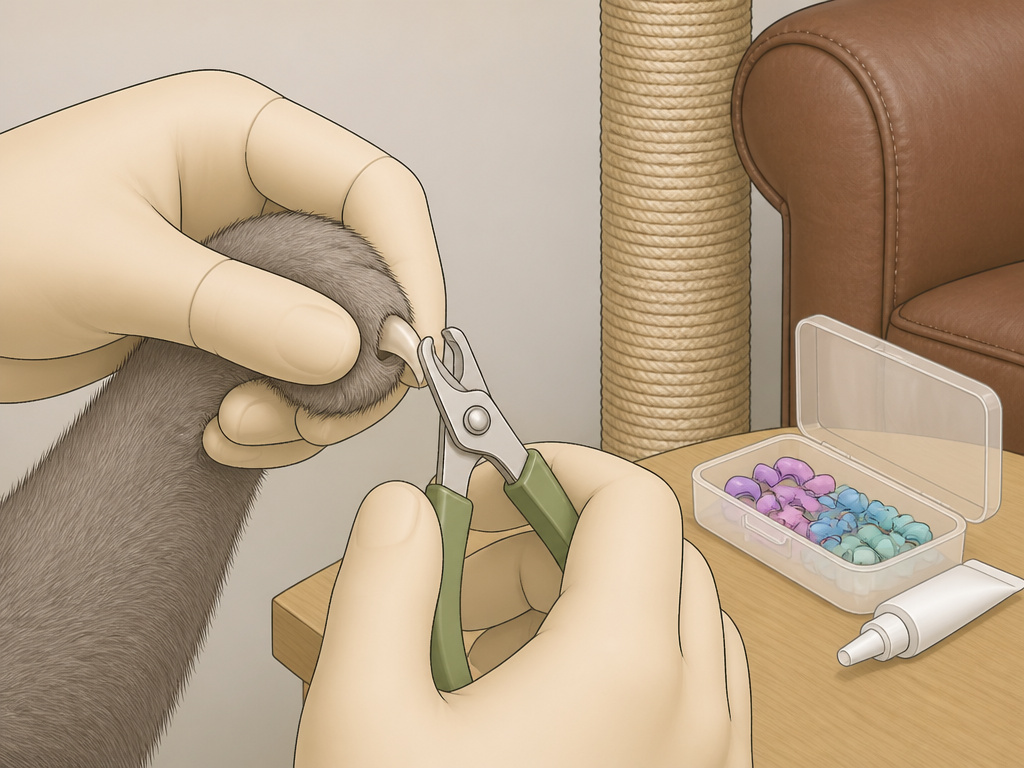
If barriers are the wall, management is the diplomacy. You’re working with the cat’s nature, not just blocking it.
Nail maintenance is essential. A blunt nail does far less damage than a sharp one. Trim the very tips every 2–3 weeks, just enough to remove the needle point. If your cat fights the clippers, plastic nail caps like Soft Paws are a brilliant workaround. Glued over the natural nail, these vinyl sheaths last 4–6 weeks and make every scratch action harmless. They don’t hurt the cat and fall off with normal nail growth.
Training and redirection takes patience, especially with an adult cat. The timeline isn’t days; it’s weeks. * Kittens can learn in 1–2 weeks. * Adults with set habits need 3–8 weeks of consistent work. * Stubborn cases can take 2–3 months.
The protocol is simple but must be daily: place a tall, sturdy scratching post right next to the damaged furniture. Sprinkle catnip on it. Reward the cat with a treat or praise every single time you see them use it. The moment you see them approach the leather, gently pick them up and place their paws on the post. This approach makes the right choice easier and more rewarding than the wrong one, avoiding any need for force. Pair this with a deterrent on the leather itself, like a strip of double-sided tape, which feels unpleasant on their paws.
I learned the hard way that skipping the test step leads to disaster. In a hurry to repair a bag, I once used a dye that was chemically incompatible with the existing finish. It peeled in hours, creating a bigger mess. The same principle applies here: test your training aids and deterrents on a hidden patch of leather first. What works on one type might damage another.
The Two Types of Cat Scratches, and How to Fix Them
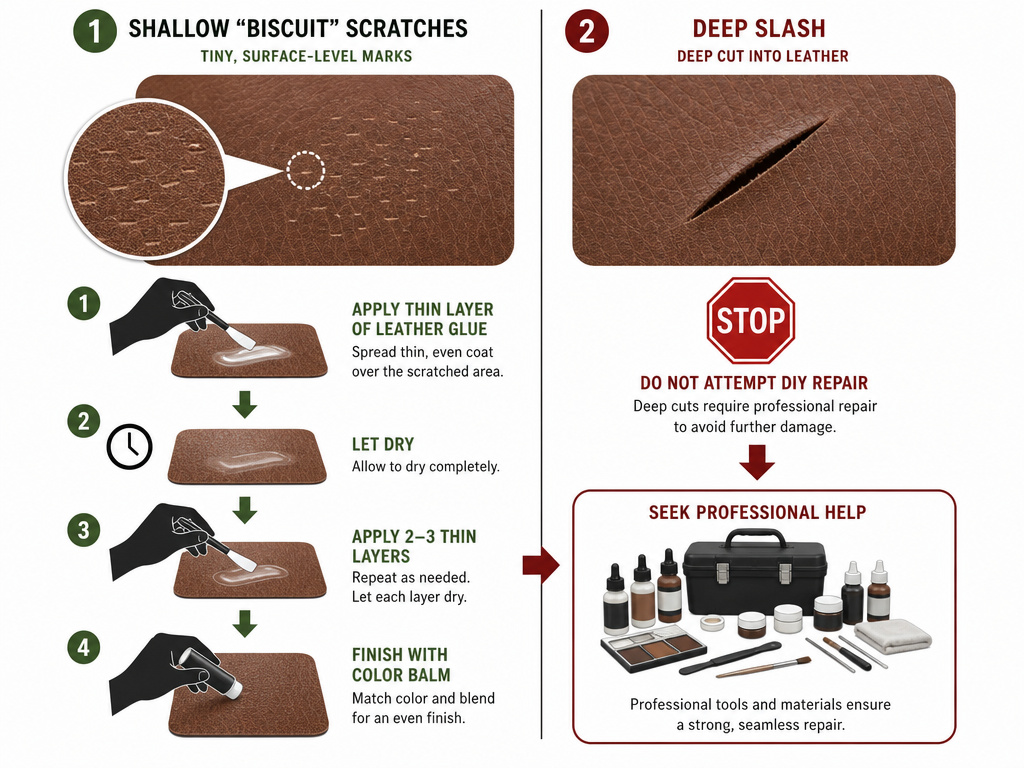
When prevention fails, you need the right repair. Cat damage falls into two categories, and your response depends entirely on which one you’re facing.
Kneading “Biscuits”: These are the clusters of tiny, shallow scratches from your cat pushing their paws in and out. They pill the surface and mar the finish but don’t cut deep.
The repair for kneading damage is a slow, layered process. Clean the area with a leather-specific cleaner, then apply a leather binding glue with a sponge. You must apply 7 to 9 thin coats, allowing each to dry completely before the next. This rebuilds the surface. Finish with 4-5 coats of a leather finish product to seal and protect it.
Swiping Scratches: These are the long, dramatic slashes from a running cat or an aggressive scratch. They can be surface-level discolorations or, if deep enough, actual cuts through the leather hide.
- Surface Scuffs: Hide these with a leather recoloring balm matched to your furniture. It’s a cosmetic cover-up, not a structural repair.
- Deep Cuts: This is the red line. If the scratch has cut through the leather, no DIY fix will hold. The tension on a couch or chair will pull a glued cut open again. This is a job for a professional.
The difference is critical. Trying a home fix on a deep cut wastes time and money, and can make a professional’s job harder later. Which brings us to the big question.
DIY Repair vs. Calling a Professional: The $100 Rule
Rachel Wilson of Hub Leather Repair & Restoration in Massachusetts has seen the fallout. “We’ve just seen too many DIY disasters,” she notes. The hardest parts are sanding without gouging the leather and matching the color exactly. Sunlight and moisture change leather’s color over time, so your repair can stand out as a mismatched patch.
Let’s be clear about one thing. Some damage you can handle. Some you absolutely cannot.
Call a pro when:
- The scratch is a deep cut or tear.
- The furniture is aniline leather (dyed through, not top-coated). It’s far harder to recolor.
- You’ve tried a home remedy that made things worse.
- The damage is widespread or on a highly visible area like a seat cushion.
According to industry estimates, professional repair for a single cat scratch starts around $100. Complex jobs involving large areas, color blending, or structural work can run into the thousands. It’s an investment, but it’s the only path to a near-invisible repair on valuable furniture. For more on navigating these repairs, our guide on how to fix cat scratches on leather breaks down the decision tree.
What Doesn’t Work (And Can Do Harm)
A lot of well-meaning advice can actually damage your leather further. Let’s clear the deck.
- Olive Oil & Baking Soda: These home remedies are worse than useless. Olive oil can make the leather absorb liquids more readily, leading to dark stains. Baking soda is desiccant, it dries out the leather, causing it to crack.
- Apple Cider Vinegar Deterrent: Spraying this on leather to repel cats is risky. Its low pH can degrade the finish over time, especially if over-applied or if the leather absorbs it.
- Generic “Leather Conditioners” After Damage: Applying a conditioner to a fresh scratch before repairing it can seal dirt and oils into the wound, complicating any future professional repair.
The practical takeaway? If you’re going to try a DIY fix, use products made for leather repair, not items from your pantry. And for ongoing leather furniture care, use conditioners designed for your leather type.
The Cover-Up Strategy (and Why It’s Not Giving Up)
Sometimes, the most elegant solution is to simply cover the problem area, not with a temporary throw, but with a dedicated, fitted cover. This is especially true for older furniture with accumulated wear or for households with multiple cats where constant vigilance is exhausting.
A slipcover certified to the OEKO-TEX Standard 100 does three things: It provides a complete physical barrier. 2. It can refresh the look of your room. 3. It removes the psychological stress of watching your cat near the leather.
When selecting a cover for protection, prioritize fit and texture. A loose cover is a playground; a tight, fitted couch cover stays in place. Choose a fabric with a rough or nubby weave that cats find less appealing to dig into than smooth leather. It’s a pragmatic choice, not a defeat.
The One Product You Should Skip
The market is full of sprays and creams that promise to make leather “scratch-proof.” Ignore them. No topical treatment can make leather impervious to a determined cat’s sharp claws. These products may add a slight protective coating or change the surface feel temporarily, but they are not a forcefield. Relying on them alone gives a false sense of security. Your money and effort are better spent on the physical and management layers we’ve already discussed. For a look at products that offer realistic protection, our review of the best leather protector for cats evaluates them on real-world performance, not marketing claims.
Frequently Asked Questions
Can leather furniture be cat-proof?
No material is truly cat-proof, but leather is more resilient than many fabrics. It won’t snag and pull like tweed or velvet. The goal isn’t cat-proofing; it’s damage management through barriers, training, and nail care.
What is the fastest way to stop my cat from scratching?
There is no instant fix. The fastest route combines an immediate physical barrier (a cover or guards) with concurrent nail trimming. Training for permanent change takes consistent effort over weeks.
Are some leather types more resistant to cats?
Yes. Pigmented (corrected-grain) leathers with a thick protective topcoat are more resistant to surface scratches than porous, unprotected aniline leather. However, no leather is immune to a deep cut from a sharp claw.
Is it cruel to use nail caps on my cat?
No. Properly applied nail caps are safe, painless, and a humane alternative to declawing. They allow the cat to perform all natural scratching behaviors without causing destruction. They shed naturally as the nail grows.
Before You Go
The most common mistake is treating all scratches, and all cats, the same. Match your response to the depth of the damage and the age of the cat. A kitten’s kneading needs a different approach than an adult’s territorial slash.
If you take one action this week, make it a nail trim. Blunt the weapons. Then, assess your sofa’s most vulnerable spot and deploy a physical barrier there. That combination gives you breathing room to plan the longer-term training.
Remember, protecting leather from cats is a system, not a single product. It combines quick barriers with patient training and the wisdom to know when a scratch is beyond your fix. Start with the nails and a cover. Everything else builds from there.
