
Leather Car Seat Repair: The TSB Iron Temp Most Shops Miss
This post contains affiliate links. As an Amazon Associate, we earn from qualifying purchases.
This post contains affiliate links. As an Amazon Associate, we earn from qualifying purchases.
Repair leather car seats by applying controlled heat, steam, or adhesive, depending on the damage. Shallow wrinkles respond to a steamer set to manufacturer specs; deeper creases may require ironing at 284–356°F with a wet cloth barrier. Detached upholstery often needs the underlying metal clips bent or replaced.
You’ve seen the TSBs. They say “iron at 284-356°F” and “don’t steam leatherette,” then stop. That’s the official stance, but it leaves out the part where a standard home iron at 300°F will melt a vinyl seat bolster if you misjudge the material by half an inch. The leather will tell you what it needs, if you know how to listen.
What follows: the three factory-approved repair paths pulled straight from the NHTSA bulletins, the edge cases that break them, and the one structural failure you can fix for about $20 in parts but most dealerships will call a $400 seat-cover replacement.
Key Takeaways
- The official ironing temperature for leather seat wrinkles is 284–356°F (140–180°C), but the leather’s own heatproof limit is only around 212°F. Use a water-soaked cloth barrier.
- Leatherette and vinyl trim cannot be steamed or ironed; the heat will melt or blister the material immediately.
- A detached thigh bolster is often caused by fatigued metal retainer clips, part number 52 10 7299673, which can be bent or replaced.
- Perforated leather sections are a no-go for direct steam application; the moisture soaks through and can delaminate the backing.
- For color-matched repairs, products like Colourlock Leather Fresh Paint or the Fiebing’s Leather Repair Kit are professional-grade choices.
Repairing Leather Car Seats: The Three Official Methods
Commercial steamer method (preferred), heat gun method (secondary), and ironing method are the three NHTSA-approved approaches for wrinkle reduction. The ironing method specifies a temperature range of 284–356°F (140–180°C) and cautions against applying the iron directly to trim beading or side bolsters.
The factory doesn’t leave this to guesswork. Their technical service bulletins lay out a clear hierarchy: steam first, apply dry heat second, and use an iron as a last resort for set-in creases. Each method trades control for penetration. Let me share what I’ve learned about why that order matters.
A handheld garment steamer delivers moisture at a distance. The leather’s surface never gets as hot as the steam itself, which reduces the risk of scorching or hardening the topcoat. It’s the safest starting point. A heat gun, like the ones used for stripping paint, focuses dry heat on a smaller area. You get deeper penetration into the leather’s core, which is why it’s the backup plan for tougher wrinkles. The iron is the nuclear option, direct, conductive heat through a damp cloth. It provides the most aggressive crease-removal power, which is why the factory caps the temperature and demands a wet barrier.
Common mistake: Running a heat gun over the same spot for more than 10 seconds. The surface temperature can spike past 250°F in under 15 seconds on most tools, and that’s when the leather’s topcoat starts to cook into a hard, shiny glaze. Move in slow, wide arcs.
The Steamer Method: Moisture Without Madness
Grab a handheld garment steamer, not a wall-mounted unit. Fill it with distilled water to prevent mineral deposits. Hold the nozzle about two inches from the leather and move it in slow, overlapping passes. You’re looking for the leather to darken slightly as it absorbs moisture and becomes pliable. That’s your cue to stop steaming and start stretching.
Here’s the practical takeaway. Never point the steamer head directly at perforated sections. The holes channel steam straight into the foam backing, which can lead to mold or delamination over time. And if your seats are imitation leather, often labeled as “leatherette” or “vinyl”, put the steamer down. That material can’t handle the heat and will warp or bubble.
The Heat Gun Method: Precision Dry Heat
If steam didn’t do the trick, a heat gun can tackle more stubborn wrinkles. Set it to its lowest setting, usually around 150°F. Keep the nozzle moving in a six-inch circular pattern and never linger. The goal is to warm the leather evenly, not to cook it.
You’ll know you’ve gone too far by smell first, not sight. A faint, sweet odor like burnt plastic means the topcoat is overheating. Back off immediately. For this job, a variable-temperature heat gun is worth the investment over a basic hardware-store model; the extra control is everything.
The 3-Step Ironing Method (The Last Resort)
This is where the factory specs get specific. The NHTSA-issued repair procedure for certain models calls for an iron set between 284 and 356°F. That sounds extreme until you realize you never let the iron touch the leather.
- Soak a clean, white cotton cloth in water and wring it out so it’s damp, not dripping.
- Lay the cloth over the wrinkled area.
- Set your iron to the “wool” setting (typically around 300°F) and press it firmly onto the damp cloth for 3-5 seconds, then lift.
The steam generated under the cloth relaxes the leather fibers. The iron’s weight and heat set the new, flat shape. Do not iron seat bolster sides or any central belt-shaped trim. These areas are often made from a different, heat-sensitive material and will melt or discolor.
When the Leather is Actually Coming Apart
A wrinkle is one thing. A section of upholstery pulling away from the seat frame is a structural failure, not a cosmetic one. The most common spot is the front of the thigh support, right where your knees bend. The cause is almost always the same: little metal retainer clips that have lost their spring.
I learned this the hard way on a client’s car. The dealership quoted $400 for a new seat cover. The official NHTSA technical service bulletin for this exact issue lists the culprit as “loose metal retainer clips” and the fix as “reinstalling upholstery, bending clips to exert more force.” We pulled the seat, bent three clips with a pair of needle-nose pliers, and snapped the leather back into place. Total cost: an hour of time. The part number for the entire thigh support carrier, should a clip be broken, is 52 10 7299673.
| Symptom | Likely Cause | Official Fix | DIY Feasibility |
|---|---|---|---|
| Upholstery detaching from thigh bolster | Fatigued metal retainer clips | Bend clips for more tension; replace carrier if broken | High – requires seat removal & basic tools |
| Deep horizontal wrinkle on cushion | Leather stretched over time | Steaming or ironing per TSB | Medium – requires heat tool & caution |
| Glossy, hardened spots on leather | Overheating during repair | Cannot be reversed; prevent with controlled heat | N/A – prevention only |
| Leather cracking along stitch lines | Dryness & friction | Hydrate with conditioner; fill cracks with flexible repair compound | Medium – color matching is tricky |
Where this goes sideways: Using super glue to reattach a detached section. Use a flexible adhesive like Tear Mender Instant Fabric & Leather Adhesive only as a last resort if the clips are truly gone.
Matching Materials: Genuine Leather vs. Imitation
Not everything that looks like leather is. And the repair protocol changes completely based on what you’re actually touching. This is based on years of practical experience seeing well-intentioned fixes go wrong on the wrong material.
Genuine leather is a natural hide. It can be steamed, carefully heated, and conditioned. The factory-recommended protectant is a specific leather care foam (product code A 001 986 59 71). It absorbs, nourishes, and doesn’t sit on top like a silicone glaze.
Imitation leather, leatherette, vinyl, bicast, is a plastic coating over a fabric or split-hide base. Heat is its enemy. An iron will melt it. A steamer can cause the plastic layer to separate from the backing. Your only repair options for cuts or cracks are specific vinyl repair kits car seats often include, which use a liquid compound and a graining paper to mimic the texture.
Easy to miss: The center “belt” design or bolsters on many modern seats are often a different, softer material than the main cushion, even on all-leather trims. They scorch at a lower temperature. Always test heat on an inconspicuous spot first, like under the seat where it meets the backrest.
The Right Kit for the Job
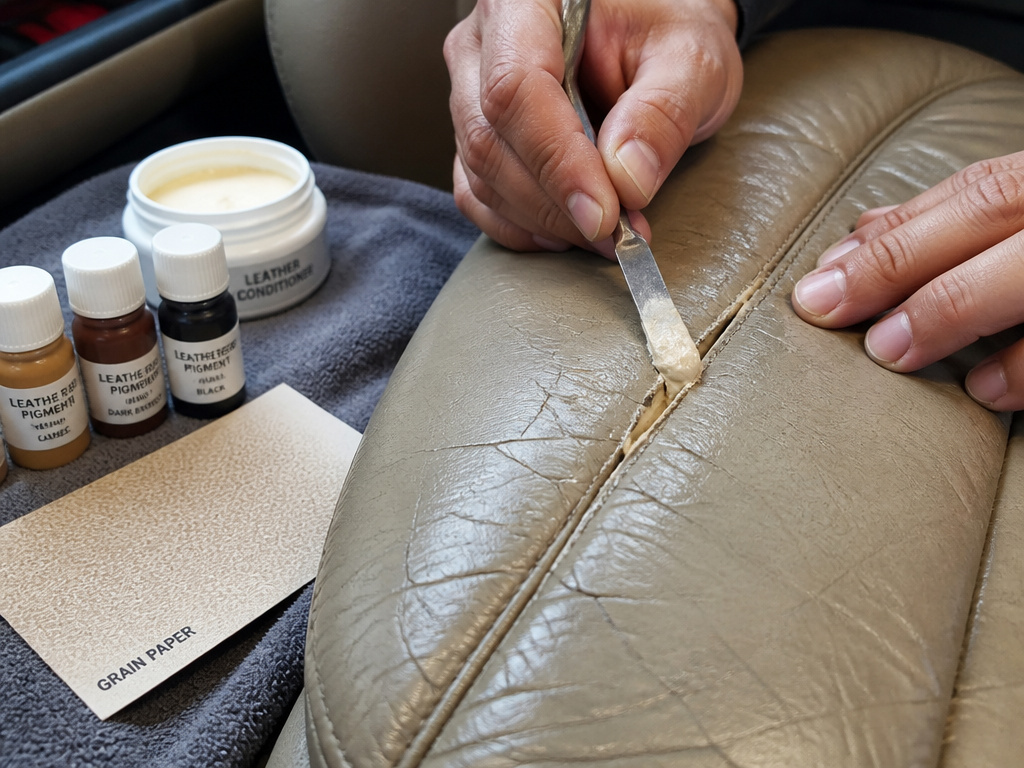 Walking into an auto parts store presents a wall of options. Here’s a straightforward guide to what each type actually does. Your choice hinges on whether you’re dealing with a scratch, a crack, or a clean tear.
For color restoration and small scratches, a pigment-based leather paint like Colourlock Leather Fresh Paint is the gold standard. It’s used by professional detailers because it flexes with the leather and doesn’t crack. It requires precise color matching, which they facilitate with a custom-mix system.
For filling cracks and repairing torn seams, a compound-based kit like the Fiebing’s Leather Repair Kit is the right tool. These contain a flexible filler paste, pigments, and a grain paper. The paste fills the void, and the grain paper re-embosses the surface texture after it cures. They work best on areas without heavy flex.
For general maintenance and prevention, a quality leather conditioner for car seats is essential. It replaces the oils lost to sun and heat, keeping the leather supple and resistant to cracking. Think of it less as a polish and more as necessary hydration.
Frequently Asked Questions
Can you fix cracked leather car seats?
Yes, but “fix” means filling and concealing, not restoring the original material. Use a flexible leather filler from a repair kit, color-match with a dye or paint, and seal it. The repair will be visible on close inspection and may crack again with time and flexing, but it can significantly improve appearance.
Does steam really remove wrinkles from leather seats?
Yes, steam can relax and remove mild wrinkles from genuine leather. It works by introducing moisture and heat, making the fibers pliable. It is the factory-preferred method for a reason. However, it is ineffective on deep, set-in creases and is strictly forbidden on imitation leathers.
What is the best glue for reattaching leather car seats?
For a temporary hold, a flexible adhesive like Tear Mender Instant Fabric & Leather Adhesive can work. However, the correct, permanent repair is almost never glue. It is to locate and secure the original metal or plastic retainer clips, as outlined in the applicable model and VIN list for your vehicle. Glue should be a last resort.
How do you repair a tear in a leather car seat?
Clean the area with a leather cleaner. Apply a flexible leather repair compound into the tear, overfilling slightly. Use a putty knife to smooth it flush. Once cured, lightly sand the area, apply a color-matched leather dye or paint, and finish by pressing a grain paper onto the surface to replicate the texture.
Can you use a regular iron on car leather?
You can, but you must use a protective, damp cloth barrier and strictly control the temperature. The official specification calls for 284–356°F (140–180°C). Exceeding this, or applying the iron directly, will scorch and harden the leather. This method carries the highest risk and is recommended only for severe wrinkles after other methods fail.
Before You Go
One rule most guides skip: if your leather is stiff, brittle, and cracked all over, no repair kit or iron will bring it back. You are managing the decline, not reversing it. In that case, your realistic options are a high-quality seat cover or a professional reupholster car seats leather job.
The practical takeaway is to act early. A wrinkle addressed with a steamer today is a simple fix. That same wrinkle, left for a year, becomes a permanent crease that demands an iron. And a loose clip tightened this month prevents a torn seam next year. Leather rewards consistent, mindful care leather car seats require, not heroic last-minute rescues.
Understand leather better to make confident choices. Start by identifying your material, then match the repair to the problem, not the other way around.
