
Master Hand Sewing Leather With Two Needles & Saddle Stitching
This post contains affiliate links. As an Amazon Associate, we earn from qualifying purchases.
To sew leather by hand with two needles, you use the saddle stitch. This method employs a single length of waxed thread with a needle on each end, passing each needle through the same hole from opposite sides to create a self-locking seam inside the leather that is stronger and more repairable than any machine stitch.
That self-locking action is the whole point. When you pull the two threads tight, they cinch together in the middle of the hole, creating friction that prevents unraveling if one thread breaks. This isn’t about making do without a machine; it’s about building a seam that will outlive the leather around it. Let me share what I’ve learned.
The rest breaks down the details: the exact tools that matter (and the ones that don’t), how to set up your leather for a clean stitch line, and the step-by-step hand motion that makes the lock. By the end, you’ll know why a saddle stitch with two needles and a single thread is the benchmark for durable leather goods.
Key Takeaways
- The saddle stitch creates a locked seam inside each hole, making it dramatically stronger and more repairable than a machine lockstitch on leather over 3 oz.
- A diamond-shaped awl blade or a pricking iron makes clean holes that don’t tear the leather fibers, which is critical for stitch longevity.
- Pull thread tension evenly, not tightly, thinner leather puckers if you pull too hard, while thicker leather needs a firm, consistent snugness.
- Cut your waxed thread to at least three times the length of your seam; anything shorter risks running out before you finish, forcing a weak knot.
- Beeswaxing your own thread before stitching reduces friction, helps the thread lay flat, and seals the stitch holes against moisture.
Why the Saddle Stitch is the Only Answer for Leather
A machine lockstitch has a single point of failure. It’s a chain of loops on the underside held by a bobbin thread. If that thread wears through or breaks, the whole seam can unravel. The saddle stitch doesn’t have that weakness.
With two needles on one thread, each stitch hole gets two passes. As you pull the threads, they lock against each other in the middle of the leather. If one thread fails, the other holds the seam in place. It’s a redundant, self-securing system. Think of it as a series of tiny knots inside the leather itself, each one independent. This is why a well-executed hand saddle stitch is stronger than anything a domestic, and most industrial, sewing machines can produce on medium-weight leather and up.
The saddle stitch is the “most frequently used” hand stitch for leatherwork, where one length of waxed thread has a needle attached to each end. The exact position and angle of the awl’s entry for each hole is precisely marked beforehand by a pricking iron or stitch-marking wheel.
That’s the other half of the answer: precision. The strength relies on clean, consistent holes. A jagged hole cut by a dull tool creates a weak point where the thread can saw through over time. The rest of this guide is about getting that precision, then executing the simple cross-handed motion that builds the lock.
Tools You Absolutely Need (And One You Don’t)
You can start with just four things: thread, two needles, an awl, and a way to mark your line. Everything else makes the job cleaner or faster, but isn’t strictly necessary.
Thread: Waxed linen or polyester braid. Linen (like the classic 18/3 cord) is traditional and strong, but modern braided polyester threads like Ritza Tiger Thread are incredibly consistent and abrasion-resistant. For a hand saddle stitch, Tiger Thread in 0.8mm or 1.0mm diameter is a fantastic default.
Needles: John James Needles in sizes 002 or 003 are the standard. They’re blunt, rounded-point needles designed to follow an awl hole, not puncture new ones. Don’t use sharp sewing needles; they’ll catch on the leather grain and fight you.
Awl: A stitching awl with a diamond-shaped blade is essential. The sharp, angled edges slice through leather fibers cleanly. A round awl or an ice pick will tear and compress the leather, making a weaker, uglier hole.
Marking Tools: An overstitch wheel (like a 6 SPI model) or a pricking iron. The wheel scores a dotted line; the iron cuts the holes directly. More on that choice next.
The Tool You Don’t Need (Yet): A stitching pony. It’s a fantastic third hand that clamps your work, but you can manage without it for small projects by using binder clips to hold the leather to a table edge. Invest in one once you’re committed.
Pre-Punching Holes: Awl vs. Pricking Iron
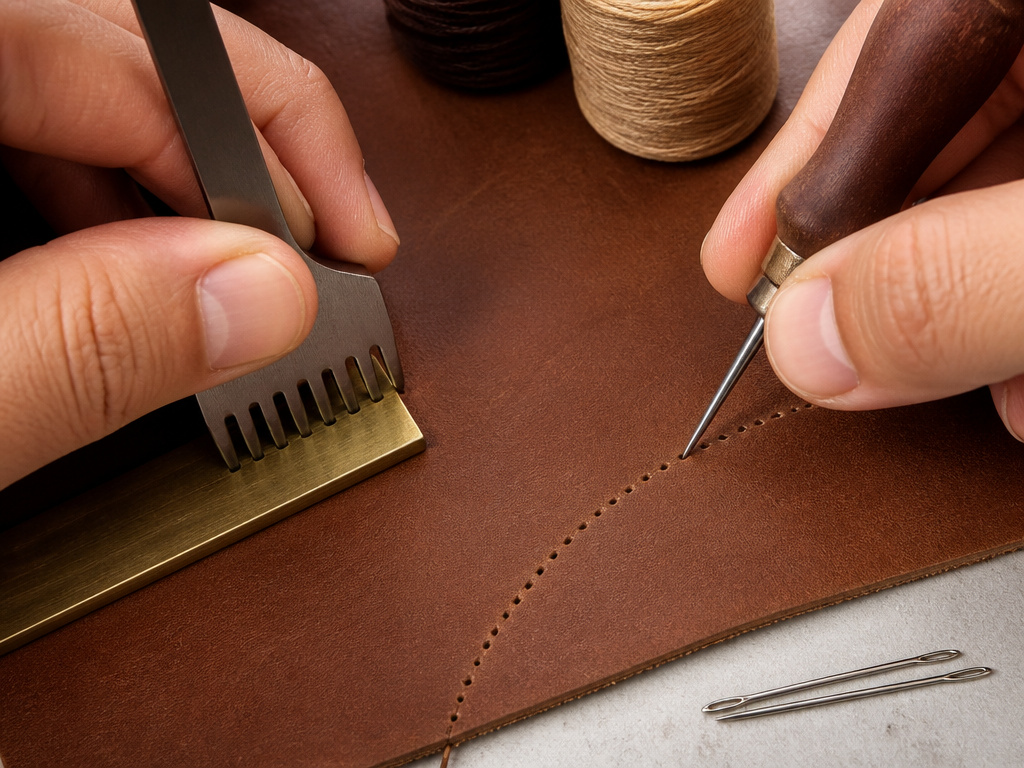
Your stitch line is only as straight as your holes. You have two main paths here, and the right one depends on your project’s shape.
The Pricking Iron Path
This is a multi-tined fork (like a 2 or 4 tooth iron) with blades set at an angle. You line it up and strike it with a mallet to cut several perfect holes at once. It’s fast and yields incredibly consistent, slanted holes that naturally accept the saddle stitch.
Where this goes sideways: Using a pricking iron on a curved seam. The rigid spacing of the tines can’t follow a curve, so your line will wobble. Save the pricking iron for long, straight seams like bag gussets or belt edges.
The Awl & Wheel Path
Here, you use an overstitch wheel to mark a dotted line, then follow each dot individually with your diamond awl. It’s slower, but it gives you complete control for curves, corners, and complex shapes.
The part nobody mentions: Awl angle matters. Keep the awl at a 90-degree angle to the leather surface when piercing. If you angle it, the holes won’t align from front to back, and your stitches will look twisted and feel rough on the underside.
| Method | Best For | Key Skill |
|---|---|---|
| Pricking Iron | Long, straight seams | Consistent mallet strikes |
| Awl & Wheel | Curves, corners, complex shapes | Maintaining a vertical 90-degree awl angle |
Thread Length, Waxing, and Needle Locking
Cut your thread too short, and you’ll be splicing in a new piece mid-seam with a bulky knot. Cut it too long, and you’ll spend the whole project wrestling with tangles.
The rule of thumb from saddle makers is straightforward: three times the length of your seam. If your seam is 10 inches long, cut at least 30 inches of thread. For thick leather or if you’re new and slower, go for three and a half times. The extra is cheap insurance.
Waxing Is Not Optional
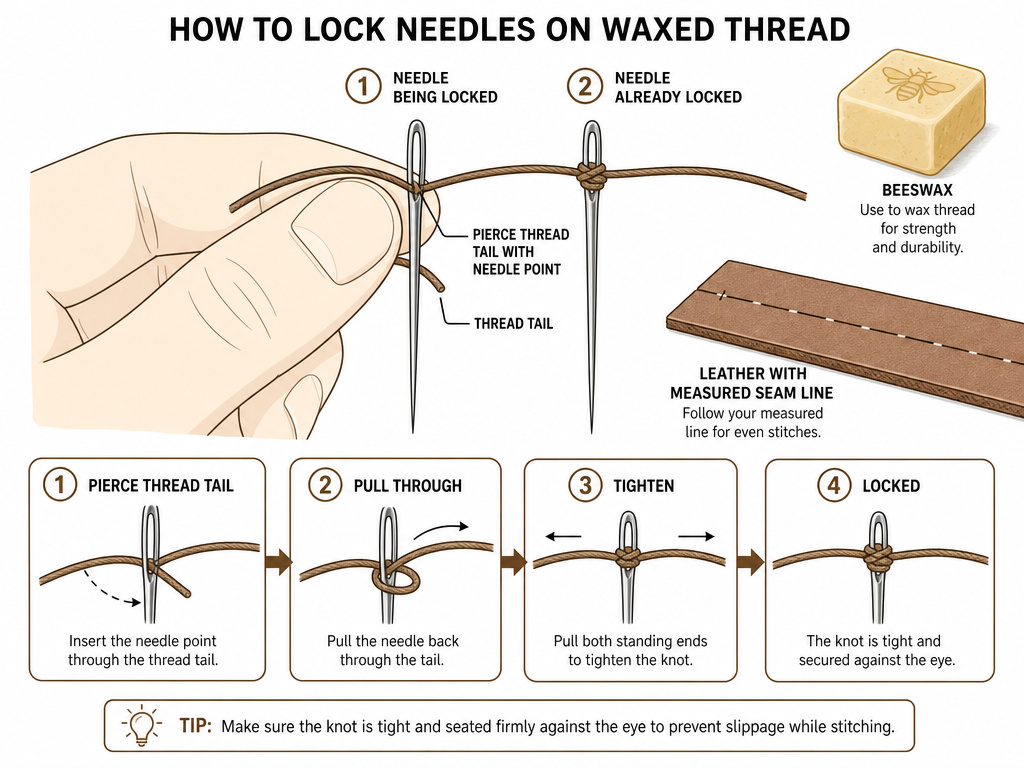
If your thread isn’t pre-waxed, you must wax it. Run the length through a block of beeswax a few times, pulling it firmly between your thumb and forefinger. The heat from friction melts the wax into the fibers. This does three things: 1. It strengthens the thread. 2. It lubricates the thread, reducing drag as you pull it through the hole. 3. It helps seal the stitch hole against moisture.
Locking the Needles
You don’t just thread the needle. You lock it on. After passing the thread through the needle’s eye, pull through a few inches. Then, pierce that tail with the needle’s point about a half-inch from the end. Push this small loop up toward the eye, then pull the long end of the thread to tighten the loop against the eye. Now the needle is fixed and won’t slip off during stitching. Do this on both ends.
The Saddle Stitch Sequence: Step-by-Step
Let’s walk through the actual hand motion. I’m assuming your leather is clamped or held firm, and your holes are punched.
- Start the First Hole. Take one needle (needle A) and pass it through the first hole from the front to the back. Pull the thread through until the length is even on both sides of the leather.
- The Cross. With needle A now in back, pass the other needle (needle B) through the same first hole, also from front to back. You now have both needles and threads through the first hole.
- Establish the Lock. Move to the second hole. Pass needle A (now in your right hand, coming from the back) through the second hole from back to front. Before you pull it tight, pass needle B (in your left hand, coming from the front) through the same second hole from front to back. The two threads should cross inside the hole.
- Pull Snug. Pull both threads away from each other with even tension. You should feel a soft, satisfying lock as the threads cinch in the middle. This is the saddle stitch forming.
- Repeat. Continue this pattern: right needle (A) goes back-to-front through the next hole, left needle (B) goes front-to-back through the same hole, pull snug. The needles are always chasing each other through consecutive holes.
I won’t recommend a speedy stitcher or sewing awl for a primary seam. They’re great for repairs, but that in-and-out motion produces an inconsistent, often weaker stitch compared to the controlled cross of a proper hand saddle stitch.
The Rhythm Tip
Don’t pull each stitch death-grip tight. Pull it snug, then give a tiny extra tug to set the lock. Consistent, medium tension beats variable, high tension every time. Your leather will lie flat, and the thread won’t cut itself against the hole edge.
Managing Thread Tension for Different Leathers
The pull that works for a 2 oz. Calfskin wallet will ruin a 8 oz. Saddle skirt.
Thin Leather (1-3 oz.)
Pulling too tight is the number one mistake. The leather has no body to resist the tension, so it will pucker and warp, creating a wavy seam line. Aim for a light, consistent snugness, just enough to close the hole and see the threads lie flat.
Medium Leather (4-7 oz.)
This is the sweet spot. You can apply firm, confident tension. The leather is thick enough to resist distortion, and the stitch will sink nicely into a pre-cut groove if you used one.
Thick Leather (8 oz.+)
Here, you need deliberate force. The thread is fighting the compression of a dense material. Pull firmly and evenly. You might even hear a slight creak as the threads lock, that’s normal. The goal is to get the threads to seat fully in the depth of the hole.
Common mistake: Changing your tension mid-seam. Your hands tire, and the pull weakens. If you feel fatigue, stop, reset your grip, and continue. An uneven seam is weaker than a consistently medium-tight one.
Finishing and Backstitching
When you reach the last hole, you need to secure the thread. Simply tying a knot on the surface leaves a bump and a point of abrasion.
The professional finish is a backstitch. Sew back through the last two or three holes you just made, following the existing stitch path. This doubles the thread through those holes, creating a massive amount of friction that holds everything permanently.
- After your final forward stitch, pass one needle back through the previous hole (following the path of the other thread).
- Do the same with the other needle through its corresponding path.
- Repeat for one more stitch if possible.
- Now, trim the thread ends flush to the leather surface, leaving about 1/8 inch.
The wax will hold the tiny tails in place, and the backstitch locks everything. Over time, the ends will retract into the hole, becoming invisible.
Frequently Asked Questions
Can I use regular sewing thread?
No. Regular cotton or polyester sewing thread lacks the tensile strength and abrasion resistance for leather. It will fray and break during stitching or under minimal stress. Always use a thread designed for leatherworking, like waxed linen or braided polyester.
What size needle should I use?
Match the needle to your thread and hole size. For 0.8mm thread, a John James size 002 needle is typical. The needle should slide through your pre-punched hole with just a hint of resistance, not loose, not forcing its way. If it sticks, your holes are too small or your needle is too large.
How many stitches per inch should I use?
It’s a balance of strength and aesthetics. For most general leatherwork (wallets, bags, belts), 6 to 8 stitches per inch is a great range. More stitches (higher SPI) looks refined but takes longer; fewer stitches is faster and more rugged. Refer to a guide like the Redox Saddles chart: for 3-6 oz. Leather, they recommend 11-9 SPI; for 7-10 oz., 10-8 SPI.
My needles keep getting stuck. What am I doing wrong?
First, check your holes. Are they cleanly pierced with a diamond awl, or are they torn and compressed? A clean hole is key. Second, ensure you’re following the correct needle path, each needle goes in from the designated side every time. If they cross paths inside the hole incorrectly, they’ll jam. A drop of beeswax on the needle itself can help in stubborn, thick leather.
How do I fix a broken stitch in a saddle-stitched seam?
This is the repair advantage. Because each stitch locks independently, you can often repair a single broken stitch without redoing the whole seam. Use an awl to carefully open the hole, thread a new piece of waxed thread with two needles, and replicate the saddle stitch through just that hole and its neighbors, tying off the new thread ends on the backside.
The Bottom Line
Mastering how to sew leather by hand with two needles isn’t about learning a hundred tricks. It’s about perfecting three things: cutting clean holes, locking your needles on a properly waxed thread, and maintaining even, appropriate tension as you cross your hands. The saddle stitch that results is more than strong, it’s honest craftsmanship.
Ignore the urge to rush. Speed comes from muscle memory, not force. Your first few seams will feel clumsy. That’s fine. Focus on the rhythm of the cross, the feel of the lock, and the straightness of your line. Once that click happens in your hands, you’ll understand why this centuries-old method is still the benchmark. The leather will tell you what it needs; your job is to listen and pull accordingly.
