
What Is a Leather Awl? The Tool That Makes the Stitch
This post contains affiliate links. As an Amazon Associate, we earn from qualifying purchases.
This post contains affiliate links. As an Amazon Associate, we earn from qualifying purchases.
A leather awl is a sharp, pointed hand tool used to pierce or enlarge holes in leather for stitching. Its primary job is to create a clean path for your needle and thread, not to cut the leather. The tool consists of a handle and a thin, tapered metal shaft, often interchangeable, that comes to a fine point.
That definition covers the basics, but the leather will tell you what it needs. An awl isn’t a universal hole-puncher. Using the wrong one on a refined project is how you turn a planned stitch line into a ragged cut.
What follows is a breakdown of the two main awl families, the specs that matter (like blade width and Rockwell hardness), and how to match this tool to your pricking irons. By the end, you’ll know which awl to reach for and why a simple, sharp point isn’t enough.
Key Takeaways
- A piercing awl makes holes for hand-sewing; a sewing awl (like a Speedy Stitcher) has an eye to create machine-like lock stitches and is a different tool.
- Match your awl blade width to your pricking iron tooth width. A blade that’s too wide enlarges the hole and risks cutting through to the leather’s edge.
- For saddle stitching, a diamond awl is standard. A round awl is for marking or opening pre-punched holes without cutting.
- The Federal Specification GGG-A-891B defines awl dimensions and hardness, with belt awl blades hardened to 30-40 HRC and bent-point awls to 60-65 HRC. Sharpening only the first millimeter of the blade to a very sharp edge, while leaving the sides polished and dull, prevents the awl from making the stitch hole too large.
The Core Function: Piercing vs. Sewing
Let’s be clear about one thing. Most conversations about “leather awls” mix two distinct tools: the piercing awl and the sewing awl. Confusing them sets you up for frustration.
A piercing awl is what you use with traditional hand-stitching. You push its point through the leather to create a hole, then follow with a separate needle and thread. Its job is to displace material, not to carry thread. This is the tool you’ll use with a saddle stitch after marking holes with a pricking iron.
A sewing awl, like the common Speedy Stitcher, is a self-contained stitching system. It has a needle with an eye, an internal bobbin, and a mechanism to create a lock stitch as you work. You use it more like a portable, hand-cranked sewing machine for repairs or joining thick materials. It’s a fantastic tool, but it’s not the primary awl for fine leathercraft.
The practical takeaway: When leatherworkers talk about an awl in the context of saddle stitching or working with pricking irons, they mean a piercing awl. The sewing awl is for a different set of jobs.
Anatomy of a Leather Awl
A piercing awl is simple, but every part has a purpose. Understanding the anatomy helps you choose a good one and use it correctly.
The handle needs to fill your palm. The Federal Specification GGG-A-891B states handles should be at least 1-1/8 inches thick. This isn’t arbitrary. A thin handle digs into your hand during hours of work. Traditional materials are seasoned hardwoods like maple or ash, or durable plastics. The shape often has flattened sides to prevent rolling and to give you rotational control.
The haft or ferrule is the metal collar that connects the handle to the blade. A tight, seamless fit here prevents wobble. A loose haft means a wobbly blade, and your holes won’t be straight.
The blade is the business end. It’s a tapered steel shaft that can be fixed or interchangeable. The point is its most critical feature. For leather sewing, you’ll primarily see diamond points and round points. The tang is the part of the blade that seats into the handle. A full tang that runs deep into the handle is stronger than a short, stubby one.
Blade length matters. Common “stick out” lengths are 18mm (short), 25mm (standard), and 29mm (long). A short blade is faster to pull in and out of pre-punched holes. A long blade is for piercing through thick stacks, think a saddle skirt or a bag gusset.
Types of Leather Awls and Their Jobs
You can group awls by their point shape and their specific trade use. The shape determines what the tool does to the leather.
| Awl Type | Point Shape | Primary Job | Best For |
|---|---|---|---|
| Diamond Awl | Four-sided, diamond cross-section | Piercing stitch holes for hand-sewing | General saddle stitching, working with pricking irons |
| Round Awl | Circular cross-section | Marking, opening pre-punched holes, delicate work | Scoring lines, opening holes without cutting, soft awl techniques |
| Stitching Awl (Sewing Awl) | Curved or straight needle with an eye | Creating lock stitches in heavy materials | Repairing canvas, gear, quick leather repairs without traditional stitching |
| Belt Awl (Harness Awl) | Diamond or flat, with multiple holes in blade | Making holes for belt tongues and buckles | Belt making, harness work, where multiple hole sizes are needed |
| Brad Awl | Very fine, sharp round point | Starting holes for small nails or screws | Woodworking, light marking on leather |
The diamond awl is the default for leather sewing. Its sharp edges cleanly cut through leather fibers as you push it through, creating a precise, consistent hole for your needle. The round awl is your marking tool. Its point displaces leather without cutting it, which is perfect for scribing a line or gently opening a hole you’ve already punched with an iron.
Here’s where I see beginners go sideways. They buy a generic “craft awl” and try to use it for everything. That tool might have a round point, which will crush and tear leather fibers when you try to pierce a new stitch hole. The result is a fuzzy, irregular hole that makes clean stitching impossible.
Where this goes sideways: Using a round awl to pierce new stitch holes. It mashes the leather instead of cutting it, leading to ragged holes and uneven thread tension in the finished seam.
For the vast majority of hand-stitched projects, you need a diamond awl. Brands like Barry King Tools and C.S. Osborne make excellent, durable models with interchangeable blades. That’s the one to invest in first.
Matching Your Awl to Your Pricking Irons
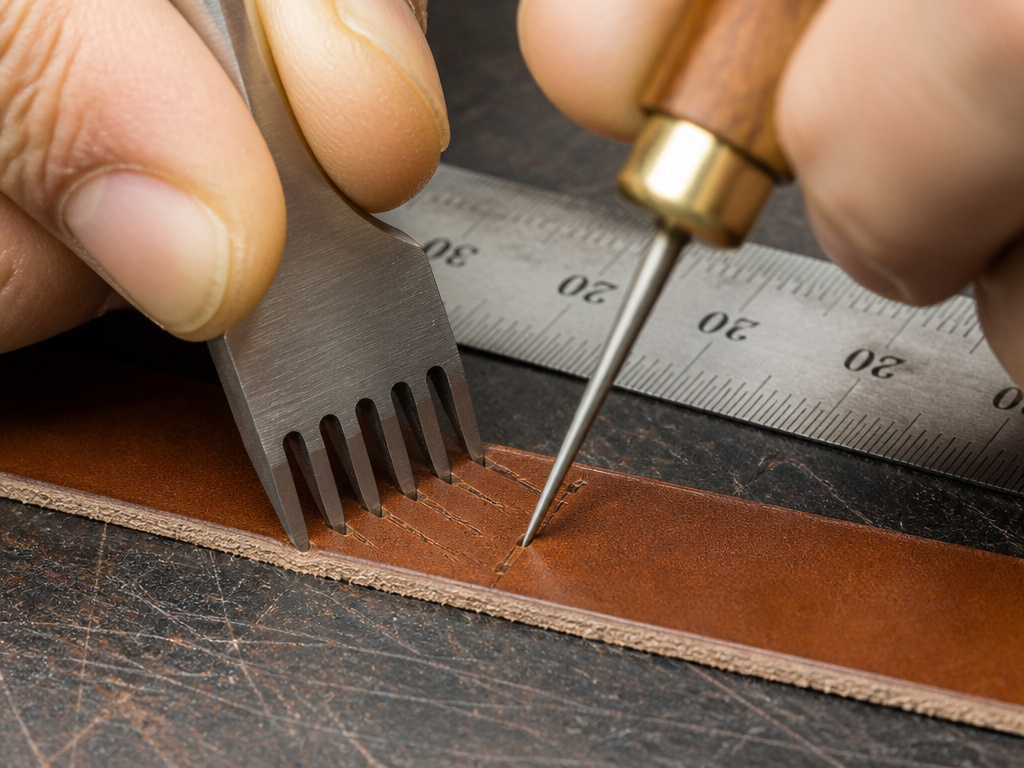
Your awl and pricking irons are a team. They should make the same size hole. This is the most overlooked rule in beginner leathercraft, and it’s the reason seams sometimes look torn instead of stitched.
Pricking irons create a specific stitch hole size based on their teeth. A 9 SPI (stitches per inch) iron has narrower teeth than a 5 SPI iron. Your awl blade must match that width. If your awl is wider than the iron’s tooth, it will enlarge the hole every time you push it through.
Why does that matter? Leather has a finite edge margin. If you’re stitching 3mm from the edge and your awl enlarges the hole outward, it can connect to the edge of the leather. Instead of a hole, you’ve made a cut. The seam loses integrity right there.
The fix is simple. Measure the width of your pricking iron’s tooth. Your awl blade should be the same width or a hair narrower. For finer work (8-10 SPI), you need a narrow blade, often between 1-2 mm wide.
| Pricking Iron SPI | Approx. Tooth Width | Recommended Awl Blade Width | Risk of Mismatch |
|---|---|---|---|
| 3-4 SPI (Heavy) | 2.5mm+ | 2.0mm – 2.5mm | Less critical, edge margin usually larger |
| 5-7 SPI (General) | 1.5mm – 2.0mm | 1.5mm – 2.0mm | Hole can become sloppy, stitch appearance suffers |
| 8-10 SPI (Fine) | 1.0mm – 1.5mm | 1.0mm – 1.5mm | High risk of cutting to leather edge if blade is too wide |
This matching principle is why many leatherworkers own several awls. You wouldn’t use the same blade for a thick belt as you would for a delicate card wallet. It’s a core part of your essential leatherworking tools setup.
How to Use a Piercing Awl Correctly
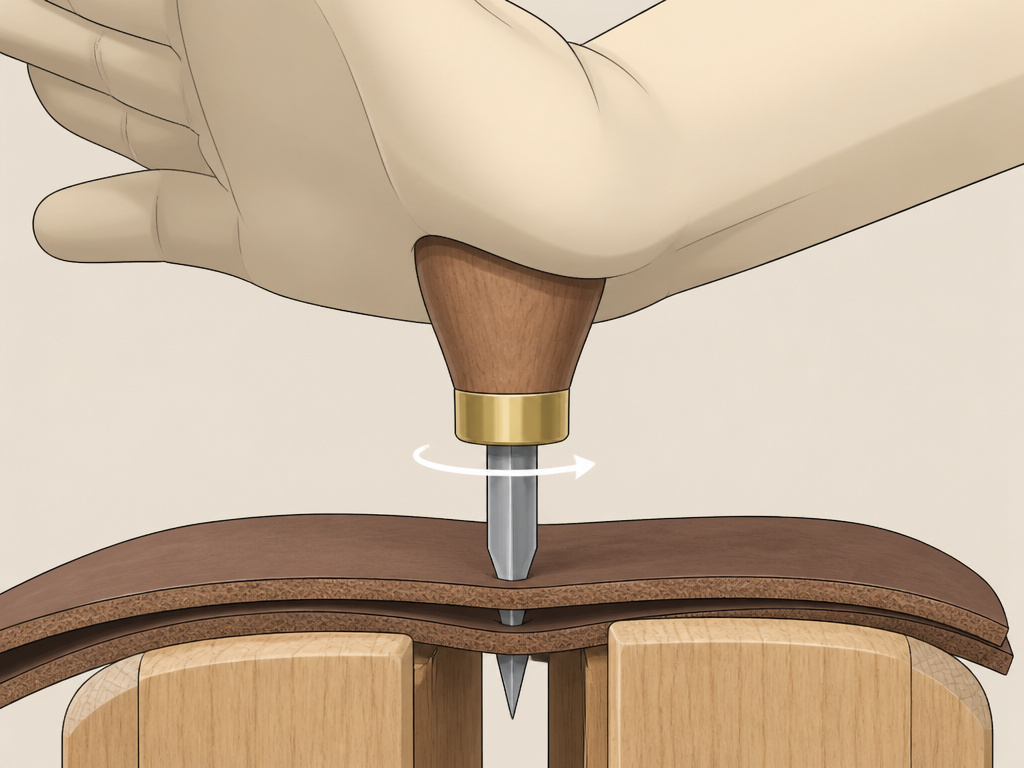
The motion is simple: push, twist, pull. Doing it right saves your hands and your leather.
First, secure your work in a stitching pony or clamp. This frees both hands, one to guide the awl, the other to apply pressure from the handle’s end. For holes pre-marked with a pricking iron, align the awl point directly in the impression.
Push straight down with steady pressure, using the heel of your palm or the base of your thumb on the handle’s end. Don’t stab. A controlled push gives you more accuracy. As the point penetrates, give the handle a slight twist, no more than a quarter turn. This helps the diamond edges cut cleanly and prevents the blade from sticking.
Pull straight back out. If you wiggle it side-to-side, you’ll enlarge the hole. The goal is a clean, crisp tunnel for your needle.
For stitching two pieces together, you’ll punch holes through both layers at once. Pierce from the side that has your pricking iron marks, using them as a guide. The awl should exit cleanly on the opposite side. If you meet resistance, don’t force it. Back out, check for alignment, and ensure your blade is long enough to go through the total thickness.
Easy to miss: The twist. A slight rotation as you push ensures the cutting edges engage cleanly. A straight push with a diamond awl can bind and requires more force, which reduces control.
This technique is the foundation for all hand stitching. Master the push-twist-pull motion before you ever thread a needle, and your stitching will be smoother and more consistent.
Awl Selection, Sharpening, and Maintenance
A good awl is a lifetime tool if you care for it. Start with selection. Look for a comfortable handle and a blade made of good steel. Interchangeable blade systems offer flexibility. The Wikipedia entry on the stitching awl notes the tool’s long history, and modern versions from professional brands continue that legacy of simple, effective design.
Sharpening is critical, but it’s not about making the whole blade a knife. A common mistake is sharpening the full length of the blade’s sides to a cutting edge. That makes the hole too big. The professional method is to sharpen only the very tip, the first millimeter or two, to a keen point. The rest of the blade should be polished smooth but left deliberately dull. This lets the tip cut the initial hole, while the polished body slides through without further widening it.
You can sharpen an awl on a fine-grit diamond stone or a ceramic rod. Hold the blade at its existing angle (usually around 20-30 degrees) and rotate it to maintain the diamond shape. A few light passes are all it needs. Test the point on scrap leather. It should pierce with moderate pressure and leave a clean hole.
Maintenance is straightforward. Keep the blade clean and dry to prevent rust. A light coat of oil on the steel protects it between uses. If the handle becomes loose, a drop of wood glue or epoxy in the haft will reseat it.
This is based on years of practical experience. I once over-complicated advice on a simple technique, confusing the reader with unnecessary steps. The lesson was that straightforward, actionable care, wipe it down, sharpen the tip, store it dry, is always best. A well-kept awl from C.S. Osborne or Barry King will outlast you.
Frequently Asked Questions
Can you use an awl on other materials?
Yes, a stitching awl can work on canvas, denim, thick fabrics, and even thin wood. The principle is the same: it pierces a hole for sewing or lacing. For rigid materials like wood, a brad awl (a finer, sharper round awl) is better for starting holes for nails or screws.
What is the difference between an awl and a pricking iron?
Pricking iron is a striking tool with multiple teeth used to mark and partially cut a set of stitch holes at once. An awl is a piercing tool used to complete those holes or to create holes individually. You often use them together: the iron marks the spacing, and the awl finishes the hole through all layers of leather.
Do I need a special thread for using a sewing awl?
Yes, sewing awls like the Speedy Stitcher work best with a strong, waxed thread. Waxed polyester thread is the standard. The wax coating helps the thread glide through the material and locks the stitch tightly. Regular sewing thread will break under the tension.
What does “Rockwell hardness” mean for an awl blade?
The Rockwell C scale (HRC) measures the hardness of the steel. A higher number means harder, more wear-resistant steel, but it can also be more brittle. The Federal Specification GGG-A-891B calls for belt awl blades to be 30-40 HRC (tough, resistant to bending) and bent-point awls to be 60-65 HRC (very hard, holds a sharp point). For general leather sewing, a blade in the 50-55 HRC range offers a good balance of sharpness and durability.
Is a stitching awl good for beginners?
Piercing diamond awl is an essential beginner tool. It’s fundamental to leathercraft basics. A sewing awl (lock-stitch awl) is also beginner-friendly for repairs, but it teaches a different skill set than traditional hand-stitching. Start with a simple diamond awl to learn proper hole-making for the saddle stitch.
Before You Go
The right awl disappears in your hand. It becomes an extension of your intent, translating a marked line into a clean, ready hole. Ignore the marketing copy for fancy gadgets and focus on this single-pointed tool.
Invest in one good diamond awl that matches your most-used pricking irons. Learn to sharpen only its tip. Use it to practice awl techniques on scrap until the push-twist-pull motion is automatic. This one tool, more than any machine, connects you to the slow, deliberate craft of putting leather together by hand. That connection is what makes a seam last for decades.
