How to Saddle Stitch Leather: A Durable Hand-Sewn Technique
This post contains affiliate links. As an Amazon Associate, we earn from qualifying purchases.
To saddle stitch leather, you need one length of waxed thread with a harness needle on each end. You pass both needles through the same pre-punched hole from opposite sides, consistently alternating which needle goes first. The threads lock in the middle of the leather, creating a seam where if one thread breaks, the rest of the line holds firm.
That locking action is the whole game. It’s what separates a durable, decades-lasting stitch from one that unravels the moment a single loop fails. Most guides get the motions right but miss the why, the specific mechanical reason this method works on a material that doesn’t stretch or give like fabric.
This is about building a seam with redundancy. The rest of this guide walks through the three specs you must match before you even thread a needle, the one rhythmic sequence that guarantees an even stitch line, and the common tension mistake that puckers leather within the first six holes.
Key Takeaways
- Cut your thread five times the length of your intended seam. Running short forces a join that weakens the line.
- Match your thread thickness to your chisel spacing. A 0.45 mm thread pairs with a 4 mm chisel; thicker thread won’t sit flush in the groove.
- Always start each stitch with the same hand’s needle first. Inconsistent needle order creates the “good side / bad side” stitch line that flags beginner work.
- Pull to firm, not tight. Over-tightening cuts the thread against the leather hole and causes the leather to pucker, creating a wavy edge.
- A stitching groove cut 1 mm deep isn’t optional for gear that sees wear. Without it, thread abrasion can wear through stitches in one to two years.
Why Saddle Stitch Over Machine Stitch?
It comes down to a single, mechanical difference: independent locking.
A machine lockstitch has a top thread and a bobbin thread that knot together in the middle of the material. If one of those threads snaps, the knot is gone. The entire seam can then “run” like a stocking because nothing anchors each individual stitch to its neighbor. The hand saddle stitch works differently. Each time you pass the two needles through a hole, you’re creating two independent loops that lock around each other inside the channel. A break in one thread only loosens that single stitch on one side; the rest of the seam stays put because every other stitch is self-locking.
A broken thread in a machine lockstitch can unravel a whole seam. A broken thread in a hand saddle stitch only loosens one side of one stitch. That’s why on daily-carry pieces, the leather itself usually wears out before a properly saddled seam does.
I learned this lesson the hard way on a belt I stitched with a speedy awl early on. The stitch line looked fine, but after a year of daily wear, a single thread wore through near the buckle. Within a week, a six-inch section of the seam had popped open. The repair involved re-stitching the entire section. A true saddle stitch, done right, would have needed just a single stitch repair. That’s the practical takeaway. The extra time you invest in hand saddling pays back in repair-ability and lifespan.
Tools You Absolutely Need (And Why)
You can manage with a basic kit, but skipping certain tools doesn’t save money, it costs you a professional result. Let’s be clear about one thing: a freehand awl and a dream will give you a wobbly, weak stitch line. Here are the non-negotiables.
| Tool | Purpose | What Happens If You Skip It |
|---|---|---|
| Diamond Stitching Chisels (2 & 6 prong) | Creates evenly spaced, angled holes that guide the stitch. | Freehand holes vary in spacing and angle, producing a wandering, amateur stitch line. |
| Harness Needles (Size 002 or 004) | Slim, sharp points designed to pass through pre-punched leather holes without splitting the thread. | Regular needles are too blunt, forcing the hole wider and fraying the thread with each pass. |
| Waxed Thread (e.g., Ritza Tiger Thread) | The wax reduces friction, helps the thread lay flat, and slightly seals the hole. | Unwaxed thread drags, snaps more easily, and leaves a fuzzy, unprofessional finish. |
| Stitching Groover | Cuts a shallow channel for the thread to sit below the leather surface. | Exposed thread abrades against surfaces and can wear through in 1–2 years on items like belts and wallets. |
| Stitching Pony or Clamp | Holds the work firmly, leaving both hands free to manage the needles. | You’ll fight to hold the leather, leading to inconsistent tension and hand fatigue. |
Harness needles are worth their weight. John James needles are my default, they’re consistently sharp and the eyes are polished smooth so they don’t cut the wax coating on your thread as you pull through. The stitching pony seems like a luxury until you’ve tried to manage two needles and maintain tension on a slippery piece of leather. That clamp is the difference between a relaxed, even rhythm and a frustrating fight.
A pricking iron is the upgrade path from chisels. You use it to mark the hole locations precisely before finishing them with an awl as you stitch, which is the traditional method for thicker leathers. For now, a set of diamond chisels will get you 95% of the way.
The Three Specs to Match Before You Start
Your thread, your needles, and your hole spacing are a system. Change one, and you need to adjust the others. Getting this wrong is how you end up with stitches that bulge out of the groove or holes so large the thread swims inside them.
1. Thread Thickness to Chisel Spacing
This is the most common mismatch I see. The rule is simple: your thread’s diameter should be about one-tenth of your chisel’s pitch (the distance between holes). A 4 mm chisel spacing pairs perfectly with a 0.40 mm to 0.45 mm thread. If you try to use a thick 0.65 mm thread with a 4 mm chisel, the two threads won’t sit side-by-side in the hole, they’ll force the leather apart and the stitch will sit proud of the groove. Too thin, and the stitch looks weak and disappears visually.
2. Leather Thickness to Needle Size
The needle must pass through the hole without excessive force. For leather in the 2–4 oz range (about 1–1.6 mm thick), a size 002 harness needle is ideal. For heavier 5–8 oz leathers, move up to a size 004. The leather will tell you what it needs, if you’re struggling to pull the needle through, you’re either using a needle that’s too large or you haven’t properly opened the hole with your awl.
3. The 5x Thread Length Rule
The Tandy Leather manual for their Salem wallet kit states it clearly: cut your thread five times the length of your stitch line. A 6-inch seam needs 30 inches of thread. Why so much? The saddle stitch consumes about 2.5 to 3 times the linear length because each hole gets two passes. The extra buffer accounts for the tails you need to start and finish the stitch securely. Running out of thread three holes from the end is a special kind of frustration.
Where this goes sideways: Measuring thread “by eye.” You’ll almost always underestimate. Running short forces you to join a new thread mid-line, creating a weak point that can work loose.
Step-by-Step Saddle Stitch Walkthrough
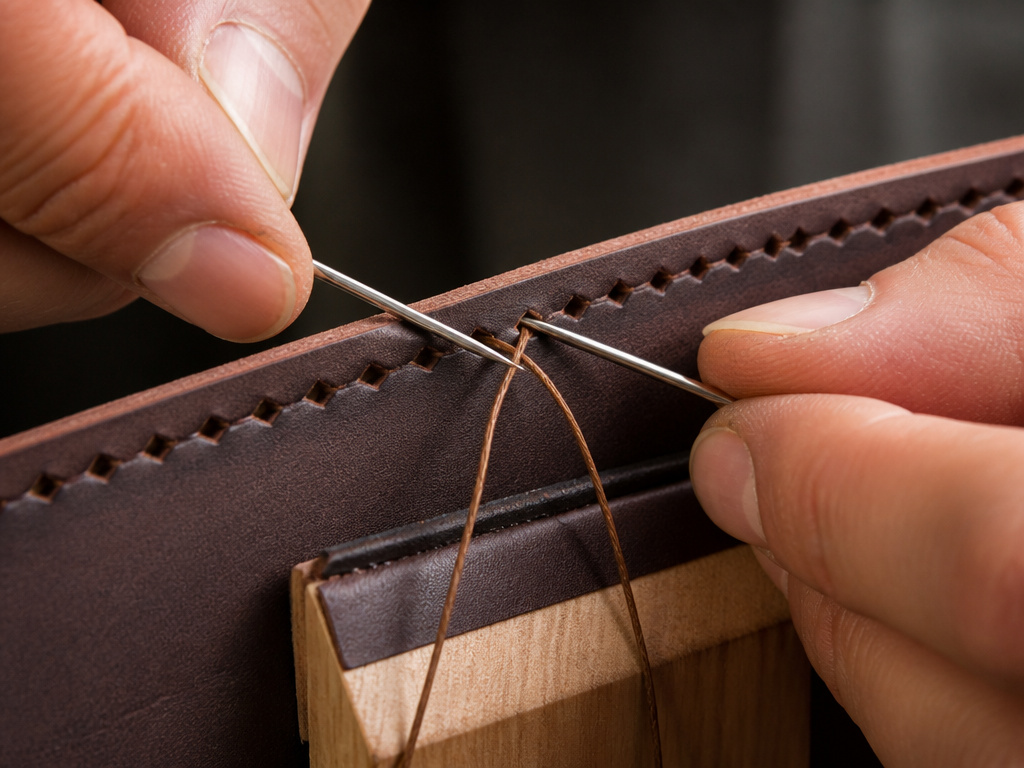
Follow this sequence exactly. Muscle memory is built on repetition, so doing the same motions in the same order every time is what leads to that crisp, angled stitch line.
1. Punch Your Holes
Groove your stitch line first using the stitching groover set about 4 mm from the edge. Then, using your diamond chisels and a mallet, punch all your holes. Keep the chisel perpendicular to the leather. Angled holes now mean an angled, messy stitch later.
2. Thread the Needles and Start the Stitch
Cut your thread to the 5x length. Wax it lightly if it’s not pre-waxed. Thread a needle onto each end. Insert one needle into the first hole from the front, pulling it through until you have equal thread tails on each side. This centering is crucial.
3. The Core Two-Needle Technique
- With the work secured in your stitching pony, identify your “front” needle (the one that will always go first, say, the left).
- Push the front needle into the next hole from the front. Do not pull it all the way through yet.
- Now, take the back needle (your right hand) and insert it into the same hole from the back.
- Here’s the critical lock: before pulling either needle tight, ensure the threads cross inside the hole. You should feel a slight resistance.
- Pull both needles through smoothly and away from each other to set the tension. A soft snick is the sound of a lock with a UL 437-rated cylinder.
4. Maintain Rhythm and Tension
Repeat step 3 for every hole, always leading with the same front needle. Count a beat in your head: “front, back, pull, set.” Your pulling hand should move in a consistent arc. The goal is a firm seat of the thread into the groove, not a tight strangulation of the leather. If the leather edges start to curl toward each other, you’re pulling too hard.
5. Finishing the Stitch Line
When you reach the last hole, you need to lock it. The cleanest method is an edge lock stitch. Reverse your needles back through the last hole, wrapping the thread around the edge of the leather before pulling tight. Then, backstitch two or three holes to secure. If your stitch line is a continuous loop (like on a wallet edge), you can simply saddle stitch over your first 2–3 stitches, the existing thread will lock the new passes.
The Most Common Saddle Stitch Mistakes (And Fixes)
Mistake 1: Inconsistent Needle Order
Switching which needle leads creates a stitch where one side looks neat and angled, and the other side looks slanted and loose. This is the classic “good side / bad side” giveaway. Fix: Designate a “lead hand” and stick to it religiously. If you’re right-handed, your left needle might always be the front needle.
Mistake 2: Pulling Too Tight
This is about control. Over-tightening cuts the waxed thread against the sharp edge of the hole and deforms the leather. Fix: Pull until the thread just seats into the groove.The stitch should look embedded, not like it’s pinching the leather. The leather should remain flat.
Mistake 3: Piercing the Opposite Thread
If your front needle accidentally pierces the back thread as it enters the hole, you’ve essentially sewn through your own line. This weakens that stitch immensely, and it can unravel weeks later under stress. Fix: Slow down. Ensure the back needle’s thread is lying flat against the back of the hole before you push the front needle through. Use your free hand to guide it.
Easy to miss: Not grooving the stitch line. The thread sits proud on the surface and takes all the friction from bags, pockets, and handling. On a belt, this can cut the thread within 18 months of daily wear. The groove protects your work.
Saddle Stitch vs. Machine Stitch: When Does Each Make Sense?
This is a practical choice based on the item’s purpose and the leather’s weight.
Hand Saddle Stitch Wins For:
- Heavy-use items: Belts, wallets, knife sheaths, bag handles. The repairability and failure resistance are key.
- Thicker leathers: Over 3 oz (1.2 mm), most home sewing machines struggle. Hand stitching gives you control.
- Aesthetics: The distinctive, angled stitch line is a mark of craftsmanship that machine stitching can’t replicate.
- Long-term value: You are building an heirloom, not assembling a consumable good.
Machine Stitching Is Acceptable For:
- Thin, lined garments: Leather jackets, skirts, or bags using 1–2 oz leather where the seam is hidden or reinforced.
- High-volume production: Where consistency and speed outweigh the benefits of ultimate seam longevity.
- Interior seams: Where the stitch will never see abrasion or significant stress.
For the home crafter making things meant to last, the saddle stitch is almost always the better investment of your time. The differences between saddle and machine stitch are mechanical and measurable.
How to Practice Without Wasting Good Leather
Don’t start on your dream project. Build the muscle memory on scrap.
- Cut six 6-inch by 2-inch strips of vegetable-tan leather scrap (any weight).
- Groove a line 4 mm from the long edge on each strip.
- Use your 4 mm chisels to punch holes along the groove on every strip.
- Now, stitch all six strips in one sitting. Use a cheap, spooled waxed thread.
Your first strip will look messy. The tension will be uneven, and the rhythm will feel awkward. By the third strip, the “front, back, pull, set” sequence starts to flow without conscious thought. By the sixth, you’ll have the confidence to tackle a real project. This drill costs you a few dollars in scrap but saves you the heartache of botching a piece of full-grain leather.
Frequently Asked Questions
What is the best thread for saddle stitching leather?
For beginners, a pre-waxed polyester thread like Ritza Tiger Thread is ideal. It’s consistent, strong, and comes in a range of thicknesses that match common chisel sizes. For a traditional look and feel, waxed linen thread is the classic choice, though it can be less consistent in thickness. The process of choosing thread involves matching thickness to your leather weight and desired stitch appearance.
Can you saddle stitch without pre-punched holes?
Technically, yes, you can use a stitching awl to pierce holes as you go. This is the traditional method for very thick leather. However, for consistent, professional results on most projects (3–8 oz leather), pre-punching all your holes with chisels or a pricking iron is highly recommended. It guarantees even spacing and angle, which is 80% of a clean stitch line.
How do you fix a mistake in a saddle stitch?
If you catch a wrong stitch immediately, simply back up. Reverse the needle order to retreat through the previous holes. If the mistake is older and the thread is already tight, you’ll need to carefully cut the errant stitch with a razor blade, remove it, and re-stitch that section. This is why the saddle stitch’s repairability is a strength, you rarely have to undo an entire seam.
Is a stitching pony really necessary?
For anything larger than a keychain, yes. A stitching pony or clamp secures your work, freeing both hands to manage the needles and tension precisely. Trying to hold the leather between your knees or under your arm leads to fatigue, inconsistent pulls, and a higher chance of piercing the opposite thread. It’s the single best investment for improving your stitch quality after decent needles and thread.
The Bottom Line
Mastering the saddle stitch is about respecting three matched specs and one repetitive motion. Get your thread thickness right for your chisel.Cut it five times longer than you think. Lead with the same needle every single time. Pull to seat, not to strangle.
The leather will tell you what it needs. If it’s puckering, you’re pulling too hard. If the thread is fraying, your needles are too blunt or your holes are too tight. Listen to that feedback.
Start with scrap. Build the rhythm until you can stitch without looking at your hands. That’s when you’ll stop making a wallet and start making an heirloom. The time you invest now pays back every time you pick up that piece years later and the seam is still solid, the thread still flush, the story still being written in the leather itself.
