
How to Make a Leather Stamp for Clear, Lasting Impressions
This post contains affiliate links. As an Amazon Associate, we earn from qualifying purchases.
To make a leather stamp, you need three things: a reversed design, a durable material like brass or acrylic, and a method to cut or carve that design into the stamp face. The process reverses your image, transfers it to the material, and uses tools from a laser cutter to a simple file to create the raised impression that will mark the leather.
That design reversal is the step everyone misses first. You stare at your perfect logo on the screen, send it off, and get back a stamp that prints everything backwards. It’s a mirror. Getting that right from the start saves the cost of a second attempt.
What follows is a breakdown of the three practical paths: buying a professional metal stamp, making one from acrylic with a laser cutter, and the DIY method using basic metalworking tools. Each has a different upfront cost, skill requirement, and lifespan. By the end, you’ll know which material matches your project volume and which tools you actually need on your bench.
Key Takeaways
- Brass stamps are for high-volume use; they outlast acrylic by years but require professional fabrication.
- Always reverse your design in graphic software before sending it for production, the stamp face is a mirror image.
- Test on scrap vegetable-tanned leather that has been properly cased; dry leather gives a weak, fuzzy impression.
- A solid maple or poly mallet matters more than an expensive stamp for consistent, clean strikes.
- If you dampen leather and get a water spot, wet the entire piece evenly to prevent a permanent stain as it dries.
The 3 Most Common Stamp Materials Compared
Your stamp is only as good as the stuff it’s made from. A soft material wears down, a brittle one cracks, and the wrong choice for your shop’s volume is just wasted money.
I learned this the hard way with a holster pattern. The leather stretched during wet molding, and the final piece was too loose. The problem wasn’t the design, it was not accounting for the material’s behavior under tension. A stamp is the same. You’re not just carving a shape; you’re choosing a partnership between that shape and a physical substance that will be hit hundreds of times.
Here’s the breakdown of what you’re actually buying with each option.
| Material | Best For | Durability & Finish | Key Limitation |
|---|---|---|---|
| Brass or Steel | Professional shops, daily use, intricate logos. | Decades. Produces the crispest, most consistent impression. | Requires professional fabrication (CNC, laser engraving). Highest cost. |
| Acrylic | Beginners, low-volume hobbyists, testing designs. | Moderate. Can last for hundreds of impressions if cared for. | Can crack under repeated heavy strikes. Less fine detail than metal. |
| Delrin (Acetal Plastic) | A balance between DIY and pro use. | High. Excellent wear resistance, closer to metal than acrylic. | Still usually requires CNC or laser tools. Less common for home shops. |
| DIY Metal (e.g., Tool Steel) | The hands-on maker, unique single-purpose tools. | Very high, depends on finishing. | Requires metalworking skill (grinding, filing, hardening). Finish is handmade. |
Brass is the default for a reason. It’s dense, machines cleanly, and transfers force evenly across the design. For a maker’s mark you’ll hit on every leather wallet or leather belt, it’s the only choice that won’t degrade. The cost is upfront.
Common mistake: Choosing acrylic for a high-use stamp. After about 300 solid strikes, the corners of the design start to round off. The impression gets progressively fuzzier, and you can’t re-sharpen it.
Acrylic wins for prototyping. You can laser-cut a complex design for a fraction of the metal cost, test it for a month, and only then commit to brass. It’s also the gateway to understanding how your leather stamping process works before investing heavily.
Design First: Reversing Your Image and Choosing Size
The design phase happens on screen, but it dictates everything that happens on the anvil. This is where you avoid the mirror-trap.
Use vector software. Adobe Illustrator, the free program Inkscape, or CorelDRAW are the standards. You need clean lines that a machine can follow, not a fuzzy JPEG. Think about silhouettes and negative space; what you carve away won’t print.
Now reverse it. Every graphic tool has a “Flip Horizontal” command. Use it. The design on your stamp face must be a mirror of your desired final impression. This is essential for any text or asymmetrical logo.
Size your stamp to your work. A giant, detailed crest will look muddled on a leather keychain. A tiny monogram gets lost on a bag flap. Keep the stamp width under one-third the width of the smallest item you’ll mark. This leaves a clean border.
If you’re integrating this stamp into a larger tooling project, sketch the entire layout first. The stamp’s location affects your leather patterns and where you’ll need to case the leather.
Path 1: Ordering a Professional Metal Stamp
This is the “send it out” path. You provide the reversed vector file, a company machines the stamp, and you get a finished tool in the mail. It’s straightforward if you know the specs to ask for.
The typical process involves uploading your file to a metal engraving service. They’ll offer choices: usually brass, sometimes stainless steel or magnesium. Brass is standard. You’ll specify the shank size, the round post that fits into a holder or that you grip directly. A common diameter is 3/8 inch.
The shank length matters for your grip. If you plan to use the stamp in an arbor press, a shorter shank is stable. For hand-stamping with a mallet, a longer shank (around 3 inches) gives you more to hold onto away from the strike point.
You don’t need to understand the machining. What you need is a clean .SVG or .DXF file and the patience to wait a week or two. The cost scales with the surface area of your design and the material.
Path 2: Creating an Acrylic Stamp with a Laser Cutter
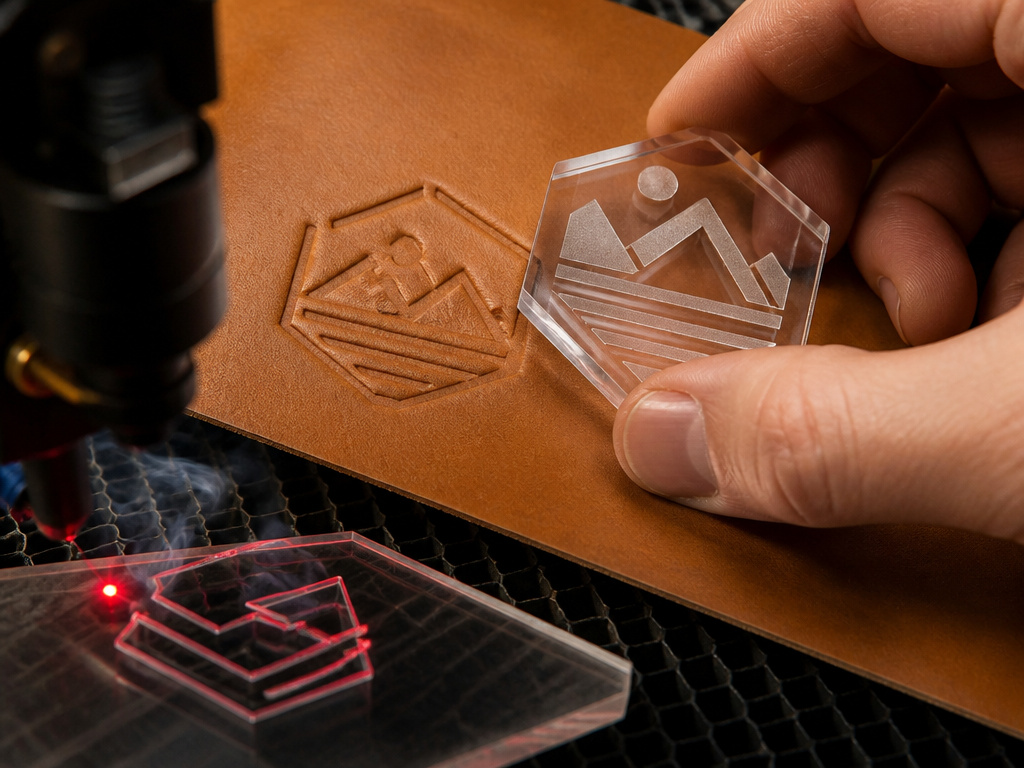 For the hobbyist with access to a makerspace or a local laser-cutting service, acrylic is the fastest from idea to impression. This path turns digital design into physical tool in under an hour.
The material is clear or colored cast acrylic sheet, usually 1/4 or 3/8 inch thick. The laser cutter follows your vector lines, vaporizing the acrylic to create depth. The raised portions of your design become the stamp face. The laser also cuts the outer shape of the stamp blank.
The finish is clean but not polished. The laser leaves a slightly frosted vertical wall on the carved areas. This is fine for most impressions. You can sand the stamp face with fine grit sandpaper (400 then 600) on a flat surface to smooth it, but go gently, the goal is to remove the frosted texture, not alter the design’s level.
Where this goes sideways: Laser settings. Too much power can melt and widen fine details, blurring lines. Always ask for a test cut on a scrap piece of the same material to check detail fidelity before cutting your final blank.
This method is perfect for geometric patterns or simple logos. It bridges the gap between a full tooling process and a simple brand.
Path 3: The DIY Metal Stamp from Scratch
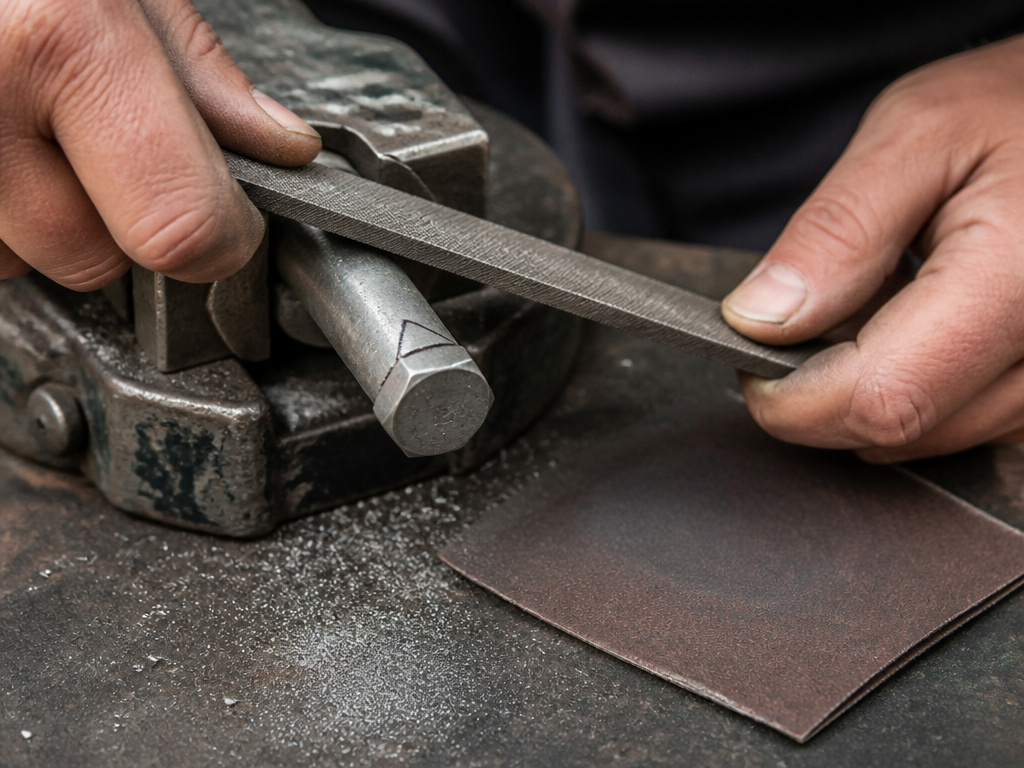 This is hands-on metalworking. It’s for making a specific tool, like a custom edge beveler or a simple shape you can’t find. You start with a blank of tool steel, a bolt, or even a hardened nail.
The YouTube transcript shows the spirit: using a landscaping spike, a grinder, and files to replicate a beveling stamp. The process is about subtraction. You define the shape on the metal’s face with a marker, then grind or file everything else away.
The key is a dead-flat striking surface. You must sand the top of the shank perfectly level so your mallet strike is even. Any angle, and the force drives one corner of the stamp deeper into the leather than another.
Hardening is optional but recommended. If you’re using mild steel, it will deform over time. You can harden it with a torch and a quench in oil, but that’s a separate skill. For a few dozen uses, annealed steel is fine. For a stamp that sees regular work, start with a pre-hardened steel blank.
The feel is different. A handmade stamp has a heft and a slight imperfection that a machined one lacks. It’s a one-of-a-kind tool, and the Colorado State University leathercraft guide confirms the value of understanding your tools at this fundamental level.
Step-by-Step: From Design to First Test
Once you have your physical stamp, the real work begins. A stamp is useless without the right leather and the right strike.
- Prepare the Leather. Use vegetable-tanned leather. It’s the only type that reliably holds a cold impression. Dampen it with a sponge, the goal is for it to feel cool to the touch, not dripping. Let the water absorb for a few minutes. This is casing.
- Set Your Surface. Work on a solid, non-bouncing surface. A granite tile or a thick marble slab is ideal. Your bench top is not enough. The slab should be at least 3/4-inch thick to absorb the impact.
- Position the Stamp. Place the stamp exactly where you want the impression. For a straight line, use a ruler or a t-square as a guide. Look from the side to ensure the stamp is perfectly vertical.
- Strike Once. Use a rawhide, poly, or solid maple mallet. Barry King mallets are the standard for a reason, their weight and balance prevent wrist fatigue. Deliver a single, firm, controlled strike. Do not tap multiple times.
- Lift Straight Up. Peel the stamp directly upward. Any side-to-side motion will smear the impression, especially on well-cased leather.
- Let it Dry. Do not manipulate the stamped leather while it’s damp. Let it dry completely at room temperature. This can take a few hours depending on thickness and humidity.
Worth knowing before you start: If you need to pause for more than an hour, cover the cased leather with a clean plastic bag or a piece of plate glass. This keeps the moisture level stable. For an overnight pause, put the bagged leather in the refrigerator to prevent mold.
Testing is not optional. Use a scrap piece of the same leather, cased the same way. This tells you if your strike force is correct and if the leather thickness is suitable for the depth of your stamp.
Troubleshooting Common Stamp Problems
A bad impression has a clear cause. Here’s how to read the leather and fix it for the next strike.
- Fuzzy, Indistinct Lines. The leather is too dry. It needs more water, and you need to wait for it to absorb fully. Dry leather fibers resist compression and tear.
- Stamp Sinks In Too Deep, Details Mush Together. The leather is too wet. It’s supersaturated and can’t hold a sharp wall. Blot excess water with a paper towel and let it sit longer before stamping.
- Double Image or Ghosting. The stamp shifted between strikes, or you hit it more than once. Use a single, decisive blow. If using a press, ensure the leather and stamp cannot move.
- Impression is Uneven (Deeper on One Side). Your stamp face is not level with the leather, or your striking surface is not flat. Check the stamp’s base for burrs and sand it flat. Ensure you’re holding the stamp perfectly vertical.
- Design is Backwards. The design was not reversed before manufacturing. This is a fatal error for the stamp itself; you must start over.
If you get a water spot on dry leather while prepping, don’t panic. Moisturize the entire piece evenly, applying a little extra to the spotted area and feathering it out. This ensures it dries uniformly and prevents a permanent dark ring.
Finishing and Maintaining Your Stamp
A little care makes any stamp last longer. This is especially true for the DIY and acrylic versions.
After each use, wipe the stamp face with a dry cloth to remove any leather residue or moisture. For acrylic, you can use a damp cloth, but dry it immediately. For metal, a very light coat of machine oil on the shank and face will prevent rust, but wipe the face completely clean before next use, oil will stain leather.
Store stamps in a dry place, preferably in a rack or case where the faces don’t rub against each other. Throwing them in a toolbox dulls the fine edges.
Acrylic stamps cannot be sharpened. When they wear out, you make a new one. Metal stamps can be professionally re-surfaced if the face becomes damaged, but it’s often near the cost of a new one. The goal is to never need to.
Frequently Asked Questions
Can I use a 3D printer to make a leather stamp?
You can, but temper your expectations. Standard PLA or ABS filament from a hobbyist FFF (Fused Filament Fabrication) printer is too soft for repeated striking, it will crack and deform quickly. Industrial 3D printing methods like Selective Laser Sintering (SLS) with nylon or resin-based processes can produce durable stamps for moderate use, as noted in polymer industry research. For most home crafters, it’s a prototype method, not a production one.
What kind of mallet should I use?
Use a dead-blow mallet. A rawhide or solid polyurethane mallet transfers force without bouncing. A metal hammer will damage your stamp shank and is too harsh. The mallet’s weight should feel substantial but not fatiguing over an hour of work, typically 12 to 16 ounces.
How do I stamp leather that is already dyed or finished?
It’s difficult. Dyes and finishes, especially acrylic-based sealers, fill the leather’s pores and make it resistant to compression. Your best chance is to lighty sand the specific spot with very fine grit sandpaper to remove the finish, then case and stamp. The impression will never be as deep or crisp as on unfinished veg-tan. Consider this before you paint leather or apply a topcoat.
Can I make a stamp with my own handwriting?
Absolutely. Write your signature or phrase on paper, scan it, and import it into vector software like Inkscape. Use the “Trace Bitmap” function to convert it to a clean outline, then reverse the image. This creates a perfect, personal stamp for a maker’s mark.
My stamp impression is too light. Do I hit it harder?
Not necessarily. First, ensure the leather is properly cased. If it is, a heavier strike is the answer, but there’s a limit. Hitting too hard can over-compress the leather, making the design spread and look muddy. The solution is often a better mallet and a confident, single strike, not uncontrolled force.
Before You Go
Making a stamp is a commitment to a design. Start with acrylic to prove the concept on scrap leather. If you use it weekly, upgrade to brass, the cost per impression drops to almost nothing over a decade.
The one rule most guides skip: if your stamp will see less than fifty uses, the material hardly matters. A filed bolt or a laser-cut acrylic piece is perfect. But if this is your brand, your mark on every project, the calculus changes. That’s when you stop buying a tool and start investing in a signature.
Everything above assumes you’re stamping vegetable-tanned leather. Chrome-tan or finished leathers change the game entirely, the stamp often becomes decorative rather than structural, and a hot foil stamp might be the better tool for the job. Know your material first. The leather will tell you what it needs.
