
What Is Leather Tooling? The Art of Custom Embossed Leather
This post contains affiliate links. As an Amazon Associate, we earn from qualifying purchases.
This post contains affiliate links. As an Amazon Associate, we earn from qualifying purchases.
Leather tooling is the art of cutting and stamping designs into vegetable-tanned leather to create raised, three-dimensional patterns. It requires dampening the leather to a specific moisture level, a process called casing, and using specialized tools like a swivel knife for cutting and metal stamps struck with a mallet to shape and texture the design. The result is permanent, custom decoration that adds significant value and personalization to items like belts, wallets, and bags.
That definition covers the what, but the how is where most beginners get stuck. The entire craft hinges on the leather’s moisture content at the moment you press the tool into it. Get it wrong, and your hours of work vanish into a blurry, indistinct mess. Get it right, and you press a crisp, lasting impression that looks like it was molded, not stamped.
What follows is a breakdown of the tooling process, the required materials, the essential toolkit, and the common pitfalls that separate a clean project from a frustrating one. By the end, you’ll know not just what leather tooling is, but how to judge a piece made from full-grain vegetable-tanned leather and where to start if you want to try it yourself.
Key Takeaways
- Leather tooling only works on vegetable-tanned, full-grain leather; chrome-tanned or bonded leathers will not hold the impression.
- The preparatory step of casing, dampening the leather to the consistency of firm clay, is more critical than the brand of tools you use.
- A clean swivel knife cut is the foundation; all subsequent stamping aligns to and accentuates these initial lines.
- Invest in a solid, heavy mallet (like a Barry King) before expensive stamp sets; consistent force matters more than intricate tool shapes.
- Practice casing and stamping on scrap leather before touching your project piece; the cost of a small skin is cheaper than a ruined belt.
The Core Process of Leather Tooling
Forget the ornate finished pictures for a moment. The core process is a mechanical series of steps that force the leather’s fibers to displace and hold a new shape. It starts with a flat, pale piece of vegetable-tanned cowhide.
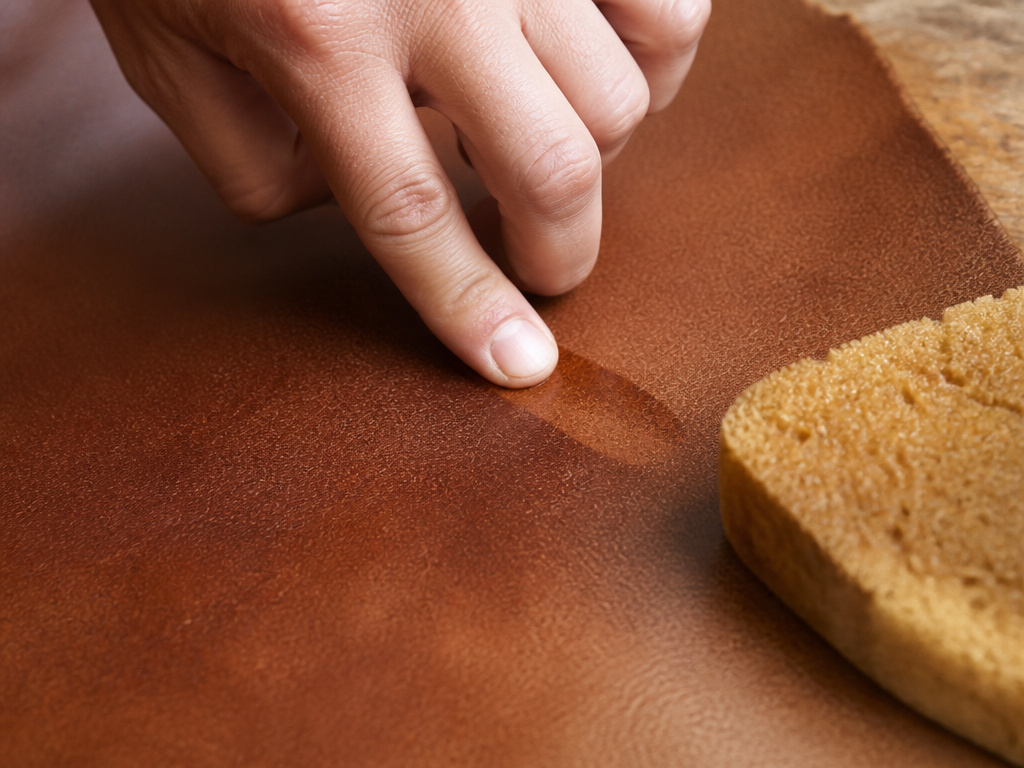
First, you transfer your design. This usually means tracing a pattern onto the leather’s smooth grain surface with a stylus. Then, you case the leather. This isn’t a quick splash with a sponge. You dampen the entire piece evenly so moisture penetrates about one-third of the way through the thickness. The goal is a specific physical state: the leather should feel cool and firm to the touch, like stiff modeling clay. A common test is to press it against your cheek; if it feels cool but not wet, it’s close. This casing step swells and softens the leather fibers, making them malleable enough to tool but still resilient enough to snap back and hold the impression as they dry.
Properly cased leather feels cool to the touch, and has the feel of firm, wet clay. A damp sponge can be used to maintain the dampness while tooling but should never be used to replace proper casing.
With the leather cased, you make the primary cuts with a swivel knife. This is the most nerve-wracking part for beginners. You hold the knife vertically and cut along your traced lines to a depth of about half the leather’s thickness. These cuts create the bold outlines of your design. Everything that comes next, every stamp, every bevel, references these cuts.
The final stage is stamping and beveling. This is where you use a suite of metal tools and a mallet to create dimension. A beveler presses down the leather on one side of a cut to make that side appear lower, creating a shadow. A modeling spoon or pear shader smooths and blends areas to create curved, shaded effects. Background stamps texture the areas around the design to make the central pattern pop. Each tool is struck with a mallet, and the sequence is deliberate: you work from the center of the design outward to avoid stretching and distorting the leather.
Vegetable-Tanned Leather: The Only Material That Works
This is the first and hardest filter. You cannot tool just any piece of leather. The leather tooling process demands a very specific raw material: full-grain, vegetable-tanned leather.
Here’s why the tanning method is non-negotiable. Vegetable tanning uses natural tannins from tree bark and other plant matter. This process leaves the leather fibers open and absorbent. When you add water during casing, the fibers swell and become plastic, allowing them to be permanently deformed by your tools. As the leather dries, it contracts and locks that new shape in place. Chrome tanning, which uses chromium salts, fills and coats the fibers. It makes leather water-resistant and soft but also inert. Dampen chrome-tanned leather and it just gets soggy; it won’t hold a crisp impression.
The leather grain matters too. You need the full, top layer of the hide intact. This grain surface is tight and smooth, providing a perfect canvas for clean cuts and detailed stamps. “Genuine leather” or bonded leather products have no real grain structure to hold a shape, they’re like trying to carve particle board.
| Leather Type | Tanning Method | Suitable for Tooling? | Why or Why Not? |
|---|---|---|---|
| Herman Oak / Shaheen | Vegetable | Yes | Industry standard. Consistent temper, excellent for casing and holding fine detail. |
| Calfskin | Vegetable | Yes | Softer and finer-grained than cowhide. Ideal for detailed, lighter tooling leather projects. |
| Chrome-Tanned Cowhide | Chrome | No | Fibers are sealed. Will not absorb water properly or hold a stamped shape. |
| Bonded / “Genuine” Leather | Mixed/Reconstituted | No | No continuous grain structure. Will tear or crumble under tooling pressure. |
For beginners, a 4-5 ounce (1.6-2.0mm) vegetable-tanned shoulder is the default pick. It’s thick enough to be forgiving but not so thick that it requires excessive force. Brands like Herman Oak or Tandy’s “Tooling Leather” are predictable. I’ve seen students waste money on a beautiful bag of scrap chrome-tanned leathers, only to find every piece useless for the basic leather tooling class. Buy the right material first.
Essential Tools for Leather Tooling
You don’t need a wall of tools to start. A focused, quality beginner set beats a box of cheap, mismatched stamps. Your first investment should be in the tools that transfer force and make cuts, not the decorative stamps.
- Swivel Knife: This is your pencil. It makes the defining lines. A sharp, well-adjusted knife with a comfortable handle is non-negotiable. Dull blades drag and tear the leather instead of slicing cleanly.
- Mallet: This is your engine. A Barry King Mallet or similar solid maple/poly mallet provides the heft. A cheap, hollow mallet vibrates in your hand, causes fatigue, and delivers inconsistent strikes. Your stamp impressions will be uneven.
- Bevelers (Sizes #0, #2, #4): These are your primary 3D makers. They have a angled, concave face that presses leather down beside a cut. Different sizes are for different cut widths.
- Modeling Spoon or Pear Shader: This underrated tool is for smoothing and creating soft shadows. It blends hard stamp lines into gentle curves.
- Background Tool: A small, crosshatched stamp for texturing the areas around your design. It darkens the leather and makes the main pattern stand out.
- Stamping Pad: A hard, flat surface. A granite slab is ideal; it doesn’t absorb the mallet’s energy, so all the force goes into the stamp.
A basic Craftool Pro starter set will cover most bevelers and backgrounders. Ignore the giant sets with 100 stamps. You’ll use five or six tools on 90% of your projects. The SDSU extension handicraft manual from 1960 lists a surprisingly similar starter kit, the fundamentals haven’t changed because the material hasn’t changed.
Where this goes sideways: Using a metal hammer on your metal stamps. It deforms the tops of the tools and rings your ears. A soft-faced mallet protects your tools and your sanity.
The Critical Role of Casing (Preparing the Leather)
 If tooling is a conversation with the leather, casing is you learning its language. This is the step every rushed beginner wants to skip, and it’s the reason their first project looks fuzzy.
Casing is controlled dampening. The goal is to get the leather’s internal moisture content to a specific point where the fibers are lubricated and movable but not waterlogged. According to the Colorado 4-H leathercraft PDF, moisture should be about one-third of the way through the thickness from the grain side. How do you know without an MRI?
You use sensory checks. Dampen the leather evenly with a sponge and clean water. Wait. The surface will darken as it absorbs the water, then lighten slightly as the water migrates inward. The moment to start tooling is when the surface color is almost back to normal but the leather still feels cool to the touch. Press a finger firmly into a scrap area. It should yield with resistance and spring back slowly, leaving a faint impression that disappears. If your finger sinks in easily and the impression remains, it’s too wet. If the surface feels room-temperature and hard, it’s too dry.
Common mistake: Only wetting the area you plan to tool. This creates a water line that will show up under dye or finish. Always dampen the entire piece uniformly to avoid a permanent stain.
If you mess up and the leather dries while you’re working, don’t just wet the surface. That creates a soggy top layer over a dry core. Set it aside, let it dry completely, and re-case the whole piece. This is why you prepare leather with patience. Rushing here guarantees a failed project. I keep a spray bottle with a fine mist to lightly rehydrate small areas as I work, but it’s a touch-up, not a reset.
Common Mistakes and How to Avoid Them
 Tooling is a forgiving craft, the leather wants to hold a shape, but only if you avoid a few critical errors. These aren’t minor imperfections; they’re project-killers.
- Tooling on Dry Leather. This is the most frequent error. Dry leather is hard. Your swivel knife will scratch instead of cut, producing ragged, fuzzy lines. Your stamps will bounce or leave faint, inconsistent impressions that vanish as the leather relaxes. The tell-tale sign is a white, chalky dust in your cut lines instead of a clean, dark groove.
- Tooling on Soggy Leather. The opposite problem. If water pools on the surface or the leather feels mushy, stop. Tools will sink in too deep, often cutting through the backing. Stamps create puddles, not crisp impressions, and the leather will warp dramatically as it dries.
- Using a Dull Swivel Knife. A dull blade requires more pressure, which leads to loss of control. You’ll wobble, go off-line, and cut uneven depths. It also tears the leather fibers, leaving a rough edge that no amount of stamping can clean up. Hone your blade before every project.
- Inconsistent Mallet Strikes. This comes from a poor stance or a weak mallet. If your strikes vary in force, your beveler will create a wavy, uneven border. Practice on scrap: aim for a consistent thud, not a bang. Your arm should move from the elbow in a piston motion, not a wild swing from the shoulder.
Let me share what I’ve learned. My first major belt project failed because of mistake number one. I was impatient, saw the leather had darkened after a quick sponge pass, and started cutting. The knife dragged. I pressed harder. The line was ragged. I thought, “I’ll fix it with the beveler.” The beveler skidded over the surface. Two hours later, I had a blurry, shallow mess. The leather was bone-dry underneath that damp surface. I now wait the full ten minutes after sponging, every single time. The leather will tell you what it needs.
Tooling vs. Embossing vs. Carving
These terms get tossed around interchangeably, but they describe different techniques with different results. Knowing the difference helps you understand what you’re looking at and plan your own work.
Leather tooling is the broad category we’ve been discussing. It involves both cutting (with a knife) and stamping to create a raised design. The design is pushed up from the back.
Embossing is a specific subset. Leather embossing uses pressure, often from a heated, pre-made metal die, to press a pattern into the leather without cutting it. It can be done to damp or dry leather and is the method used for most commercial embossed leather with repeating patterns like crocodile or logo textures. You can also emboss leather by hand with stamps, which is where the confusion starts. Hand embossing typically doesn’t involve a swivel knife; it’s just stamping a pattern onto the surface.
Carving is essentially a synonym for tooling in modern parlance, though purists might reserve “carving” for designs where the swivel knife cuts are the star, and “tooling” for designs built mainly with stamps. The Wikipedia entry on leather carving treats them as one and the same, which is the practical view.
| Technique | Primary Action | Leather State | Result | Common Use |
|---|---|---|---|---|
| Tooling/Carving | Cutting & Stamping | Damp (Cased) | 3D, raised design | Custom belts, wallets, artwork |
| Hand Embossing | Stamping Only | Damp or Dry | Shallow, pressed-in pattern | Borders, background textures |
| Machine/Die Embossing | Pressure with Heat/Die | Usually Dry | Consistent, pressed-in pattern | Commercial upholstery, accessories |
So, if you see a belt with a deep, shaded floral pattern, it’s tooled. If you see a notebook cover with a uniform lizard-skin pattern, it’s embossed. The embossing technique is faster and more repeatable; the tooling process is slower and fully custom.
Frequently Asked Questions
Can you tool any type of leather?
No. You can only reliably tool full-grain, vegetable-tanned leather. Chrome-tanned, oil-tanned, suede, and bonded leathers will not hold the impressed design. The fibers are either sealed, too loose, or too weak.
What’s the best leather thickness for beginners?
4-5 ounce (1.6-2.0mm) weight is ideal. It’s thick enough to allow for deep, mistake-forgiving cuts without being so thick that it requires excessive force to stamp. A shoulder piece of tooling calfskin or cowhide in this weight is the standard starter block.
How do you fix a mistake in leather tooling?
Minor over-cuts or slips with a beveler can often be blended in with a modeling spoon or hidden with strategic backgrounding. Deep cuts or major stamp errors are permanent. This is why you practice on scrap and plan your stamping sequence carefully. The leather’s memory is long.
Do you need expensive tools to start leather tooling?
You need effective tools, not necessarily expensive ones. Prioritize a sharp swivel knife and a solid mallet. A basic set of Craftool Pro stamps is fine for learning. A cheap, vibrating mallet will hamper your progress more than a lack of decorative stamps.
Can tooled leather get wet?
Once the project is finished with a sealant (like resolene or acrylic finisher), it can handle light moisture. However, the tooled design is a physical compression of the fibers. Soaking the finished piece can cause it to relax and lose some definition. It’s best to keep tooled items dry.
Before You Go
Leather tooling transforms a functional material into personal art. The barrier to entry isn’t cost or innate talent, it’s patience. Patience to case the leather correctly. Patience to practice knife cuts on scrap. Patience to strike a stamp fifty times with the same force.
The one actionable step to take this week: buy a small square of 4-5 ounce vegetable-tanned leather and a single stamp. Don’t plan a project. Just practice casing it. Get it damp, wait, and test the feel with your finger. Then press the stamp. See what too dry looks like. See what too wet looks like. That $15 experiment will teach you more than any article can.
Everything here assumes you’re using quality vegetable-tanned leather. If you walk into a craft store and pick up a pre-dyed, floppy remnant, none of this advice will work. Start with the right foundation. The rest is just careful, repeated motion.
