
Leather Edge Beveler Guide: What It Is & How to Use It
This post contains affiliate links. As an Amazon Associate, we earn from qualifying purchases.
A leather edge beveler is a small, handheld cutting tool with a V-shaped or U-shaped groove. You run it along the sharp 90-degree corner of cut leather to shave off a thin, continuous strip, creating a rounded chamfer. This rounded profile is the mandatory first step for effective burnishing; without it, your edge will stay flat and square no matter how much you slick it.
That definition is the what. The why is where most guides stop short. A beveler doesn’t just make edges look nicer. It physically preps the leather fibers so that friction and burnishing compound can compress them into a solid, smooth surface. Skip this step, and you’re trying to polish a square block into a round rod, it just won’t work.
What follows is a breakdown of the tool’s mechanics, a precise guide to matching its size to your leather’s thickness, and the maintenance ritual that keeps it cutting clean curls instead of dusty crumbs. By the end, you’ll know exactly which beveler to reach for and why it’s essential for professional results.
Key Takeaways
- An edge beveler works by removing the sharp corner fibers, creating a chamfer that allows burnishing compound to compress the edge into a smooth, rounded shape.
- Match the tool number to leather thickness: a #2 (2.5mm) is the most versatile for common 4-7oz leather, while a #1 is for linings and a #3 is for belts.
- The tool must be razor-sharp to produce a clean, unbroken curl; a dull beveler tears the leather and creates a ragged edge that won’t burnish well.
- Bevel both the front (grain) and back (flesh) sides of the edge to create a balanced, rounded profile before moving on to sanding and burnishing. A bevel with a consistent angle of 30 to 35 degrees significantly increases edge durability by removing the exposed fibers that are first to fray and wear during use.
How an Edge Beveler Actually Works
A leather edge beveller is a small cutting tool with a V-shaped or U-shaped groove at the tip. When drawn along the corner of a leather edge, it lifts and removes a thin strip of material from that corner, leaving a chamfered profile rather than a sharp right angle. This new profile is what makes burnishing effective.
Think of a freshly cut piece of leather. The edge is a series of tiny, open-ended straws, the cut ends of the collagen fibers. If you try to burnish that square edge, you’re just mashing those straws flat against each other. They might polish a little, but they’ll never fuse into a unified, rounded surface.
The beveler solves this by cutting those straws at an angle. It shaves off the very corner, creating two sloping faces that meet at a new, softer angle. Now, when you apply burnishing compound and friction, you’re working on a tapered surface. The fibers have somewhere to go; they can be compressed and rolled into each other, fusing under heat and pressure into that glassy, rounded edge we’re after. This isn’t just cosmetic. Those corner fibers are the most vulnerable to abrasion. Removing them through beveling is a durability upgrade, plain and simple.
The Critical First Step: Cutting and Preparing the Edge
A beveler cannot fix a bad cut. Before you even pick up the beveler, you need a straight, clean edge to work with.
Start by trimming your leather piece with a sharp utility knife or rotary cutter against a metal straightedge. Any waves or jagged cuts will be magnified by the beveling process. Once cut, hit the edge lightly with a sanding stick or 220-grit sandpaper held flat. You’re not shaping yet, just knocking off any obvious fuzz or irregularities to create a uniform starting point. This prep work takes two minutes and saves you ten minutes of frustration later.
For vegetable-tanned leather, a trick I’ve adopted is to lightly case the edge. Run a damp finger along the corner you’re about to bevel. You’re not soaking it, just introducing a hint of moisture. Slightly damp leather cuts cleaner; the blade tends to lift a continuous curl instead of producing dusty, broken shavings. It’s the difference between slicing a tomato with a sharp knife versus a dull one. Skip this step for chrome-tanned or oily leathers, as it doesn’t have the same effect.
Choosing the Right Size: A Data-Driven Guide
This is where most beginners go wrong, and it’s not their fault. Picking a “medium” beveler is useless advice. You need to match the tool’s cutting width to the thickness of your leather. An oversized beveler on thin leather will gouge out half the edge, leaving it weak and oddly angular. An undersized one on thick leather will barely scratch the surface, making your burnishing efforts pointless.
Manufacturers like Mollies.nz provide exact specs, which I rely on. Their numbering system is typical, and it gives you a concrete framework to work from.
| Beveler Size | Cutting Width | Ideal Leather Thickness ( & Weight) | Best For |
|---|---|---|---|
| #1 | 1.5mm (1/16″) | 0.4mm ~ 1.2mm (1-3 oz) | Wallet linings, card sleeves, small gussets |
| #2 | 2.5mm (3/32″) | 1.6mm ~ 2.8mm (4-7 oz) | Wallets, bags, knife sheaths, aprons (most versatile) |
| #3 | 3mm (1/8″) | 3.2mm ~ 4.0mm (8-10 oz) | Belts, dog collars, holsters, saddlebags |
| #4 | 4mm (5/32″) | 4.0mm ~ 5.2mm (10-13 oz) | Heavy belts, gun belts, harness straps |
| #5 | 4.5mm (3/16″) | 5.6mm ~ 6.4mm (14-16 oz) | Safety belts, saddle skirting, machine belting |
If you’re buying one tool to start, the #2 is the default pick. It handles the 4-7oz leather used in the vast majority of small leather goods projects. Brands like Kevin Lee or Barry King Tools make excellent versions of this size. Once you start working with belt-weight leather (8oz+), you’ll want to add a #3 to your kit. This precise matching is the first step in a professional edge finishing workflow.
The Beveling Technique: Angle, Pressure, and Grain
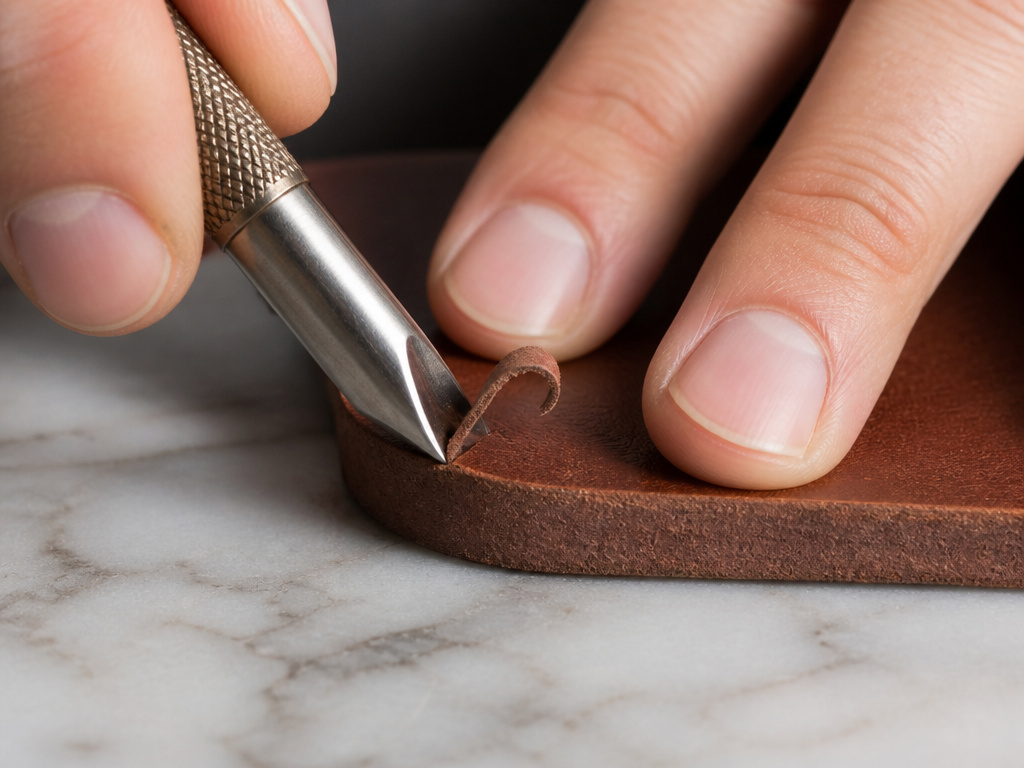
With a sharp, correctly sized tool in hand, the actual cutting is straightforward. The goal is one continuous, smooth stroke that lifts a single, unbroken curl of leather.
- Set the angle. Rest the V-shaped groove of the beveler directly on the top corner of your leather edge. The natural angle of the tool, usually around 45 degrees, is the one you want. Don’t overthink it; let the tool’s design guide you.
- Apply even pressure and pull. With the leather secured on a solid surface (a marble slab is ideal to protect your blade), pull the tool toward you in a firm, consistent motion. Let the sharp blade do the work. If you have to force it, the blade is dull.
- Follow the grain. Leather has a grain direction, just like wood. You’ll feel it. Pulling the beveler with the grain results in a silent, clean cut. Pulling against the grain causes chatter, tearing, and a ragged edge. If your tool starts grabbing, stop and go the other way.
- Bevel both sides. Repeat the process on the back (flesh side) of the exact same edge. Beveling both sides creates a symmetrical, rounded profile that will burnish evenly and beautifully.
Where this goes sideways: Beveling after sanding. The sequence is cut, bevel, then sand. If you sand first and then bevel, you’ve just created a fresh, rough cut that you’ll need to sand all over again. Do it in the right order.
For long, straight edges like belts, some crafters prefer to push the tool away for better control. The principle is identical: consistent angle, consistent pressure. For very thick straps where you want a wider, flatter chamfer, you’d switch to a different tool entirely, like a French edger. But for 95% of work, the standard pull stroke with a numbered beveler is the technique you need.
Tool Maintenance: Keeping the Edge Razor-Sharp
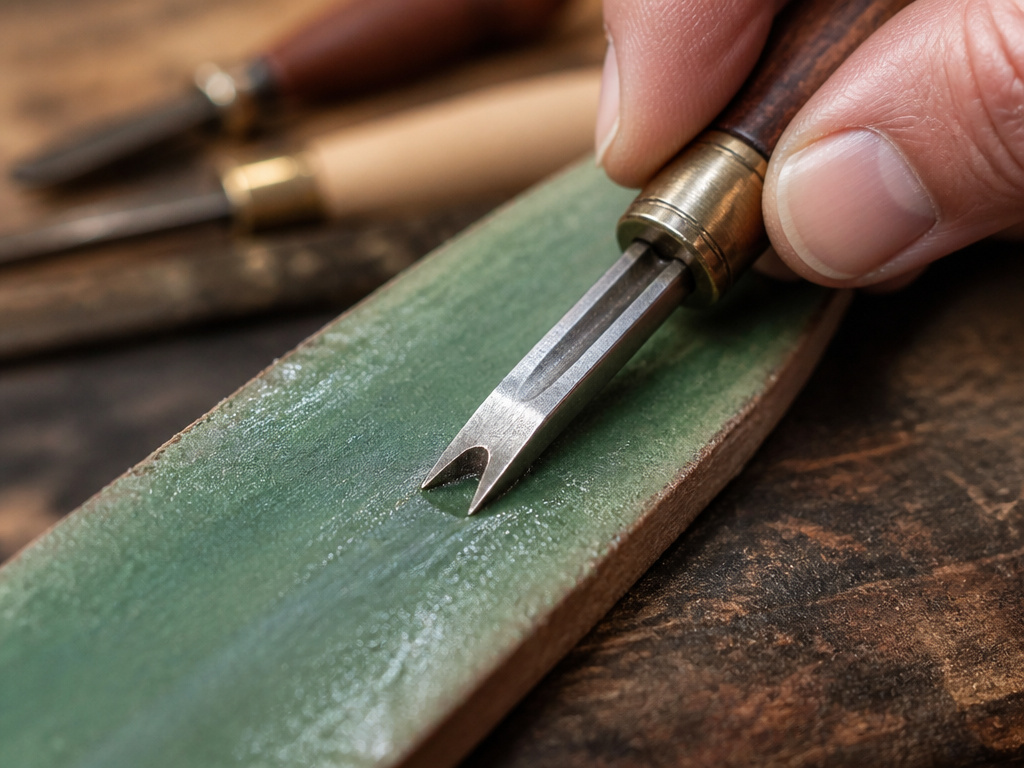
A dull beveler is the single most common reason for poor results. The blade is shaving through an abrasive material, dried collagen fibers. It will dull faster than you think. The test is simple: after a few strokes on your prepared edge, look at the shaving. It should be a thin, continuous ribbon. If it’s breaking into dust or crumbling, your blade is crushing the leather, not cutting it. It’s time to strop.
Stropping is not sharpening. It’s routine maintenance that realigns the microscopic edge of the blade. You need a narrow strip of leather charged with a fine polishing compound (green chromium oxide is standard).
- Draw the inside of the beveler’s V-shaped channel over the strop a few times, as if you’re trying to shave the strop itself.
- Do this every couple of projects, or anytime the cut doesn’t feel glassy-smooth.
- For the “keen edge” style bevelers with a rounded underside, you’ll need a rounded strop or a dedicated polishing board.
I learned the importance of this the hard way. A new, mid-priced beveler arrived and performed miserably on a stiff shoulder of veg-tan, it skipped and tore. Out of frustration, I gave it a serious stropping session on a loaded bench strop. The next pass produced a perfect, translucent curl. The tool wasn’t defective; it just hadn’t been finished to a working sharpness at the factory. Now, stropping any new tool before its first use is my non-negotiable rule. A cheap, sharp tool will always outperform an expensive, dull one.
How Beveling Fits Into the Complete Edge Finishing Process
An edge beveler isn’t a standalone miracle worker. It’s the crucial first act in a multi-step play. Understanding its role in the entire sequence prevents wasted effort.
Here’s the professional order of operations, from cut to final finish:
- Cut & Trim: Create a clean, straight edge with a knife.
- Bevel: Use your sized edge beveler on both the grain and flesh sides. This is where you are now.
- Sand: With the chamfer created, sand the entire edge smooth with progressively finer grits (e.g., 220 -> 400). This blends the beveled faces and removes any tool marks.
- Burnish or Paint: Now your edge is ready for its final treatment. Apply gum tragacanth or Tokonole and burnish with a wood slicker or canvas cloth for a natural finish. Alternatively, apply edge paint for a colored, sealed look.
- Optional: Crease: For a decorative touch, you can run a heated leather creaser along the edge to imprint a fine line.
Notice that beveling comes before sanding and long before any thought of decorative leather tooling. It’s a foundational preparation step. Trying to burnish an unbeveled edge is the most frequent roadblock I see for newcomers. They’ll sand and slick for ages, wondering why their edge remains stubbornly flat and fuzzy. The answer is always the same: they skipped the bevel.
Frequently Asked Questions
What’s the difference between an edge beveler and a skiver?
They are fundamentally different. An edge beveler cuts the corner off the edge to round it. A leather skiver shaves thickness off the face or back of the leather to make it thinner, often for folding seams or reducing bulk. One works on the edge’s profile, the other on the leather’s thickness.
Can I use a woodworking chamfer tool on leather?
You could, but you shouldn’t. Woodworking tools are designed for a much harder, more homogeneous material. They will tear leather fibers and lack the fine, controlled precision of a Tandy leather beveler. The results will be rough and inconsistent.
My beveler is chattering and tearing. What am I doing wrong?
First, check that you’re pulling the tool with the grain of the leather (try going the opposite direction). If that’s not it, your blade is almost certainly dull. Stop and strop it immediately. Forcing a dull tool will ruin your edge.
Do I need to bevel edges if I’m just going to paint them?
Yes. Edge paint adheres best to a slightly rounded, smooth surface. A square, rough edge will cause the paint to chip and peel more easily. Beveling and sanding create the perfect substrate for edge painting.
The Bottom Line
An edge beveler isn’t an optional accessory; it’s a core component of professional leatherwork. Its job is mechanical, not magical: it removes the geometry that prevents a finish from adhering to a surface prepared with 220-grit sandpaper. The single most important decision you’ll make is matching the tool’s size to your leather’s thickness, refer to the manufacturer’s chart, don’t guess.
Buy a #2 to start, strop it before its first use, and integrate it into your workflow right after cutting and before sanding. That one tool, used correctly, will do more to elevate the perceived quality of your work than almost any other. It turns a raw cut into a prepared canvas, and that’s where every great edge begins.
