
Defining a Leather Skiver: The Tool for Thinning Leather Edges
This post contains affiliate links. As an Amazon Associate, we earn from qualifying purchases.
This post contains affiliate links. As an Amazon Associate, we earn from qualifying purchases.
A leather skiver is a tool, either manual or powered, designed to shave thin layers from the edge or surface of leather to reduce its thickness. This process, called skiving, is essential for creating clean, professional folds and seams in projects like wallets, bags, and belts by preventing bulky, stiff joins.
That definition covers the what, but the why matters more. You don’t skive leather because a tutorial told you to. You skive because two pieces of 4-ounce leather folded and stitched together create an 8-ounce lump that looks amateurish and feels rigid. The skiver solves that by tapering the material where it needs to bend.
What follows is a breakdown of how skivers work, from the simple hand tool to the industrial bell knife machine. This guide explains the mechanics, the common mistakes that tear leather instead of thinning it, and how the leather’s own properties dictate which tool you should use.
Key Takeaways
- Skiving thins leather specifically at seams and folds; a splitter thins an entire piece uniformly. Confusing the two tools wastes time and money.
- Hand skivers offer control for one-off projects, while powered bell knife skivers deliver speed and consistency for production work.
- The two most common skiving failures are a dull blade tearing the leather and incorrect pressure causing an uneven, wavy cut.
- Vegetable-tanned leather skives predictably; chrome-tanned leather requires a sharper blade and lighter passes to avoid stretching and tearing.
- Always test your skiving depth and blade sharpness on a scrap piece of the same leather before committing to your project piece.
The Core Job of a Skiver: Thinning for a Clean Fold
Look at the top edge of a well-made leather wallet. That crisp, thin fold isn’t magic. It’s the result of a skiver removing material from the flesh side of the leather for about a quarter-inch back from the edge. Without that tapered feather, the leather would crack or bulge when folded.
Skiving transforms a blunt, bulky edge into a tapered, flexible one. This allows the leather to fold cleanly, glue evenly, and stitch flat without creating a ridge under the final layer.
The goal is never to make the entire piece thinner. That’s the job of a different machine called a splitter. A skiver works locally. It feathers an edge for a fold, tapers a seam allowance for gluing, or thins a specific area where multiple layers will stack. Getting this wrong is how projects fail. I learned this the hard way early on, assuming a “medium” weight label was enough. I cut my pieces, went to fold a wallet edge, and the leather was too thick and stiff. The fold was clumsy and the stitching was uneven. That was the day I bought a pair of calipers and started measuring thickness before every cut. The leather will tell you what it needs, but you have to listen with the right tools.
Hand Skivers vs. Powered Machines: Matching Tool to Volume
Your project volume decides the tool. For the hobbyist making a few wallets a year, a hand skiver is a perfect, low-cost entry point. For a workshop producing dozens of bags a week, a powered skiver is a necessary investment.
Hand Skivers are exactly what they sound like: a sharp blade fixed in a handle that you draw across the leather. Popular styles include the French skiver with its guarded blade for safety and the Japanese-style skiver with a curved blade for better control on convex edges. Their advantage is direct feedback. You feel the resistance, you control the angle and pressure. Their disadvantage is also direct feedback—your hand tires, and maintaining perfectly consistent depth and angle across a long strap is a real skill.
Powered Skivers, most commonly the bell knife skiver, automate the cutting action. A spinning, bell-shaped blade does the cutting while a feed roller pulls the leather through at a set pace. The result is machine-grade consistency. Edge after edge, wallet after wallet, the skive is identical. The trade-off is cost, bench space, and a learning curve to set the depth, feed pressure, and blade angle correctly for each leather type.
| Tool Type | Best For | Key Limitation |
|---|---|---|
| Hand Skiver | Low-volume projects, curved edges, total control | Inconsistent results on long edges, user fatigue |
| Tabletop Skiver | Consistent edge skiving, small workshop use | Limited to lighter leathers, manual operation |
| Bell Knife Skiver | High-volume production, thick leather | High cost, significant space, setup complexity |
The choice isn’t about which is better. It’s about which matches the frequency of the operation on your bench. Buying a $3,000 bell skiver to make two belts a year is like buying a commercial dough mixer to bake a weekly loaf of bread.
Anatomy of a Bell Knife Skiver
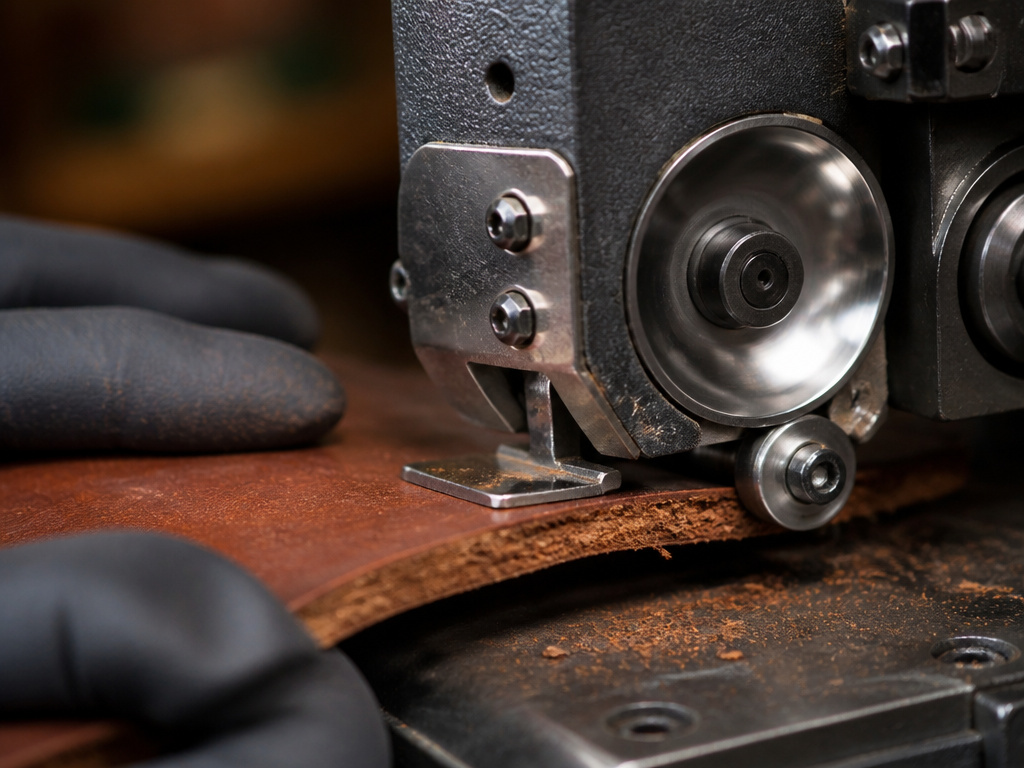
If you move into production, you’ll encounter the bell knife skiver. Understanding its parts isn’t just mechanics—it’s troubleshooting. When a skive goes wrong, you need to know which component to adjust.
The bell knife itself is the heart. It’s a rotating, bowl-shaped blade made of a hard chromium alloy, typically about 12cm in diameter. The sharpened rim of this “bowl” is what slices the leather. It’s kept sharp by a built-in sharpening stone that the operator engages periodically with a clutch lever.
The pressure foot holds the leather down against the feed roller. This isn’t a passive piece; it’s a replaceable component that determines the shape of your skive. A flat foot creates a straight taper, while a U-shaped foot creates a concave skive for specific folded edges. The skiving guide or fence sits near the pressure foot and sets the width of the skived margin. Move it forward to skive a narrower strip, back for a wider one.
The feed roller is an abrasive-coated wheel that grips the leather’s flesh side and pulls it past the blade at a constant speed. The top pressure adjuster controls how firmly this roller grips. Too little pressure, and the leather slips, causing an uneven cut. Too much pressure on a soft chrome-tan, and you’ll stretch and distort the leather before it even hits the blade.
Where this goes sideways: A clogged blade. If leather stops feeding smoothly, pieces may be jammed in the blade housing. Forcing it tears the work. The fix is to turn the machine’s hand wheel back and forth a few times to clear the waste into the tray before resuming.
These machines are powerful. They can bevel edges on leather up to 16 ounces thick. But that power requires respect. Dialing in the settings for a new leather type always starts with a long scrap piece, not your prized hide.
How Leather Type Changes the Skiving Game
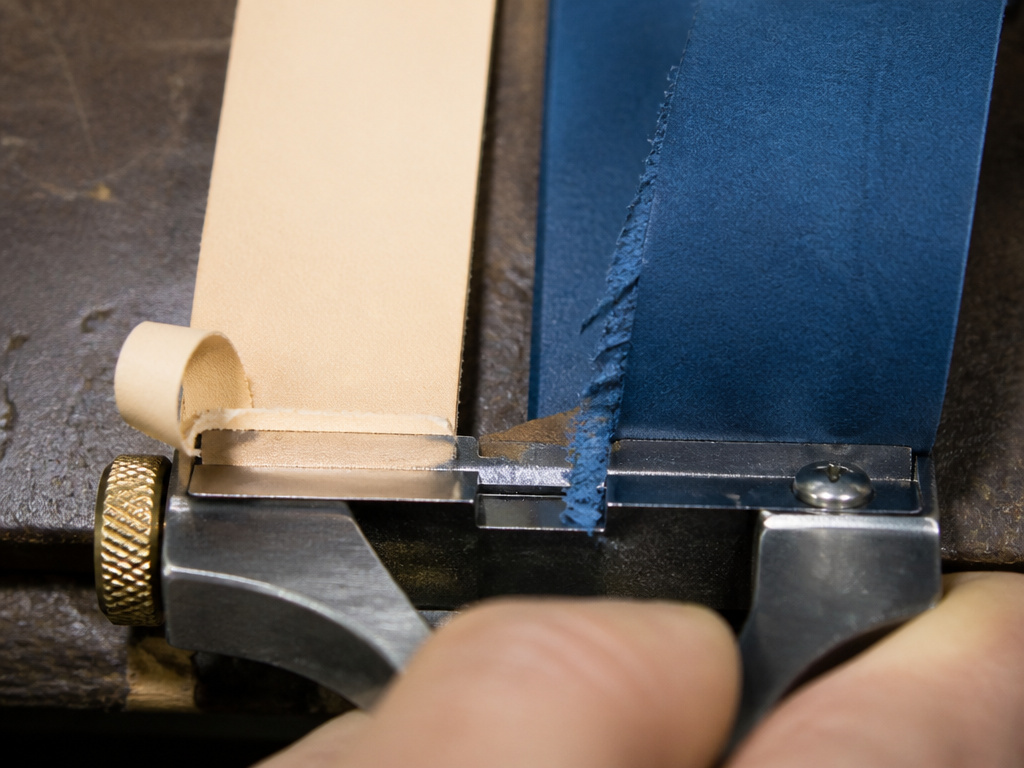
Not all leathers skive the same. The tanning process changes the fiber structure, which changes how it meets the blade. Using the same technique on all of them is a recipe for frustration.
Vegetable-tanned leather is the skiver’s best friend. Its firm, dense structure cuts cleanly. The blade parts the fibers predictably, giving you a smooth, almost polished-looking skive. You can take slightly more aggressive passes with consistent results. This reliability is one reason it’s preferred for traditional tooling and structured bags.
Chrome-tanned leather is softer and more stretchy. A blade that isn’t razor-sharp will tear and drag rather than slice. You must use a sharper blade, take lighter passes, and support the leather fully to prevent it from stretching under the feed roller’s grip. The skive on chrome-tan often looks fuzzier—that’s the nature of the looser fiber network.
The leather’s grain matters too. You’re almost always skiving the flesh side (the rough back). Skiving the top grain side is a specialist technique that risks cutting through the surface layer entirely. For most projects involving corrected grain leather or delicate top grains, skiving is kept to the flesh side.
Thin leathers under 0.8mm (about 2 oz) often don’t need skiving at all—they’re already pliable. Attempting to skive them can easily lead to cutting a hole straight through. Very thick leathers, on the other hand, may require multiple gradual passes to achieve a smooth taper without overloading the tool.
Critical Skiving Techniques and Common Pitfalls
The technique is simple in theory: sharp blade, correct angle, steady pressure. In practice, each element has a failure mode you’ll encounter.
First, blade sharpness. A dull skiving blade doesn’t cut. It tears and compresses the leather fibers. You’ll feel it as increased resistance, and you’ll see a ragged, fuzzy skive instead of a clean slice. For a hand skiver, this means frequent stropping. For a bell skiver, it means using the built-in sharpening stone regularly. The sound changes too—a sharp blade hums; a dull one grumbles.
Second, angle and pressure. Hold a hand skiver too upright, and you’ll dig a trench. Hold it too flat, and you’ll skip over the surface. The sweet spot is usually a 15-20 degree angle to the leather, letting the blade slice forward as you pull. Downward pressure should be firm but not forceful. Let the sharpness do the work.
Common mistake: Skiving against the natural pull of the leather grain. On a bell skiver, you always feed leather from left to right across the blade. With a hand tool, you should pull the blade in the direction that offers the least resistance, which is usually along the edge, not across it. Going against the grain catches fibers and causes snags.
Third, work surface. You need a hard, flat surface. A soft cutting mat will allow the leather to flex, leading to an uneven skive depth. A slab of marble, granite, or even a piece of thick glass provides the solid backing needed for a consistent cut.
Finally, always mark your skiving area with a ruler and wing divider. Eyeballing it leads to a wavy, inconsistent margin that looks unprofessional when folded. The line is your guide, not a suggestion.
Skiver vs. Splitter: Choosing the Right Thinning Tool
This is the most common point of confusion for newcomers. A skiver and a splitter both make leather thinner, but they solve completely different problems.
A skiver thins a localized area, almost always along an edge, at a tapered angle. Its purpose is preparation for folding, gluing, or layering. You’d skive the edge of a bag flap so it folds crisply.
A splitter thins an entire piece of leather to a uniform thickness across its full width. Its purpose is material standardization. You’d split a whole shoulder of 8-ounce vegetable-tanned leather down to a consistent 5-ounces for belt blanks.
| Machine | Primary Action | Result | Typical Use Case |
|---|---|---|---|
| Bell Knife Skiver | Shaves a tapered edge margin | Feathers edge for folding | Wallet edges, bag seams, strap ends |
| Leather Splitter | Shaves the full flesh side evenly | Uniform panel thickness | Creating consistent belt blanks, lining leather |
Buying a splitter because you need to skive wallet edges is an expensive error. Most small workshops will use a hand skiver for years before justifying a powered skiver, and may never need a splitter unless they move into production of goods requiring perfectly uniform thickness.
Frequently Asked Questions
What’s the difference between a skiving knife and a skiver?
Skiving knife is a general-purpose blade you hold freehand, like a head knife or paring knife, used for skiving among other tasks. A skiver is a dedicated tool, either handheld with a fixed blade angle or a powered machine, designed specifically for the skiving operation. The skiver offers more guidance and consistency; the knife offers more versatility for complex shapes.
Can I skive leather with a utility knife or X-Acto blade?
You can, but you shouldn’t for anything beyond a tiny, one-time repair. These blades are too flexible and lack the proper edge geometry. They will bend, skip, and give you an uncontrollable, wavy cut. The right tool for the job exists for a reason.
How do I know what thickness to skive to?
The goal is to reduce the thickness at the fold line by 50-70%. For instance, if you’re folding 2mm (approx. 5 oz) leather, you’d want to taper the skived margin down to about 0.6-1mm at the very edge. The thicker the leather, the more gradual and longer the taper needs to be to avoid a hard line. Always test on a scrap.
My skived edge is fuzzy. What did I do wrong?
Fuzzy edge almost always means a dull blade. The blade is tearing the leather fibers instead of slicing them cleanly. Stop, sharpen or replace your blade, and try again on a fresh scrap. For chrome-tanned leather, some fuzz is normal, but it should be minimal with a sharp edge.
Is a powered skiver dangerous?
Any machine with a high-speed rotating blade demands respect. The key safety rules are: never reach near the blade while it’s spinning, always use the provided guards, keep your fingers clear of the feed path, and disconnect power before making any adjustments or clearing jams. Treat it with the same caution as a table saw.
Before You Go
Skiving is a fundamental skill, not an advanced trick. It’s the difference between a project that looks handmade and one that looks home-made. Start with a hand skiver and a stack of vegetable-tanned leather scraps. Practice the angle, the pressure, and the pull until you can produce a smooth, even taper without thinking about it.
Understand that the tanning process fundamentally changes how the material behaves under your blade. The dense structure of vegetable tanned leather will forgive minor errors that would ruin a piece of soft chrome tanned leather.
Don’t rush toward a powered machine. The feedback from a hand tool teaches you what the leather needs in a way a machine never will. When you find yourself skiving the same edge on the twentieth consecutive wallet, that’s the signal to start looking at bell knife skivers. Until then, a sharp blade, a steady hand, and a little patience are all you need.
