
How to Dry Wet Leather | Follow These Steps, Avoid Heat
This post contains affiliate links. As an Amazon Associate, we earn from qualifying purchases.
Dry wet leather by blotting away moisture with a clean towel, then letting it air dry at room temperature away from direct sunlight or heat sources. Forcing the process with a heater, hairdryer, or direct sun will remove the leather’s natural oils, leading to irreversible cracking, stiffness, and shrinkage.
The moisture itself isn’t the real enemy. Leather is a skin that can handle a drink, then recover. The panic that sets in is the real problem, grabbing a hair dryer, aiming a space heater at your favorite jacket, or tossing the boots on a radiator because you need them dry by morning. That’s the move that turns a soaked afternoon into a permanent, brittle souvenir.
What follows: the step-by-step process to get moisture out without pulling the oils out with it, why the rule against heat has a specific and measurable danger zone, and how to handle edge cases like motorcycle seats and GORE-TEX boots. We’ll also look at what to do once it’s dry, because that’s when you fix the damage you didn’t cause.
Key Takeaways
- Leather dries from the inside out. Blotting the surface only buys you time; air circulation is the only way to pull moisture from the core.
- The shrinkage temperature for fresh leather starts between 60°C and 75°C (140°F–167°F). For aged leather, it’s much lower. A hair dryer on high can hit that threshold in seconds.
- Water penetration at stitched seams takes longer to dry than the surrounding leather. Rushing this is how seams rot and threads break.
- For boots, place them sole-up so gravity helps moisture escape from between the lining and the upper. Never dry them heel-down.
- A dried-out leather item will feel stiff and look dry. The immediate next step is a light application of the right leather conditioner to replace lost oils.
The Step-by-Step Dry-Down Process
Let’s be clear about one thing. You’re not trying to wring it out like a sponge. You’re guiding water out of a dense, fibrous material without taking the structural fat with it. The process rewards patience and punishes speed.
Here’s the straightforward guide I follow every time.
Step 1: Remove Excess Water (Gently).
Pick up a clean, absorbent towel, microfiber or a thick cotton kitchen towel works. Don’t rub. Press and blot. You’re trying to lift standing water off the surface, not grind it deeper into the grain. For a saturated leather jacket or bag, you can lay the towel flat, place the item on it, and roll gently. The goal is to stop drips, not achieve a dry feel.
Common mistake: Rubbing a wet leather boot with a towel. This grimes dirt into the grain and can stretch the leather while it’s swollen.
Step 2: Find the Right Shape & Position.
Leather has memory. Let it dry in its natural, unstressed shape. – Boots & Shoes: Stuff them loosely with crumpled newspaper or paper towels. This absorbs internal moisture and helps hold the shape. Then, place them sole-up. As daytona’s care guide notes, this lets “moisture between the layers escape more easily.” Letting them sit heel-down traps water in the toe box. – Jackets & Bags: Hang them on a broad, padded hanger (not a wire one) in a well-ventilated room. Button or zip them up to maintain structure. If a bag is limp, crumple some clean, dry paper inside to give it form. – Flat Items (Straps, Belts): Lay them flat on a dry towel, not over the edge of a table where they’ll develop a permanent kink.
Step 3: Choose the Right Environment.
This is where most DIY advice fails. It’s not just “room temperature.” It’s stable, moderate humidity. The National Park Service’s conservation guidelines peg the ideal range at 40–60% relative humidity. A bathroom with a shower running is too damp. A sun-blasted attic in July is too dry and hot. A bedroom with a ceiling fan on low or a dehumidifier running gently is perfect. Airflow is your friend, but not hurricane-force winds from a fan six inches away.
Step 4: Wait. Then Wait Some More.
A moderately wet jacket can take 24 hours. A soaked pair of heavy boots can take 48 to 72 hours to dry completely through all the layers and seams. The outside will feel dry to the touch long before the inside is done. This is the test of patience. If you put them on when the lining is still damp, your body heat creates a warm, moist incubator against the leather, the perfect recipe for mold.
The upper material of your boot with GORE-TEX is leather and should be treated as described above. If your boots do get wet, place the boot with the sole facing upwards first so that the water between the lining and upper material can escape more easily.
– daytona Motorradstiefel Care Instructions
Step 5: The Post-Dry Check & Recovery.
Once it’s fully dry, the leather will tell you what it needs. Run your hand over it. Does it feel stiff, cardboard-like, or slightly chalky? That’s the leather crying out for oil. This is not optional maintenance; it’s damage control for the hydration loss that just occurred. Reach for a dedicated leather conditioner. For a leather jacket, a light cream works. For leather furniture or boots, a richer balm might be better. Apply sparingly, let it absorb, and buff off the excess. The goal is to replenish, not saturate.
| Leather Item | Critical Drying Position | Why This Matters |
|---|---|---|
| Boots / Shoes | Sole facing up | Lets gravity pull moisture from between lining and upper leather. |
| Jackets / Bags | On a broad hanger, zipped/buttoned | Prevents shoulder dimples and keeps panels aligned as they contract. |
| Belts / Straps | Laid flat on a towel | Avoids permanent bends or creases at stress points. |
| Motorcycle Seat | Bike on center stand, seat open to air | Prevents water from pooling in stitching channels. |
The “No Heat” Rule and the Science Behind It
Everyone says “no heat.” Few explain the breaking point. It’s not that warmth is inherently evil; it’s that leather’s tolerance is shockingly low and poorly marked.
Freshly tanned hide has a shrinkage temperature, the point where its fibers contract permanently, between 60°C and 75°C (140°F to 167°F). Your hair dryer on the high setting can blast air at over 150°C (300°F). A radiator surface can easily hit 80°C. Direct summer sun on a dark car seat? You’re well over the limit.
Heating the leather will remove the natural oils and cause it to dry out and crack. Do not attempt to accelerate the drying process by using heat.
– Polaris (Indian Motorcycle) Owner’s Manual
But here’s the nuance most miss: aged leather is far more fragile. The National Park Service guide notes that for degraded, antique hides, the shrinkage temperature “can be considerably lower.” That vintage jacket or your ten-year-old favorite boots are playing on hard mode. What feels like gentle warmth to your hand can be a destructive blast furnace to the collagen fibers inside.
The mechanism is simple. Heat drives off water violently. It doesn’t just evaporate the surface moisture; it boils the bound water deep in the fibers, forcing the leather to contract and squeeze out its natural lubricating oils along the way. Those oils are what keep leather supple. Once they’re gone, the fibers grind against each other, become brittle, and crack under stress. The damage is a chemical certainty.
Special Cases: Motorcycle Gear, Boots, and Aged Leather
Not all wet leather is created equal. The basic rules apply, but the consequences of ignoring them scale with the item’s complexity and value.
Motorcycle Seats & Saddlebags:
These are built for abuse, but they fail in specific ways. Prolonged exposure, as Indian’s manual warns, “may allow for water penetration at stitched seams, requiring more time for the product to fully dry.” The thread channels act like wicks, drawing moisture deep into places you can’t blot. Rushing the drying here doesn’t just stiffen the leather; it rots the thread from the inside out. The repair requires a full re-stitch.
GORE-TEX or Lined Boots:
This is a double-layer system. The daytona instructions are specific: use little oil-based agents during care, as they can “considerably reduce” the GORE-TEX membrane’s breathability. During drying, the same principle applies. Trapped moisture between the liner and the shell needs a clear path out. That’s why the sole-up position is essential. Heel-down drying lets water pool in the toe cap, against the liner, where it takes days to evaporate and can start to degrade adhesives.
Aged, Dry, or Delicate Leathers:
This is where the common wisdom of “avoid getting leather wet” actually applies with force. The client’s bag caught in a downpour? That’s a modern, well-oiled leather. An antique ledger cover or a dried-out vintage belt soaked through is a museum-level emergency. Its fibers are already compromised. Swelling with water and then contracting as it dries, even at room temperature, can cause stress cracking. For these items, the goal is to slow the drying process down, not speed it up. A slightly damp towel in the same room can help moderate the humidity drop.
What to Use (and What to Avoid) While Drying
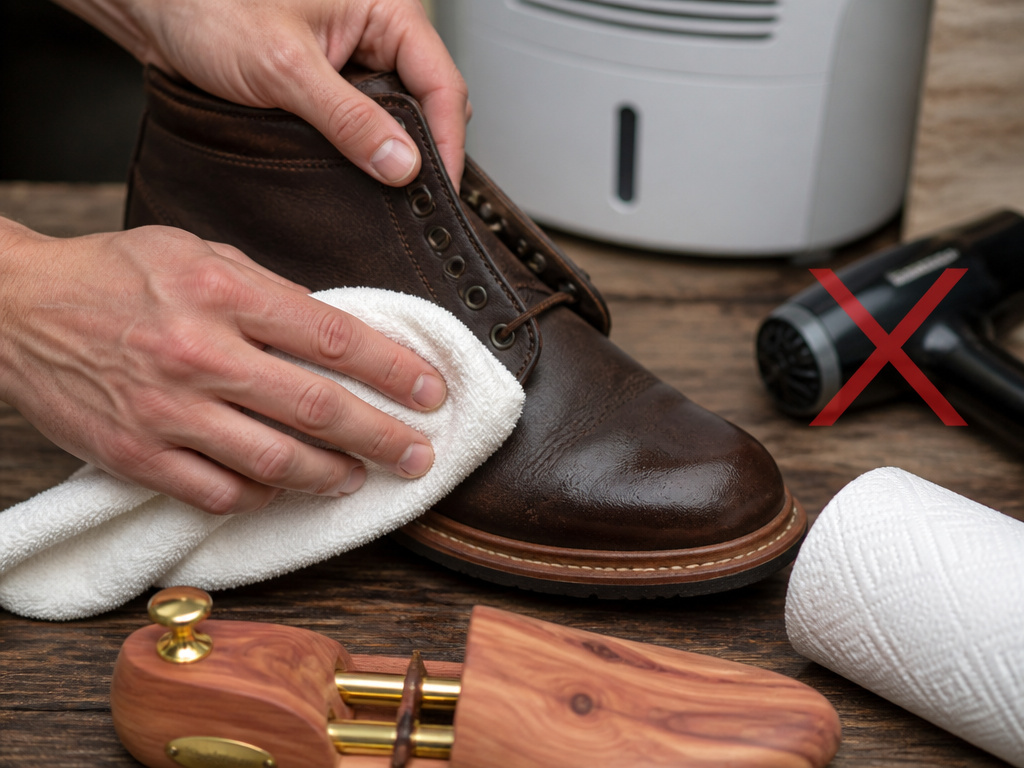
Your toolkit should be simple, absorbent, and inert. Avoid anything chemical or forceful.
The Yes List:
- Clean, Dry Towels (Cotton or Microfiber): For blotting.
- White Paper Towels or Newspaper: For stuffing boots. The ink on newsprint is generally dry and soy-based these days, but for light-colored linings, white paper is safer.
- Cedar Shoe Trees: After the initial 12 hours of drying with paper, swap in a cedar shoe tree. The cedar absorbs residual moisture and helps maintain perfect shape.
- Dehumidifier (on low, in the room): If you’re in a humid climate, this helps maintain that 40-60% RH sweet spot.
The No List:
- Hair Dryers, Heat Guns, Space Heaters: This is the direct path to cracked, shrunk leather.
- Direct Sunlight: It’s uneven heating (one side hot, the other cool) and UV damage on top of dehydration.
- Radiators, Vents, or Ovens: See “shrinkage temperature” above.
- High-Pressure Air (Compressed Air Cans): daytona says compressed air can be used solely for the zip on a dry boot. On wet leather, it forces water deeper.
- Newspaper with Wet Ink: If the newsprint smudges on your fingers, it’ll stain your lining.
Why Your Environment Matters as Much as Your Technique
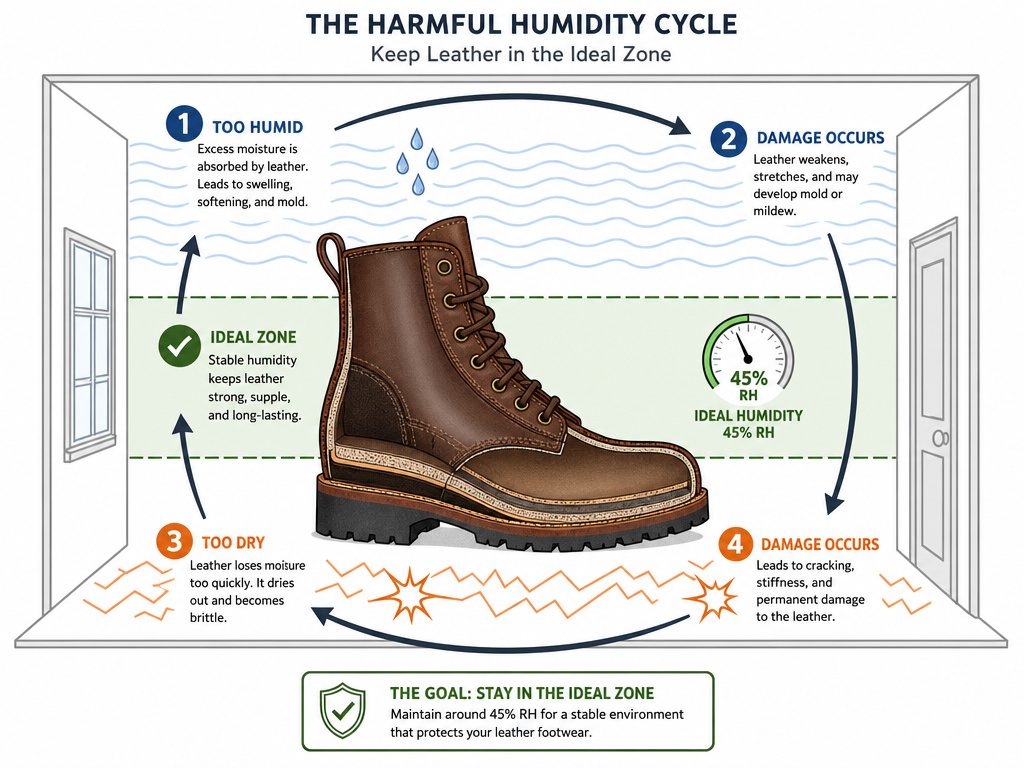
You can follow every step perfectly and still ruin leather by drying it in a bad room. The NPS guide spells out the stakes: excessive moisture above 65% RH encourages mold. Excessive dehydration below 22% RH “forces the skin to give up moisture permanently, which results in shrinkage and deformity.”
The real killer is the swing. Repeated exposure to moist and dry cycles “will, eventually, physically stress the hide’s fibers enough to induce mechanical damage.” Your house might be 40% RH during a dry winter day, then spike to 70% when you boil pasta. That kind of rollercoaster is what fatigues leather over years.
Think of your drying space like a recovery room. Stable, quiet, and climate-controlled. A spare bedroom or a basement with a dehumidifier is better than a sunporch or a garage. This approach acknowledges that leather is a biological material, not a synthetic fabric.
The Right Way to Condition After Drying is only half the job. The other half is repairing the moisture loss you can’t avoid. When water evaporates, it doesn’t leave alone. It takes some of the leather’s natural lubricants with it. The result is a stiff, thirsty surface.
This is where you need to condition leather. But not with the first bottle you grab.
| Leather Type | Post-Drying Conditioner Priority | Reason |
|---|---|---|
| Vegetable-Tanned (Belts, Saddles) | High — use a nourishing balm (e.g., Venetian Shoe Cream) | Open-pored, absorbs water and loses oils readily. |
| Chrome-Tanned (Most Jackets, Gloves) | Medium — use a lighter cream or lotion | More water-resistant, but still loses plasticity. |
| Nubuck / Suede | Special — use a suede conditioner spray | Brushing restores nap; conditioner protects without altering texture. |
| GORE-TEX Lined | Low-Oil Formula — use daytona Special Leather Cleaner/Aqua Stop | Preserves membrane breathability. |
Apply conditioner sparingly to clean, dry leather. Use a soft cloth, work it in with circular motions, and let it absorb for at least an hour before buffing off any residue. Over-conditioning is its own problem, it clogs pores and can attract dirt.
If the leather remains stiff after conditioning, you might need a deeper treatment to make leather soft again. That’s a separate process involving more targeted products and sometimes physical manipulation, but it starts with a thorough air-dry and a dedicated conditioner like Nikwax Tech Wash first.
Frequently Asked Questions
Can I use a fan to dry leather?
Yes, but indirectly. Point a fan at the wall across the room to circulate air, not directly at the leather item. Direct, high-speed airflow can dry the surface too fast, creating a hard shell that traps moisture underneath.
How long does it take for leather to dry naturally?
It depends on thickness, saturation, and humidity. A light jacket: 12-24 hours. Heavy boots or a soaked bag: 2-3 days. The “feel dry” test is deceptive, assume it needs double the time you think.
Will getting leather wet ruin it?
Not if you dry it correctly. Controlled wetting and proper drying is far less damaging than chronic under-conditioning or heat exposure. The panic-response with a hair dryer is what does the real harm.
Can I dry leather in the sun?
No. Direct sunlight provides uneven, intense heat (often above the shrinkage threshold) and fades color. It’s a perfect storm for damage.
My leather is stiff after drying. Did I ruin it?
Probably not. Stiffness is a cry for oil, not a death sentence. Clean it, then apply a quality leather conditioner. If it’s extremely stiff, you may need to soften stiff leather with specific products designed to relax fibers, but always condition after drying as your first step.
Should I use silica gel packets when storing dried leather?
No. Silica gel is too aggressive and can over-dry leather, sucking out its essential moisture content. Stable, moderate humidity (40-60% RH) in a closet is better than an ultra-dry environment with desiccants.
Before You Go
The practical takeaway is this: water is a temporary condition; heat is a permanent choice. Your leather can survive a downpour. It cannot survive a hairdryer. The process isn’t complicated, blot, shape, air dry, condition, but it does demand that you fight the urge to speed it up.
One final threshold to remember: if your leather is more than a few decades old or already shows signs of dryness, treat it like a museum piece. Slow, stable drying in a controlled environment isn’t just best practice; it’s the only practice. For everything else, a little patience and a conditioner with a durable water repellent (DWR) treatment will see your gear through years of accidental showers. The leather will tell you what it needs. Your job is to listen.
