
Your Guide on How to Choose Leather Hiking Boots (45 chars)
This post contains affiliate links. As an Amazon Associate, we earn from qualifying purchases.
To choose leather hiking boots, match three things: your pack weight to sole stiffness, your hiking terrain to leather type (full-grain for durability, nubuck for faster break-in), and your foot to the boot using the ½-inch heel-slip test with your hiking socks on. Ignoring any one of these leads to blisters, rolled ankles, or boots that fall apart within a season.
That ½-inch heel test is the part most fitting guides gloss over. They tell you to wiggle your toes, which is correct, but they skip the specific, measurable check that stops heel blisters before you ever leave the store. A boot that fits in the morning on flat ground will feel completely different after six miles with a 30-pound pack on a descent.
What follows is the boot-buyer’s checklist from the inside out: how to read a sole’s stiffness rating, why the welt holding it all together is more important than the leather’s sheen, and the one field repair every leather boot owner should know before their first muddy trail.
Key Takeaways
- Test fit with weight. With the boot laced, slide your foot forward until your toes tap the front. You should be able to fit your index finger (about ½ inch) between your heel and the boot’s back. Do this wearing your hiking socks.
- Match sole stiffness to pack weight. A flexible sole is fine for daypacks. If your pack regularly exceeds 25 pounds, you need a boot with a stiff shank (¾ or full-length) to prevent foot fatigue and ankle roll on uneven ground. Condition is essential.** A $300 full-grain leather boot will crack and fail within a year without regular conditioning. A $8 tube of Nikwax or Atsko SNO-SEAL applied every few months doubles the boot’s lifespan.
- Heat destroys leather. Never dry boots by a fire or in a hot car. The leather fibers contract too fast, becoming brittle, and the adhesives holding the sole on can melt. Air-dry them at room temperature, stuffed with newspaper.
The Stiffness-to-Weight Rule That Prevents Ankle Roll
A boot’s sole isn’t just for grip. Its rigidity, determined by a hidden shank between the midsole and outsole, is what transfers support from the ground to your ankle. Think of it like the frame of a backpack, a flimsy frame collapses under load.
Here’s the practical translation: your total pack weight dictates the shank stiffness you need. A daypack with 10 pounds of water and snacks is fine with a flexible sole. The moment you strap on a multi-day backpacking load, that flexibility becomes a liability. Your foot muscles work overtime to stabilize on every rock, leading to fatigue and, eventually, a twist.
Where this goes sideways: Choosing a boot with a flexible sole for heavy backpacking. Your foot will cramp on mile eight, and a misplaced step on a loose rock becomes a sprain instead of a stumble.
The industry uses vague terms like “trail” or “backpacking,” but you can find the spec. Look for mentions of a ¾ or full-length nylon or steel shank. Boots built for serious load-bearing will advertise it. The Lowa Renegade EVO GTX, for example, uses a stiff polyurethane midsole that acts like a full shank, which is why it’s a staple for backpackers.
| Your Typical Pack Weight | Recommended Sole Stiffness | What Happens If You Go Too Flexible |
|---|---|---|
| Day hiking (< 15 lbs) | Flexible to Moderate | Extra foot fatigue, but low injury risk. |
| Weekend backpacking (15-30 lbs) | Moderate to Stiff | Arch strain on descents, increased ankle roll risk. |
| Multi-day trekking (30+ lbs) | Stiff (full shank) | Chronic foot fatigue, high sprain risk on technical terrain. |
The feel test is simple. Hold the boot in your hands and try to twist it along its length. A day-hiker will twist easily. A backpacking boot should resist strongly, with most of the flex happening at the ball of the foot, not the arch.
Full-Grain vs. Nubuck: Durability vs. Break-In
All leather is not created equal. The two you’ll face in the boot aisle are full-grain and nubuck, and the choice isn’t about quality, it’s about timing and terrain.
Full-grain leather is the top layer of the hide, with all its natural grain and scars intact. It’s dense, fibrous, and slow to absorb water. This is the durable choice. It resists abrasion from scree and brush far better than any synthetic. The trade-off? It’s stiff. A full-grain leather boot from Danner requires a deliberate break-in period of several short hikes to mold to your foot without causing blisters.
Nubuck is also top-grain leather, but its surface has been lightly sanded to create a soft, velvety nap. This makes it more supple out of the box, leading to a faster, more comfortable break-in. The sanding, however, opens up the fibers. Nubuck absorbs water and stains more readily and shows scuffs more obviously than smooth full-grain.
I learned this the hard way early on. I used a wire brush to clean some heavily soiled nubuck work boots, thinking I was being thorough. I wasn’t cleaning them; I was sanding them. The nap went flat and patchy, dulling the grain more than the dirt ever did. A soft brush and specialized nubuck cleaner were what it actually needed.
So, which to choose? If your priority is maximum durability for rocky, wet trails and you have the patience for a break-in, go full-grain. If you want comfort faster for well-maintained trails and don’t mind more frequent conditioning to maintain water resistance, nubuck is a great option. Many brands, like Meindl, also use Heinen Terracare leather, a more environmentally friendly option that doesn’t sacrifice performance.
Construction: Why the Welt Outlasts the Sole
You can have the best leather in the world, but if it’s glued poorly to a cheap sole, the boot is junk. The construction method, how the upper is attached to the sole, is the true predictor of longevity.
Most modern hiking boots use cemented (glued) construction. It’s lightweight and cost-effective. The problem is that glue fails. Moisture, flexing, and temperature cycles eventually break the bond. When a cemented sole delaminates, it’s often a terminal repair.
The gold standard for recraftable boots is the Goodyear welt. A strip of leather (the welt) is stitched to both the upper and a canvas rib on the insole. The outsole is then stitched to this welt. This creates a sealed, durable bond that can be cut and re-stitched when the outsole wears out. It’s heavier and more expensive, but it means the boot can be resoled multiple times.
The part nobody mentions: A Goodyear-welted boot isn’t inherently waterproof at the seam. The stitching holes need to be sealed with wax or a product like Seam Grip. That sealed seam, however, will outlast any glue joint.
For the long-term buyer, this is the calculation. A cemented boot is a single-life product. A well-made, Goodyear-welted leather boot is a decades-long companion. You’ll replace the Vibram outsole two or three times before the upper gives out. When evaluating any boot, run your finger along the seam where the upper meets the midsole. Look for clean, tight stitching, not globs of glue.
How Do I Know If a Leather Hiking Boot Fits?
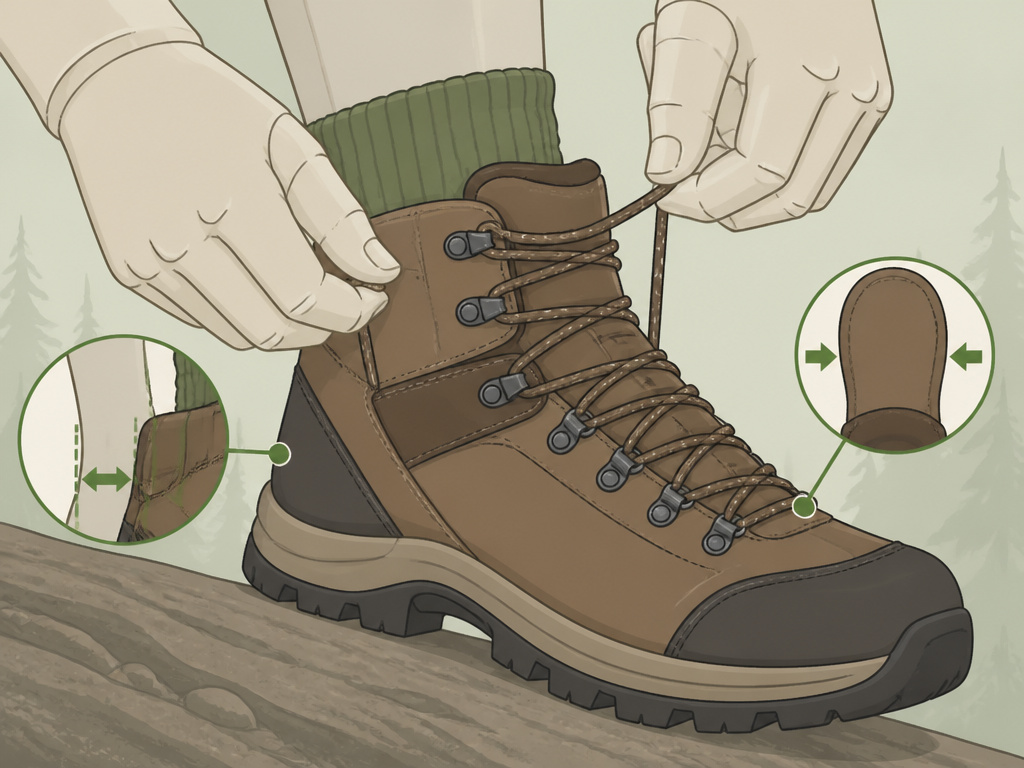 Forget the old “one thumb’s width” advice. That’s a starting point, not a test. Check that your heel is locked in place and your toes don’t jam forward when descending a steep incline.
First, wear the socks you intend to hike in. If you use orthotics or aftermarket insoles like Superfeet, put them in the boot. Lace the boot up snugly, ensuring your heel is seated firmly in the heel cup.
Now for the test. Stand on a downward slope if the store has one, or simply slide your foot forward inside the boot until your toes gently touch the front.
- Check the heel: With your toes touching, you should have about a ½-inch gap between your heel and the back of the boot. This is critical. On a steep descent, your foot will slide forward. This gap prevents your toes from jamming.
- Check the width: Your foot should feel snug but not compressed. There should be no pinching on the sides of your forefoot or over your instep.
- Check for heel lift: Now, walk around. Your heel should remain locked in place with minimal vertical lift. A slight, smooth lift is okay; a pronounced thump-thump-thump means the heel cup is too wide.
Do this later in the day when your feet are naturally slightly swollen. If you’re between sizes, choose the larger one. You can take up a bit of extra volume with a thicker sock or insole, but you cannot stretch a boot that’s too short.
Waterproofing: GTX Isn’t a Force Field
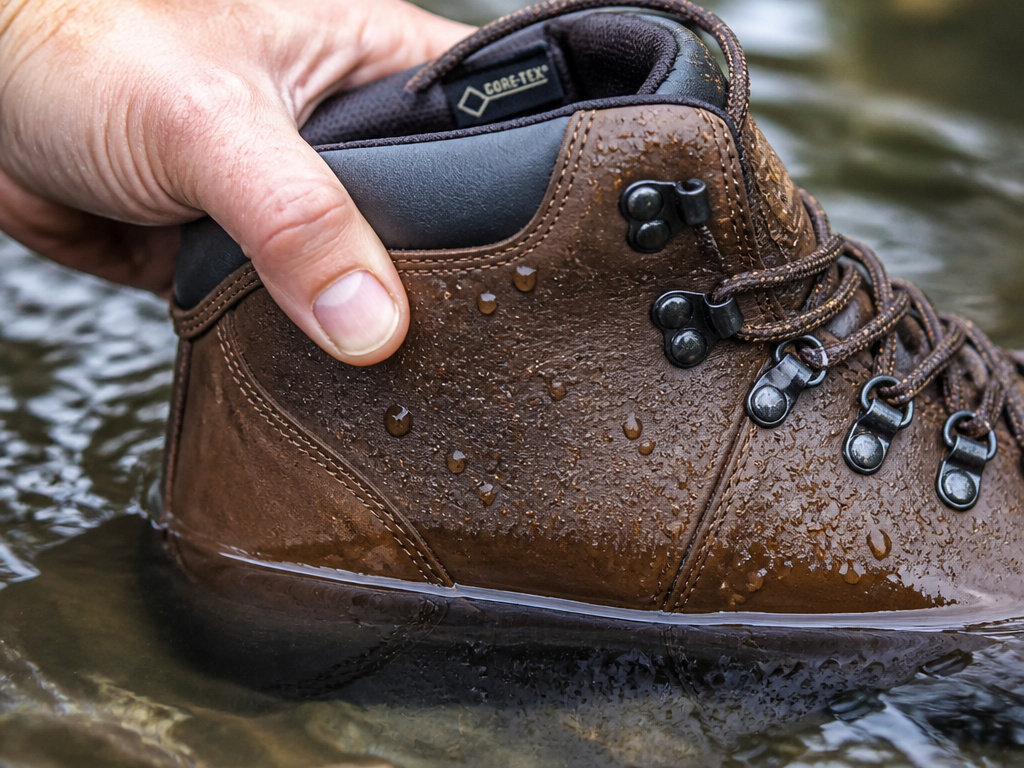 The “GTX” suffix on a boot means it has a Gore-Tex liner, a breathable, waterproof membrane. This is excellent for keeping water from seeping in through the leather and seams. It is not, however, a license to stomp through streams.
Here’s the reality check. Water will find the top of your boot. A Gore-Tex boot submerged above its cuff will fill with water just like any other boot, and it will dry much slower because the membrane hinders evaporation. The technology is for rain, wet grass, and shallow puddles, not for river crossings.
Worth knowing before you start: A non-waterproof leather boot, treated with a wax-based conditioner like Atsko SNO-SEAL, can be more versatile in dry climates. It breathes better in heat and, if it gets soaked, dries faster. The trade-off is you must actively manage its water resistance through conditioning.
For most hikers in variable conditions, a Gore-Tex-lined boot is the practical choice. But understand its limits. Pair it with gaiters for deep snow or muddy trails. And remember, the waterproofing will fail if the leather itself isn’t maintained. A dried-out, cracked leather upper will leak no matter what liner is inside.
The Non-Negotiable Maintenance Ritual
Leather is skin. It dries out. It loses its natural oils. Ignoring this is the single fastest way to turn a premium boot into a cracked, leaking mess.
Conditioning isn’t optional; it’s part of the ownership cost. After every few hikes, or at least every few months, clean off dirt with a damp cloth and apply a quality leather conditioner. For full-grain leather, a beeswax-based product like Atsko SNO-SEAL provides deep nourishment and enhances water resistance. For nubuck, use a spray-on conditioner like Nikwax that won’t alter the nap.
The process is simple, but the timing is everything. Never apply conditioner to wet or muddy boots. Let them air-dry at room temperature first, never by a heat source. Stuff them with newspaper to draw out moisture and maintain shape. Once dry, apply a thin, even coat of conditioner, let it absorb for an hour, then buff off any excess.
This routine does more than prevent cracks. It keeps the leather supple, which in turn prevents the stitching from becoming brittle and snapping under stress. An $8 tube of conditioner and 20 minutes of care can literally double the lifespan of a boot. It’s the easiest win in gear maintenance.
Frequently Asked Questions
Are leather hiking boots good for summer?
They can be, but they are not always the best for hot weather. Leather is less breathable than synthetic mesh. For dry, hot summer trails, a well-ventilated synthetic boot or a non-waterproof leather boot will be cooler and more comfortable. Leather excels in shoulder seasons and variable conditions where durability and water resistance are priorities.
How long does it take to break in leather hiking boots?
Modern boots break in faster than old legends suggest. Plan on 10-20 miles of walking, broken into several shorter hikes. Start by wearing them around the house, then progress to a few 1-2 hour local walks. The goal is to gently mold the footbed and soften the leather at flex points without creating blisters. A quality insole from Superfeet can significantly speed up this process.
Can you resole leather hiking boots?
Yes, if they are constructed to be resoled. Goodyear-welted and some other stitched construction boots can be professionally resoled, often with a new Vibram outsole. Most common cemented construction boots cannot be resoled reliably; when the sole wears out or delaminates, the boot is usually finished. This makes construction a key factor in long-term value.
How do I dry my leather hiking boots quickly?
You don’t. Speed is the enemy. Never place them near a campfire, radiator, or in a hot car. The extreme heat will cause the leather to become brittle and can melt the adhesives. To dry them properly, remove the insoles, stuff the boots loosely with newspaper or paper towels, and leave them in a well-ventilated area at room temperature. Change the stuffing every few hours until dry.
Is full-grain leather waterproof?
No leather is truly waterproof. Full-grain leather is highly water-resistant due to its tight grain. With a conditioner containing beeswax, it can shed a tremendous amount of water. However, prolonged immersion will saturate it. The waterproof rating of a leather boot typically comes from a sealed seam construction and/or an internal membrane like Gore-Tex, not the leather alone.
The Bottom Line
Choosing a leather hiking boot is a commitment to a process, not just a purchase. You’re selecting a partner for the trail that will change and adapt with you, but only if you put in the work. Forget the flashy features and focus on the fundamentals: a fit that passes the ½-inch heel test with your pack-weight socks on, a construction method that promises more than one season, and the discipline to keep the leather conditioned.
Start your search not with a brand, but with your heaviest loaded pack. Weigh it. That number tells you the sole stiffness you need. From there, let your local terrain and patience for break-in guide you to full-grain or nubuck. Try on every contender with the exact socks and insoles you’ll use. Walk downhill in them.
The right boot won’t feel like a shoe. It will feel like an extension of your foot, firm where you need support and supple where you need to move. That feeling is what turns a mile into a memory.
