
The Correct Way to Clean Leather Dress Shoes | A Full Guide
This post contains affiliate links. As an Amazon Associate, we earn from qualifying purchases.
To clean leather dress shoes, you need three separate steps: remove dirt, apply a dedicated leather cleaner or conditioner, and finish with a polish for shine. Skipping the cleaner and going straight to polish is the most common mistake, it seals grime into the leather, which dries out the hide and causes cracks within a season.
That distinction between cleaning and polishing is the whole game. Most people reach for a tin of wax, buff their shoes to a shine, and call it maintenance. But wax doesn’t clean; it seals. What you’re actually doing is locking dirt and dried sweat against the leather, where it acts like abrasive grit every time you flex the shoe. The finish looks good for a week, then goes dull and cracked.
What follows is the breakdown most guides gloss over: the specific tools that matter, the one cleaner brand that outperforms the rest, and how to handle the two most common disasters, rain and salt stains. By the end, you’ll know exactly which product to use and, more importantly, why it works.
Key Takeaways
- Never use saddle soap or all-in-one “clean and shine” products on modern dress shoes; they can strip protective finishes and dry out the leather. Cleaning and conditioning are separate, essential steps that must come before any polish is applied.
- For shoes caught in the rain, dry them at room temperature with absorbent paper inside; use white vinegar on a cloth to dab away salt stains. Invest in a dedicated horsehair brush for dusting and a separate, softer Saphir brush for applying cream polish.
- Deep cleaning and conditioning is only needed every 4-6 months with regular wear; daily brushing does most of the work.
Before You Start: The Gear You Actually Need
You don’t need a toolbox. You need five things, and two of them are brushes. The right tool prevents damage before you even touch a cleaner.
A horsehair brush with a wooden handle is for dry work. Its stiff-but-gentle bristles lift dust and dried mud from the welt without scratching. A softer applicator brush, often called a dauber brush, is for creams and conditioners, it lets you work the product into the leather without over-applying. You’ll also need several clean, white cotton cloths. Colored cloths can bleed dye, and terry cloth loops can catch on fine leather.
For products, keep them separate. A dedicated leather cleaner like Saphir Reno Cleaner is for deep cleans. A conditioner like Cole Haan Leather Conditioner or Saphir Renovateur rehydrates the leather. Finally, a pigmented cream polish, such as Cole Haan Shoe Cream or Saphir Crème 1925, adds color and a protective wax layer. A Liquiproof Microfiber cloth gives the final buff its best shine.
Common mistake: Using the same brush for dry brushing and applying polish. The dry brush holds old polish and dirt, which you then grind back into the leather’s pores. Keep two brushes clean and separate.
The Saddle Soap Debate: Why Most Advice Is Wrong
Let’s be clear about this. You’ll see saddle soap recommended in older guides and even by some high-end brands today for a “deep clean.” The Leather Institute, which writes the care manuals for tanneries, explicitly says never use saddle soap on finished leathers. Their reasoning is solid: these soaps vary widely in strength and can be incompatible with modern water-based leather finishes, leading to a dull, cracked surface.
I learned this the hard way on a pair of burgundy oxfords. Following a well-meaning tutorial, I worked saddle soap into the vamp. The leather looked revived for about a day. Then it lost its suppleness, and a network of fine cracks appeared around the flex points within a month. The soap had stripped out the natural oils and the factory-applied topcoat. The reality is, saddle soap is for actual, filthy saddles, thick, oil-rich leather meant to be saturated and re-oiled. Your calfskin derby is not a saddle.
For a true deep clean on smooth leather dress shoes, you need a pH-balanced, dedicated leather cleaner. Saphir Reno Cleaner is formulated to remove dirt, old wax buildup, and silicones without disturbing the leather’s tannage. It prepares the surface for conditioning, which is the step that actually maintains the leather’s health.
The Core Cleaning Process (Step-by-Step)
This isn’t a weekly routine. A full clean like this is for when shoes are visibly soiled or as part of a semi-annual refresh. The goal is to reset the leather so conditioner can penetrate.
Step 1: Remove the laces and insert shoe trees. This seems minor, but it’s critical. It opens the tongue area and keeps the shoe’s shape taut, giving you a flat, stable surface to work on. A shoe without a tree will flex and wrinkle as you press, making an even application impossible.
Step 2: Dry brush thoroughly. Use your horsehair brush aggressively. Scrub the welt (where the sole meets the upper), the seams, and all creases. You’re not being gentle here, you’re dislodging caked-on grit. If you skip this, you’ll just rub that grit into the leather during the next step.
Step 3: Apply a leather cleaner. Dampen a section of a white cotton cloth with your dedicated cleaner, like Saphir Reno Cleaner. Wipe the entire shoe in smooth, overlapping strokes. Focus on stained or dirty areas, but don’t scrub. Change to a clean section of the cloth as it gets dirty. Let the shoe dry completely. This usually takes about 10 minutes.
Step 4: Condition the leather. Apply a small amount of conditioner to a clean cloth, never directly onto the shoe. Work it into the leather in circular motions, covering the entire surface. This rehydrates the fibers that the cleaning process exposed. According to The Leather Institute’s guide, you should let the conditioner dry for about five minutes before moving on. Rushing this means the polish won’t adhere properly.
Step 5: Apply cream polish. Using your applicator brush, pick up a small amount of pigmented cream polish. Apply it in tight, circular motions, building thin layers. This adds minor color correction and a base layer of protective wax. Let it dry for 15-20 minutes.
Step 6: Buff to a shine. Finally, take a clean, dry microfiber cloth and buff the entire shoe. Use firm, rapid strokes along the length of the shoe. The friction melts the waxes in the polish, creating the shine. For a deeper luster, some pros lightly dampen a corner of the cloth with water for the final pass.
| Step | Tool | Goal | Risk If Skipped |
|---|---|---|---|
| Dry Brush | Horsehair Brush | Remove abrasive grit | Grinding dirt into the finish during cleaning |
| Clean | Dedicated Cleaner (e.g., Saphir Reno) | Remove wax buildup & surface grime | Conditioner cannot penetrate; polish seals in dirt |
| Condition | Leather Conditioner (e.g., Cole Haan) | Rehydrate leather fibers | Leather dries out, becomes brittle, cracks in < 6 months |
| Polish | Cream Polish & Applicator Brush | Add color & protective wax layer | Shoes lack luster and have no barrier against scuffs |
| Buff | Microfiber Cloth | Melt waxes for shine | Dull, uneven finish that attracts more dirt |
Handling Wet Shoes and Salt Stains
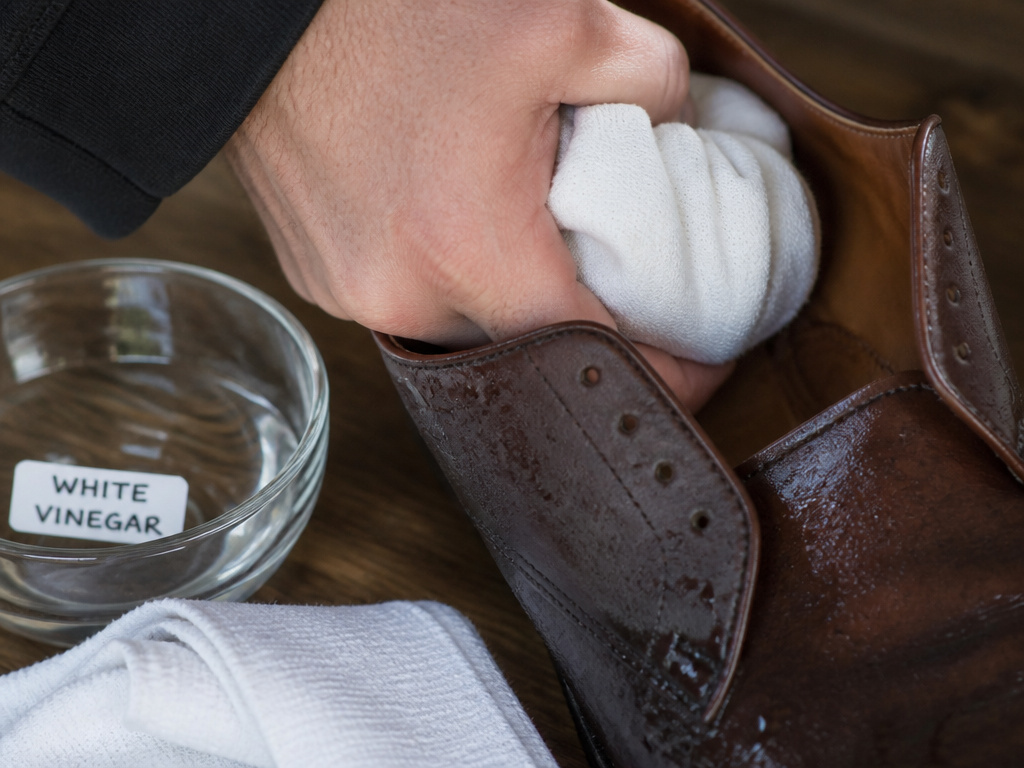 Dress shoes and rain are a bad mix, but panic makes it worse. The immediate reaction is to put them near a heat source to dry fast. That’s the worst thing you can do. Heat causes the leather to shrink and crack rapidly.
If your shoes get soaked, wipe the exterior with a dry cloth immediately. Then, crumple balls of white paper or a clean, absorbent cloth and stuff them inside the shoes. The absorbent material will pull moisture from the lining and toe box. Leave them to dry at room temperature, away from radiators or direct sunlight. This can take a full day. Be patient.
Once dry, you’ll likely see white salt rings from evaporated water. Don’t scrub. Dab a cloth in white vinegar and gently press it onto the stain. The mild acidity dissolves the salt without harming the leather’s dye. Let it dry, then follow up with a light conditioning to the affected area, as the vinegar can be slightly drying.
Where this goes sideways: Using a hair dryer or placing shoes on a radiator. The exterior leather may feel dry in an hour, but trapped moisture in the lining and inner layers will keep migrating outward, causing the leather to over-dry and the sole to separate. Always air-dry slowly.
Cleaning vs. Conditioning vs. Polishing: What Does What?
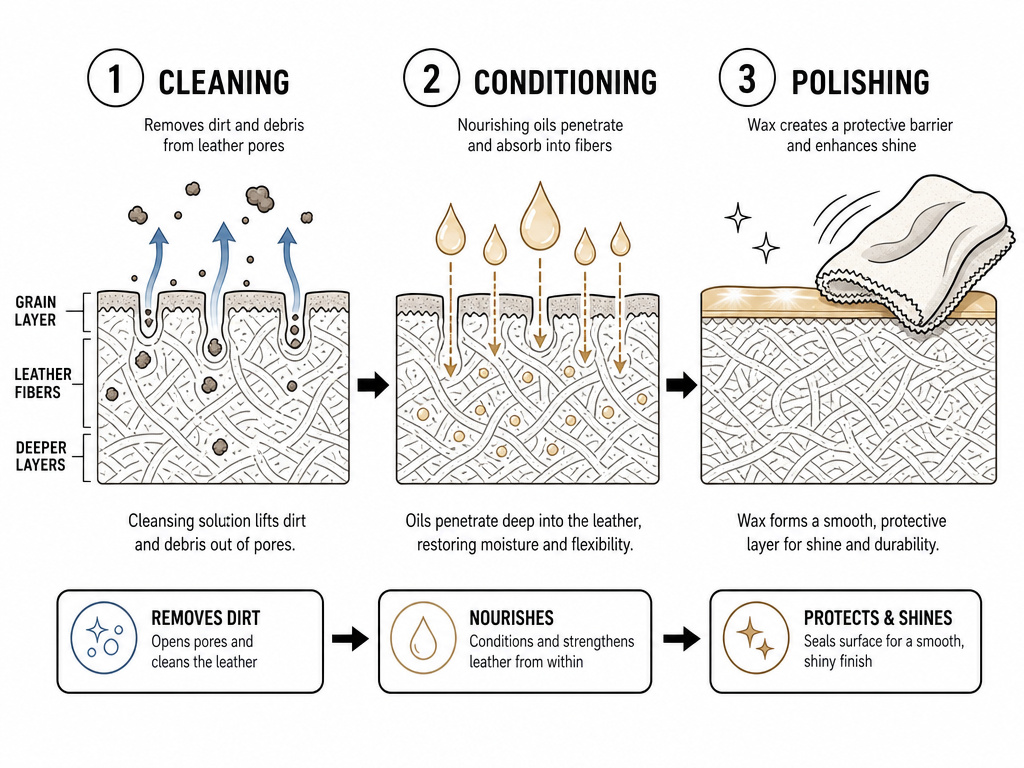 People use these terms interchangeably, and that’s why shoes get ruined. They are three distinct actions with different chemicals and purposes.
Cleaning is about removal. A true leather cleaner uses surfactants to lift dirt, old polish, and environmental contaminants from the leather’s pores without stripping natural oils. Think of it as washing your face.
Conditioning is about absorption. Leather conditioners contain oils and fats that mimic the leather’s natural lipids. They replenish what sun, wear, and cleaning remove, keeping the fibers supple and preventing cracks. This is the most important step for longevity.
Polishing is about protection and aesthetics. Cream polishes contain waxes and pigments. The wax forms a protective barrier on top of the leather, and the pigment can mask minor scuffs. The shine is a byproduct of buffing those waxes.
Using a “clean-and-shine” all-in-one product is like using a makeup wipe that also claims to be a moisturizer and sunscreen. It does none of the jobs well and often leaves a silicone layer that blocks real conditioner from ever penetrating. Always use separate products.
How to Choose the Right Products for Your Shoes
Your shoe’s leather type dictates your product choice. A one-size-fits-all approach damages either the finish or the hide.
For standard calfskin dress shoes, the Saphir system is the benchmark. Start with Saphir Reno Cleaner, follow with Saphir Renovateur conditioner, and finish with Saphir Crème 1925 polish. For shoes that need a mirror shine, like opera pumps, you’d later add a wax polish like Saphir Pâte de Luxe.
For more rugged vegetable-tanned leather shoes (like some loafers or casual boots), you can use a heavier conditioner like Collonil 1909 Leather Cream. These leathers are thirstier and designed to develop a patina, so they benefit from richer oils.
The rule is simple: match the product to the leather’s finish and intended use. A high-gloss patent leather will only need a specific patent cleaner and a soft cloth, never a standard conditioner or wax.
| Leather Type | Best Cleaner | Best Conditioner | Best Polish | Notes |
|---|---|---|---|---|
| Calfskin (Standard Dress) | Saphir Reno Cleaner | Saphir Renovateur | Saphir Crème 1925 | The professional standard; Renovateur also lightly cleans. |
| Vegetable-Tanned | Mild Saddle Soap or Reno Cleaner | Collonil 1909 Leather Cream | Neutral Cream Wax | Condition heavily; polish is optional for a natural look. |
| Patent Leather | Specialty Patent Cleaner | None | None | Never condition or wax; use only a soft, damp cloth and a dedicated patent product. |
| Suede/Nubuck | Suede Eraser & Nubuck Brush | Nubuck/Suede Conditioner Spray | None | Use a spray conditioner designed for suede; never use wax or cream. |
Frequently Asked Questions
Can I use water to clean my leather shoes?
You can use a barely dampened cloth to wipe away fresh, light dirt. But for any real cleaning, water is insufficient and risky. It can push dirt deeper, and if it seeps into the lining, it causes slow drying and potential mildew. Always use a dedicated leather cleaner for anything beyond surface dust.
How often should I clean and condition my dress shoes?
For shoes worn weekly, a light dry brush after each wear and a full clean and condition every 4-6 months is perfect. Daily wear shoes might need conditioning every 3 months. Let the leather tell you, if it looks dry, feels stiff, or has lost its luster, it’s time.
Will cleaning remove scuffs from my shoes?
Cleaning alone will not remove deep scuffs. A proper scuff removal process involves using a pigmented cream polish that matches your shoe color to fill and mask the scratch after cleaning. For severe scratches, professional repair might be needed.
Is it necessary to use shoe trees?
Yes. Cedar shoe trees are non-negotiable for proper shoe storage and care. They absorb moisture from the inside, maintain the shoe’s shape to prevent deep creases, and make the cleaning process easier by providing a solid form to work on. They pay for themselves in extended shoe life.
Can I use the same polish on all my leather shoes?
You can use a neutral polish on any color shoe, but for best results, match the polish shade to your shoe color. Using a dark brown polish on black shoes will not work, and using a neutral polish won’t cover scuffs on colored shoes. It’s worth having a small collection of core colors.
What’s the difference between shoe cream and wax polish?
Cream polish contains both wax and pigment, conditions lightly, and builds a soft shine. Wax polish is almost pure wax, builds a hard, high-gloss “mirror” shine, and offers more water resistance but less conditioning. Use cream for daily shoe polishing, and layer wax on top for special occasions if you want a glass-like finish.
The Bottom Line
The most important thing isn’t the brand you buy; it’s the sequence you follow. Clean first, condition second, polish last. Every time. Skipping straight to the polish is how you end up with shoes that look good for a season and then fall apart.
If you only take one action this week, get two separate brushes, one for dry work, one for creams. That single change will prevent more damage than any magic product. For the vast majority of dress shoes, a simple regimen of Saphir Reno Cleaner, a conditioner like Saphir Renovateur, and a matching cream polish is all you’ll ever need. The rest is just noise.
And remember, a pair of well-maintained leather shoes isn’t a fussy artifact. It’s a practical item that, with the right leather shoe care, should last for decades, developing a character that only comes from thoughtful use. That’s the whole point.
