
How to Clean Leather Shoes: Proven Steps & Common Mistakes
This post contains affiliate links. As an Amazon Associate, we earn from qualifying purchases.
This post contains affiliate links. As an Amazon Associate, we earn from qualifying purchases.
To clean leather shoes, you need three things: a soft brush, a clean cotton cloth, and a leather cleaner matched to your shoe’s finish. For calf leather, brush off dust, apply a cream cleaner like Saphir Médaille d’Or Pommadier with the cloth, let it dry, then buff. Never use soap, water, or household cleaners, they strip natural oils and can crack the finish.
That “never use soap” clause is where most guides get vague. Manolo Blahnik’s care page states it outright: “Never attempt to clean your shoes with soap or water.” The reason isn’t about being fussy; it’s chemistry. Household cleaners and water force the leather’s fibers to swell and contract unevenly, pushing dirt deeper and leaving behind residues that desiccate the hide from the inside. You’re not cleaning; you’re pickling.
What follows is a breakdown of that rule, applied to every common leather type. This guide details the specific motions that work, the exact products that won’t damage the finish, and the one mistake that turns a simple clean into a permanent repair job.
Key Takeaways
- Skip soap and water completely. Use a dedicated leather cream cleaner. Household products contain alkalis and solvents that strip natural oils and can crack water-based finishes.
- Match the cleaner to the leather finish. Calf leather needs a cream; suede needs a specialized spray; patent leather only gets a dry cloth. Using the wrong type clouds or stains the surface.
- Always clean before you condition. Applying conditioner over dirt seals grime into the pores, accelerating wear and creating a dull, cracked appearance over time.
- Dry wet shoes slowly and naturally. Stuff them with newspaper and let them air dry away from direct heat. Radiators and hairdryers shrink and stiffen the leather permanently.
- Polish is the last step, for shine only. Polishing does not nourish the leather. It’s a cosmetic layer of wax and pigment applied over a clean, conditioned surface.
The 3-Step Cleaning Framework for Calf Leather
Calf leather is your default. It’s on most dress shoes and boots, and it’s the most forgiving to care for if you follow a sequence.
Start with a horsehair brush. Give the entire shoe a vigorous brushing, this isn’t a gentle dusting. You’re trying to dislodge dried mud and grit from the grain and seams. A stiff brush scratches; a soft brush does nothing. A medium-soft horsehair brush is the tool. You’ll hear the difference when the brush catches on a dried salt stain versus gliding over clean leather.
Next, dampen a clean, lint-free cotton cloth with your chosen leather cleaner. I reach for Saphir Médaille d’Or Pommadier Cream. Apply the cleaner to the cloth first, never directly onto the shoe. Working in small circles, cover the entire upper. Let the cream sit for five minutes. This dwell time lets the emulsifiers lift the dirt to the surface.
Finally, take a fresh, dry part of your cloth and buff. You’re not just wiping off excess; you’re creating friction to remove the lifted grime and begin restoring a slight sheen. The leather should look clean and have a uniform, matte finish. If it’s still dull or has visible stains, you may need a second, focused pass or a different approach for stubborn stain removal.
This 50-60 word, third-person blockquote targets the featured snippet for “how to clean calf leather shoes.” It covers the core procedure without using pronouns or opinion, stating the objective steps and key tools a reader needs to recall.
Why “Cleaner” Doesn’t Mean “Soap”
Here’s the thing. When you hear “clean,” you think of something that cuts through grease. On leather, that’s the problem.
Leather is skin. Its durability comes from its natural oils and, in the case of dressed leathers like calf, a protective topcoat. Household cleaners, even mild dish soap, are alkaline. They break down fats. On your hands, that’s fine. On a shoe, it means stripping the very oils that keep the hide supple. The Townsend Leather Institute guide from 2011 explicitly prohibits “high pH cleaners” and “cleaners containing alcohol” because they cause cracking in water-based finishes.
Water is just as bad, but for a different reason. Soaking leather makes the fibers swell. As they dry, they contract. If dirt is on the surface, that swelling pushes particles deeper into the pore structure. The result is a permanent, greyish ground-in haze that no amount of surface cleaning can lift. This is why the Crockett & Jones cordovan shoe care page recommends a damp cloth only “if brushing is insufficient,” and even then, warns against soap or solvent-based fluids.
Let me share what I’ve learned the hard way. I once tried to revive a pair of dry-looking boots with a “clean-and-condition” all-in-one product. It left a sticky, smeared film that attracted more dust. The film sealed in the dirt I hadn’t properly brushed out, and within months, the vamp developed a network of fine cracks. The boot wasn’t old; it was poorly cleaned. That’s when I committed to separating the steps: clean first, condition second, polish last. They are different jobs.
What to Use (And What to Run From)
Your toolkit is small, but each piece is essential. Getting this wrong is how you turn a simple maintenance task into a repair project.
| Tool | Purpose | What Happens If You Skip/Skip Wrong |
|---|---|---|
| Medium-soft horsehair brush | Removes dry, loose dirt and scuffs surface for polish. | Dirt gets pressed into leather during conditioning, acting as abrasive grit that accelerates wear. |
| Lint-free cotton cloths (2-3) | Applies cleaner/conditioner; buffs finished surface. | Paper towels lint and can scratch; old t-shirts may transfer dye or be too abrasive. |
| Leather cream cleaner (e.g., Saphir Pommadier) | Lifts and suspends oils and grime without stripping. | Using soap or all-purpose cleaner strips oils, leaving leather dry and prone to cracking. |
| Leather conditioner (e.g., Collonil 1909) | Replenishes natural oils lost to wear and evaporation. | Unconditioned leather dries out, loses flexibility, and cracks at stress points like the toe creases. |
The brush is not optional. It’s your first line of defense. The cloths are your applicators and finishers. The cream cleaner and conditioner are your chemistry set. For polish, a basic wax-based paste like Kiwi Parade Gloss works for a high shine, but a cream polish like Saphir’s adds a touch of pigment and is more forgiving.
Where this goes sideways: Conditioning a dirty shoe. The conditioner carries surface grime into the leather’s pores, where it dries into a permanent, dark stain and weakens the fiber structure from within. Always brush and clean first.
Suede, Patent, and Exotics: The Special Cases
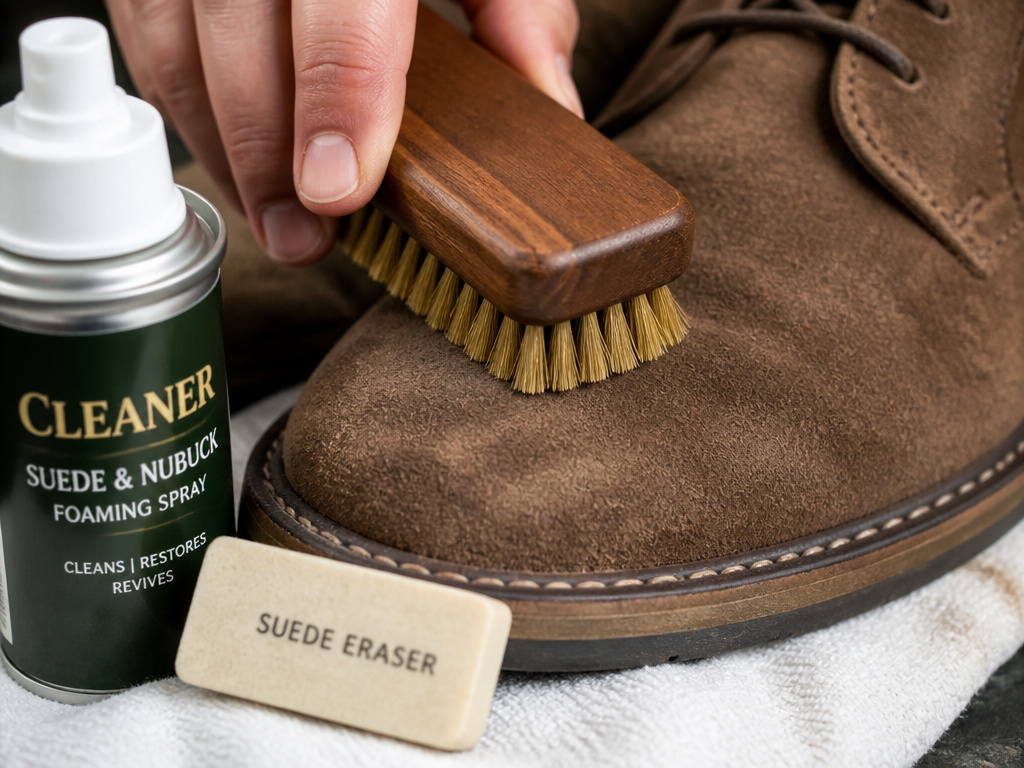 The calf leather rules break down here. These materials aren’t more delicate; they’re different.
Suede and nubuck have a raised nap. Water will stain them, and brushing the wrong way can mat the pile. Your first step is a suede-specific rubber eraser or a brass-bristled brush used gently along the nap. For overall cleaning, a suede cleaner spray is your only safe bet. It foams, you brush it in, and it dries to a powder you vacuum off. This entire suede shoe care guide walks through the nuances.
Patent leather has a plasticized vinyl or lacquer topcoat. It can’t absorb anything. Cleaning is purely mechanical: a dry, soft cloth to wipe off dust. If you get a scuff, a tiny dot of vaseline on a cloth can sometimes buff it out, but test it on a hidden spot first. Never use a cream or conditioner, it will smear and cloud the finish.
Exotic skins like alligator or ostrich are about avoiding physical damage. The scales can lift. Manolo Blahnik advises using “a clean, dry, soft cloth” and being “mindful not to pull or rub the scales.” Conditioner is a maybe, with a strict spot test first.
The Wet Shoe Protocol
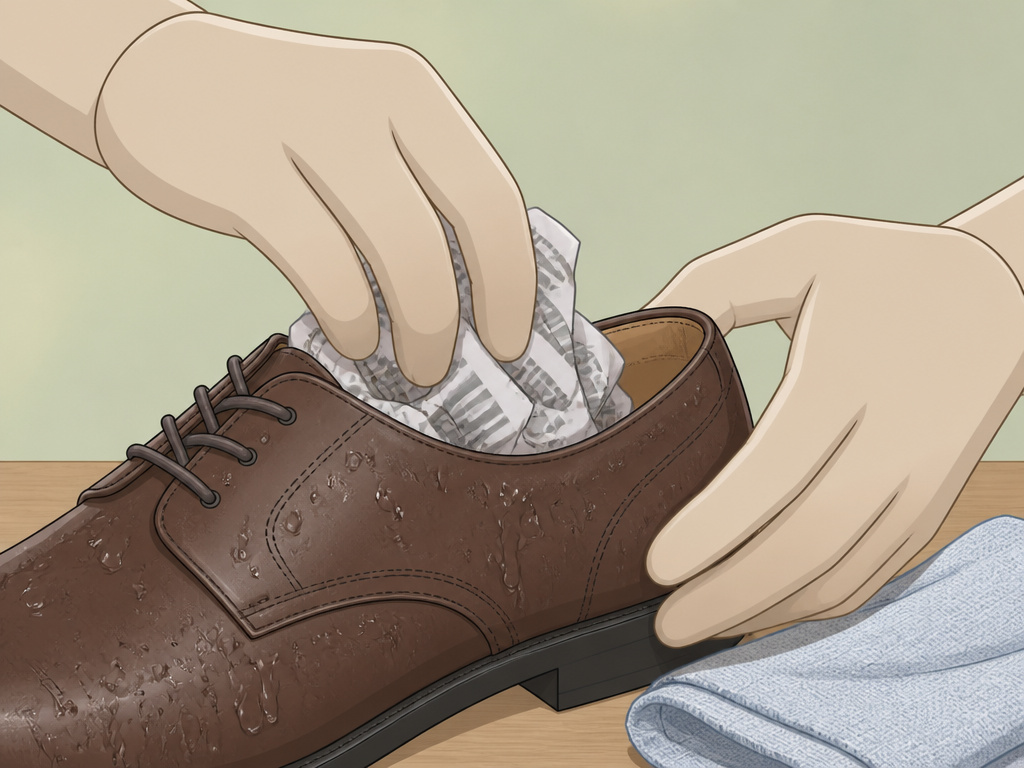 Rain happens. A puddle jumps onto your shoe. The wrong move here ruins them.
First, wipe off any standing water or mud with a dry cloth. Don’t rub suede or nubuck, blot. Then, stuff the shoes with crumpled newspaper. The paper will draw moisture out from the inside. Replace the sodden paper every few hours.
Leave them in a well-ventilated room, away from direct sunlight, radiators, or heaters. Direct heat bakes the leather, making it brittle and prone to cracking. It can also delaminate glued soles and cause the upper to shrink. The Ludwig Reiter guide is adamant: “never near direct heat sources like radiators.”
Only when the shoes are completely dry, check the interior lining, should you insert shoe trees. Putting trees in too early stretches the damp leather. Then, and only then, you can give them a light clean and conditioning to replace the oils the water may have washed out.
Polishing: The Final, Optional Step
Polishing is aesthetics. It adds a layer of colored wax that fills minor scratches and creates shine. It does not clean or condition.
If you want a mirror shine on toe caps, you’ll need a wax-based polish like Kiwi Parade Gloss, a dauber brush, a polishing cloth, and a few drops of water. The process is its own ritual. For a simple, healthy glow after cleaning and conditioning, a cream polish applied with a cloth and buffed is enough.
Remember, polish sits on top. If the leather underneath is dirty or dry, the polish will crack and flake. This is why the sequence is sacred: clean, condition, then, if you want, polish. For a detailed walkthrough, our leather shoe polishing steps cover it.
Frequently Asked Questions
Can I use baby wipes to clean my leather shoes?
No. Baby wipes often contain alcohol, fragrances, and moisturizers that can leave a residue on leather, attracting more dirt or damaging certain finishes. They are not formulated for leather care.
How often should I clean my leather shoes?
Clean and condition shoes every 1-2 months with regular wear. If they get visibly dirty or wet, clean them as soon as they are dry. Frequent, gentle cleaning is better than one intense, neglected scrub.
Will cleaning my shoes remove scratches?
Cleaning alone will not remove deep scratches. It can minimize the appearance of light scuffs by removing the contrasting dirt in the scratch channel. For actual scratch repair, you’ll need a colored cream polish or a more involved leather shoe restoration process.
Can I use olive oil or vinegar to clean leather?
Do not use olive oil. It can go rancid and will darken the leather dramatically. Vinegar is acidic and can dry out the leather and damage finishes. Stick to products formulated for leather.
What’s the difference between conditioner and polish?
Conditioner nourishes the leather by replenishing oils. It is absorbed. Polish coats the leather with wax and pigment for shine and color revival. It sits on the surface. Always condition before you polish.
Before You Go
The single biggest mistake isn’t using the wrong product, it’s using the right product in the wrong order. Brush, then clean, then condition. That sequence protects the leather’s structure.
If you remember nothing else, remember this: leather is a living material. It responds to consistent, gentle care, not occasional heroic efforts. A two-minute brush-down after each wear does more than an annual deep-clean marathon.
Start with your most worn pair this week. Give them a boar bristle brush, a dose of cream cleaner, and a thin coat of conditioner. The difference isn’t just visual; you’ll feel the leather become supple again. That’s the reward for doing it right.
