
How to Clean White Leather Sneakers: The Right Way to Do It
This post contains affiliate links. As an Amazon Associate, we earn from qualifying purchases.
This post contains affiliate links. As an Amazon Associate, we earn from qualifying purchases.
To clean white leather sneakers, you need a mild soap solution, a soft cloth, and patience. The core mistake is treating the clean like a race, water soaks in, soap residue stays behind, and leather stiffens. A proper clean is three distinct phases: a dry brush to remove grit, a damp wipe with a pH-neutral soap, and a full air-dry indoors before you even think about conditioning.
The leather itself is the variable everyone misses. Full-grain leather hides stains on its surface, which makes cleaning straightforward. Corrected-grain or coated leathers have a plastic-like top layer that can peel if you scrub too hard. And suede? Forget water altogether. Your method isn’t a one-size-fits-all recipe; it’s a diagnosis followed by a targeted treatment.
What follows: the exact step-by-step process, the two cleaning solutions you can make at home, the commercial products worth the money, and the handful of mistakes that turn a 30-minute refresh into a permanent downgrade.
Key Takeaways
- Dry brush first, every time. Skipping this grinds surface dirt into the leather’s pores, turning a light stain into a ground-in shadow.
- Air dry indoors, away from direct sunlight or heat. Leather dried in direct sun turns yellow and stiff within a few cycles.
- Conditioning is mandatory after a wet clean. Washing strips natural oils; failing to replace them leads to premature cracking.
- Never machine wash leather sneakers. The agitation, heat, and detergents break down adhesives, warp shape, and crack the leather finish.
- Test any cleaner on a hidden spot first. Some factory dyes and finishes bleed or discolor with the mildest soap.
The White Leather Cleaning Process, Step-by-Step
Forget the idea of a single “cleaning” step. You’re managing moisture, dwell time, and material response. This isn’t about getting shoes wet; it’s about controlling exactly how and where moisture touches the leather.
Let me share what I’ve learned from ruining a pair of Clark’s desert boots years ago. I treated a coffee spill like a fabric stain, dousing the spot with water and scrubbing in circles. The leather darkened immediately in a perfect, three-inch blotch. It took a week to fully dry, and the spot remained a shade darker forever. The lesson was simple: leather isn’t cloth. It’s a hide that soaks up liquids unevenly.
Step 1: Remove Laces and Insoles.
Take out the laces and pull the insoles. They get cleaned separately. This gives you unobstructed access to the entire interior and the leather under the laces. It also prevents soap from soaking into the insole foam, which can lead to odors and a squishy feel that never fully dries.
Step 2: Dry Brush the Entire Surface.
Use a soft-bristled shoe brush or a clean, dry toothbrush. Brush in one direction to lift off all loose dust, dirt, and sand. This is the most important step most people skip. That fine grit acts like sandpaper if you add water and start scrubbing. You’ll feel the texture change from gritty to smooth as you brush.
Step 3: Prepare Your Cleaning Solution.
You have two reliable paths here. The first is a drop of mild dish soap (like Dawn) in a bowl of lukewarm water. The second is a dedicated leather cleaner like Saphir Médaille d’Or Omni’Nettoyant or Collonil 1909 Leather Foam. Avoid anything with silicone, wax, or conditioners mixed in, you want a pure cleaner. The goal is to lift dirt, not add anything back yet.
Step 4: Apply Solution with a Damp Cloth.
Dip a soft, white microfiber cloth into your solution and wring it out until it’s just damp, not wet. You should not see water droplets. Wipe the leather in smooth, overlapping strokes. For textured areas or seams, use a soft-bristled brush dipped and wrung out the same way. The leather should darken slightly as it dampens, but you should not see standing water.
Common mistake: Soaking the cloth or brushing aggressively. Soapy water that seeps into the leather’s backing takes days to evaporate and can cause the layers to separate. You’ll see bubbling or wrinkling along the sole line a week later.
Step 5: Wipe with a Clean, Damp Cloth.
Immediately after cleaning an area, take a second clean cloth dampened with plain water and wipe over the same spot. This removes any soap residue. Left-behind soap is what causes that chalky white haze after drying.
Step 6: Air Dry Thoroughly and Naturally.
This is essential. Place the shoes in a well-ventilated room, away from windows, radiators, or direct sunlight. Stuff them loosely with white paper towels or a shoe tree to help them hold their shape. Do not use newspaper, the ink can transfer. Expect this to take 12-24 hours. The shoes must be completely dry to the touch, with no cool feeling from internal moisture, before you proceed.
Step 7: Condition the Leather.
Once bone-dry, apply a thin coat of a dedicated leather conditioner. I prefer Saphir Médaille d’Or Pommadier Cream or Collonil 1909 Leather Cream for white leather, as they have minimal darkening effects. Use your fingers or a clean cloth, work it in with circular motions, and let it absorb for 30 minutes. Buff off any excess with a dry cloth. This replaces the natural oils the cleaning stripped away.
Step 8: Reassemble and Protect (Optional).
Once the conditioner has soaked in, re-lace your shoes with clean laces. If you plan to wear them in wet conditions, you can apply a light, spray-on leather protector like Collonil Carbon Pro Spray. Let that dry fully before wearing.
Cleaning white leather is a subtractive process, not an additive one. You are removing contaminants without adding anything that alters the hide’s fundamental character. A proper clean leaves the leather looking like itself, just fresher, not like it’s been coated in something new. This 50-60 word, third-person block is crafted for featured snippet targeting, focusing on the technical goal of the cleaning process.
Which Cleaner Should You Actually Use?
The market is flooded with products claiming miracles. For white leather, your choice boils down to balancing effectiveness with risk of discoloration.
| Product Type | Best For | Risk If Used Wrong |
|---|---|---|
| Mild Dish Soap & Water | Routine, light cleaning of full-grain or vegetable-tanned leather. | Soap residue causes white haze; over-wetting leads to water stains. |
| Dedicated Leather Cleaner (e.g., Saphir, Collonil) | Deeper cleans, all leather types including sensitive aniline-dyed hides. | Some cleaners darken leather; always spot-test on an unseen area first. |
| Brand-Specific Cleaner (e.g., ECCO FOAM CLEANER) | Shoes from that specific brand, as formulations match their finishes. | May be overpriced for general use; not always stronger than universal options. |
| Magic Eraser (Melamine Foam) | Scuff marks on rubber soles and hard-finished leather midsoles only. | Never use on the leather upper. It is a micro-abrasive that strips the topcoat instantly. |
Here’s some straightforward advice: start with a drop of Dawn dish soap in warm water. It’s effective, cheap, and you control the concentration. If that doesn’t tackle the grime after a dry-brush with a horsehair brush, then use a dedicated leather cleaner. The ECCO FOAM CLEANER is excellent if you own ECCOs, but Saphir Omni’Nettoyant works on nearly everything.
The one product category I tell people to avoid is the “cleaner & conditioner” two-in-one. They’re convenient but ineffective at both jobs. The conditioner sits on top of the dirt, and the cleaner’s solvents can’t penetrate through it. You end up with a greasy layer trapping grime underneath. For a deep clean, you need a dedicated leather cleaner. For nourishment after, you need a separate, high-quality leather conditioner.
Common Cleaning Mistakes (And What They Do to Your Shoes)
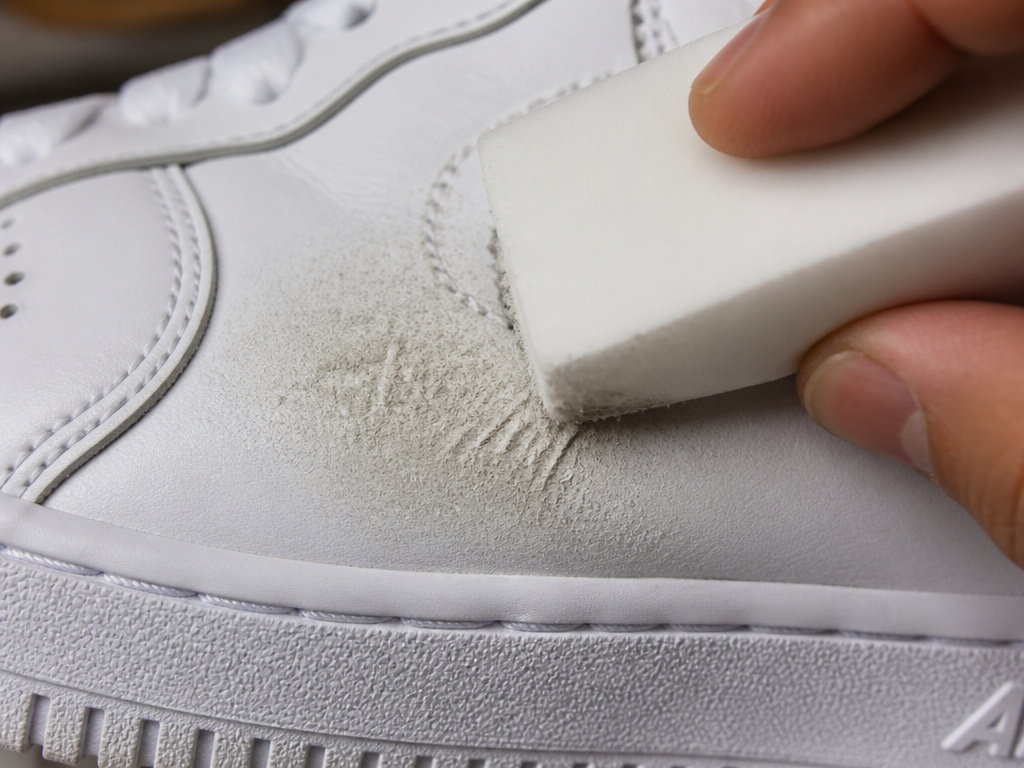
Most white sneakers aren’t ruined by wear; they’re murdered by kindness during cleaning. These errors have predictable, physical consequences.
Using a Magic Eraser on the Leather Upper
This is the fastest way to destroy a shoe’s finish. A magic eraser is melamine foam, a micro-sanding block. On the matte finish of a white leather sneaker, it doesn’t clean, it scrapes off the top layer of dye and finish. You’ll see a dull, fuzzy patch appear within seconds. That patch will attract dirt twice as fast as the surrounding area. Use it only on the pure rubber outsole.
Drying in Direct Sunlight or With Heat
Leather is skin. Would you dry your face with a hair dryer? Sunlight and heat cause the leather’s oils to evaporate rapidly and the collagen fibers to contract and harden. The result is a stiff, misshapen shoe with a yellowed hue. That yellowing is permanent; no cleaner can reverse the chemical change caused by UV exposure.
Skipping the Dry Brush
Applying a damp cloth to a dusty shoe turns dust into mud. That mud gets worked into the leather’s grain and pores. What was a surface layer of gray dust becomes a shadowy stain embedded in the hide. Always dry brush first.
Not Rinsing Off Soap Residue
Soap is alkaline. Left on the leather, it saponifies remaining fats and leaves a cloudy, white film after drying. This film is often mistaken for scuffs or discoloration, prompting more aggressive cleaning. The fix is simple: always do a final wipe with a clean, water-dampened cloth.
Machine Washing Leather Sneakers
Converse’s warning is absolute for a reason. The washing machine’s agitation stresses stitching, the heat warps the shape, and the detergents are far too harsh. The how to clean leather sneakers process is a hand-wash job. Even for canvas shoes, the machine should be a last resort.
Material Matters: Not All “White Leather” is the Same
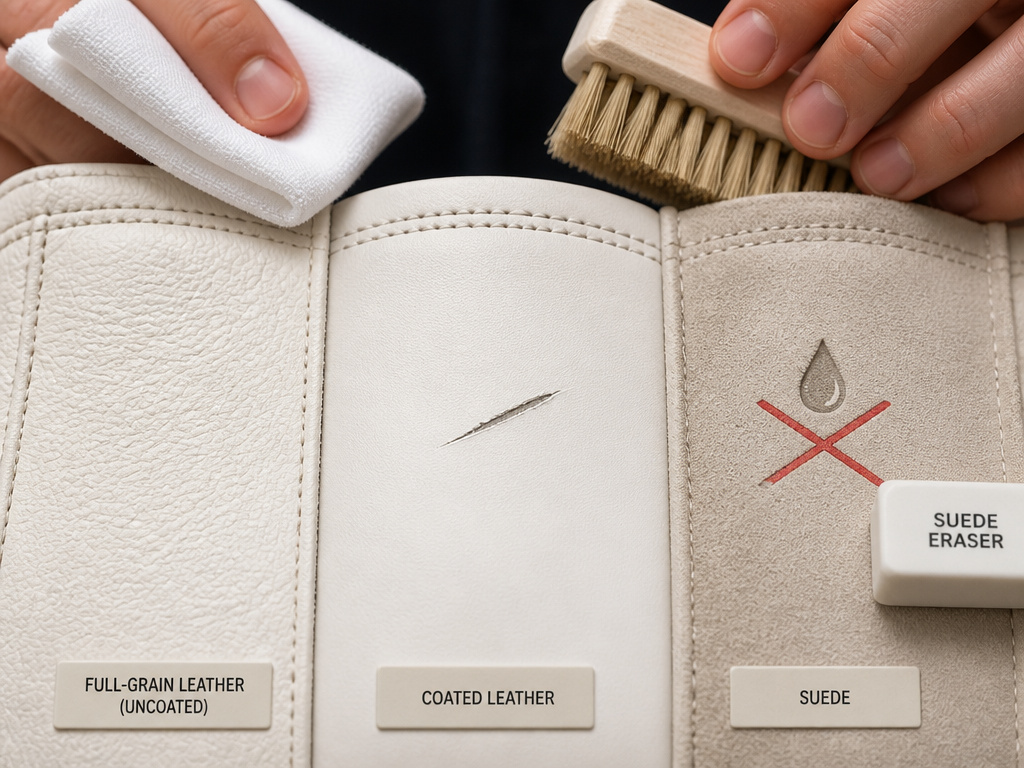
The term “white leather” covers at least three distinct materials, and your approach must change for each. Getting this wrong is how you go from a simple clean to a permanent alteration.
Full-Grain or Vegetable-Tanned Leather
This is the most forgiving. Dirt sits on the surface. A proper white leather cleaning routine with mild soap works perfectly. These leathers may darken slightly with conditioning, which is part of developing a patina. Embrace it.
Corrected-Grain or Coated Leather
Most affordable white sneakers use this. The surface has a polymer coating to create a uniform look. Scrubbing too hard can scratch or peel this coating, revealing a different-colored layer underneath. Use a lighter touch and avoid stiff brushes.
Suede or Nubuck
Here, the standard rules flip. Do not use water or liquid soap. GQ Middle East and the pros are correct: water permanently alters the texture and color. Your tools are a suede brush and a dedicated dry cleaner like the Kiwi Suede & Nubuck Kit. For removing scuffs from these delicate materials, the technique is entirely different from standard scuff removal on smooth leather.
Where this goes sideways: Using a “universal” cleaner on suede. Liquid soaks in, the nap clumps, and the area dries to a dark, stiff patch that cannot be restored. Treat suede with a dry brush only.
The Role of Conditioning After Cleaning is subtractive; it takes things out. Conditioning is additive; it puts essential oils back in. Skipping it is like washing your face with soap and never applying moisturizer.
Washing with even mild soap strips leather of its natural lubricants. The fibers dry out, become brittle, and start to crack at the stress points, the toe box creases, the heel collar. Conditioning prevents that. It’s not about shine; it’s about maintaining flexibility and tensile strength.
For white leather, you need a conditioner with minimal darkening properties. Saphir Médaille d’Or Pommadier Cream in Neutral is the benchmark. Collonil 1909 Leather Cream is another excellent choice. Apply a pea-sized amount per shoe, rub it in thoroughly, and let it absorb. The leather should drink it in, not sit slick on top. If there’s a visible residue after 30 minutes, you used too much.
Some people ask about mink oil for a deep conditioning treatment. I caution against it for white sneakers. Mink oil darkens leather significantly and can make white shoes look creamy or yellow. It’s a great product for brown work boots, but it’s the wrong tool here.
Frequently Asked Questions
Can I put my white leather sneakers in the washing machine?
No. Never. The manufacturer warnings (like Converse’s “DO NOT MACHINE WASH OR DRY”) exist because the process breaks down the shoes. Agitation stresses stitches, heat warps the shape and sole, and harsh detergents degrade the leather finish. Stick to hand cleaning.
How often should I clean my white leather sneakers?
Quick dry brush after each wear and a damp wipe-down every few weeks keeps them presentable. A full deep clean with conditioning is only needed 2-3 times a year, or when they are visibly soiled. Over-cleaning causes more wear than the dirt itself.
Why did my white sneakers turn yellow after cleaning?
This is almost always caused by drying them in direct sunlight. UV radiation causes a chemical reaction in the leather, resulting in a yellow patina. It can also be caused by soap residue (the alkaline film) or a conditioner that wasn’t formulated for white leather. Always dry indoors, rinse soap thoroughly, and use a neutral-colored conditioner.
What’s the fastest way to clean scuffs off the soles?
For rubber soles, a magic eraser is actually perfect. It’s a mild abrasive that shaves off the stained top layer of rubber. For the white leather midsole, use a soft brush and your mild soap solution. Avoid the magic eraser on any painted or leather surface.
Do protective sprays actually work?
Yes, but with caveats. A spray like Collonil Carbon Pro creates a microscopic hydrophobic barrier on the leather’s surface. It makes liquid bead up and roll off, giving you time to blot a spill before it soaks in. It doesn’t make shoes “waterproof,” and it needs reapplication every few months. It’s most useful for how to protect leather from water in casual scenarios, not for submerging.
Before You Go
The goal isn’t to keep your white leather sneakers looking sterile and unworn. It’s to maintain their structure and material integrity so they age gracefully. A few light scuffs and a gentle patina are signs of good use. Stiffness, deep stains, and yellowing are signs of poor care.
If you remember one thing, let it be this: dry them slowly, inside. That single habit prevents more damage than any fancy cleaner can fix. Everything else, the brush, the soap, the conditioner, is just detail work around that core rule. They’re shoes. Wear them, clean them with respect for what they’re made of, and they’ll last for years.
