
How to Condition Your Work Boots | Prevent Cracking & Wear
This post contains affiliate links. As an Amazon Associate, we earn from qualifying purchases.
To condition work boots, apply a thin, even coat of a product matched to your leather type, like Red Wing’s All Natural Boot Oil for full-grain, oiled leather, every 4–6 weeks of regular use. Always clean the boots first and let them dry completely; conditioning wet leather traps moisture inside and accelerates rot. Skipping this routine is what turns a five-year boot into a two-year boot.
That 4–6 week number is the published maintenance interval from Work ‘n More for full-grain leather under normal job-site wear. Conditioning serves a purpose beyond making boots look shiny for a day.It’s about replacing the oils that daily abrasion, sweat, and weather pull out of the hide, keeping the fibers supple so they don’t dry out and crack at the stress points.
What follows: why you must clean first, how to pick a product that won’t ruin your boots, the exact method that prevents over-application, and the one drying mistake that destroys more boots than any job-site hazard.
Key Takeaways
- Condition full-grain leather work boots every 4–6 weeks under normal use, or whenever the leather looks dry and pale.
- Never condition wet boots. Let them dry fully at room temperature first; products applied to damp leather won’t penetrate and can trap moisture.
- Match your conditioner to your leather: oil-based (mink oil, boot oil) for traditional work boots, cream-based for dressier or finished leathers, and specialty products for nubuck or waterproof membranes.
- Heat is the enemy. Never dry boots on a radiator or forced-air vent; it bakes the leather brittle and melts the adhesives holding the sole on.
- Waterproofing and conditioning are separate, often opposing goals. Condition first to nourish the leather, then apply a protectant only if you need a sealed barrier.
Why Your Boots Demand More Than a Wipe-Down
Leather is a natural skin that behaves like one. Every time you wear a boot, you’re flexing it, exposing it to sweat, dirt, and often water.The fibers lose their natural oils and stiffen. A stiff boot is uncomfortable and indicates a boot starting to fail. The creases over the toe box and around the ankle will turn white, then deep, hairline cracks will appear.Once those cracks go deep, the boot is structurally compromised.
The 4–6 week conditioning guideline exists because that’s roughly how long it takes for those internal oils to deplete under regular wear. You’re not adding a cosmetic layer. You’re performing essential hydration.
Common mistake: Waiting until the leather looks dry and cracked to condition it. By the time you see the pale, stiff patches, the leather’s internal structure is already damaged. The cracks will remain even after conditioning.
Think of it like skin care for your hands after a day of manual labor. You wouldn’t wait until they’re chapped and bleeding to use lotion. You’d apply it routinely to keep the skin resilient. Your boots deserve the same logic.
The Sequence That Matters: Clean, Condition, Protect
This is required. If you condition over dirt and salt, you’re just sealing those abrasives into the leather, creating a gritty paste that grinds down the fibers from the inside every time you take a step. Your cleaning and conditioning routine must always start with a clean slate.
- Remove the laces and insoles. This lets you clean the tongue and the interior fully.
- Brush off dry dirt. Use a stiff-bristled brush or a dedicated boot brush. Get the mud out of the treads and the dust off the uppers.
- Wipe down with a damp cloth. For most job-site grime, a cloth wrung out in lukewarm water is enough. For heavier grease or salt stains, use a dedicated leather cleaner, saddle soap is overkill for all but the filthiest scenarios and can strip too many oils.
- Air dry completely. This is the step everyone rushes. Stuff the boots loosely with newspaper or paper towels to absorb moisture from the inside and maintain shape. Place them in a well-ventilated spot at room temperature. This takes hours, often overnight.
Now the leather is ready to absorb conditioner. A dry, clean surface is porous and thirsty. A wet or dirty surface is not.
Technical Note: According to the ASTM F2892-24 standard that many safety boots like the Justin Boots Conductor 10″ comply with, modifying the footwear (including care that alters its slip-resistant or electrical hazard properties) can void its safety rating. Always check your boot’s care label first.
Picking Your Potion: Oil, Cream, or Wax?
Here’s where most guides get vague. They tell you to “use a conditioner.” But the wrong one can permanently darken your boots, clog a waterproof lining, or leave a sticky residue that attracts more dirt. Your choice hinges on your boot’s leather and its purpose.
| Leather Type / Boot Style | Best Conditioner Type | Product Example | Why It Works |
|---|---|---|---|
| Full-Grain, Oiled Work Boots (Red Wing 405, 402) | Oil-Based (Boot Oil, Mink Oil) | Red Wing All Natural Boot Oil, Obenauf’s Heavy Duty LP | Replenishes the oils this leather is tanned and finished with. Darkens leather permanently—embrace the patina. |
| Finished or Dress Leather (Polished surface) | Cream or Lotion-Based | Bickmore Bick 4, Lexol Leather Conditioner | Absorbs quickly without darkening, maintains the original finish and shine. |
| Boots with Waterproof Membranes (Gore-Tex, eVent liner) | Breathable Liquid Proofing | Nikwax Fabric & Leather Proof | Designed to waterproof without clogging the microscopic pores of the membrane. Wax-based products ruin breathability. |
| Nubuck or Suede (Rough, velvety nap) | Specialty Nubuck Spray | Angelus Easy Cleaner & Nubuck Kit | Cleans and conditions without oil that would darken and mat the delicate nap. |
For the classic, hard-wearing work boot, the kind most people search for, an oil-based product is the default. Red Wing explicitly recommends its All Natural Boot Oil for models like the Traction Tred 405. Mink oil is the traditional choice, but know that it darkens leather more than some boot oils. If you want maximum protection from water and salt for outdoor work, a beeswax-based product like Obenauf’s Heavy Duty LP is the benchmark, though it creates a heavier, more permanent seal.
The takeaway? Read your boot’s care instructions. If it says “use boot oil,” don’t substitute a wax. They’re engineered for different outcomes.
The Right Way to Apply Conditioner (Less Is More)
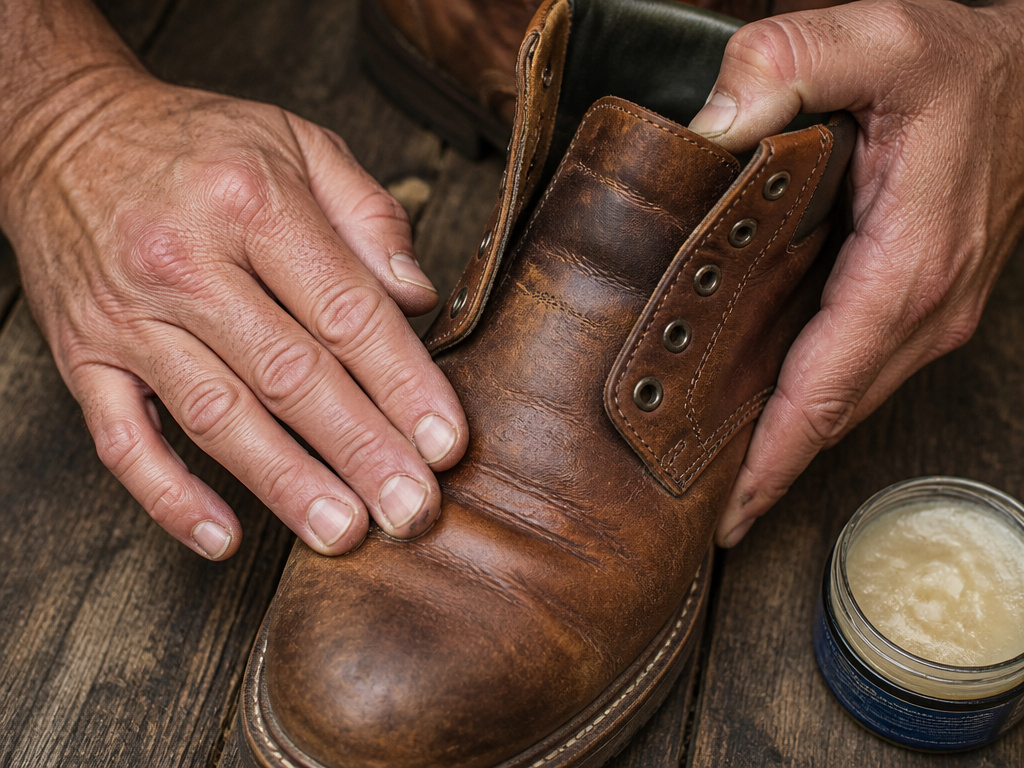
You’re not painting a fence. The goal is to let the leather drink the conditioner, not wear it on the surface. Here’s the method that prevents the common over-application mess.
- Use your hands. Bare hands are the best tool. The warmth from your skin helps thin the product and improves absorption. Use a clean, lint-free cloth if you must.
- Take a small amount. Start with a dime-sized dollop for one boot. You can always add more.
- Rub it in thoroughly. Work the conditioner into every square inch, paying extra attention to high-flex areas: the toe cap, the instep, and around the ankle collar. These are the spots that dry out fastest.
- Let it absorb. Walk away for at least 30 minutes, or ideally overnight. The leather should look nourished, not shiny or sticky. If it’s sticky, you used too much, wipe off the excess with a dry cloth.
- Buff gently. After the soak-in period, a quick buff with a soft cloth or horsehair brush will smooth the surface and restore a slight luster.
This process is nearly identical whether you’re looking to oil leather boots for deep conditioning or use a lighter cream. The difference is in the product’s consistency and dry time. Oils penetrate deeper but take longer to fully absorb; creams sit closer to the surface and dry faster.
Where this goes sideways: Applying conditioner to a boot that’s still damp from wear or cleaning. The water in the leather blocks the conditioner from penetrating past the surface layer. You’ll get a sticky top coat while the inner fibers remain dry, which leads to cracking from the inside out within a season.
When Conditioning Isn’t Enough: The Waterproofing Question
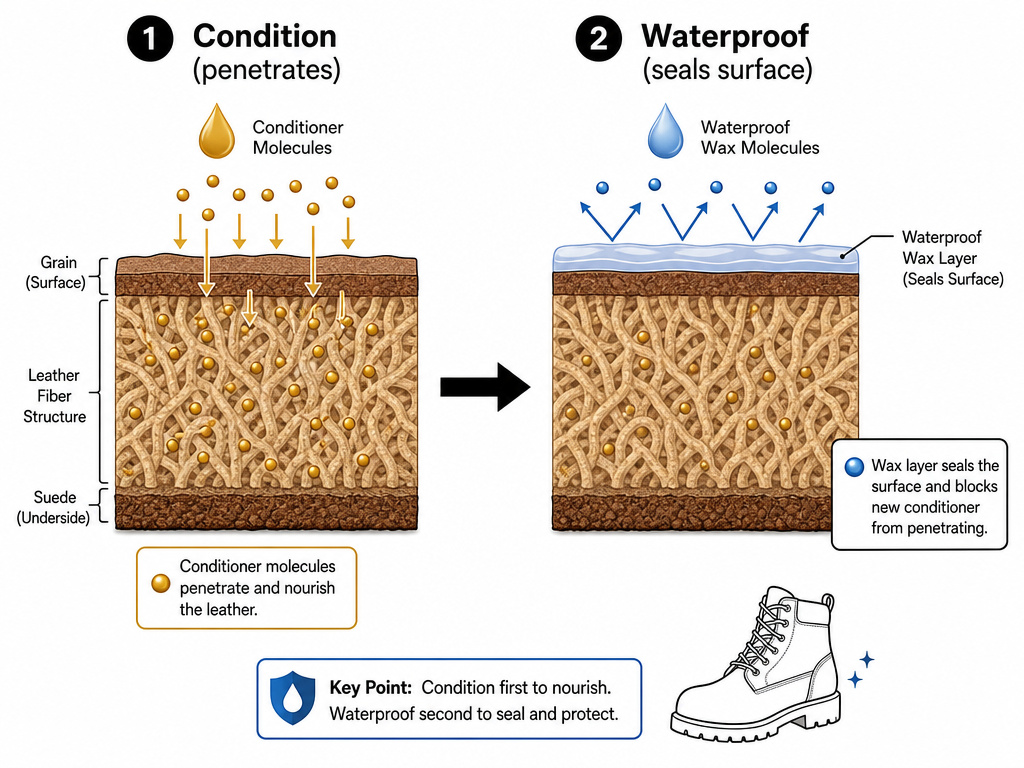
This is a crucial distinction. Conditioning and waterproofing are related but different jobs. Conditioning feeds the leather. Waterproofing seals it.
You condition a boot to keep it alive and flexible. You waterproof a boot to create a barrier against liquid water. Many products try to do both, but they’re inherently at odds. A true waterproofing agent, like a heavy wax or silicone, forms a seal on the surface. That’s great for keeping water out, but it also locks subsequent conditioners out. This is why the sequence is critical: if you plan to waterproof leather work boots, do your conditioning process first on clean, dry leather. Then apply the waterproofing treatment.
For most commuters or indoor trades, frequent conditioning provides enough inherent water resistance. For outdoor workers, applying a dedicated waterproofing treatment after conditioning is a smart, seasonal ritual, usually before the wet winter or spring months.
The Enemies of Conditioned Leather: Heat, Neglect, and Plastic
You can do everything right with product and application and still ruin your boots with one bad drying habit. The absolute worst thing you can do is try to speed up the drying process with direct heat.
- Never place boots on a radiator, space heater, or fireplace hearth.
- Never leave them in the direct sun of a hot car.
- Never point a hair dryer or heat gun at them.
High heat doesn’t just dry the leather; it bakes it. The collagen fibers shrink and become irreversibly brittle. The result is a boot that feels like cardboard and cracks with the next flex. Heat also softens the modern adhesives that bind the sole to the upper, leading to premature sole separation.
The right way is the slow way: air drying at room temperature, stuffed with absorbent paper.
Beyond heat, the other great enemy is storage. I learned this one the hard way. After a wet season, I stored a pair of leather boots in a plastic grocery bag, thinking I was keeping them clean. A few months later, the musty smell of mildew hit me when I opened the bag. Trapped moisture with no airflow is a breeding ground for mold, which eats away at the leather and leaves permanent stains. Always store boots in a cool, dry place with plenty of air circulation.
The 4–6 Week Reality Check and a Boot’s Lifespan
Let’s be realistic. Conditioning every month is a discipline. It’s easy to let it slide for a season. What happens if you do?
The leather doesn’t fail all at once. It gives you signals. First, the rich color fades to a pale, ashy grey in the creases. The boot feels stiffer both when you put it on and throughout the day. Then, you’ll notice tiny cracks, like crow’s feet, radiating from the flex points.Finally, a deep crack opens, and you can see the rough backing material underneath. At that point, conditioning is a band-aid. The structural integrity is gone.
Adhering to that 4–6 week schedule is the single biggest factor in hitting the five-year mark instead of the two-year mark. Combine it with a regular cleaning routine and proper drying, and you’re not just maintaining a tool, you’re honoring the material. The patina you build, the softness you cultivate, that’s the story of your work written into the leather.
Frequently Asked Questions
Can I use the same conditioner on all my leather boots?
No. The type of leather dictates the product. Oil-based conditioners (mink oil, boot oil) are for full-grain, oil-tanned work boots. Cream conditioners are for finished, dressier leathers. Using an oil on a dress boot will darken it dramatically and may create a greasy feel. Always check the manufacturer’s recommendation first.
How do I know if my boots need conditioning?
The visual test is simple. Look at the deep creases, especially over the toes. If the leather in the crease has turned a much lighter, almost whitish color compared to the surrounding leather, it’s dry and needs conditioning. The tactile test is to flex the boot. If it feels stiff and resistant rather than supple, it’s time.
Will conditioning make my waterproof boots less waterproof?
If you use the correct product, no. For boots with a Gore-Tex or similar membrane, you must use a conditioner or waterproofing spray designed for technical gear, like Nikwax. These are formulated to be breathable and won’t clog the membrane. Using a traditional wax or oil will coat the outer leather and can reduce the liner’s breathability and effectiveness.
Can I condition boots that are already cracked?
You can, and you should, but understand the limits. Conditioning will moisturize the remaining good leather around the crack and prevent it from spreading further. However, it cannot fuse the separated fibers back together. The crack will remain visible. Think of it as damage control, not a repair.
Is a horsehair brush really necessary?
For long-term leather boot care, yes. Brushing with a horsehair brush after each wear does two important things. First, it removes surface dust and dirt that acts as an abrasive. Second, and more subtly, it redistributes the leather’s natural oils across the surface, which helps maintain an even patina and slight water resistance. It’s a one-minute habit with a big payoff.
The Bottom Line
Conditioning work boots is the core of the maintenance schedule that separates a boot that endures from one that disintegrates. Forget the fancy techniques and complicated routines.Your entire regimen boils down to three things: clean them when they’re dirty, condition them every 4–6 weeks without fail, and never, ever let them bake dry on a heat source.
If you want one product to start with for a traditional work boot, get a small tin of the manufacturer’s recommended boot oil, like Red Wing’s All Natural Boot Oil for their boots. Apply it thin, rub it in warm, and let it soak overnight. That single step, done consistently, will add more years to your boots than any other piece of advice you’ll read. The leather will tell you the rest.
