
A Pro DIY Guide on How to Repair a Leather Couch With Tools
This post contains affiliate links. As an Amazon Associate, we earn from qualifying purchases.
To repair a leather couch, match the repair method to the damage: clean the area, then choose between spot-fixing for scratches (using 320 or 500 grit sandpaper before glue dries) or patching for larger tears (with a sub-patch, leather glue, and filler). The specific sandpaper grit and a mandatory one-hour cure time before flexing are the details most guides skip.
That one-hour flex rule is not a suggestion. Skip it and the fresh bond will shear right along the old tear line, leaving you back at square one with a messier fix. Leather moves, stretches, and compresses with every sit, a rigid glue spot won’t.
What follows: how to tell a scratch from a cut that needs a patch, the exact grits to use and when, why your choice of filler matters more than the dye, and the single biggest mistake that turns a simple tear into an irreparable stiff spot. This is based on years of practical experience.
Key Takeaways
- Grit decides the blend. Use 320-grit sandpaper on genuine leather and 500-grit on corrected or coated leather before glue dries. This creates a fine dust that fills the repair and helps it vanish into the grain.
- Glue needs stillness. After any glue repair, you must let the adhesive cure for a full hour without flexing the leather. Sitting on it sooner re-opens the tear.
- Structure before cosmetics. Always fix the hole or tear first with a sub-patch and glue. Applying color or conditioner over a weak structure is just painting a crack.
- Not all leather can be wet-cleaned. The common “clean with a damp cloth” step will ruin aniline, semi-aniline, suede, or nubuck leathers. Know your leather type before you start.
- Heat is your enemy during repair. Never use a hairdryer on high heat to speed glue drying, it can shrink the leather and create a puckered, stiff spot that cracks later.
Diagnose Before You Repair
Is it a surface scratch, a clean cut, or a torn flap exposing the cloth backing? The answer changes your tool list and your first step.
A surface scratch only grazes the top finish or dye layer. You’ll see a lighter-colored line, but the leather beneath feels solid. A clean cut goes deeper, parting the leather fibers but leaving relatively clean edges. The real trouble is a tear where the leather has separated, often showing a frayed edge or the woven fabric substrate underneath. That last one needs a sub-patch; the first two might not.
Here’s the part nobody mentions: some “scratches” are actually dye transfer from something else. A new pair of dark jeans can leave a blueish mark on a light leather couch that looks like a scuff. Before you sand anything, try a barely-damp cloth with a drop of mild soap. If the mark comes off, you just saved yourself a repair.
Where this goes sideways: Assuming all marks are damage. Dye transfer from jeans, especially on light-colored leather, can look identical to a scuff. Aggressive cleaning or sanding on a transfer mark can strip the original dye, creating a real repair job.
Let’s be clear about one thing. This guide is for finished leather, the kind with a protective top coat. If your couch is aniline, semi-aniline, suede, or nubuck, the water and glue in these steps can cause permanent staining or texture changes. For those, your best move is a professional.
The Toolkit: What You Actually Need
You can buy a pre-packaged leather repair kit or assemble your own. The kit is convenient, but knowing what each component does lets you choose better. Here are the essentials.
Look for an adhesive with a flexible bond rating for leather or vinyl. Super glue (cyanoacrylate) is brittle and will crack with the couch’s normal flex. I keep a bottle of Tear Mender Instant Fabric & Leather Adhesive on hand for this exact reason, it stays flexible. * Abrasive: Sandpaper. You need two grits: 320 for genuine leather, 500 for other types. The numbers come from a Home of Cozy guide, and they’re right. Coarser grit on delicate corrected grain leather will scar it. * Filler & Color: Leather filler paste and a matching leather dye or paint. The filler bridges small gaps; the dye hides the repair. [Colourlock Leather Fresh Paint](https://www.amazon.com/dp/B0196T93QC? * Tools: Tweezers, a small palette knife or old credit card, toothpicks, and a clean, lint-free cloth. A hairdryer is optional and dangerous, more on that later. * The Wildcard:** A sub-patch material. This is a thin, flexible fabric you insert behind a tear to bridge the gap. Some kits include it; otherwise, a bit of sturdy, thin cloth (like denim) works.
The leather will tell you what it needs. A shallow scratch might only need the sandpaper and a dab of dye. A gaping hole demands every item on this list.
| Damage Type | Essential Tools | Why Skip One Fails |
|---|---|---|
| Surface Scratch | 320/500 grit sandpaper, leather dye | Without sanding, the dye sits on top of the scratch and rubs off quickly. |
| Clean Cut / Small Tear | Sandpaper, flexible leather glue, tweezers | Using rigid glue creates a hard spot that cracks next time someone sits. |
| Large Tear (exposes backing) | Sub-patch fabric, glue, filler, sandpaper, dye | Skipping the sub-patch leaves the glue trying to bridge a gap — it will sag and fail. |
Small Scratches & Minor Cuts
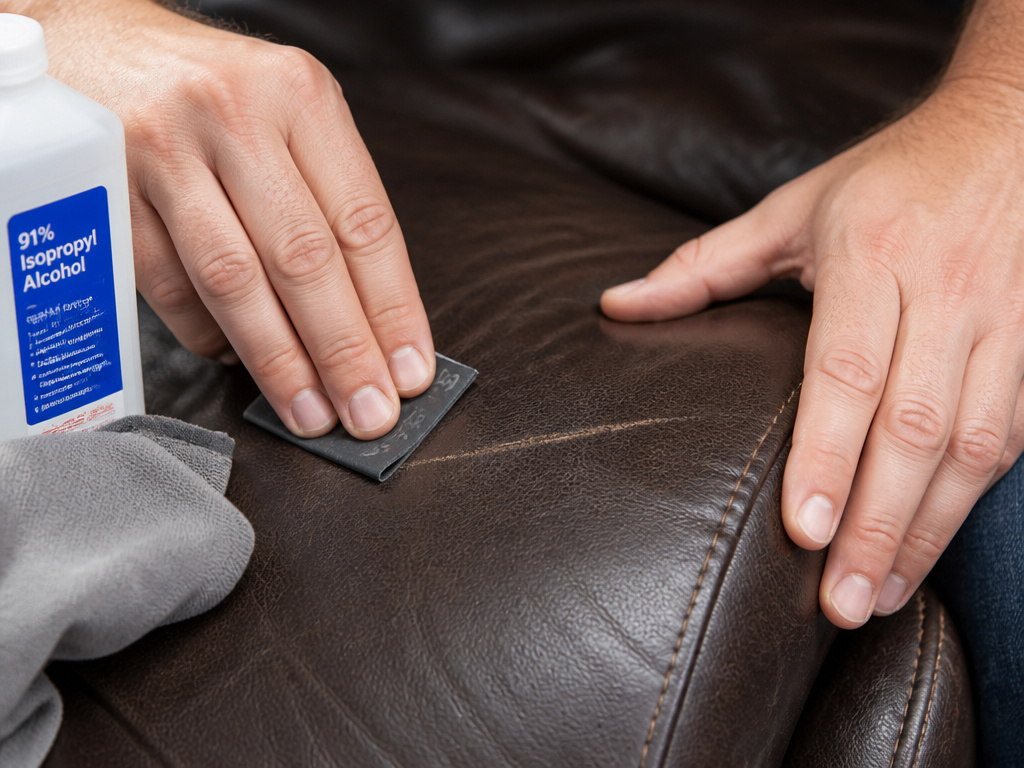 For a scratch that hasn’t severed the leather, the goal is to fill and disguise it. The trick isn’t the dye, it’s the prep.
First, clean the area with a cloth lightly dampened with 70% isopropyl alcohol. This removes oils so the repair materials can bond. Use it sparingly; you don’t want to soak the leather.
Now, the critical step. Take your sandpaper, 320 grit for full-grain or genuine leather, 500 grit for top-grain or corrected leather, and lightly sand along the length of the scratch. Do this before any glue if the scratch is deep. You’re creating a fine leather dust. This dust mixes with the glue or filler you apply next, creating a tinted, blended filler that matches the surrounding leather better than any store-bought paste alone.
If the scratch is very shallow, you might skip glue altogether. After sanding, apply a small amount of leather dye with a sponge, using a circular motion to feather the edges. Let it dry completely. If the spot looks dull, a single dab of leather finish can restore the sheen.
For a clean cut where the edges are still aligned, apply a thin bead of flexible leather glue underneath both flaps with a toothpick. Press the edges together firmly and wipe away any excess that squeezes out. Now, leave it alone.
The part nobody mentions: You must let the glue set for a full hour before doing anything that flexes the leather. That means no sitting, no leaning, no testing the bond. The glue needs that time to achieve enough tensile strength to handle the leather’s natural give. I’ve seen more repairs fail from impatience than from using the wrong product.
Repairing Major Tears & Holes
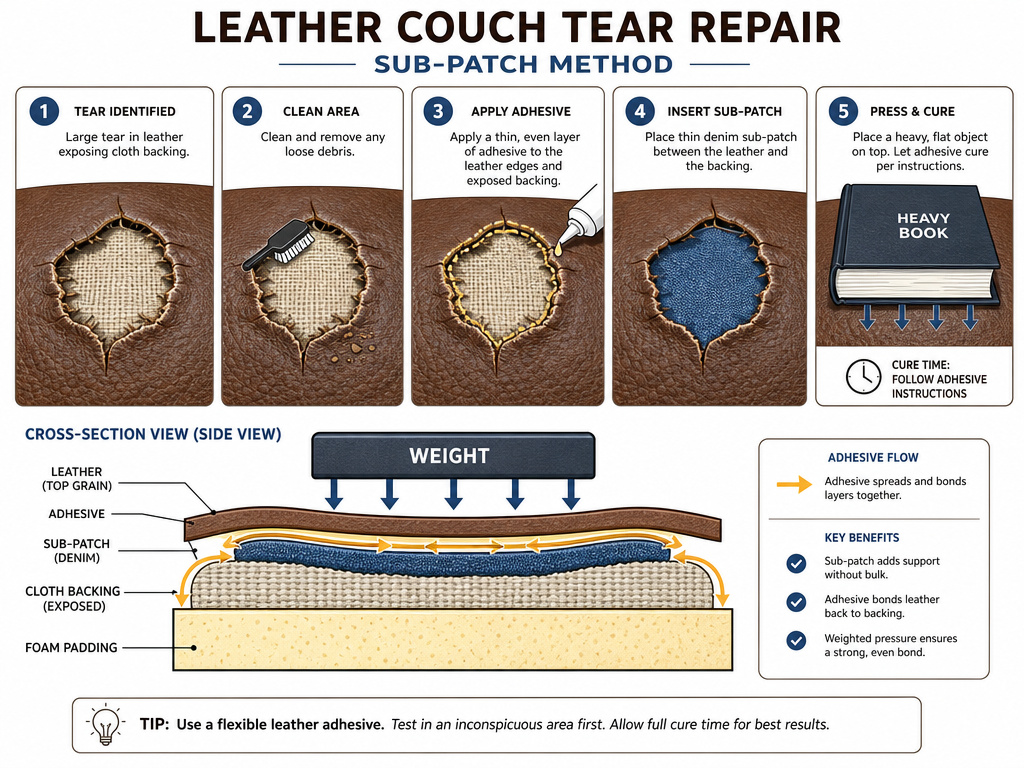 When the tear is large, or you can see the cloth backing poking through, you’re in patch territory. This is a structural repair first, a cosmetic one second.
Open the tear gently with tweezers to access the underside of the leather and the backing. Cut a piece of sub-patch material, the thin fabric from your kit or a denim scrap, so it’s slightly larger than the hole on all sides. The goal is to have a platform for the glue to grip.
Using the tweezers, insert the patch so it sits between the leather and its cloth backing, covering the hole completely. Now, apply a thin coat of leather glue to the underside of the leather around the tear. Carefully press the leather down onto the sub-patch, aligning the torn edges as best you can. Wipe away any glue that seeps out.
Place a weighted object, like a book, over the repair area. Let it dry for at least 30 minutes. Here is where people get reckless.
Common mistake: Using a hairdryer on high heat to speed up drying. High heat can cause the leather to shrink locally around the repair, creating a tight, puckered spot. That spot loses flexibility and will crack with the first real stretch. If you must use a hairdryer, use the cool setting and keep it moving.
Once the glue is dry, inspect the seam. If there are any small gaps or unevenness, apply a leather filler paste with a palette knife. Scrape it flat and let it dry according to the product’s instructions, usually another 30 minutes. Now you can sand the filler smooth with your fine-grit paper and apply color.
The Critical Role of Sandpaper Grit
Why does 320 versus 500 grit matter? It comes down to leather thickness and grain texture.
Full-grain leather is thick and has a pronounced, natural grain pattern. A 320-grit paper is coarse enough to create the dust you need without being so aggressive it gouges. Corrected-grain or coated leathers are thinner, with a more uniform, sanded surface. A 500-grit paper is fine enough to work without cutting through that delicate top layer.
Sanding before the glue dries is the key. The leather dust mixes into the adhesive, creating a custom-colored, leather-based filler. This “homemade” filler blends far more naturally than applying a commercial paste over a dry glue line. It’s the difference between a repair that looks like a patch and one that whispers.
I learned this the hard way on an old chair, using a coarse grit on what turned out to be a thin, corrected leather. The repair held, but the sanded area around it turned pale and fuzzy, requiring more dye and ending up darker than the rest. Now I check the leather type first.
Coloring and Finishing the Repair
With the structure solid, you can address color. This is the easiest part to mess up aesthetically.
Match your dye or paint as closely as possible. Test it on an inconspicuous area first, like the back of a cushion. Apply it in thin layers with a sponge, allowing each layer to dry. Building up thin coats looks more natural than one thick, glossy coat.
After the color is dry and matched, you can apply a leather finish to seal it and match the sheen of the surrounding couch. Use a tiny amount. Over-applying finish will create a shiny spot that catches the light and shouts “repair!”
Should you condition the entire couch now? Maybe. If the repair process involved cleaning with alcohol, the local area might be dry. A light application of a quality leather conditioner can help blend the area. But don’t slather it on, you can always add more later.
What Not to Do: Shortcuts That Backfire
Let me share what I’ve learned about avoiding permanent damage.
First, never use a household cleaner not designed for leather. Ammonia, bleach, or all-purpose sprays can strip dye and dry out the hide. Second, avoid rigid glues like standard super glue. They create a hard, inflexible point that will crack.
Readers often ask about using products like WD-40 to quiet a squeaky leather couch or hide a scratch. I recommend against this shortcut. It’s a petroleum distillate that can degrade the leather’s fibers over time and it attracts dirt, making the area grimy. There are better, leather-specific products for lubrication and care.
Finally, don’t confuse a surface scuff for a structural problem. Always try the gentlest cleaning method first. You might avoid a repair altogether.
Maintaining Your Couch Post-Repair
A repair can last for years if you care for the surrounding leather. That means regular, gentle cleaning and periodic conditioning.
A thorough clean every two to three months is sufficient for most households. Use a product designed for finished leather. Conditioning is where people overdo it. For a couch in a typical living room, every six to twelve months is enough. If it’s in a sunny room or a dry climate, you might move that to every three to six months. Over-conditioning leads to a greasy, sticky surface that attracts dust.
Keep the couch out of direct sunlight and away from heat vents. Heat causes uneven drying and accelerates cracking, especially along repair lines. A stable room humidity is best, too dry and the leather cracks; too damp and it can swell or mold.
Understand leather better to make confident choices. A well-maintained couch develops a rich patina, and a well-executed repair becomes just another part of its story, not a flaw.
Frequently Asked Questions
Can you repair a leather couch without a kit?
Yes, you can assemble the components separately: flexible leather glue, appropriate sandpaper, a sub-patch fabric, leather filler, and matching dye. However, a good DIY leather repair kit ensures compatibility and is often more cost-effective for a one-time repair.
How do you fix a deep scratch on a leather couch?
Clean the area, then sand the scratch with 320 or 500 grit sandpaper before applying any glue. This creates a dust that blends with the adhesive. Apply a flexible leather glue into the scratch, let it cure for an hour without flexing, then sand smooth and apply a matching leather dye.
What is the best glue for repairing leather couches?
Flexible, clear-drying adhesive designed for fabric and leather is best. Products like Tear Mender Instant Fabric & Leather Adhesive or a dedicated leather cement from a brand like Fiebing’s are good choices. Avoid brittle super glues.
Can peeling leather on a couch be repaired?
Peeling leather, where the top coat separates from the base, is a specific and challenging repair. It often requires stripping the loose coating, applying a new base layer, and re-coloring. For large areas, it may be more practical to reupholster the cushion or call a professional.
Before You Go
One rule most guides skip: if your attempted repair with flexible glue fails twice on the same tear, stop. The leather fibers around the damage are likely too compromised to hold a bond. At that point, a professional can often insert a larger, more stable patch from underneath, or it’s time to consider replacing that cushion panel.
The practical takeaway is to start with the right diagnosis. Is it a scratch, a cut, or a tear? That answer tells you whether you need just sandpaper and dye, or a full sub-patch procedure. Match your adhesive flexibility to the leather’s movement, and always, always give glue its full cure time before testing.
Everything above assumes your couch is made of finished, protected leather. If you have an aniline or suede sofa, most of these steps involve too much moisture and risk. In that case, the most confident choice is to find a specialist who works with those delicate materials. Your couch is an investment; treat its repairs with the same discernment.
