
How to Repair Cracked Leather | A Practical Guide
This post contains affiliate links. As an Amazon Associate, we earn from qualifying purchases.
This post contains affiliate links. As an Amazon Associate, we earn from qualifying purchases.
You repair cracked leather by cleaning the surface, applying a flexible leather filler for deep cracks, and sealing with conditioner or a colorant. The success hinges on knowing the depth of the crack and using a product designed for flexible material, most generic “filler” pastes will crack again after a few bends.
This crack-depth distinction changes the whole job. A shallow surface crack just needs hydration, a mechanical key for adhesion, and a flexible topcoat. A crack that runs deep into the leather’s fiber layer calls for a structural filler that won’t harden into a brittle plaque. Using the wrong category of product is why many DIY repairs fail within weeks.
What follows: a breakdown of crack types, the five-step process using specific kits like the Fiebing’s Leather Repair Kit, and how to decide between a fill-and-color approach versus a full leather patch for severe damage.
Key Takeaways
- Identify the crack depth first. A shallow crack only penetrates the topcoat, while a deep crack exposes the lighter fiber layer beneath.
- For deep cracks, use a flexible leather-specific filler paste, not a general-purpose wood or vinyl filler, which will harden and crack with movement.
- Apply filler and colorant in thin, multiple layers, allowing each to dry completely, to avoid shrinkage and a visible repair mound.
- Always follow a repair with a period of dedicated conditioning. The leather around the crack has lost oils and needs replenishment to prevent future splitting.
- A repair only restores appearance; it doesn’t rebuild lost tensile strength. For long splits or high-stress areas (like a bag handle), a leather patch is a stronger, permanent solution.
Why Leather Cracks and What That Means for Your Repair
The leather will tell you what it needs. A crack isn’t just a visual flaw; it’s a symptom of the material’s internal state. Leather is a dense mat of interwoven collagen fibers. When those fibers dry out from lack of conditioning, sun exposure, or repeated flexing, they lose their suppleness. The surface coating, whether it’s a pigment, an aniline dye, or a protective finish, isn’t as elastic as the fiber beneath it. So when the fibers shrink and stiffen, the topcoat has to stretch over a shrinking foundation. It can’t. It splits.
There are two distinct failure modes, and your repair strategy follows from which one you see.
Shallow Cracks only affect the top finish layer. The leather beneath is intact but dry. The crack looks dark because it’s a clean split in the colored coating, revealing nothing underneath. You’ll feel a ridge, but the leather isn’t materially thinner at the crack site. These respond beautifully to deep conditioning and a flexible colorant.
Deep Cracks go through the top grain and into the fiber layer. The split will often appear lighter in color because you’re seeing the untanned, buffed underside of the leather. The material is physically compromised and thinner at the crack. This requires a filler to rebuild the missing structure before any color is applied.
Here’s a quick reference to diagnose what you’re dealing with:
| Crack Type | Visual Cue | Texture Feel | Primary Repair Need |
|---|---|---|---|
| Shallow (Topcoat) | Dark line, color consistent with surface | Slight ridge, no thickness loss | Hydration & Flexible Colorant |
| Deep (Fiber Layer) | Lighter, “fuzzy” line, possible widening | Obvious dip, leather is thinner here | Structural Filler, then Color |
Understanding this isn’t academic. It’s the difference between slathering on a leather cream and watching the crack reappear in a month, versus using a filler like those in the Fiebing’s Leather Repair Kit and having the repair last for years.
The 5-Step Process for a Clean Repair
Gather a leather cleaner, 600-grit sandpaper, a flexible leather filler (like Fiebing’s or Colourlock Fresh Paint base filler), a palette knife, a matching leather colorant, and a conditioner like Leather Honey or Bickmore Bick 4. Set aside an hour for the work and a full 24 hours for curing. Let’s be clear about one thing: rushing the drying steps is the most common reason a repair feels lumpy or cracks again.
Step 1: Clean the Area Thoroughly
Spray a dedicated leather cleaner onto a microfiber cloth, never directly onto the crack, and wipe firmly along the grain. You’re removing oils, dirt, and silicone from previous conditioners. Any of that residue left behind will prevent the filler from bonding. Let the spot dry completely. Proceeding with damp leather is like painting over a wet wall; the adhesion fails at the first flex.
Step 2: Sand and “Key” the Surface
Take a small piece of 600-grit super-fine sandpaper and gently scuff the immediate area of the crack and about a half-inch around it. You’re not trying to sand the crack away. You’re creating a microscopic rough surface, called a “key,” for the filler to grip onto. Wipe away all dust with a tack cloth. This step is essential for any filler meant to last.
Step 3: Apply the Filler in Thin Layers
Load a small amount of your flexible leather filler onto the edge of a palette knife. Press it firmly into the crack, overfilling slightly. Then, tilt the knife and use its edge to scrape away the excess, level with the surrounding leather. The goal is to fill the void, not to create a mountain on top. This filler will shrink as it cures.
The part nobody mentions: One thick coat of filler shrinks dramatically, pulling away from the edges of the crack and leaving a visible divot. Apply a second thin coat after the first is dry to the touch, usually in 30-60 minutes, to account for this shrinkage.
Step 4: Re-color the Repaired Area
Once the filler is fully dry (check the product instructions; some take 2 hours, some 12), you’ll likely have a neutral-colored patch. Now you apply your colorant. Leather-specific products like Colourlock Leather Fresh Paint or Fiebing’s Leather Dye are designed to remain flexible. Using a small brush or the included applicator, stipple the color onto the repair, feathering it out into the surrounding leather. Let this dry completely, then apply a second coat if needed to build up an even tone.
Step 5: Condition and Protect
The repair area and the leather around it have been stressed. After the colorant is fully cured (24 hours is safe), apply a thin coat of a nourishing, non-silicone-based leather conditioner, like Saphir Renovateur. Rub it in thoroughly. This step rehydrates the leather fibers around the repair site, helping to prevent new cracks from forming and ensuring the repaired spot flexes with the rest of the material.
This whole sequence assumes the damage is an isolated crack. When you’re dealing with a network of alligator cracks or a large, brittle area, the game changes. That’s when the stronger play is a full leather patching technique.
When a Patch is Stronger Than a Fill
A client once brought me a beloved briefcase with a three-inch crack right at the corner’s stress point. They’d already tried a filler, which held for two months before splitting wider. The problem wasn’t the filler quality. It was physics. Filler, no matter how flexible, is a foreign substance glued into a gap. The surrounding leather flexes as one unit; the filler flexes differently. At a major hinge point, that difference creates a failure line.
For a long split, a torn seam, or any damage on a high-flex area like a bag handle or a sofa’s front edge, a leather patch is the permanent solution. It’s not that filler is bad, it’s that a patch is better suited because it distributes stress across a larger, bonded area. Here’s the comparison that matters:
| Repair Method | Best For | Longevity on High-Flex Spots | Skill Level Required |
|---|---|---|---|
| Flexible Filler | Isolated cracks, scuffs, shallow damage | Moderate (may re-crack) | Beginner |
| Leather Patch | Large tears, seam failures, corner splits, holes | Excellent (becomes part of the structure) | Intermediate |
Applying a patch involves skiving (thinning) the edges of both the patch and the damaged area, applying a flexible leather adhesive like Tear Mender, and then carefully stitching or tacking the perimeter. It’s a more involved process for repairing leather car seats or couch arms, but the result is a repair that lasts the life of the item. For a complete walkthrough, our guide on how to repair a leather couch details the patching process start to finish.
The Products That Actually Work (And One to Skip)
 Ignore the marketing copy on bottles that just say “leather repair.” You need specific chemistry for specific jobs. I’ve tested more kits than I can count, and most commercial pastes contain fillers that cure rock-hard. Here are the categories that deliver, and the one popular item I steer people away from.
Flexible Leather Filler Kits: The Fiebing’s Leather Repair Kit is my default. It includes a flexible compound that cures with a slight rubbery give, and it accepts their dye on top. The ColourLock system is more advanced and color-matched, ideal for expensive items where color is critical. Both are designed for the job.
Leather Colorants: These are not paints. A leather colorant, like those from Colourlock or Fiebing’s, contains dyes and pigments suspended in a flexible resin. They dry to a soft finish that moves with the leather. Applying them is part of any general leather restoration process.
Adhesives for Patches: For bonding a patch, you need a flexible, high-tack adhesive that remains pliable. Tear Mender Instant Fabric & Leather Adhesive is the standout here. It’s a liquid latex-based formula that soaks into the fibers and dries clear and flexible. Avoid super glue (cyanoacrylate) at all costs, it creates a brittle, hard spot that will crack and prevents any future stitching.
What most people get wrong: Using a vinyl repair kit on leather. The plastic compounds in vinyl kits are designed for non-porous surfaces and won’t properly bond to or flex with leather’s fibrous structure. The repair will peel or flake off.
The one product I find overrated in this space is the generic “leather filler paste” sold in tubes at hardware stores. It’s usually a vinyl-based spackle. It might fill the hole, but it dries hard and will crack with the first serious bend, often making the original tear worse. For a deep crack on a leather couch arm, that’s a guaranteed call-back.
After the Repair: Conditioning is Not Optional
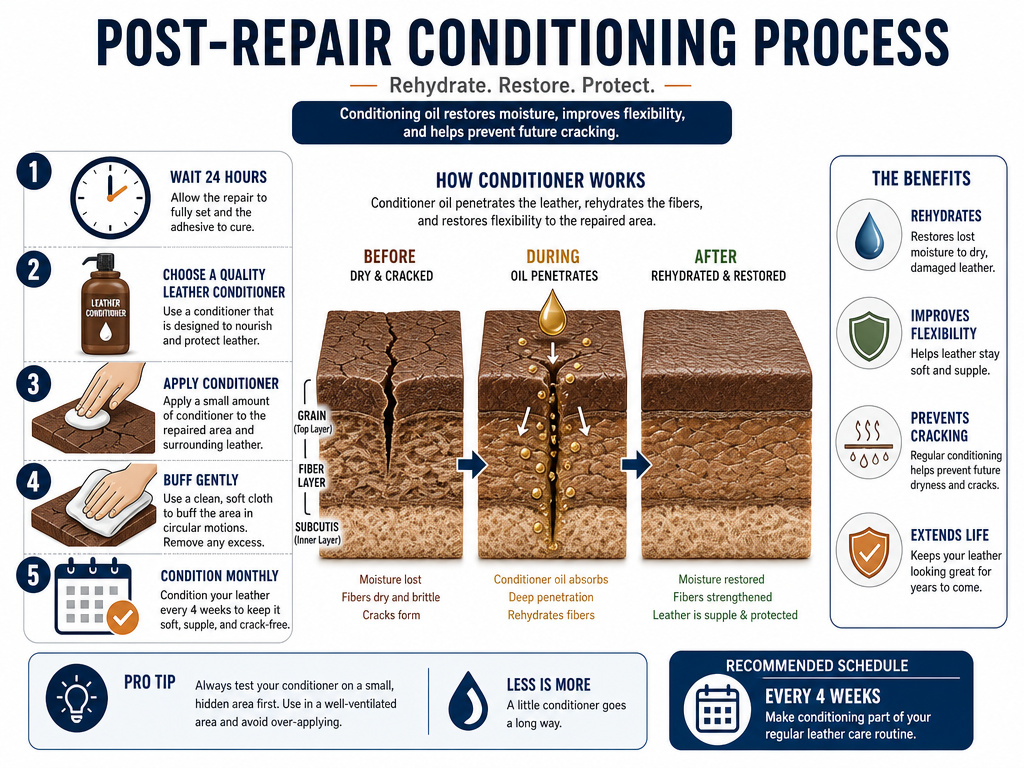 A repair fixes the symptom, not the underlying cause. The leather around that crack is almost certainly dehydrated, which is a primary cause of leather cracking. If you don’t address that, you’ll be repairing new cracks nearby in a year.
How to Condition Post-Repair:
- Wait at least 24 hours after your final colorant coat to ensure everything is fully cured.
- Choose a conditioner without silicone or wax heavy fillers. Saphir Renovateur or a pure lanolin-based cream are excellent.
- Apply a thin, even coat over the entire item, not just the repair. Work it in with your fingers in a circular motion.
- Let it absorb for 15-20 minutes, then buff off any excess with a clean, dry cloth.
- Repeat this conditioning monthly for the next three months, then return to a normal seasonal schedule.
This intensive follow-up rehydrates the fibers, restores suppleness, and is your best practice to prevent leather cracking from recurring. Think of it as physical therapy for the leather after its “surgery.”
Frequently Asked Questions
Can I repair cracked leather without a kit?
You can address shallow cracks with intensive conditioning alone. Household items like shoe polish or super glue will not provide a durable, flexible repair and can cause further damage.
How long does a leather crack repair last?
Proper repair using flexible, leather-specific products can last for many years, effectively for the life of the item if it’s not in a high-stress area. Repairs on constantly flexing points (like shoe creases) will have a shorter lifespan and may eventually need re-touching.
Can I dye leather a different color after repairing a crack?
Technically yes, but it’s an advanced project. You must first strip the existing color completely with a leather stripper, which can be harsh on already-dry leather. Then you repair the crack, and then you re-dye the entire piece for uniformity. It’s often more cost-effective to have a professional do this or to use a colorant that matches the original shade.
Will repairing cracks make the leather stiff?
High-quality flexible filler should not make the leather stiff. The problem arises when using hard-setting fillers not designed for leather. The repaired spot should blend invisibly and flex with the surrounding material. This is why product choice is critical.
Is it worth repairing severely cracked leather?
It depends on the item’s sentimental or monetary value. If the leather is thoroughly dried out and crackled all over (alligatored), a full restoration involving stripping, multiple filler applications, and re-dyeing is a major project. For a mass-produced item, replacement might be cheaper. For a valuable antique or beloved piece, professional restoration can bring it back to life.
Before You Go
One rule most guides skip: if your leather has more than a few isolated cracks and feels stiff overall, you’re looking at a restoration, not a spot repair. Spot-fixing a single crack on a generally healthy hide works. Trying to fix one of many cracks on a desiccated surface is a temporary fix, the next weakest spot will give way soon. In that case, use a complete leather furniture restoration kit from Colourlock or Fiebing’s.com/how-to-restore-leather-furniture/) regimen or consult a professional.
The practical takeaway is this: for a single, clean crack, the Fiebing’s Leather Repair Kit is the most reliable path. Use it exactly as outlined, clean, key, fill thin, color, condition, and the repair will be a footnote in the item’s long life, not a recurring headache. The leather will tell you what it needs; your job is to listen and match the solution to the problem’s true depth.
