
How to Sharpen Leather Tools | The Edge That Cuts vs Tears
This post contains affiliate links. As an Amazon Associate, we earn from qualifying purchases.
This post contains affiliate links. As an Amazon Associate, we earn from qualifying purchases.
Sharpening leather tools requires matching the right abrasive, the correct angle, and a consistent stroke for each specific blade type. A straight knife needs a 16-20 degree per-side bevel and stropping, while serrated blades and edge bevelers demand single-side work with rods or custom strops to preserve their profiles.
The angle isn’t arbitrary. A Leatherman plain-edge blade is factory-set at 16 degrees per side for a reason—it balances keenness with durability. Getting that angle wrong by just a few degrees means the blade either folds on thick leather or tears instead of slicing.
What follows is a breakdown for the six tools you’ll sharpen most: knives, edge bevelers, skivers, groovers, awls, and chisels. You’ll learn the one motion that ruins a serration, the argument over which way to strop a beveler, and how to tell when a blade needs the coarse stone versus just a touch-up on the strop.
Key Takeaways
- Match the abrasive to the damage: use a coarse diamond plate only for repairing chips or changing an angle; a fine ceramic rod and strop handle 90% of maintenance.
- Sharpen serrated blades only on the scalloped side. Running a stone across the flat back wears the serrations away into a useless, wavy line.
- The direction you strop an edge beveler is contested—some pull towards themselves, others push away. The real rule is to use a strop that fits the tool’s profile to avoid rounding the edge.
- A blade that drags, tears leather, or requires noticeable pressure needs sharpening. A blade that feels “gummy” or leaves a white, burnished line on the leather is already dull.
- Invest in three abrasives: a fine/medium combination water stone, a set of ceramic rods in varying diameters, and a leather strop loaded with white rouge compound. This covers every tool in your kit.
The Two Sharpening Philosophies You’re Actually Choosing Between
You have two paths: freehand sharpening on stones and guided systems like the Work Sharp WS3000. Freehand is faster once you have the muscle memory, but it’s easy to roll the angle and create a rounded bevel. A guided system locks the angle, which is perfect for beginners or for resetting a bevel on a damaged blade. The catch? No guided system on the market fits every odd-shaped leatherworking tool.
I learned this the hard way with a set of inherited C.S. Osborne edgers. The previous owner had used a one-size-fits-all leather strip sharpener, which had widened the cutting profile of the #1 tool almost to a #3. It no longer made the fine, crisp bevel it was designed for. That’s when the penny dropped: sharpening isn’t just about making a tool sharp. It’s about preserving its intended function.
Technical Snippet: For straight-edged blades, a 32-degree included angle (16 degrees per side) is a common industry standard, offering a balance of edge retention and cutting aggression. Serrated blades are typically sharpened at a steeper 20-degree angle on the scalloped side only, maintaining the cutting geometry of each individual serration.
The 4-Step Sharpening Process for Straight Blades
This is your core method for knives, skivers, and any blade with a simple, straight edge.
Step 1: Set the angle and find the burr. Hold the blade at a consistent 16-20 degrees against your stone. Use a marker to blacken the bevel—the first strokes will show you exactly where you’re making contact. Push or pull the blade across the stone, maintaining pressure, until you raise a wire edge along the entire length. This is a tiny, feathery burr of metal you can feel with your fingernail. If you skip this step, you’re just polishing the existing edge, not reshaping it.
Step 2: Refine with a finer grit. Switch to a finer stone or ceramic rod. Repeat the same strokes, but focus on removing the burr you just created. The goal is to make that wire edge smaller and more uniform. You’ll know you’re done when the burr is barely detectable.
Step 3: Strop to align the edge. This is the secret to a razor finish. Pull the blade backwards across a leather strop loaded with white rouge compound. The abrasive compound and the give of the leather straighten out the microscopic teeth of the edge, aligning them. Do 10-15 alternating strokes per side. The blade should now cleanly shave hair off your arm.
Step 4: Test on scrap leather. The final test isn’t paper. It’s the material you actually use. A properly sharpened blade will glide through 4-5 oz veg-tan leather with minimal pressure, leaving a smooth, polished cut. If it drags or tears, go back to the strop.
How to Sharpen Specialty Leather Tools
A knife is straightforward. Your other tools have quirks.
Edge Bevelers: The Direction Debate
An edge beveler has a curved or angled cutting profile. You can’t sharpen it on a flat stone without destroying its shape. The classic method is to use a dowel wrapped with sandpaper or a custom leather strop that matches the tool’s groove.
Here’s where craftsmen split. Some, like the guide from Mollies, insist you should pull the blade towards you on the strop to align the micro-edge. Others, like Bruce Johnson Leather, advocate pushing the blade away from the edge to cleanly remove the foil burr. Who’s right? Both are, depending on the final finish you want. Pulling tends to create a keener, more aggressive edge for hard leathers. Pushing creates a more durable, polished edge for consistent work.
Common mistake: Using a flat strop on a round-bottom keen edge beveler. This contact on only the high points dulls the tool faster. You must use a rounded strop that makes full contact.
Skivers and Groovers
A skiver needs a wicked-sharp, delicate edge. Use a fine ceramic rod, holding it almost flush with the blade’s flat side, and take 3-4 light passes. Then, strop meticulously. A dull skiver will dig into the leather instead of cleanly peeling off a layer.
For a leather groover, strop the blade by dragging it backward across a loaded leather surface. The goal is to polish the inside of the cutting channel. A sharp groover leaves a clean line; a dull one wanders or tears up the leather’s surface.
Awls and Chisels
Your leather awl is a needle. Sharpen it by rolling the point on a fine stone or rod, maintaining its conical shape. A sharp awl pierces with a clean pop; a dull one pushes and distorts the leather fibers.
Pricking irons and chisels are sharpened by gently stropping the faces of the individual teeth with a narrow strip of leather. Angle the strop slightly to avoid blunting the tips. The goal is to remove the tiny burrs that form from punching through hardened leather.
The One Rule for Serrated Blades
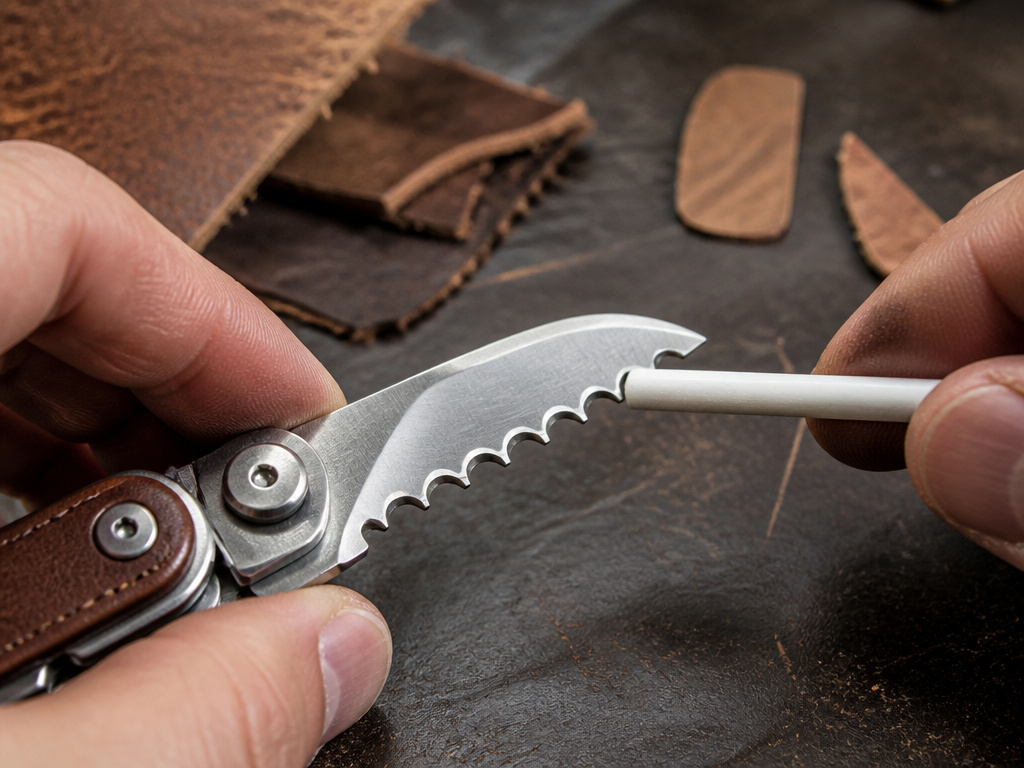 Serrated blades on multi-tools or certain knives are a different beast. The rule is absolute: only sharpen the scalloped, curved side.
Use a ceramic rod that matches the diameter of the serration. A 3mm rod for small teeth, a 5mm for larger ones. Insert the rod into the serration and use 3-5 short, push-and-pull strokes, following the existing curve. Move to the next serration. Never drag the rod across the flat back of the blade. That action wears down the peaks of the serrations, turning them into shallow waves that can’t grip or slice.
Leatherman specifies a 20-degree angle for their serrated sections. You won’t measure this. You’ll match the factory angle by letting the rod sit naturally in the curve. If your blade is MagnaCut steel, remember the offer: Leatherman provides a free sharpening service for these blades, which is worth considering for a complex resharpen.
When to Sharpen, Strop, or Replace
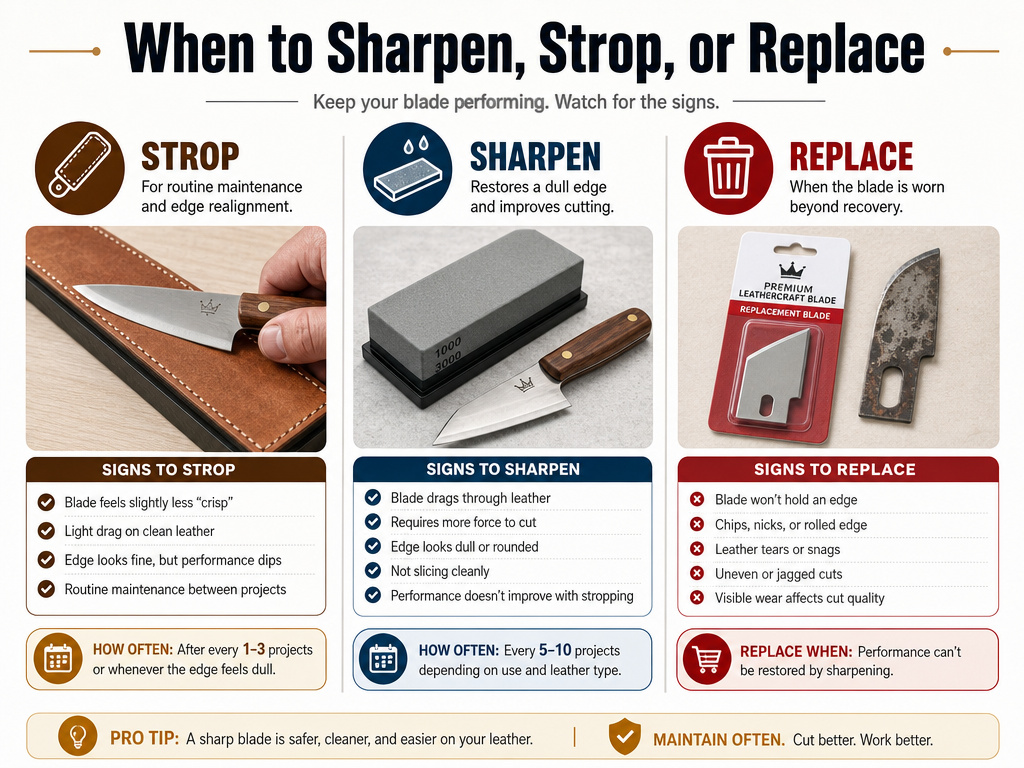 Not every problem requires the coarse stone.
| Symptom | Cause | Fix |
|---|---|---|
| Blade drags, requires more pressure | Dull edge, minor rounding | Strop on loaded leather (10-15 strokes per side) |
| Leather tears, cut is fuzzy | Dull edge with visible nicks | Sharpen on fine stone, then strop |
| Edge is chipped or angle is wrong | Damage or previous incorrect sharpening | Start with coarse diamond plate to re-establish bevel, progress to fine |
| Tool skips or jumps in cut (beveler) | Burr or foil edge on one side | Strop carefully, ensuring even pressure on both sides of the cutting profile |
| Blade is cheap, stamped steel | Low-quality steel won’t hold an edge | Replace the blade. It’s not worth your time. |
You should strop your most-used tools every few hours of work. It’s maintenance, like oiling a hinge. A full sharpening session is for when stropping no longer restores performance. For replaceable blade tools like skivers or utility knives, just swap the blade. Your time is more valuable.
The Essential Sharpening Kit
You don’t need a bench full of gear. A minimalist kit wins.
- A Combination Water Stone (1000/6000 grit). The 1000 side for sharpening, the 6000 side for refining. This is your workhorse for knives.
- Ceramic Sharpening Rods (Assorted Diameters). A must for serrations, awls, and touching up inside curves. Look for a set with 3mm, 5mm, and 8mm rods.
- A Leather Strop and Compound. Make your own by gluing a piece of vegetable-tanned leather to a flat board, flesh side up. Load it with white rouge compound. This is your most used tool.
- Custom Stropping Dowels. For edge bevelers, wrap a dowel with 800-grit sandpaper for shaping, then a separate dowel with leather for polishing.
- A Petzl or Black Diamond headlamp.** You cannot sharpen what you cannot see. A bright, focused LED lamp is essential for spotting the wire edge.
Brands like Barry King Tools and KS Blade Punch sell excellent, ready-made strops, but a DIY version works just as well. The investment is in the habit, not the hardware.
Where this goes sideways: Using the wrong abrasive progression. Jumping from a coarse 220-grit stone straight to a strop leaves deep scratches that the strop can’t remove. The edge will feel sharp but will tear leather fibers like a saw. Always progress through at least one finer grit before stropping.
Frequently Asked Questions
What’s the best angle for sharpening leather knives?
For most leatherworking knives, a 16-20 degree angle per side is ideal. This is slightly steeper than a chef’s knife, providing more strength for cutting through dense, fibrous leather without chipping. Start at 20 degrees if you’re new; you can always make it more acute later.
Can I use a regular knife sharpener on my leather tools?
You can use the principles, but many pull-through or electric sharpeners will destroy the specialized edges on tools like bevelers or skivers. They’re designed for kitchen knives, which have simple, straight bevels. For leather tools, stick to rods, stones, and strops that allow you to control the contact area.
How do I sharpen a round knife?
Round knife, or head knife, is sharpened only on the beveled side (usually the bottom). Use a stone and maintain the existing curve by rocking the blade as you push it away from the edge. Strop using the same rocking motion on a flexible leather strop. Sharpening the flat back will ruin the blade geometry.
Why does my blade feel sharp but still tear leather?
This is almost always a burr issue. You’ve created a wire edge that folded over instead of being cleanly removed. The edge feels sharp to your finger, but under the pressure of cutting leather, that burr folds and acts like a tiny hook, tearing instead of slicing. Go back to your fine stone with lighter pressure, then strop thoroughly.
How often should I sharpen my tools?
Strop after every few hours of active cutting or beveling. Give a tool a full sharpening session on stones when stropping no longer brings back a clean, effortless cut. For a hobbyist, that might be once a month. For a professional, it could be weekly.
Before You Go
Sharpening is the quiet, repetitive skill that separates a frustrating craft from a satisfying one. The goal isn’t a mirror polish—it’s the sound a blade makes when it parts leather fibers without a tug. It’s a faint, crisp whisper.
Ignore the complex jigs and exotic stones at the start. Master the three-step rhythm of stone, rod, and strop on a simple utility knife first. That muscle memory transfers to every other tool in your roll. And the next time a blade drags, you won’t see a chore. You’ll hear an invitation to make your next cut perfect.
