
Your Guide on How to Wet Mold Leather for Perfect Results
This post contains affiliate links. As an Amazon Associate, we earn from qualifying purchases.
This post contains affiliate links. As an Amazon Associate, we earn from qualifying purchases.
To wet mold leather, you case vegetable-tanned leather by dunking it in room-temperature water for a specific time (10-30 seconds based on weight), then wait 15-30 minutes for the moisture to even out. The leather should feel like cool, firm modeling clay, not soggy, not dry. Press it onto a plastic-wrapped form, define details with a boning tool, and let it air-dry at room temperature for 1-2 days. Using hot water, chrome-tanned leather, or forced heat ruins the process.
That “cool, firm modeling clay” feel is the whole game. Most tutorials gloss over the waiting period after the dunk, which is why first attempts come out mushy or cracked. The water needs time to migrate from the soaked surface to the dry core. If you start pressing detail when the surface is still dark and glossy, the fibers smear. If you wait until the piece pales back to its natural color, it’s too late, the leather is already setting up and will crack under pressure.
What follows is a breakdown of the four things that separate a vacuum-formed look from a lumpy one: the right leather, the exact water content, the tools that matter, and a drying schedule nobody rushes.
Key Takeaways
- Use only vegetable-tanned leather; chrome-tanned leather will not hold a permanent shape.
- Dunk, then wait. Soak time is 10-15 seconds for 4-6 oz leather, 20-30 seconds for 8-9 oz. Then bag the piece for 15-30 minutes to let moisture equalize.
- Mold at the cased stage: the leather should be cool and matte, pliable like modeling clay, with no surface sheen.
- Always wrap your form in plastic to prevent rust stains and corrosion on both the object and the leather.
- Air-dry only at room temperature for 24-48 hours. Heat guns, ovens, or radiators cause warping and case-hardening.
The One Rule You Can’t Break: Leather Type
This is not a suggestion. Wet molding only works with vegetable-tanned leather. The plant-based tannins create a network of fibers that relax when wet and permanently set as they dry. Chrome-tanned leather, used for jackets and bags, is processed with chromium salts that keep the fibers permanently flexible. It will spring back to its original shape every time.
Think of veg-tan as uncooked pasta. You can bend it when it’s wet, and it hardens into that new shape. Chrome-tan is a cooked noodle, you can bend it, but it always returns to being straight. If your project is a sheath, holster, valet tray, or any piece that needs to hold a form, you must start with veg-tan. This is the essential foundation of every successful wet-molding process.com/how-to-make-a-leather-holster/).
The Casing Sweet Spot: Not Wet, Not Dry
Casing is the most under-taught skill in wet molding. It’s the process of bringing the leather to an even, uniform dampness throughout its thickness. Not a wet rag, not a damp surface over a dry core.
Here’s the method that works every time: 1. Dunk. Submerge your pre-cut leather piece in room-temperature water. Use cool or room-temp water only. Hot water begins a hardening process called cuir bouilli and will shrink your piece unpredictably. 2. Time it. The soak isn’t about saturation, it’s about introduction. * 4-6 oz leather: 10 to 15 seconds. * 8-9 oz leather: 20 to 30 seconds. 3. Wait. This is the step people skip. Pull the leather out and immediately place it in a plastic bag or wrap it in a damp cloth. Let it sit. The surface will go from dark, glossy, and saturated to a cooler, matte tone. This is the cased state. For 8-9 oz leather, this takes 15 to 30 minutes.
The cased state feels like cool, firm modeling clay. It will take a fingerprint impression without mushing, and a boning tool will glide with slight resistance, leaving a crisp line. If your tool sinks in with no feedback, it’s too wet. If it skids and the leather cracks, it’s too dry.
If you try to bone detail while the surface is still dark and shiny, the surface fibers are waterlogged and will smear. You’ll lose all crispness. If you wait until the leather looks pale and feels room-temperature, the core has started to set and the leather will resist shaping, leading to pale stress lines. The window is specific, and it’s everything.
Tools You Actually Need (And One You Don’t)
You don’t need a workshop full of specialized gear. You need a few specific tools that perform distinct jobs.
| Tool | Its Real Job | What Happens If You Skip It |
|---|---|---|
| Boning Tool / Modeling Spoon | Defines crisp, permanent lines along spines, guards, and edges. | Details look soft and vague, like a vague lump instead of a fitted sheath. A spoon handle or polished antler tine works. |
| Spring Clamps / Binder Clips | Holds the leather tightly against the form or a backing board while drying. | The leather relaxes away from the form as it dries, ruining the fit and shape. |
| Plastic Wrap | Creates a barrier between wet leather and any metal object (knife, mold). | Bare steel touches wet veg-tan and causes dark rust stains within hours. It also risks corroding your blade. |
| Spray Bottle | Re-dampens small areas that dry out during an extended molding session. | You’re forced to re-dunk the whole piece, resetting the clock and potentially over-wetting it. |
The tool you don’t need? A heat gun or hair dryer. Force-drying is the fastest way to ruin a piece. It dries the surface long before the core, trapping moisture inside. This leads to warping, case-hardening (a brittle surface), and even mold growth inside the leather. The proper drying leather method is patience: room-temperature air drying with good circulation for 24 to 48 hours.
Step-by-Step: From Dry Cut to Dry Form
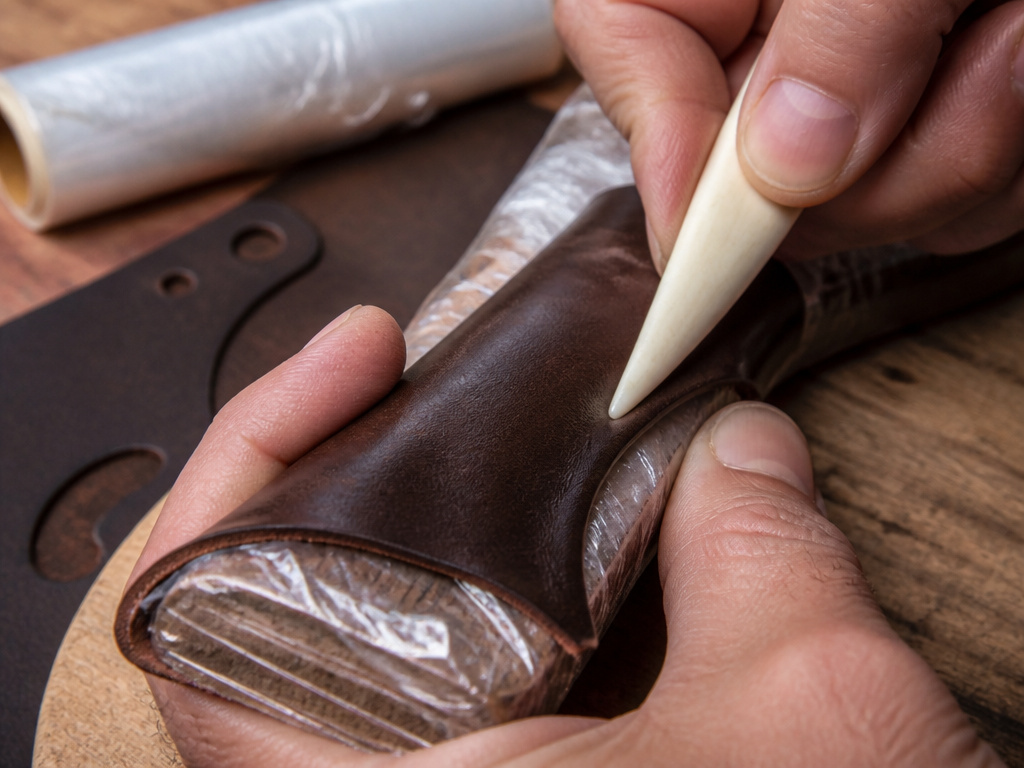 This sequence keeps the wet stage controlled and short. Once the water comes out, you’re on the clock.
- Do Everything Dry First. Cut your pattern. Bevel edges that will be hard to reach later. Punch stitch holes if your design includes them. Dry-fit the leather around your form. Cutting wet leather is harder and tears the grain.
- Case the Leather. Follow the dunk-and-wait method above. Your goal is that cool, matte, clay-like feel.
- Wrap Your Form. Whether it’s a knife, a gun, or a wooden mold, wrap it snugly in multiple layers of plastic wrap. This accounts for the leather’s shrinkage as it dries, ensuring a final “click-fit.”
- Mold and Bone. Press the cased leather onto the wrapped form with your hands first, working it into the basic shape. Then, use your boning tool. Apply firm, deliberate pressure to define the important lines, the spine of a blade, the curve of a guard. Start at the center and push outward.
- Secure and Dry. Use clamps or clips to hold the leather in place against itself or a backing board. Place it in a well-ventilated area, out of direct sunlight and away from heat sources. Let it sit for a full 24-48 hours. The piece is fully dry when it has returned to its uniform pale color and feels room-temperature, not cool, to the touch.
- Finish. Only after it is completely dry do you move on to dyeing, stitching, and applying any finish. Sealing or stitching a damp core is why a perfectly molded piece relaxes and loses its shape a week later.
Why Most First Projects Fail (And How to Fix Them)
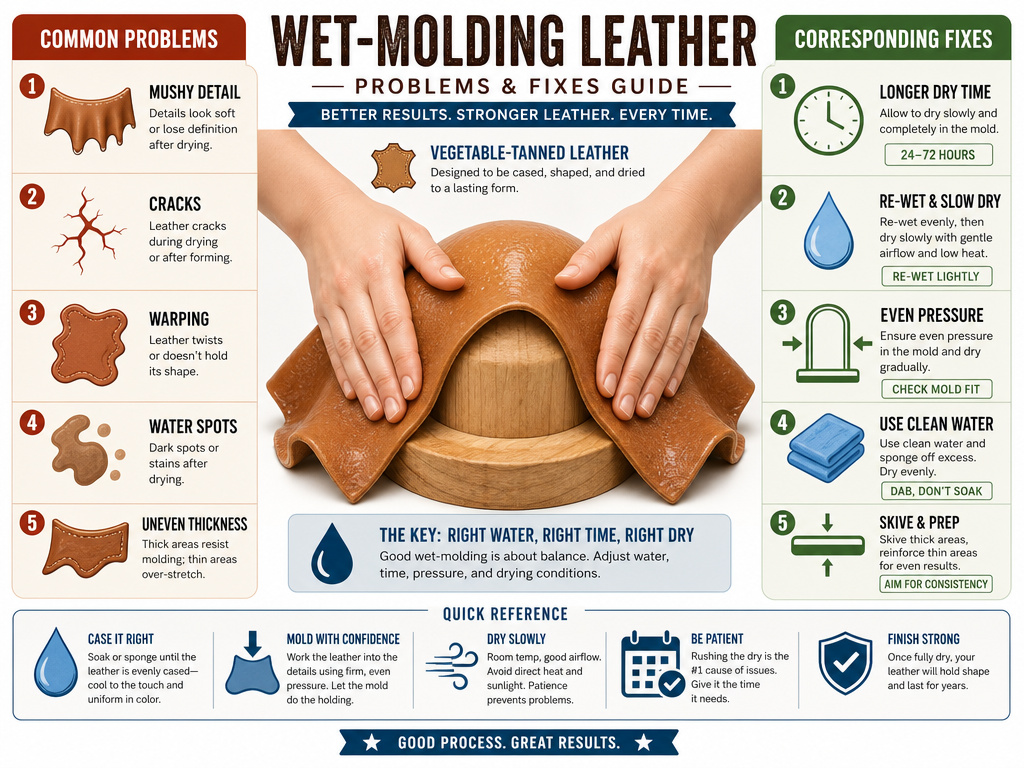 When a molded piece goes wrong, the cause is almost always traceable. Here’s a diagnostic table.
| Problem | Most Likely Cause | The Fix & How to Prevent It |
|---|---|---|
| Mushy, soft detail | Molding too wet (didn’t wait after dunking). | Let the piece air-dry fully. Next time, wait for the matte, cased feel before boning. |
| Cracks or pale stress lines | Molding too dry, or leather too thick for a tight radius. | Lightly re-wet the area and work more gently. For tight curves, use a lighter weight leather (4-6 oz). |
| Shape relaxed after drying | Sealed, stitched, or removed from form before the core was dry. | The piece must air-dry completely (24-48 hrs) before any further construction. |
| Dark blotches or rust marks | Bare metal touched the wet leather. | Always wrap the form in plastic. For existing stains, see our guide on mold removal for cleaning techniques. |
| Musty smell or surface fuzz | Dried too slowly in stagnant, humid air. | Ensure good air circulation during drying. If mold appears, address it immediately with a proper cleaning mold protocol. |
| Warped or twisted shape | Used a heat source to speed drying. | Never use ovens, heat guns, or radiators. Air-dry only. The damage is often permanent. |
Where this goes sideways: Using hot tap water to “speed up the process.” Water near 80°C (175°F) begins to permanently shrink and harden the leather fibers. You’re not molding anymore; you’re accidentally starting a hardening process that will distort your dimensions and leave the piece stiff and brittle.
Frequently Asked Questions
Can you wet mold chrome-tanned leather?
No. Chrome-tanned leather is processed to remain flexible and will spring back to its flat state after drying. Only vegetable-tanned leather has the memory to hold a permanent, set shape. This is the first filter for your project material.
How long does wet molded leather take to dry?
Fully molded piece needs 24 to 48 hours of room-temperature air drying to be completely dry throughout. A sheath may feel dry to the touch in 8 hours, but the core will still be damp. Rushing this stage by applying heat or stitching too soon is the most common reason a molding job fails to cure properly later.
Why did my leather get stained during molding?
Dark stains are almost always rust marks from bare steel touching the wet veg-tan. The tannic acid in the leather reacts with the iron, creating a permanent stain in hours. Always wrap any metal object, knives, tools, molds, in multiple layers of plastic wrap before molding.
Can I use a hair dryer to speed up drying?
Never. Forceful heat dries the surface instantly, creating a hard shell that traps moisture inside the core. This leads to warping, internal mold growth, and a condition called case-hardening where the surface becomes brittle and prone to cracking. Patience is the only tool for this job.
My piece smells musty after drying. What now?
Musty smell indicates the leather dried too slowly in humid conditions, allowing mold spores to grow. Increase airflow in your drying area for future projects. For the affected piece, you’ll need to follow a careful process for removing odors from leather to address the smell without damaging the formed shape.
Before You Go
Wet molding feels like a magic trick, but it’s just controlled chemistry. The critical point is that 15-30 minute wait after the dunk. That’s when the water stops being a surface event and becomes a property of the entire piece. Get that right, and the boning, shaping, and drying all fall into place.
The practical takeaway is this: your next project will succeed if you match the soak time to the leather weight, wrap your form twice, and walk away for two full days of drying. That’s it. Everything else, fancy tools, complex molds, is secondary. Start with a simple wet-molding project like a valet tray to feel the casing window without pressure. The leather will tell you what it needs.
