
Your First Project: How to Make a Leather Keychain Quickly
This post contains affiliate links. As an Amazon Associate, we earn from qualifying purchases.
This post contains affiliate links. As an Amazon Associate, we earn from qualifying purchases.
Making a leather keychain requires three things: a strip of leather, a way to cut and punch it, and a key ring. A simple fold-over design using a Chicago screw takes under five minutes with a pre-cut piece. A braided or looped design needs only glue and a steady hand.
The difference between a keychain that lasts a decade and one that cracks in a year isn’t the hardware. It’s the leather you pick and what you put on it. A cheap, finished split leather will peel. The wrong conditioner can turn rancid or break down the fibers.
What follows is a straightforward guide to three beginner designs. I’ll give you the specific leather weights, the one tool limitation nobody mentions, and the conditioning rule I learned the hard way. You’ll know which design fits your scrap pile and your patience level.
Key Takeaways
- Use 3-4 oz vegetable-tanned leather for fold-over fobs and 6/7 oz for stitched designs; thickness dictates which tools work.
- A basic fold-over keychain needs only a knife, punch, Chicago screw, and split ring—avoid complex hardware for your first try.
- Never condition a finished piece without a spot test; some oils degrade leather over time, causing permanent blotching.
- For a no-sew option, a braided or looped keychain uses simple E6000 glue and requires no special tools beyond a ruler and blade.
- Downloading a free template saves time, but understanding why the dimensions work teaches you more for your next project.
The Leather, Tools, and Hardware You Actually Need
You can start with almost any leather scrap. The type and thickness you choose, though, lock you into certain designs and tools. This isn’t a suggestion—it’s a physical constraint.
For a simple folded key fob held by a Chicago screw, aim for 3-4 oz leather. That’s about 1.2mm to 1.6mm thick. It’s stiff enough to hold its shape but thin enough that the screw’s barrel can pass through three layers without a struggle. If you want to stitch a keychain, step up to 6/7 oz leather (2.4mm to 2.8mm). That thickness gives the stitches something to bite into and develops a nice patina. Our guide to leather thickness for projects breaks down weights for every common item.
Your tool list shrinks or grows with your ambition. The absolute bare minimum is a sharp knife and a hole punch. A metal ruler and a self-healing cutting mat turn a jagged cut into a clean one. If you plan to stitch, add a stitching awl or a set of pricking irons and two needles.
The part nobody mentions: Punching through three layers of 6/7 oz leather can stop a cheap hand punch cold. The awl tip dimples the bottom layer without breaking through, leaving you to re-punch from the back side. A solid drive punch and a mallet handle it in one hit.
Hardware is the fun part. For a basic fob, you need a Chicago screw (also called a screw post) and a split ring. The screw post is infinitely better than a rivet for a first project—if you misalign it, you can unscrew it and try again. A rivet is permanent. For a belt-loop style, swap the split ring for a ¾” eye swivel snap hook. You can find clear instructions for setting these in resources like The Leather Guy tutorial.
| Design | Best Leather Weight | Critical Hardware | Skill Threshold |
|---|---|---|---|
| Fold-Over Fob | 3-4 oz (1.2-1.6mm) | Chicago Screw, Split Ring | Very Low |
| Stitched Keychain | 6/7 oz (2.4-2.8mm) | Thread, 2 Needles | Medium |
| Braided/Looped | 2-3 oz (0.8-1.2mm) | E6000 Glue, Key Ring | Low |
Three Simple Designs to Start With
Not every keychain requires stitching. The design you choose should match the leather you have and the time you want to spend. Let’s be clear about one thing: complexity does not equal quality. A perfectly executed simple design always beats a sloppy complex one.
The fold-over fob is the quickest path to a finished product. Cut a strip, punch three holes, fold it, and add the screw and ring. It’s the project I use to test a new leather’s temper. The stitched keychain is a classic. It involves cutting two or three pieces, punching stitching holes, and sewing them together with a saddle stitch. This is your next step after mastering the fob, and the skills directly transfer to making a leather wallet.
Then there’s the glued-and-wrapped loop. This design uses a long, thin strip of leather (often 1/8-inch wide) folded through a key ring and glued to itself. It’s elegant, uses minimal material, and requires no hardware or stitching. The challenge is making a clean, invisible glue joint. It’s a great way to use up long, narrow scraps.
Step-by-Step: The Basic Fold-Over Fob
This is your five-minute keychain. I’ll walk you through it using a free template, because starting with a proven shape builds confidence before you draft your own leather patterns.
First, print and cut out your template. Lay it on your leather, close to the edge to conserve material. Trace it with a fine pen or stylus. Use a sharp knife and a metal ruler to cut the straight sides. Cut the curved end freehand with slow, steady pressure. Test your curve-cutting technique on a scrap first.
Now, punch the holes marked on the template. The key move is to fold the leather over exactly where it will sit in the final product and punch through all layers at once. This guarantees perfect alignment. If you punch the top and bottom pieces separately, even a millimeter of drift will make the screw post hard to seat.
Fold the leather and slide the end through your split ring before you add the screw post. Forget this, and you’ll fight to wrestle the ring on later, likely scratching the leather. Insert the screw post barrel through all three holes, thread on the cap, and tighten it with a screwdriver. Don’t crush the leather, but get it snug.
Where this goes sideways: Using a screwdriver that’s too small for the cap. The driver slips, gouging a shiny scratch across the leather’s surface. Use the correct bit size.
That’s it. You now have a durable keychain. The entire process takes longer to read than to do.
Working With Thicker Leather: Stitching and Stamping
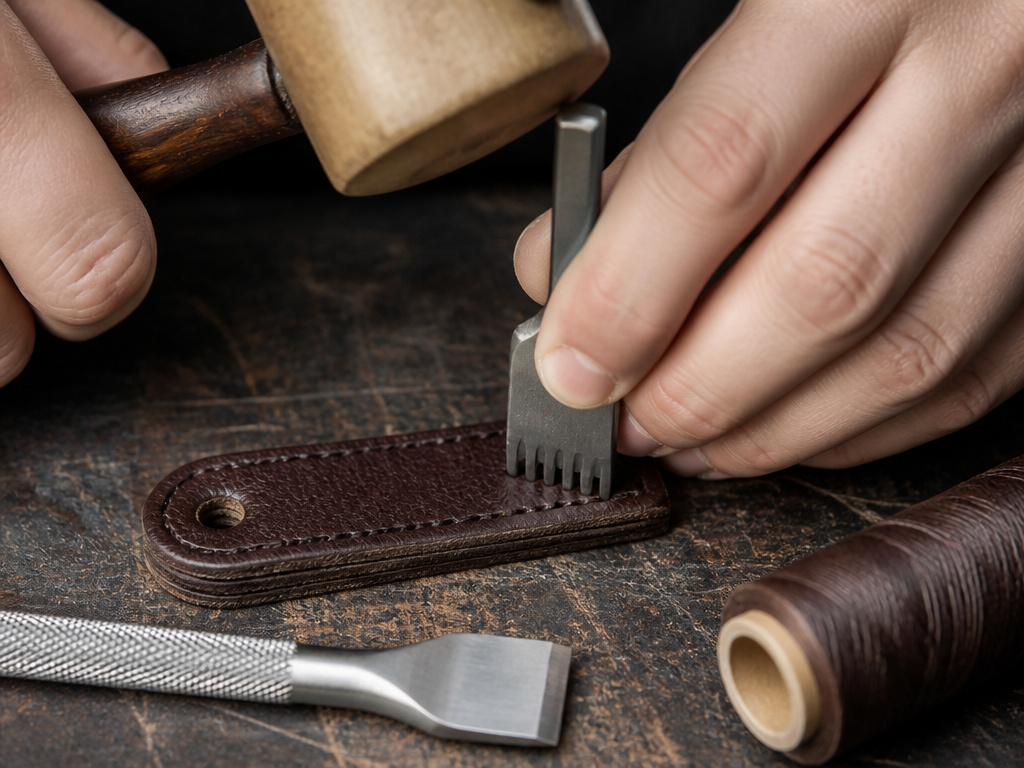 When you step up to 6/7 oz leather for a stitched keychain, the game changes. The leather has more presence, but it also fights back. Your punches need to be sharper, your needles stronger, and your patience deeper.
Cut your main piece and any lining. Apply a thin coat of glue to hold the pieces together for punching—this stops them from shifting. Mark your stitch spacing. If you’re using an awl, a stitching wheel keeps your spacing even. If you’re using pre-spaced pricking irons, drive them through with a mallet. Here’s the thing: punching through two layers of this thick leather is fine. Three layers, like at the folded tip of a keychain, requires a solid whack. A weak swing will leave an incomplete hole.
Now for the saddle stitch. You’ll need about two feet of thread for one side. This stitch is strong because it uses two needles, creating two interlocking threads that lock in the middle. If one breaks, the other holds. It’s the same stitch used in a quality leather belt.
Want to add a name or initial? This is the time. Dampen the leather slightly with a sponge. This relaxes the fibers, allowing a stamp to make a crisp, permanent impression. Place your letter stamp and strike it once, firmly, with a mallet. Double-tapping can cause a shadow effect. Let the leather dry completely before you move on to finishing.
The No-Tool, Glue-Based Alternative
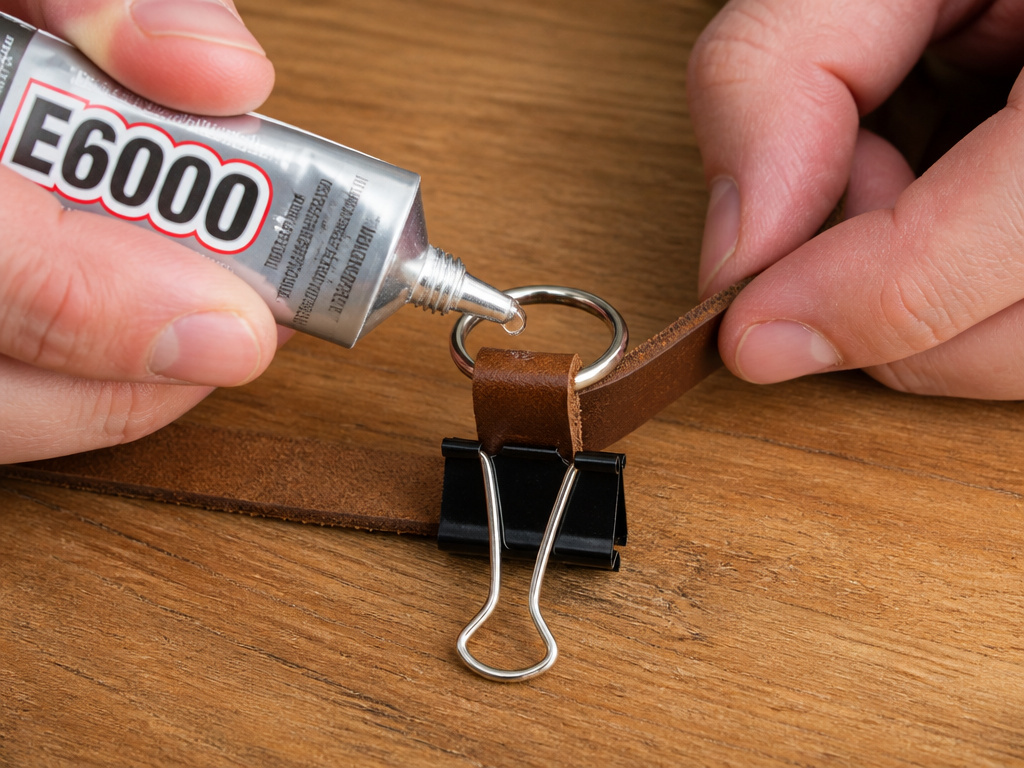 What if you have no punches, no screws, and no thread? You can still make a handsome keychain with just a strip of leather, a key ring, and the right glue. This approach is perfect for thin, supple leather in the 2-3 oz range.
The loop keychain is all about dimensions. Cut a strip 16 inches long and 1/8-inch wide. That length is not arbitrary—it gives you enough to fold through the ring, glue, and wrap for a secure hold. Precision in cutting is your only real task here.
Apply a small dot of E6000 glue to the end of the strip. Fold about an inch of it through the key ring and press the glued end firmly onto the standing part of the strip. Hold it with a binder clip for a full 24 hours. E6000 remains flexible when cured, which is essential for something that will be bent and flexed constantly. Super glue (cyanoacrylate) is too brittle and will crack.
For a braided keychain, cut a wider strip, about 3/4 inch. Cut slits 1/4 inch apart up most of its length, leaving a solid inch at the top. Braid the three strands, secure the end with a drop of glue, and then wrap a tiny piece of leather around the end to hide the glue. Attach the solid top to a key ring with another dot of glue. This design is all about texture and requires no hardware at all.
Finishing: The Step That Defines Longevity
Finishing isn’t just decoration. It’s protection. It’s also where a well-made piece can be ruined in seconds by a well-intentioned mistake. I learned this through a frustrating blotch on a vintage bag.
After your keychain is assembled, you may want to burnish the edges and apply a conditioner. Burnishing compresses the fibers with friction, creating a smooth, sealed edge. You can use a wood slicker, a piece of canvas, or even the edge of a plastic ruler. A little water on the edge helps.
Conditioning is where caution is essential. Many commercial conditioners are loaded with silicones that sit on top of the leather, blocking its pores. Some natural oils can go rancid. Others, like certain neatsfoot oil blends, can break down the leather’s internal structure over years.
Common mistake: Conditioning a finished piece without testing. An oil can react with residues or previous finishes, causing dark, blotchy stains that never fully even out. Always apply conditioner to a hidden spot, like the backside or a scrap from the same piece, and wait 48 hours.
If your leather feels stiff after assembly, you might need to soften leather carefully. For a keychain that will live in a pocket, a light application of a pure conditioner like pure lanolin or a dedicated leather balm is sufficient. Less is more. Let it absorb fully before using the item.
Frequently Asked Questions
What is the best leather for a beginner’s keychain?
Vegetable-tanned leather in 3-4 oz weight is the best starting point. It’s firm, easy to cut, takes stamps and dye well, and develops a beautiful patina with use. You can find it in small pre-cut pieces or scrap bags from leather suppliers.
Can I use leather from an old jacket or bag?
You can, but it’s an advanced move. Garment leather is usually very thin (1-2 oz) and chrome-tanned, making it supple but less structured. It’s ideal for the glued loop keychains but too flimsy for a fold-over fob. You’ll also need to remove any lining fabric carefully.
Do I need a special glue for leather?
For keychains, a flexible adhesive like E6000 is superior to standard craft glue. Leather flexes, and a rigid glue will crack and fail. While specific leather glues exist, a high-quality multi-purpose flexible adhesive like E6000 works perfectly for bonding leather to itself.
How do I keep my stitching holes even?
Use a tool to mark them. A stitching wheel or pricking irons create consistent spacing. If you’re punching freehand, measure and mark each hole with an awl before punching. Uneven holes lead to uneven stitches, which weaken the seam and look messy.
Is this a suitable project for a classroom or kids’ group?
Absolutely. With proper supervision on cutting tools, the fold-over design is excellent. The educational value goes beyond craft; it touches on material science and repurposing. Resources like the PBS lesson plan PDF show how to integrate it into a broader lesson on utilitarian design and local craftsmanship.
Before You Go
Your first keychain might have uneven curves or a glue spot that shows. That’s fine. The goal isn’t perfection on attempt one; it’s understanding the relationship between your tools, your material, and your hands.
The practical takeaway is to start with the fold-over fob. It teaches you cutting, punching, and hardware setting with almost no risk. Once that feels quick, move to stitching with a simple leather cuff project, which uses the same techniques on a slightly larger scale.
Finally, respect the material. A keychain made from good leather and assembled with attention can outlive the keys it holds. It’s a small, personal testament to making something that lasts. Now go find a scrap and put a hole in it.
