
How to Make a Leather Bag With No-Sew Construction Quickly
This post contains affiliate links. As an Amazon Associate, we earn from qualifying purchases.
To make a leather bag, you need three things matched: the right leather weight for each part, a joining method that fits your tools, and a simple, accurate pattern. A stitchless bucket bag made with 3-4oz full-grain leather and double-cap rivets can be completed in about five hours on a first attempt, delivering a professional-looking result without a single stitch.
That five-hour timeline is the practical ceiling most guides miss. They either assume you own an industrial machine or have weeks to hand-sew. The reality is that a clean, minimal design built with the right technique looks expensive precisely because it’s simple. Your choice of joining method, rivets, Chicago screws, or folded seams, dictates the tools you need and the final aesthetic.
What follows is a breakdown of leather specs, the three stitchless construction paths, and the one pattern mistake that makes a bag look homemade. By the end, you’ll know which method fits your bench and how to avoid the stiffness that kills a drawstring bag’s function.
Key Takeaways
- Match leather thickness to the part: Use 3-4 oz (1.4-1.8mm) leather for bag bodies and 5-6 oz (2-3mm) for straps and handles. Thicker isn’t better, it can prevent a drawstring from cinching.
- Rivets are the most beginner-friendly stitchless method. Double-cap rivets set with a hammer and anvil create a permanent, flush finish on both sides of the leather.
- A simple paper mock-up saves your hide. Cutting two mismatched panels is the fastest route to a lopsided bag. Test your pattern on cardboard first.
- Burnish edges before final assembly. Trying to burnish inside a tight corner after the bag is built is nearly impossible. Do it when each piece is flat on your bench.
- Conditioning is for after. Applying oils or conditioners before assembly can interfere with glue adhesion and make handling the leather slippery. Finish the bag, then feed the leather.
Leather Selection: It’s About Weight and Grain, Not Just Color
The leather will tell you what it needs. A bag that scrunches needs suppleness; a structured tote needs firmness. Ignore the marketing copy about “genuine leather” and focus on two printed specs: weight and grain.
Common mistake: Choosing leather based only on color and price. A stiff, corrected-grain hide at 8oz will make a bucket bag that stands up like a cardboard tube, the drawstring pulls, but the bag doesn’t collapse. The ideal leather has a slight hand-bend before it springs back.
Weight (Thickness) is Non-Negotiable
This isn’t a suggestion. It’s a load-bearing specification. * Bag Body & Panels: 3-4 oz leather (1.4–1.8mm). This is thick enough to hold structure but thin enough to fold, skive, and burnish cleanly. The Ethiopian leather goods standard ES 6847-2021 references similar dimensional guidelines for panel construction, emphasizing consistency. * Straps, Handles, & Stress Points: 5-7 oz leather (2.0–2.8mm). The extra thickness here handles tensile stress without stretching. A thin strap will elongate over time, making the bag droop. * Linings & Accents: 2-3 oz leather (0.8–1.2mm). Anything heavier adds useless bulk and makes turning edges a fight.
The Full-Grain vs. Corrected-Grain Divide
Full-grain leather has an intact surface. It’s the outermost layer of the hide, making it the most durable and breathable. It develops a patina, a personal, darkening sheen from oils and use. Corrected-grain leather has been sanded and embossed to hide imperfections. It starts uniform but won’t patinate; it wears down, not in.
For a stitchless bag with visible raw edges, you need full-grain, preferably vegetable-tanned. Chrome-tanned leather is often too soft and doesn’t burnish to a hard, shiny edge. It’s like trying to sear a steak that’s been boiled, you won’t get the crust. Vegetable-tanned leather responds to burnishing, forming a smooth, sealed edge that is part of the design.
The 3 Stitchless Joining Methods Explained
If you’re not sewing, you have three proven paths. Each changes the tool list and the final look.
| Method | Best For | Tools Required | The One Limitation |
|---|---|---|---|
| Double-Cap Rivets | First-time builders, modern aesthetic. | Hammer, rivet setter/anvil, hole punch. | Misaligned holes are not correctable without visible damage. |
| Chicago Screws | Where disassembly might be needed. | Screwdriver, hole punch. | Can loosen over time with heavy use if not thread-locked. |
| Folded & Glued Seams | A clean, hidden raw edge. | Skiving knife, contact cement, clamps. | Adds complexity; requires precise skiving to avoid bulk. |
Rivets are the default choice for a reason. The metal-on-leather connection is genuinely permanent when set correctly, and the hardware adds an intentional, industrial look. You can choose brass, nickel, or copper finishes. Chicago screws offer flexibility, you can unscrew them, but that’s also a potential failure point. I always add a drop of thread locker to the posts.
The folded seam is the most advanced of the three. You skive (shave) down the edge of the leather to a feather edge, apply contact cement, fold it over, and clamp. Done right, it hides the raw edge completely, giving a sleek, minimalist look. Done wrong, you get a lumpy, stiff seam that cracks along the fold line within a year.
Where this goes sideways: Using rubber cement for temporary holds. I abandoned that years ago. It leaves a residue that interferes with later dye absorption and makes a gummy mess. For dry assembly, use blue painter’s tape or binder clips. They hold without leaving a trace.
Tools You Actually Need (And One You Don’t)
You don’t need a $3,000 industrial sewing machine to make your first bag. A basic toolkit gets you there.
- Cutting: A sharp utility knife with fresh blades and a metal ruler. A rotary cutter helps with long straight lines.
- Hole Making: A round awl for marking and a drive punch for clean rivet holes. An awl makes a small indentation so you can confirm placement before committing.
- Edge Finishing: An edge beveler (size #2 is versatile) and a burnishing tool. The beveler shaves off the sharp 90-degree corner, giving the burnisher a rounded surface to work on.
- Assembly: A rubber mallet, a rivet setter, and clamps or clips.
- The Optional Upgrade: A Sailrite Sewing Machine or similar heavy-duty portable machine if you ever decide to stitch. It handles thick leather, but it’s an investment for later.
Notice what’s not on the list: a stitching pony, pricking irons, or harness needles. This is a stitchless guide. If you want to learn hand-stitching later, that’s a fantastic skill, check out our tutorial for a leather wallet to see it in action on a smaller project. But for now, keep it simple.
Pattern Logic: Why Your First Bag Should Be a Bucket
A bucket bag is a cylinder with a bottom and a drawstring. This shape is forgiving and elegant. More importantly, its pattern consists of just three parts: a rectangle for the body, a circle for the base, and a strap. You can master the spatial reasoning here before moving to a complex multi-gusset design.
Drafting Your Pattern
- Decide on finished dimensions. A classic bucket bag might be 40cm wide by 27cm tall.
- The body panel is a rectangle. The width is your desired circumference. The formula is Circumference = π × Diameter. If you want a base diameter of 26cm, your rectangle needs to be (3.14 × 26cm) = ~82cm wide by 27cm tall.
- The base is a circle with your chosen diameter (26cm).
- Add no seam allowance. For riveted or screwed construction, you butt edges together. For folded seams, you add the skiving allowance (usually 8-10mm) to the edge that will be folded.
The part nobody mentions: Cut your pattern from poster board first and tape it together. Does the cylinder form cleanly? Does the circle fit? This 20-minute step saves you from cutting into expensive leather only to find your math was off. This principle of prototyping applies to any leather project, whether you’re making a leather belt or a leather valet tray.
Transfer the final pattern to the leather using a scratch awl or fine marker. Cut just outside the line, then trim to the line for perfect accuracy. This is also the stage where you’d mark and punch holes for rivets or screws, following the guide to making leather patterns.
Step-by-Step: Making a Riveted Bucket Bag
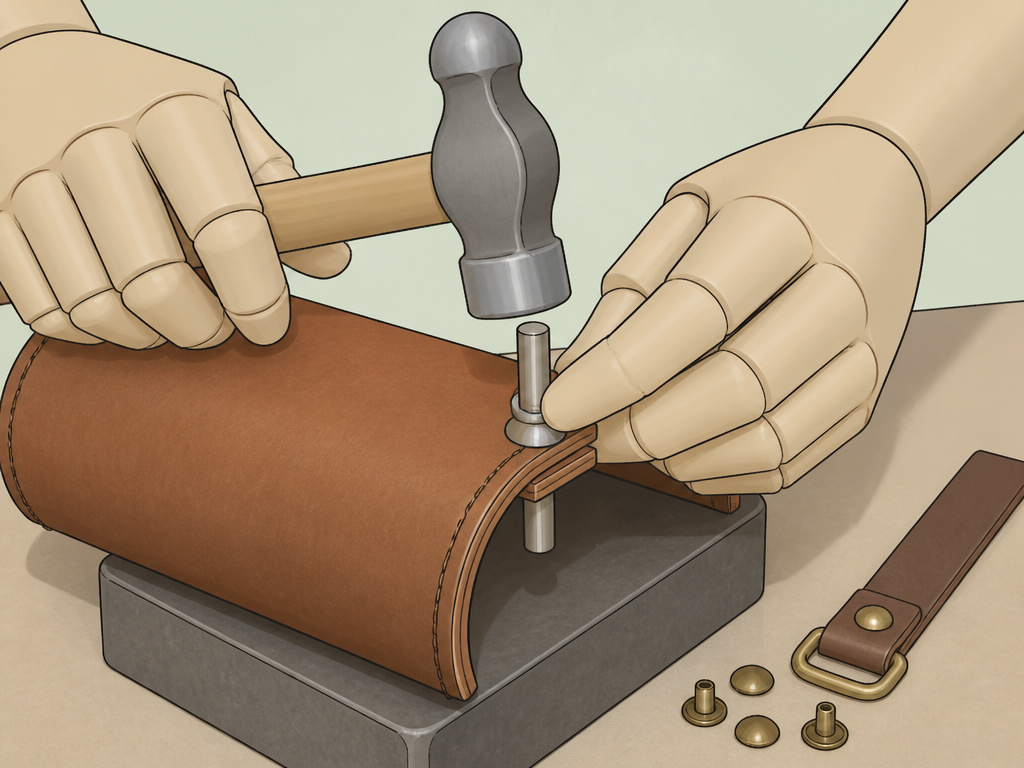 Let’s walk through the riveted method. This is the sequence that turns panels into a bag.
Step 1: Prepare All Pieces
Burnish the edges of every piece, the body rectangle, the base circle, and the strap, while they are flat. Use the edge beveler, then dampen the edge with water and rub vigorously with a wood slicker or canvas cloth until it’s smooth and shiny. Trying to burnish inside a assembled cylinder is frustrating and ineffective.
Step 2: Form the Cylinder
Wrap the body rectangle into a tube, overlapping the ends by about 2cm. This overlap is your rivet plate. Mark where the two layers meet every 4-5cm along the vertical seam. These are your rivet points. Use your awl to mark, then punch through both layers.
Step 3: Attach the Base
This is the trickiest part. Roll the cylinder onto the base circle and mark through the leather where the two meet. You want rivets every 3-4cm around the circumference. Accuracy here prevents a wobbly bottom. The official ES 6847-2021 leather goods standard emphasizes the importance of precise alignment in assembly for product integrity, and it’s right.
Step 4: Set the Rivets
Insert a double-cap rivet through each punched hole. Place the bag on a solid surface (a steel block or anvil is best), and use the rivet setter and hammer to flare the post, securing the caps on both sides. The sound changes from a dull thud to a sharp click when the rivet is fully set. That’s your cue to stop hammering.
Step 5: Add Hardware and Strap
Punch holes at the top of the bag for the drawstring grommets or eyelets. Attach your strap using either rivets or a buckle system. For a shoulder strap, a leather watch strap tutorial has useful tips on attaching hardware securely.
Finishing: The Difference Between Homemade and Handmade
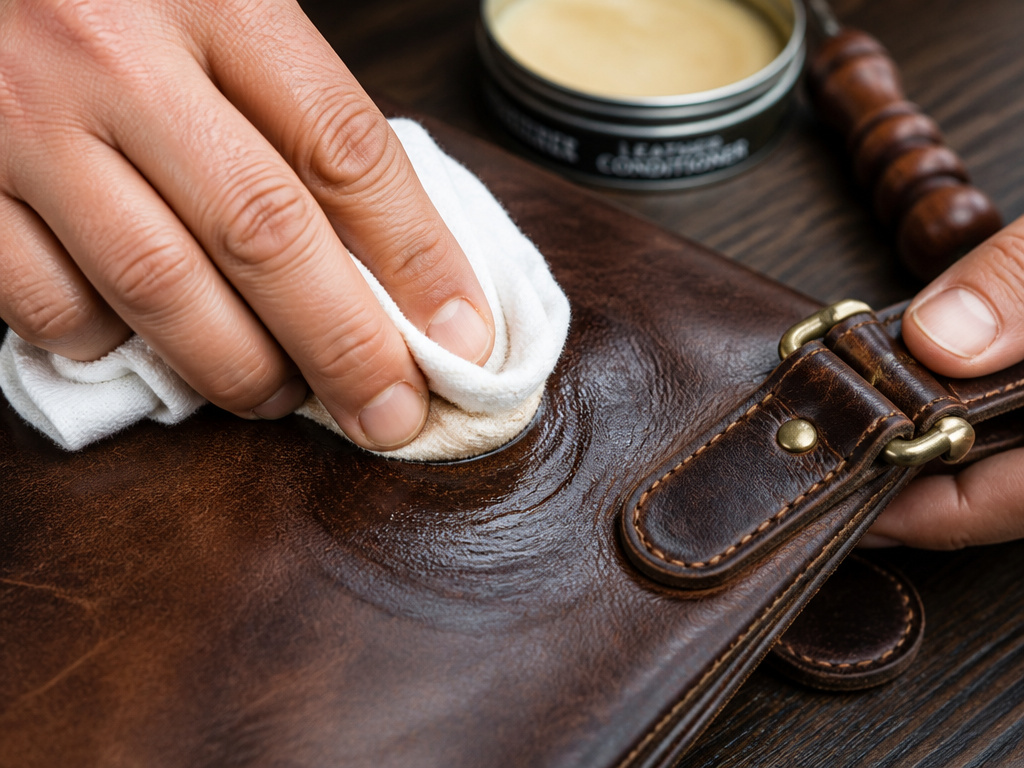 The bag is assembled. Now you make it yours.
Conditioning
Use a light coat of a pure oil conditioner (like neatsfoot or coconut oil blend) or a dedicated leather cream. Apply with a cloth, let it soak in for an hour, then buff off any excess. This isn’t about waterproofing, it’s about feeding the fibers so the leather stays supple as it ages. Remember my earlier story: conditioning on a schedule rather than need leads to a greasy, clogged feel. This bag needs one good conditioning now, then maybe once a year.
Edge Touch-Up
The burnished edges might have scuffed during assembly. A quick pass with the burnisher and a drop of water will restore the shine.
The Maker’s Mark
If you have a stamp, now is the time. Heat it evenly and press firmly on an inconspicuous spot, inside near a seam, or on the bottom. Hold for three seconds. It’s a signature of pride, the same final touch you’d add to a leather keychain or a leather sheath.
Frequently Asked Questions
Can I use faux leather for this?
You can, but the result will be fundamentally different. Faux leather (PU or PVC) won’t burnish, patina, or mold to use. It also can’t be securely riveted, the layers may separate. The techniques here are designed for the physical properties of real animal hide.
What if I don’t have a rivet setter?
Standard hardware store rivet kit often includes a simple setter. For double-cap rivets, you need the matching anvil with a concave cup. It’s a specific tool. You can’t properly set them with pliers or a flat surface; you’ll mash the cap and damage the leather.
How do I fix a mis-punched hole?
If a rivet hole is slightly off, you can sometimes enlarge it slightly to allow for adjustment. If it’s drastically misaligned, your only clean option is to make it a feature, add a second, correct hole and use both, turning the mistake into a deliberate asymmetric detail. This is a core principle in leatherwork, applicable when crafting a wallet or making a holster.
Is hand-stitching really stronger?
Yes, a saddle-stitch is stronger and more repairable than machine stitching for leather. The two independent threads lock each other in place; if one breaks, the seam doesn’t unravel. But it’s a skill that takes time. The riveted method here provides immense strength for far less time investment.
How do I clean and care for the bag?
Dust it off. If it gets wet, let it dry away from heat, then condition once it’s fully dry. For stubborn stains, use a damp cloth with a tiny bit of saddle soap, then re-condition. Avoid silicone-based sprays that create a plastic-like barrier.
Before You Go
One rule most guides skip: if your leather is too stiff to scrunch when you test the pattern by hand, it’s too stiff for a functional bucket bag. Swap it out before you cut. The five-hour build time assumes a supple 3-4oz hide, a stiff 6oz hide will fight you for eight hours and still look rigid.
The riveted bucket bag is your proof of concept. It teaches you grain direction, hole alignment, and edge finishing. Once it’s done, you’ll have the confidence to scale the logic to other designs, like a leather cuff or a leather coaster. Start simple, finish completely, and let the leather do the talking.
