
How to Make a Custom Leather Holster: Complete Build Guide
This post contains affiliate links. As an Amazon Associate, we earn from qualifying purchases.
This post contains affiliate links. As an Amazon Associate, we earn from qualifying purchases.
Making a leather holster requires three things: vegetable-tanned leather of the correct weight, a precise pattern based on your firearm, and the patience to wet mold and stitch the piece properly. The leather forms a custom pocket that holds the gun securely, while the stitching and finishing ensure it lasts for years.
That last point about patience is the one most first-timers underestimate. A holster isn’t just a pouch; it’s a fitted, structural piece of gear that needs to withstand daily draw-and-reholster cycles. Rushing the drying after wet molding or skipping steps in edge finishing shows up immediately as a loose fit or rough, unprofessional seams.
What follows is a straightforward guide that walks you from selecting the right leather to the final coat of conditioner. We’ll cover why certain leathers can damage your firearm, how to avoid common pitfalls like using the wrong part of the hide, and the one tool most tutorials skip that makes all the difference in a clean finish.
Key Takeaways
- Use only vegetable-tanned, full-grain leather (7-8 oz weight recommended) and cut your pattern from the back of the hide, avoiding the stretchy belly and neck areas. Wet molding is essential for a custom fit; submerge the leather in water for 10-15 seconds, mold it around your plastic-wrapped gun, and let it dry undisturbed for a full 24 hours.
- A saddle stitch with waxed thread, punched with a pricking iron and finished with an awl, creates a seam far stronger than any machine stitch for this application.
- Never use chrome-tanned leather or suede linings, the chromium salts can react with a firearm’s bluing, and suede traps moisture and abrasive dust.
- The difference between a serviceable holster and a professional one is in the edge finishing: beveling, slicking, and sealing the edges prevents fraying and gives a polished look.
The Leather, Pattern, and Tools You Need
Let’s be clear about one thing: your holster will only be as good as the leather you start with. This isn’t a place to use scrap or mystery leather from the craft store.
You need vegetable-tanned, full-grain leather. The “vegetable-tanned” part is critical because it uses natural tannins, not the chromium salts found in chrome-tanned leather. Those salts can react with the bluing on a firearm, leading to surface corrosion. It’s a chemical reality, not speculation. Full-grain means the top, strongest layer of the hide is intact, giving you durability and the ability to develop a patina.
For weight, aim for 7-8 ounces. This is thick enough to hold its shape after molding but not so thick that it becomes rigid and difficult to stitch. Some argue you can go lighter if using a lining, but for a first project, a single piece of 7-8 oz leather is the most straightforward path. If you’re unsure about weight, our guide on choosing leather thickness for a holster project breaks it down further.
Common mistake: Cutting your pattern from any part of the hide. The back (the area with a straighter top line) is dense and stable. The belly (wavy bottom line) and neck are stretchier. A holster cut from the belly will deform under the gun’s weight within a month.
Your pattern is your blueprint. You can find digital templates online for specific gun models, or you can create your own. To draft your own, you’ll need poster board, a pencil, and your unloaded firearm. The goal is to sketch a shape that wraps around the gun with about a 3/4-inch margin on all sides for seam allowance and the fold-over belt loop. This process of creating a leather pattern is a skill worth learning for any leather project.
Here are the essential tools you’ll need gathered before you make the first cut:
| Tool Category | Specific Tools Needed | Why You Need It |
|---|---|---|
| Cutting & Marking | Utility knife or rotary cutter, metal ruler, wing divider or pen | For precise, straight cuts and marking consistent stitch lines. |
| Hole Punching | Pricking iron (6 stitches per inch), diamond awl, mallet | The pricking iron marks stitch holes; the awl pierces the final layers cleanly. |
| Stitching | Two harness needles, waxed polyester or linen thread, stitching pony (optional but helpful) | Hand-stitching requires two needles for the saddle stitch, the strongest seam. |
| Edge Finishing | Edge beveler (size #2), wooden slicker or burnisher, edge dye or gum tragacanth | Beveling rounds the sharp edge; slicking compresses and polishes it. |
| Assembly & Forming | PVA leather glue (like Reina Aquilim 315), plastic wrap, container for water | Glue holds pieces for stitching; plastic wrap protects the gun during wet molding. |
The edge beveler is one of those tools that seems minor but defines a professional piece. It shaves a tiny, consistent bevel off the raw leather edge so it can be neatly slicked and sealed. If you’ve never used one, our primer on the essential edge finishing tool explains the technique.
Cutting, Skiving, and Prepping the Leather
With your pattern finalized and leather selected, it’s time to cut. Lay the pattern on the flesh side (rough side) of the leather. Weight it down and trace firmly with a pen or stylus. Use a sharp utility knife and a metal ruler to cut just outside your line, giving yourself that slight margin for error.
Now, inspect your cut piece. The areas that will fold or overlap, like where the belt loop forms or the holster wraps around the trigger guard, are often too thick. This is where skiving comes in. Skiving is the process of thinning the leather from the flesh side in a specific area to reduce bulk. You can use a dedicated skiving knife or a very sharp utility knife held at a shallow angle. The goal isn’t to cut through, but to pare away maybe a third of the thickness. This makes the final fold cleaner and easier to stitch.
Before any gluing or stitching, you also need to bevel the edges. Run your #2 edge beveler along every cut edge on the grain side (smooth side). You’ll feel it catch and peel off a thin ribbon of leather. This creates a rounded profile that won’t catch on clothing and provides a surface for the next step: edge slicking.
Where this goes sideways: Skipping the skiving on fold lines. When two thick layers of 8 oz leather meet at a fold, they create a stiff, bulky hinge that stresses the stitching and cracks the leather finish over time. A skived fold moves smoothly from day one.
A note on linings: they are primarily an aesthetic choice. A lining gives the interior a smooth, finished look, but it adds complexity. If you do line, use a thin (2-3 oz) vegetable-tanned leather. Never use suede. The nap increases surface area, trapping moisture and dust which acts as a fine abrasive against the gun’s finish. Glue the lining to the main piece with a thin layer of PVA glue before moving on to assembly.
Wet Molding: Shaping Leather to Your Gun
This is the transformative step. Wet molding uses water to make the leather pliable so it can be formed around your firearm, creating a perfect, memory-retaining pocket.
First, unload your gun and double-check it. Then, wrap it completely in 2-3 layers of plastic wrap. Seal it tightly. This protects the metal from prolonged moisture exposure during the 12-24 hour drying period.
Submerge your cut and prepared leather piece in room-temperature water. Don’t use hot water, and definitely don’t use isopropyl alcohol as some shortcuts suggest. Alcohol dries the leather’s natural oils aggressively, leading to a stiff, brittle result that requires heavy conditioning later. Just use plain water.
The soak time is short, 10 to 15 seconds is enough. You want the leather saturated but not waterlogged. Remove it, let the excess drip off, and place it grain-side down on a clean surface.
Now, press your plastic-wrapped gun into the leather. Start with the muzzle, working it into the deepest part of the pocket. Then press the trigger guard and slide the rest of the frame down. Use your fingers to press the leather tightly around every contour, the slide serrations, the sights, the magazine well. You’re not just making an impression; you’re actively stretching and forming the leather to hug the gun.
Leave it overnight and allow it to dry. After 12 hours, remove the firearm and allow it 12 more hours to continue to dry.
That 24-hour total dry time is not a suggestion. If you pull the gun out early, the leather is still flexible enough to lose its shape. Patience here is the only thing that guarantees a snug, secure fit. For a more detailed look at the science and technique, our guide on the wet molding process for leather covers it in detail.
Once the leather is bone-dry, you can remove the plastic wrap from your gun. The holster body should hold its shape perfectly on its own. If it feels a bit stiff, that’s normal. A light application of Neatsfoot oil after the project is complete will restore suppleness without affecting the molded shape.
Stitching: The Saddle Stitch or Machine
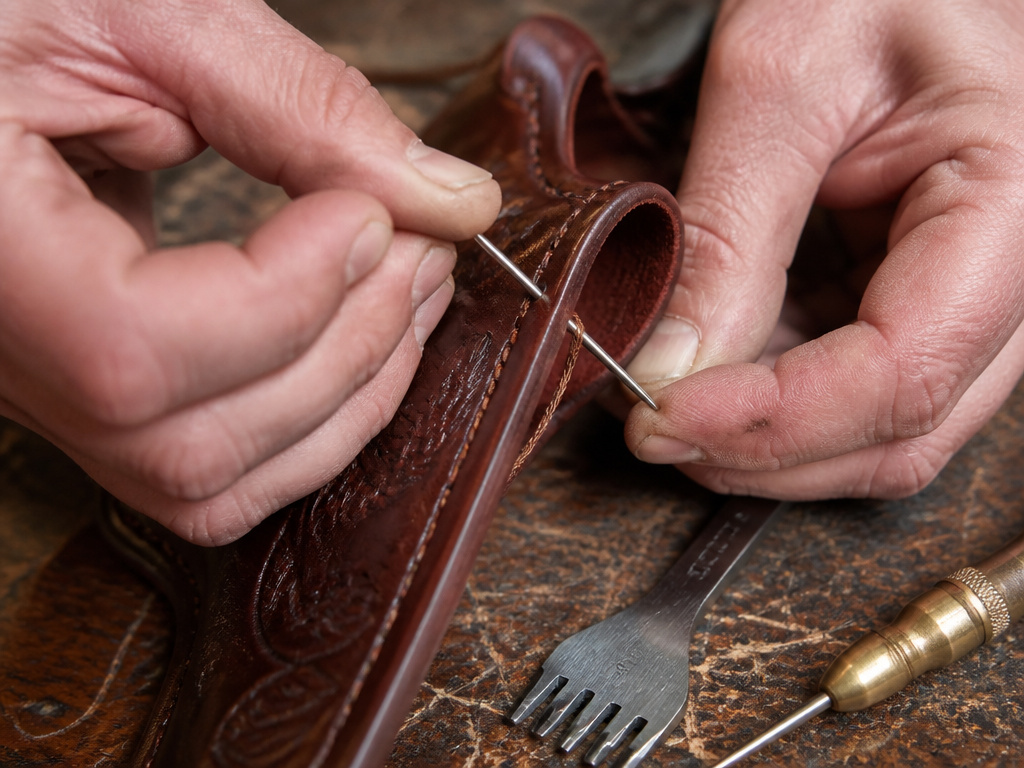
The glue holds, but the stitch lasts. For a holster, you need a seam that can handle constant friction and stress. That means either a lockstitch sewing machine capable of handling heavy leather or, for most DIYers, the hand-sewn saddle stitch.
The saddle stitch is king for a reason. Each stitch is actually two independent threads passing through the same hole in opposite directions. If one thread wears through and breaks, the other thread locks that stitch in place, preventing a total seam failure. A machine seam, if the thread breaks, can unravel completely.
To saddle stitch, you first need to punch your holes. Use a 6-spi (stitches per inch) pricking iron and a mallet to mark the holes along your pre-drawn stitch line. Press firmly so the prongs leave a clear mark. For thick leather (like two 8 oz layers stacked), the pricking iron may not go all the way through. This is where the diamond awl comes in. You’ll use it to pierce the remaining depth as you stitch, ensuring clean, aligned holes.
Thread two needles onto your waxed thread. The process is rhythmic: push one needle down through the hole, pull it through, then push the other needle up through the same hole from the opposite side. Pull both threads taut, but not so tight you distort the leather. This creates the signature “X” pattern on both sides of the seam. It’s meditative work, and the result is immensely strong.
If you choose to machine stitch, ensure you’re using a heavy-duty needle (size 110/18 or higher) and bonded nylon or polyester thread. Test your stitch length and tension on scrap leather of the same thickness first. A machine can save time, but it offers no mechanical advantage over a well-executed saddle stitch for this kind of load-bearing item.
Finishing: Edges, Dye, and Protection
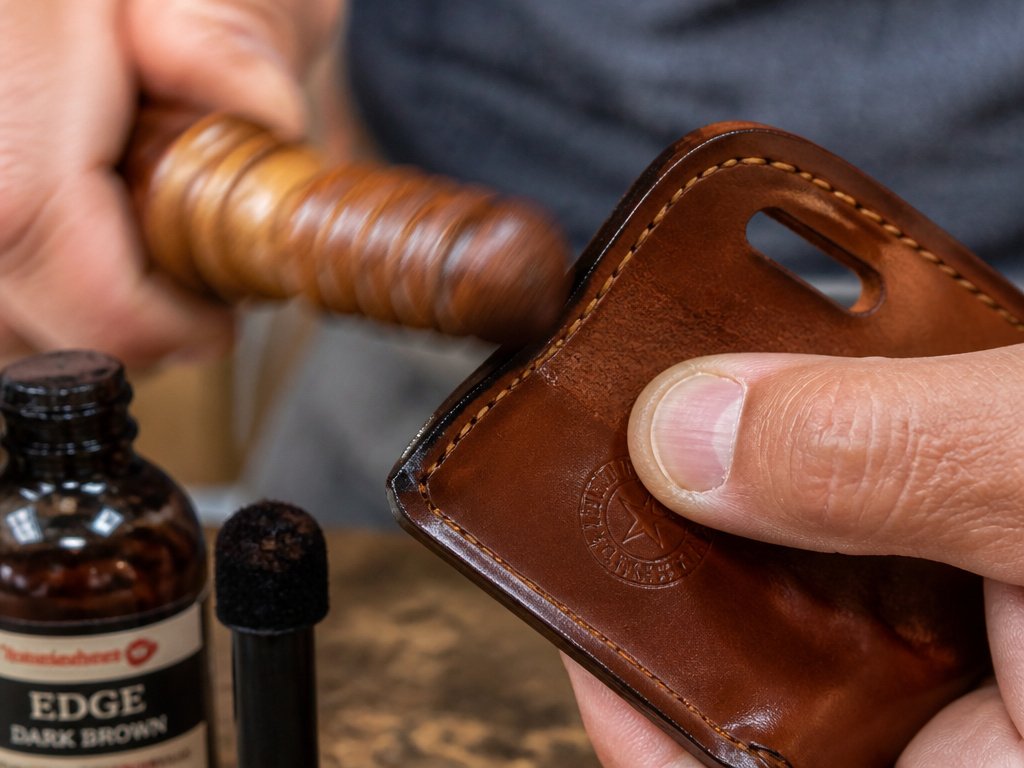
The construction is done, but the job isn’t finished. A raw, unfinished edge will fray, absorb dirt, and look amateurish. This final stage is what separates a functional item from a crafted one.
Start by sanding the edges with 400-grit sandpaper to make them perfectly smooth and even. Then, apply a thin coat of edge dye or gum tragacanth with a dauber. While it’s still slightly damp, take your wooden slicker or burnisher and rub it back and forth rapidly along the edge. The friction generates heat, melting the natural fibers and any applied gum into a hard, polished seal. You’ll feel the tool glide smoothly as the edge hardens and shines. This is the part I enjoy most, the tactile shift from rough to glassy.
I’ve stuck with a simple wooden slicker for burnishing edges for years. It’s inexpensive, gives me perfect control over the pressure and angle, and consistently produces a professional finish. Fancy machines can’t replicate that feedback.
If you’re dyeing the holster, do it before you finish the edges. Use an alcohol-based dye for better penetration and less risk of water damage. Apply it evenly with a dauber or sponge in a well-ventilated area. Let it dry completely. Then, apply a leather conditioner like Neatsfoot oil or a dedicated leather balm. This replenishes the oils lost during the wet molding and dyeing process. Work it in with your fingers, let it absorb for an hour, then buff off the excess with a clean cloth. Understanding the distinct purposes of cleaner and conditioner is key here, you’re conditioning, not cleaning.
Finally, consider the closure. A simple thumb-break strap secured with a Chicago screw or snap adds security. Ensure any metal hardware is stainless steel or heavily plated to prevent rust stains on the leather.
Common Pitfalls and How to Avoid Them
Even with careful planning, a few issues can pop up. Knowing what to look for saves a project.
The holster is too tight or too loose after drying. This usually traces back to the pattern. Too tight means your seam allowances were insufficient; too loose means you didn’t form the leather aggressively enough during wet molding or you removed the gun too soon. Make a test piece from cheap vinyl or scrap leather first.
The leather cracked after drying. This means the leather was either too dry to begin with or you used a harsh chemical like isopropyl alcohol during molding. A deep conditioning with Neatsfoot oil might salvage it, but prevention is better. Always use water and start with properly conditioned leather. If you’re working with stiff leather, soften it before you begin the project.
Stitches are uneven or the thread keeps breaking. You’re likely pulling the thread too tight or using an awl that’s too small, causing excessive friction. Use a larger awl to open the hole slightly more, and pull the threads firmly but not with full force. Beeswax on the thread can also reduce friction.
The holster loses its shape over time. This is a failure of either leather selection or construction. If you used leather from the stretchy belly of the hide or chrome-tanned leather (which is less dimensionally stable), it will deform. If your stitching isn’t tight enough or your glue failed, the holster can stretch. There’s no fix except to rebuild with the correct materials and techniques.
Rust appears on the firearm. This is the cardinal sin of holster making and points directly to the use of chrome-tanned leather or storing a gun in a damp, unfinished holster. Always use vegetable-tanned leather and let the holster dry completely if it gets wet from sweat or rain. Regular essential holster cleaning and conditioning prevents moisture buildup.
Frequently Asked Questions
What’s the best leather for a first-time holster project?
Vegetable-tanned, full-grain leather in 7-8 oz weight. It’s firm enough to hold shape, soft enough to mold and stitch by hand, and forgiving of minor mistakes. Avoid exotic leathers, chrome-tans, and anything labelled “genuine leather” for a project like this.
Can I make a holster without a stitching machine?
Absolutely. The hand-sewn saddle stitch is the traditional and strongest method for leather holsters. It requires only two needles, waxed thread, a pricking iron, and an awl. Many professional makers use no machine at all.
How do I prevent my gun from rusting in a leather holster?
Use only vegetable-tanned leather, ensure the holster is completely dry before storing a gun inside, and apply a light coat of gun oil to the firearm as part of your normal maintenance. Never store a gun in a holster that is damp from sweat or rain.
Is wet molding absolutely necessary?
For a molded, custom-fit holster that provides secure retention, yes. For a simple, unstructured pouch holster, it’s not. But the classic, form-fitting holster everyone pictures requires the leather to be wetted, shaped, and dried around the specific firearm.
How long does it take to make a leather holster?
From pattern to finished product, budget 6-8 hours of active work spread over 2-3 days. The majority of that time is waiting, 24 hours for the wet molding to dry completely, and drying time between dyeing and conditioning steps. Rushing any of these drying phases compromises the result.
Before You Go
The practical takeaway is this: a well-made leather holster is a marriage of correct materials and deliberate process. It’s not a race. The leather will tell you what it needs, more pressure here, more drying time there. Your first one might have a wobbly stitch line or an edge that’s not quite glassy. That’s fine. The second one will be markedly better.
If your finished holster feels a bit rigid, a proper conditioning regimen over the first few weeks of use will break it in perfectly. And if you ever want to branch out, the skills you’ve learned here, pattern drafting, wet molding, saddle stitching, translate directly to other projects like crafting a leather sheath for a knife or tool.
Start with a simple design for your own gun. The confidence of carrying a piece you made, that fits perfectly, is worth every minute spent at the workbench.
