
How to Use Leather Balm | The Exact Motion Most People Skip
This post contains affiliate links. As an Amazon Associate, we earn from qualifying purchases.
To use leather balm, you apply it in thin, even layers to clean, dry leather, working it in with a circular motion using a cloth or your fingertips. You then let it absorb fully, which can take several hours, before buffing off any excess with a clean, dry cloth to prevent a sticky, tacky surface. The exact product and frequency depend entirely on your leather’s type and condition.
The “thin, even layers” clause is where most attempts go wrong. A thick coat doesn’t absorb; it sits on top, clogs the leather’s pores, and turns gummy. Leather breathes. It needs to drink the conditioner, not wear it like a coat.
What follows breaks down the five physical steps, the one balm type that ruins most projects, and the climate adjustments that flip the standard timing rule. By the end, you’ll know the motion that matters more than the product.
Key Takeaways
- Apply balm to clean leather only. Dirt sealed under conditioner acts like sandpaper, grinding into the fibers with every flex.
- “Thin, even layers” means you should barely see the product on the surface. If the leather looks wet or glossy immediately, you’ve used too much.
- Buff after absorption, not before. Wait until the leather no longer feels cool or damp to the touch, this can take 2 to 6 hours. Buffing too soon spreads un-absorbed oils and creates a tacky film.
- Match the balm base to your leather. Water-based conditioners (like Chamberlain’s No. 1) are for maintenance. Oil/wax balms (like Obenauf’s) are for restoration and heavy weather protection.
- Frequency is dictated by use and climate, not a calendar. A leather jacket worn weekly in a dry climate needs care every 3-4 months. A seldom-used bag in stable humidity might go 8-12 months between treatments.
The One Balm Type You Should Probably Avoid (For Now)
Let’s be clear about one thing: a “healing” or “recoloring” balm is not a standard conditioner. Products like Chamberlain’s Leather Healing Balm or Leather Honey Recoloring Balm are designed for cosmetic touch-ups and color restoration on already-damaged leather. Their primary effects are aesthetic, using concentrated pigments and heavy oils.
Using a healing balm as your regular conditioner is like using a heavy foundation as daily moisturizer. It will oversaturate the finish, often darkening the leather significantly, and can create a stiff, plasticky feel. The Leather Honey product page explicitly states it’s for restoring faded color. Chamberlain’s guide calls its Healing Balm a “supplemental, touch up conditioner and refiner.”
For routine care that nourishes without altering appearance, you need a dedicated leather conditioner or a pure oil. Save the heavy balms for the specific job of fixing a deep scratch or reviving sun-bleached color.
The 5-Step Process for Applying Leather Balm
This isn’t about slapping on product. It’s a sequence that lets the leather absorb at its own pace. Skip a step, and you’ll see, or feel, the consequence within days.
Apply leather balm in thin, even layers using a circular motion with a clean, soft cloth or your fingertips. Allow the product to absorb fully until the leather surface no longer feels cool or damp, which may take several hours. Buff any remaining residue with a clean, dry cloth to achieve a natural, non-tacky finish.
Step 1: Clean the Leather (Non-Negotiable)
Never apply balm to dirty leather. Dust and grit act as abrasives. When you work in conditioner, you grind those particles deeper into the pores. Chamberlain’s guide states it plainly: contaminants sealed inside “may harm your leather, and will prevent… Absorbing effectively.” Wipe the surface with a barely damp microfiber cloth. For heavier grime, use a dedicated leather cleaner like Chamberlain’s Straight Cleaner No. 2. Let the leather dry completely at room temperature. Rushing this with a heat source bakes in moisture and can cause the leather to stiffen.
Step 2: Apply a Thin, Even Layer
Dispense a pea-sized amount onto a clean, lint-free cloth or your fingertips. The goal is to barely see the product on the surface. Imagine you’re applying sunscreen, enough to cover, but not so much it leaves a white cast. Work the balm in using gentle, circular motions. Cover the entire surface evenly. If you’re treating a bag, pay extra attention to stress points: handles, corners, and folds.
Step 3: Let It Absorb (This is the Waiting Game)
Walk away. This is the part people skip. The leather needs time to drink the oils in. If you buff immediately, you’ll just smear unabsorbed product around, guaranteeing a sticky finish. How long? It depends on the leather’s dryness and the balm’s thickness. A light conditioner might take 30 minutes. A heavy oil/wax balm can need 4-6 hours. The tactile test is reliable: the leather should no longer feel cool or damp to the touch.
Step 4: Buff Off the Residue
Once absorbed, take a fresh, dry microfiber cloth. Buff the surface with light, quick strokes. You’re removing the tiny fraction of oil that couldn’t penetrate, not the balm itself. You’ll feel the difference immediately. Properly buffed leather feels smooth and dry, with a slight, natural sheen. If it still feels at all slick or tacky, you either buffed too soon or used too much product. In that case, let it sit for another hour and buff again.
Step 5: Let It Cure Before Use
After buffing, give the leather another 12-24 hours before you use the item. This cure time lets the oils fully settle and bond within the fibers. Putting a jacket on or loading a bag right away can cause the still-absorbing oils to transfer onto clothing or create pressure spots.
How Often Should You Use Leather Balm? (It’s Not “Twice a Year”)
The standard “once or twice a year” advice is a commodity baseline. It’s useless. Frequency depends on three things: the leather, its use, and your environment.
| Factor | Increases Frequency | Decreases Frequency |
|---|---|---|
| Climate | Arid, dry air (desert, winter heating) | Stable, moderate humidity |
| Use | Daily wear (boots, wallets, work bags) | Occasional use (display items, seasonal bags) |
| Leather Type | Dry-finished, porous leather (vegetable-tanned, full-grain) | Oily-finished, sealed leather (chromium-tanned, corrected grain) |
| Condition | Already dry, stiff, or cracked | Well-maintained and supple |
Here’s the practical takeaway. A leather wallet used daily in Arizona probably needs a tiny touch-up every two months. A decorative pillow on a sofa in Florida might only need it annually. Your leather will tell you, when it starts to feel stiff, loses its supple drape, or looks a bit thirsty, it’s time.
Common mistake: Conditioning on a rigid schedule. A bag stored in a closet for six months doesn’t need conditioning just because the calendar says so. Condition based on feel, not date.
I learned this the hard way with a client’s portfolio. The typical rule is to store leather in a cool, dry place. We followed that in an arid climate, and the case became board-stiff within a year. Dry doesn’t mean zero humidity. We added a small humidifier to the storage room, and the next case stayed supple for a decade. The environment always wins if you ignore it.
Choosing the Right Balm for Your Leather Type
Not all leathers are the same, and using the wrong balm can do more harm than good. Think of it like skincare, you wouldn’t use heavy shea butter on oily skin. Your choice hinges on the leather’s finish and tannage.
| Leather Type | Best Balm Base | Products to Consider | Why It Works |
|---|---|---|---|
| Vegetable-Tanned / Full-Grain | Oil-Based (Beeswax, Neatsfoot Oil) | Obenauf’s Leather Oil, Pure Neatsfoot Oil | These porous leathers absorb oils deeply, restoring flexibility and building a natural patina. |
| Aniline & Semi-Aniline | Light, Water-Based Conditioner | Chamberlain’s Leather Milk No. 1, Bickmore Bick 4 | These delicate, dyed finishes need gentle hydration without darkening or clogging the open pores. |
| Corrected Grain / Finished Leather | Silicone-Free Cream Conditioner | Lexol Leather Conditioner | The topcoat limits absorption; a light cream moisturizes the surface without causing a blotchy appearance. |
| Exotics (Suede, Nubuck) | Specialty Spray Conditioner Only | Do not use standard balms | The nap will be matted and ruined by oils or waxes. Use only conditioners designed for napped leathers. |
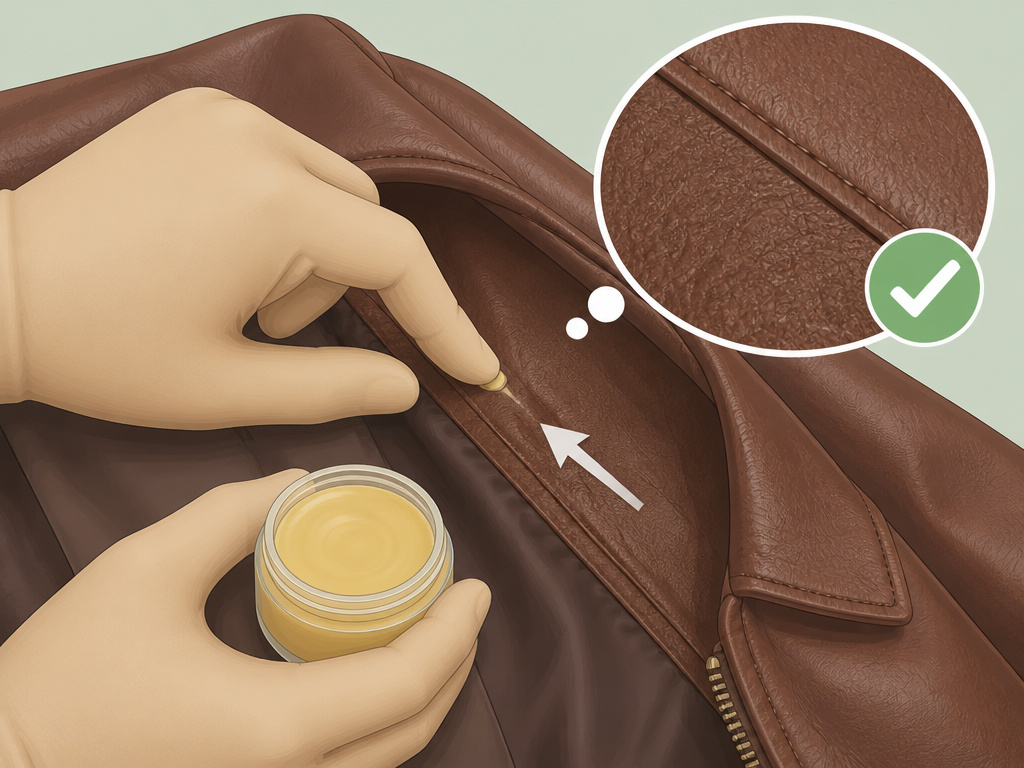
The critical test: Always, always test your balm in a discreet area first. This is essential for aniline, vegetable-tanned, or light-colored leathers. Chamberlain’s own guide warns that their Healing Balm “will darken leather” and advises testing on these sensitive types. Apply a dab to an inside seam or hidden spot, let it dry fully, and check for color change or texture issues.
What’s the Difference Between Balm, Oil, and Cream?
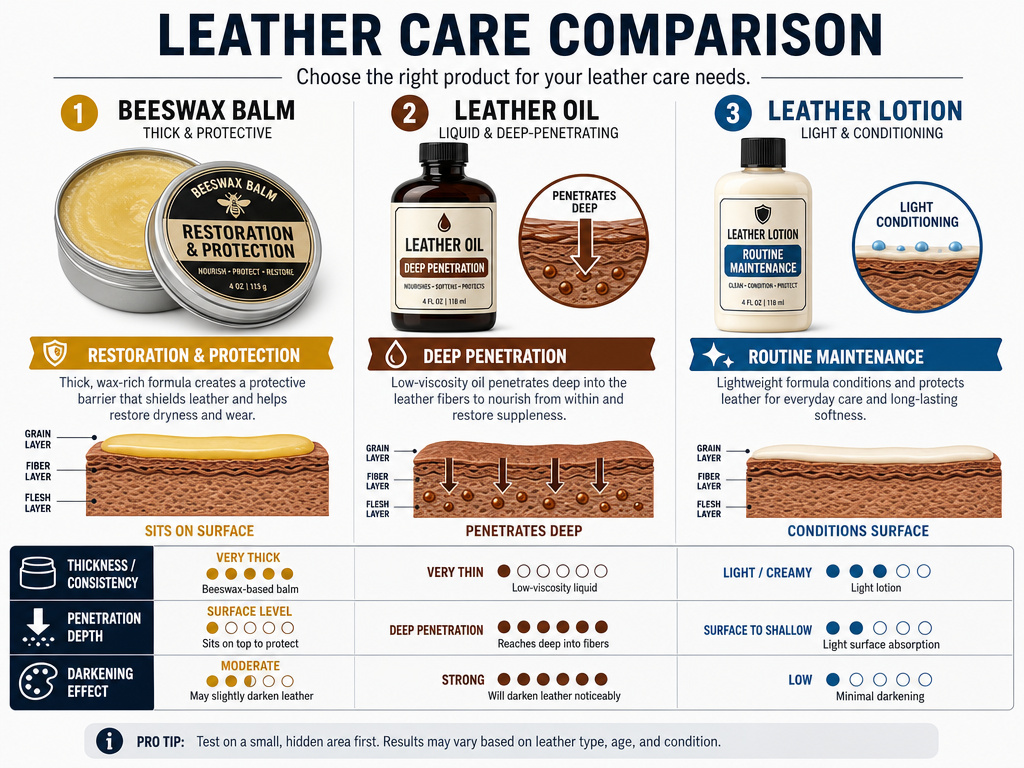
The labels are confusing. Here’s the breakdown a tanner would give you.
- Leather Balm: Typically a blend of oils and waxes (like beeswax or carnauba). It’s thicker, offering deeper conditioning and some protective, water-resistant properties. Think of Obenauf’s Heavy Duty LP. It’s for restoration and hard-use items.
- Leather Oil: A pure or blended liquid oil (neatsfoot, mink, coconut). It penetrates the fastest and deepest, excellent for reviving very dry vegetable-tanned leather. It will always darken the leather. This is your tool for oiling leather that’s lost its flexibility.
- Leather Cream/Conditioner: Usually water-based or a light emulsion. It’s the lightest option, designed for routine maintenance without significant darkening. Bick 4 is the classic example. It’s perfect for keeping an already-healthy jacket or bag supple.
For most general maintenance on quality leather goods, a good leather cream is the safest starting point. You graduate to oils or heavy balms only when the leather shows clear signs of dryness that lighter products can’t address.
3 Common Leather Balm Mistakes (And How to Fix Them)
1. Over-Conditioning (The Sticky Residue)
Applying too much balm, or conditioning too often, saturates the leather. The pores clog, and the excess oils sit on the surface, turning tacky and attracting dirt. It’s the most common error.
The Fix: If it’s already sticky, wipe the surface gently with a clean, dry cloth to remove any surface residue. Then, leave the item alone for several weeks, months even, to allow the leather to fully absorb the excess. Do not apply more product.
2. Using the Wrong Product for the Leather Type
Putting a heavy mink oil balm on a delicate aniline sofa will darken it dramatically and may leave a permanent, blotchy stain. Using a wax-based balm on a garment leather can ruin its drape.
The Fix: Know your leather. When in doubt, use the gentlest option: a pH-balanced, water-based conditioner. For a deep dive on options, our guide on what oil to use on leather breaks down the chemistry.
3. Neglecting to Clean First
Balm traps dirt, creating a permanent, abrasive layer inside the material.
The Fix: It’s simple. Make cleaning the unbreakable first step. The difference between a leather cleaner vs conditioner is fundamental, one removes, the other adds. Never skip the remove part.
Frequently Asked Questions
Can I use leather balm on suede or nubuck?
No. Never use standard leather balms, oils, or creams on suede or nubuck. The oils will mat the nap, creating dark, greasy spots that are nearly impossible to remove. Only use conditioners specifically labeled as safe for napped leathers, which are usually aerosol sprays.
Will leather balm darken my leather?
It depends on the product and leather. Pure oils and wax-based balms will almost always darken leather, at least temporarily. Light, water-based conditioners like Bick 4 are formulated to minimize darkening. Always test in an inconspicuous spot first.
How do I know if my leather needs balm?
Use the tactile test. Pinch a fold (like on the side of a bag). If the leather feels stiff, crackly, or dry, it needs conditioning. If it’s still supple and pliable, it’s fine. Visually, dry leather may look dusty, pale, or have faint white lines along flex points.
Can I make my own leather balm?
You can, but consistency and shelf stability are challenges. A simple, effective DIY blend for very dry leather is a 2:1 ratio of pure neatsfoot oil to melted beeswax. For a more balanced, ready-to-use option, selecting one of the best leather conditioner products is more reliable.
Before You Go
The real secret isn’t in the brand or the frequency. It’s in the restraint. Leather is a durable, living material. It needs far less product than you think, applied with far more patience than you likely have.
Start with a pea-sized amount. Wait longer than feels necessary. Buff until it feels dry, not shiny. That’s the whole game.
If you only remember one thing, let it be this: condition based on the leather’s feel, not the date on your phone. Your bag doesn’t know it’s been six months. It only knows if it’s thirsty. Learn to listen, and you’ll keep your leather looking and feeling right for decades.
For specific product recommendations, our roundup of the best leather balm options is a practical next stop.
