
The Definitive Guide on How to Burn a Design into Leather
This post contains affiliate links. As an Amazon Associate, we earn from qualifying purchases.
This post contains affiliate links. As an Amazon Associate, we earn from qualifying purchases.
To burn a design into leather, you need three things matched correctly: the right leather (vegetable-tanned), the right tool (a variable-temperature pyrography pen), and the right surface preparation (smooth and firm). The process is transferring your design, then using controlled heat between 300–600°F to trace it, building tone from light to dark. Skipping prep on the wrong leather type is why most first attempts fail.
That gap between having a tool and getting a clean, dark line is where the whole craft lives. The leather’s surface texture and tannage decide whether your heat creates a crisp mark or a fuzzy, shallow scorch.
What follows is a breakdown of the gear that matters, the essential prep step most tutorials gloss over, and the temperature control that separates a hobbyist burn from a professional piece. By the end, you’ll know how to test any piece of leather and adjust your approach to get the result you want.
Key Takeaways
- Vegetable-tanned leather is mandatory. Chrome-tanned leather releases toxic fumes when burned and produces poor, inconsistent results.
- Surface preparation changes everything. Burnishing (smoothing) the leather with water compresses the fibers, creating a firm surface that accepts cleaner, darker burns.
- Heat control is your primary skill. A variable-temperature pen set between 350–450°F (175–230°C) is the sweet spot for most work. Start low and increase slowly.
- Always test on a scrap first. This reveals your leather’s ideal temperature and exposes defects like “fatty spew” that can ruin a project.
- Work from light to dark. You can always add more heat to darken a line, but you cannot remove a burn that’s too deep.
The Core Three-Step Process
The method isn’t complex. You transfer, you burn, you finish. Where people stumble is in the specifics of each stage, assuming all leather and all heat are the same.
First, transfer your design. For simple work, you can sketch directly onto the leather with a fine pencil. For complex patterns, use transfer paper. Place the carbon sheet shiny-side down between your paper pattern and the leather, then trace the design firmly with a stylus or ballpoint pen.
This 50–60 word technical blockquote targets the featured snippet. Pyrography on leather requires a variable-temperature tool, typically set between 300–600°F (150–315°C). The work must be performed on vegetable-tanned leather to avoid toxic fumes. A successful transfer uses carbon paper or a water-dampened Craftaid sheet, with lines traced under firm pressure. The burning sequence progresses from outline to shading, allowing tonal build-up.
Second, burn with discipline. Plug in your pen, select a medium heat setting, and let it fully warm up. Always start on a scrap piece of the same leather. Trace your transferred lines with a steady, even hand speed. Do not press down; let the heat do the work. For shading, lower the temperature and use a back-and-forth motion to build tone gradually.
Third, apply a protective finish. Once cooled, brush away any ash. Apply a light coat of a neutral leather conditioner or a dedicated sealer like Collonil Protect and Care with a soft cloth. This protects the design from dirt and moisture without darkening the burn marks excessively.
The short version: Trace it clean, burn it light-to-dark, seal it lightly. Rushing any step shows in the final piece.
Choosing and Using Your Tools
Your tool is an extension of your hand, but it’s not a magic wand. A basic wood-burning kit from a craft store can work, but its limitations become apparent fast. The fixed high heat scorches thin leather, and the bulky tips make detail work frustrating.
A dedicated variable-temperature pyrography pen makes the critical difference. Brands like Colwood offer precise control, usually with a dial numbered from 0 to 10. On vegetable-tanned leather, a setting between 3 and 6 (roughly 350–450°F) is where you’ll spend most of your time. This control lets you use the same pen for fine outlines and broad shading, just by turning a dial.
The tip you choose matters as much as the temperature. * Pointed or knife tips: Best for sharp lines, details, and outlining. They concentrate heat. * Ball or rounded tips: Ideal for shading, filling areas, and smooth curves. They disperse heat. * Chisel or flat tips: Used for bold lines, lettering, and creating texture.
Where this goes sideways: Switching tips on a hot pen without pliers. The metal holds heat for minutes. Use a pair of needle-nose pliers and have a ceramic dish ready to hold the hot tip. A burnt finger ruins your focus for the rest of the session.
Let me share what I’ve learned about pressure. You don’t need to push the tip into the leather. If your temperature is correct, the heat will do the cutting. Pressing distorts the line, slows your hand, and accelerates tip wear. The right sound is a faint, consistent hiss, not a sputter or a crackle. If you hear sputtering, the leather might be too damp or have a finish resisting the heat.
Preparing Your Leather Canvas
This is the step most beginners skip, and it’s the root of 80% of early frustration. Burning on raw, unprepared leather is like writing on a paper towel with a fountain pen, the line bleeds and goes fuzzy.
You need a smooth, firm surface. For vegetable-tanned leather, that means burnishing. Dampen the skin side (the smooth side) with a sponge and clean water. Then, using a smooth burnisher, glass slicker, or even the back of a spoon, rub the surface in circular motions with firm pressure. You’ll feel the leather tighten and become slick under the tool.
| Leather State | Burn Result | Best For |
|---|---|---|
| Unprepared, porous | Fuzzy, light lines, difficult shading | Practice scraps only |
| Lightly burnished | Cleaner lines, better contrast | General projects, tooling |
| Highly burnished | Crisp, dark lines, excellent detail | Fine art, portraits, lettering |
Why does this work? Burnishing compresses the surface fibers, closing the pores. The heat from your pen then carbonizes a tight, uniform layer, producing a dark, defined mark. On uncompressed leather, the heat dissipates into the porous structure, giving you a weak, spread-out burn.
One critical warning: burnishing stretches the leather. A small test piece can grow by an eighth of an inch on each side. Never cut your project to final size before smoothing. Do the prep work on a larger piece, then trim it down.
The Right Leather: Non-Negotiable Basics
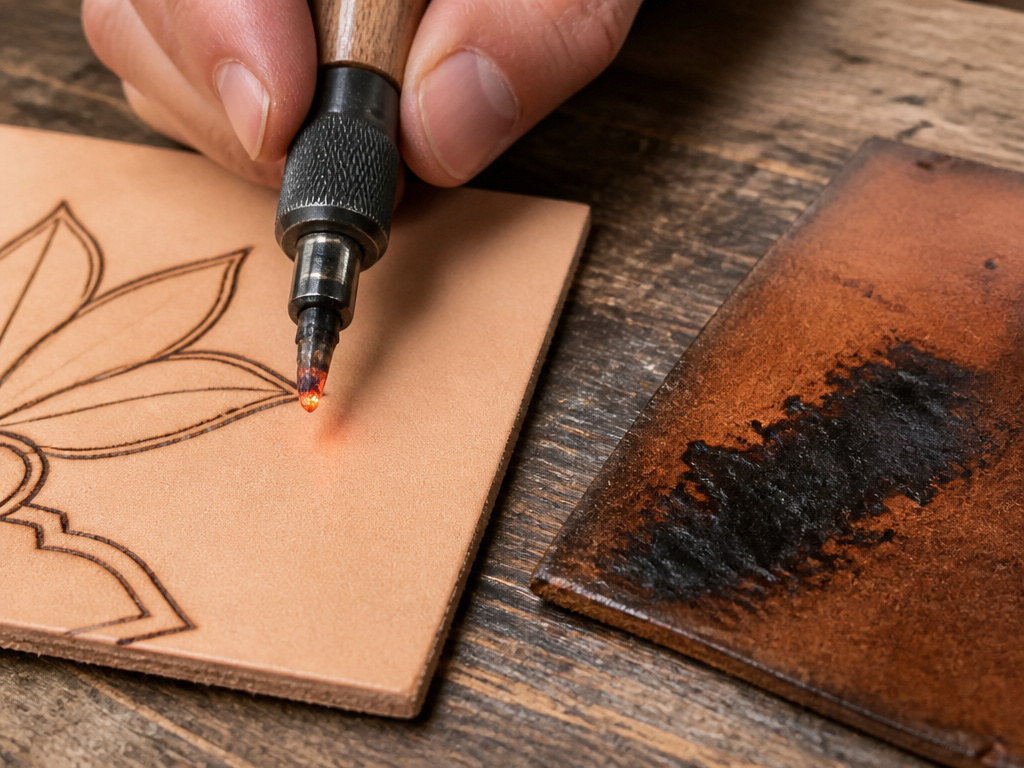
If you remember one thing from this guide, let it be this: you must use vegetable-tanned leather. The “vegetable” refers to the natural tannins (from tree bark, leaves) used in the curing process. This leather burns cleanly, producing a pleasant, woody smoke and predictable, rich brown tones.
Chrome-tanned leather, cured with chromium salts, is the opposite. It’s what most modern shoes, jackets, and bags are made from. When heated, it can release toxic fumes and produce sickly green or black burns that smell acrid. It’s not worth the health risk.
Common mistake: Trying to burn on finished or dyed leather without testing. A surface coating can melt, gum up your tip, and release harmful vapors. Always test an inconspicuous spot first.
Your best bet is undyed, natural vegetable-tanned leather in a medium weight (3-4 oz). This weight is thick enough to handle heat without warping but thin enough for your pen to make an impression without extreme pressure. You can find this at specialty suppliers like Tandy Leather, often sold as “tooling leather.”
Understanding the leather grain is part of selecting the right piece. A tight, smooth grain will give you the cleanest lines. A loose or pebbled grain can add interesting texture but makes fine detail difficult. This is why many crafters prefer full-grain leather for pyrography, it has the strongest, most intact surface layer.
Heat Control and Technique
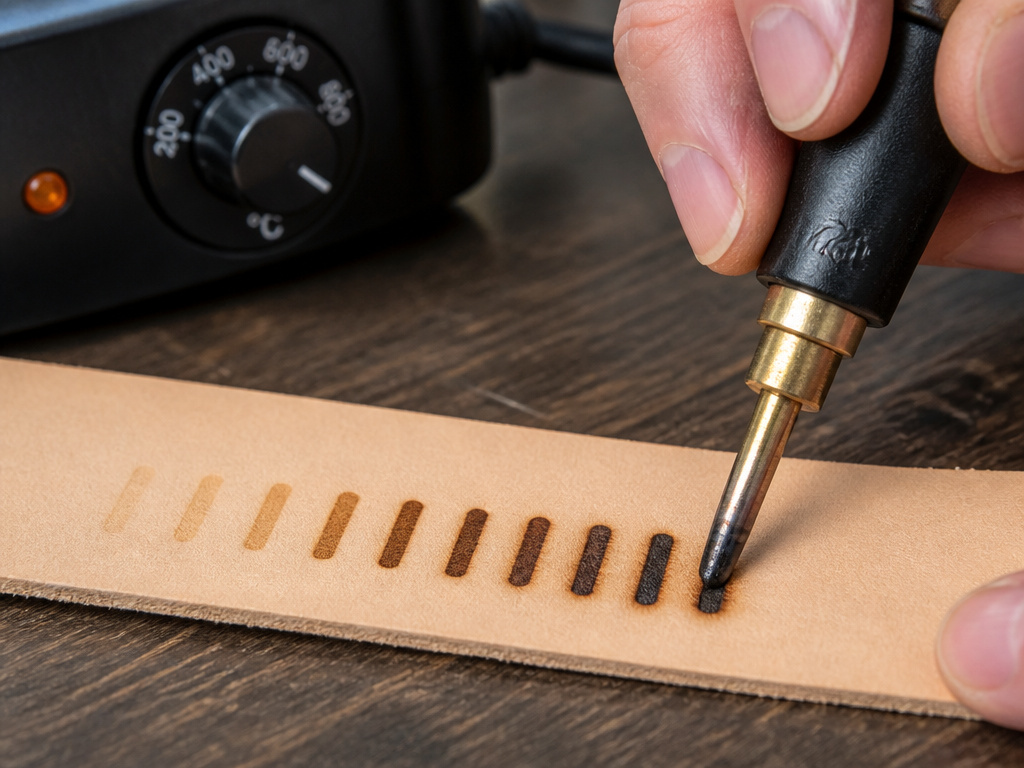
Think of your temperature dial as a volume knob for darkness. More heat equals a darker, deeper burn. The skill is in knowing how much to turn it for the line you want.
Start every session, on every new piece of leather, with a test patch. Draw a few lines on a scrap at different settings. For most natural veg-tan, begin at a Colwood setting of 3 (approx. 350°F). Make a two-inch line. Turn the dial to 4, make another, and so on up to 6. You’ll see the line transition from light tan to deep chocolate brown. This chart tells you everything.
| Colwood Setting | Approx. Temperature | Result on Veg-Tan | Use Case |
|---|---|---|---|
| 2 – 3 | 300–375°F (150–190°C) | Light tan, faint line | Subtle shading, very light outlines |
| 4 – 5 | 375–425°F (190–220°C) | Medium brown, clear line | Standard outlining, detail work |
| 6 – 7 | 425–500°F (220–260°C) | Dark brown, deep line | Bold outlines, lettering, dark fills |
| 8+ | 500°F+ (260°C+) | Black, charred line | Risk of burning through; creates brittle spots |
Your hand speed is the other variable. Move too fast, and the line is faint even at high heat. Move too slow, and you’ll char the leather. A medium, consistent pace is the goal. If a line isn’t dark enough, slow down slightly on your next pass or nudge the heat up, don’t stop and re-burn the same spot repeatedly.
For shading, drop the temperature and use a ball tip. Work in small, overlapping circles or back-and-forth strokes to build tone like a pencil drawing. The leather will tell you what it needs. If it starts to look glossy or plastic-like, you’re too hot and melting the fibers, not burning them.
Troubleshooting Common Problems
You will hit snags. The difference between a failed project and a learning moment is knowing what went wrong.
- Fuzzy, indistinct lines: The leather wasn’t prepared. The surface is too porous. Next time, burnish it first. On your current piece, you can sometimes salvage it by going over the lines again at a slightly higher temperature with a very steady hand.
- Uneven darkness: This is almost always inconsistent hand speed or pressure. Practice making lines on scrap while focusing on a smooth, robotic arm movement. Don’t pivot from the wrist.
- Leather tearing or lifting: You’re either too hot or moving too slowly, or you’re burning against the grain on a problematic piece. Try changing your burning direction. Also, ensure your leather isn’t overly dry.
- Greasy, milky residue after burning: This is “fatty spew” or “fatty bloom.” It’s a defect in low-quality or improperly cured leather where fats rise to the surface when heated. The spot will feel greasy and refuse to take a dark burn. There’s no fix. Discard that piece of leather.
A specific edge case is black leather. You can’t see the burn as you make it. The method is to start at 350°F on a scrap, hold the tip in place for three seconds, and check. If no faint tan mark appears, increase the temperature ten degrees and repeat until you find the minimum heat that makes a visible mark. Use that setting for your project, relying on feel and timing rather than sight.
I once saw a student ready to give up because their stitches were a mess. They switched focus from speed to consistent hand pressure, and their next wallet looked like a pro’s work. The principle is the same here. Mastering the fundamental variables, pressure, speed, heat, matters more than any advanced technique.
This is also where practical leather quality tests save you time and material. A simple burn test on a corner of a new hide will immediately reveal issues like fatty spew before you commit a design.
Finishing and Protecting Your Work
Once the burning is complete and the leather has cooled, brush it gently with a soft, dry brush to remove any carbon ash. Now you must decide on a finish.
A finish does two things: it protects the leather and the burn from the elements, and it can enhance contrast. A neutral leather conditioner (like pure neatsfoot oil or a light cream) will soak in, darkening the leather slightly and making the burn marks pop. Apply a thin coat with a cloth, let it soak in for an hour, and buff off the excess.
For items that might get wet, like coasters or outdoor gear tags, use a dedicated leather sealer or acrylic resolene. These create a protective barrier. Test the sealer on a scrap first, as some can slightly dull the richness of the burn.
Remember, the finish is the last step. Any dye or paint must be applied before burning, as the burn will resist subsequent color. A burned line on dyed leather creates a beautiful, contrasting effect.
Frequently Asked Questions
Can I use a soldering iron for leather burning?
You can, but it’s a compromise. Most soldering irons have a single, fixed high temperature (around 700°F), which is too hot for controlled leather work. It will char the leather quickly and offers no tip variety. It’s okay for very bold, simple branding marks but not for detailed pyrography. A variable-temperature pen is a significantly better investment.
How do I fix a mistake in leather burning?
You can’t erase a burn. Minor mistakes can sometimes be incorporated into the design or shaded over. For a small, dark error, you can carefully carve it out with a sharp craft knife and fill the depression with leather filler, then re-burn over it once sealed. Prevention, through careful transfer and practice, is the best policy.
Is leather burning safe?
It is when you respect the materials. Always work in a well-ventilated area; even vegetable-tanned leather produces smoke. Wear a particulate mask if you’re sensitive. Never burn chrome-tanned leather due to toxic fumes. Keep a bowl of water nearby for hot tips, and always use a heat-resistant surface.
What’s the best way to transfer a complex design?
For one-off projects, graphite or carbon transfer paper is reliable. For repeated patterns or intricate work, consider using a custom stamp. Alternatively, acrylic Craftaid transfer sheets are excellent. They require you to dampen the leather slightly before rubbing the design on, which actually helps prepare the surface for burning.
Can you burn designs onto any color of leather?
Technically yes, but practicality varies. Natural, light leather shows burns best. Dark leather requires the heat-testing method described earlier. Avoid burning on pre-finished or painted leather unless you know the finish is heat-stable and non-toxic. The pull-up effect in some waxed leathers can be disrupted by heat, altering the color around your design.
Before You Go
The real secret isn’t a special tool or a hidden technique. It’s matching three fundamentals: a prepared vegetable-tanned surface, a controlled heat source, and a patient hand. Start your next session with a scrap piece and the sole goal of creating a perfect, dark, crisp line. Once you can do that on demand, the designs will follow.
Ignore the marketing copy on cheap leather bundles. Invest in a side of Hermann Oak tooling leather and a variable-temperature pen. That combination removes the two biggest variables holding you back. Everything else is practice, and the leather itself will be your best teacher.
