The Complete Guide on How to Care for Suede Shoes Properly
This post contains affiliate links. As an Amazon Associate, we earn from qualifying purchases.
To care for suede shoes, you follow a dry-first, gentle-always rule. Never use water as a cleaner, never apply heat to dry them, and store them only when completely dry. The core process is a three-part sequence: dry brush to lift dirt, use a suede eraser on scuffs, then spot-treat stains with a specialist cleaner like Saphir Suede & Nubuck Cleaner or a dab of white vinegar. Rushing the 24-hour drying time or storing them damp guarantees damage.
That 24-hour window is the single most ignored spec in every manufacturer guide. Nike says 15 minutes to clean, but a full day to dry. Wirecutter’s guide clocks the whole process at 20 minutes of work and 24 hours of waiting. The drying is the step that decides whether the shoe retains its shape and softness or shrinks and stiffens.
What follows breaks that sequence into the tools you actually need, the mistakes that warp the material, and the storage habits that prevent mold. You’ll know how to handle a fresh salt stain, why a hair dryer is a death sentence, and the one product that cleans and conditions in a single step.
Key Takeaways
- Heat destroys suede. Direct heat from a hair dryer, radiator, or dryer causes irreversible shrinkage and warping. Air drying at room temperature is the only safe method.
- Water is not a cleaning agent. Pouring water on suede leaches its natural oils, causing permanent stiffness and setting stains. Use only damp cloths for spot treatment.
- Dry completely before storage. Storing even slightly damp suede leads to mold and rot within weeks. Always stuff shoes with acid-free paper and let them air out for a full day before putting them away. Use a suede brush with brass bristles.A horsehair brush is essential. Brushing after each wear in the direction of the nap lifts dirt and maintains the velvety texture.
- Skip the washing machine. Agitation and detergent will felt the fibers and ruin the shoe’s finish. Suede requires hand-cleaning only.
Why Suede Demands a Different Playbook
You can’t treat suede like smooth leather. Here’s the thing. Full-grain leather has a tight, protective top layer; suede is the underside of the hide, sanded to raise a soft nap. This nap is why it feels luxurious, but it’s also a dirt magnet and moisture sponge. Every drop of water soaks in instantly, and every scuff flattens those delicate fibers in the wrong direction.
The goal of suede care is about preserving that nap and preventing the two great killers: moisture and heat. Get those wrong, and the damage is permanent.
Suede & nubuck deep cleaning guide – Saphir Médaille d’Or France “Due to the efficiency of the cleaner and its ability to revive the shade of the leather, you should clean both shoes entirely, otherwise it may leave two different shades of colour.”
The Non-Negotiable Tool Kit
You can manage 90% of cleaning suede jobs with four items. A complicated kit is usually a sign of overcomplication, not thoroughness.
- A Suede Brush (Horsehair): This is your first and most used tool. The stiff bristles are designed to lift the nap and dislodge dried dirt without cutting the fibers. Don’t substitute a clothes brush; the bristle density is wrong.
- A Suede Eraser: This is a gritty, rubbery block that works like a gentle abrasive to lift grime and scuff marks from the surface of the nap. Microfiber Cloths: You need a few.They’re lint-free and soft, perfect for dabbing moisture and applying cleaners without scratching.
- A Specialist Cleaner: For anything beyond surface dust, use a product made for the job. I keep Saphir Médaille d’Or’s Suede & Nubuck Cleaner on hand. It’s a benchmark. For a quick spot treatment, a bottle of white vinegar works.
Optional but wise additions are a crepe brush for final nap-raising and a waterproofing spray for after cleaning. A cedar shoe tree is the best investment for storage.
The Three-Part Cleaning Sequence (Dry, Erase, Spot Treat)
This is the core rhythm. Follow these stages in order, and never move to the next until the current one is complete.
Stage 1: The Dry Brush-Out
Always start dry. If the shoes are wet from rain, you stop here. Let them dry completely at room temperature before you even look at the brush.
Take your horsehair brush and work in one direction, go with the grain of the nap. You’ll feel it; brushing one way feels smooth, the other feels rough. Use smooth, firm strokes to lift surface dirt. This alone can make a worn shoe look fresh.
What happens if you skip this? You grind surface grit deeper into the fibers during the next wet stage. That creates a permanent, ground-in stain.
Stage 2: Erasing Scuffs and Marks
For scuffs or darker spots, grab the suede eraser. Rub it gently back and forth over the mark. You’ll see the eraser crumble and pick up the discoloration. Brush the residue away with your suede brush.
This is where people press too hard. You’re abrading the very top of the nap, not sanding wood. Too much pressure wears a bald spot.
Common mistake: Using a suede eraser on a wet or oily stain. The rubber gums up and smears the problem. Oils need a different approach.
Stage 3: Targeted Stain Treatment
Only now do you introduce moisture. Dampen the corner of a microfiber cloth with your chosen cleaner, either a dab of the Saphir product or a touch of white vinegar. Don’t soak the cloth.
Dab the stain gently. Don’t rub. The area will darken; that’s the moisture being absorbed and is normal. Once the stain is treated, dab the area with a dry part of the cloth to absorb excess cleaner.
Let the shoe dry naturally for 24 hours, stuffed with paper to hold its shape. This is the Wirecutter’s documented timeline, and it’s correct.
| Stain Type | Immediate Action | Treatment | Why This Works |
|---|---|---|---|
| Water Spot | Blot with microfiber cloth. | Let dry fully, then brush. If ring remains, lightly steam over a boiling kettle (do not touch water) and brush. | The nap is matted down. Moisture and heat can re-lift it. |
| Salt Stain | Let salt residue dry completely. | Brush off crust. Dab with a 50/50 mix of white vinegar and water. Neutralizes salt, prevents leather drying. | Salt is corrosive and draws moisture out of leather. |
| Oil/Grease | Immediately sprinkle with cornstarch. | Let sit overnight. The powder absorbs the oil. Brush away. Repeat if needed. | Absorbent powders pull the oil out of the porous suede. |
| Mud | Let it dry completely into dust. | Brush vigorously with suede brush. Follow with eraser if stain remains. | Wet mud is pushed into fibers; dry mud sits on top. |
What Never to Do: The Suede Death Sentence
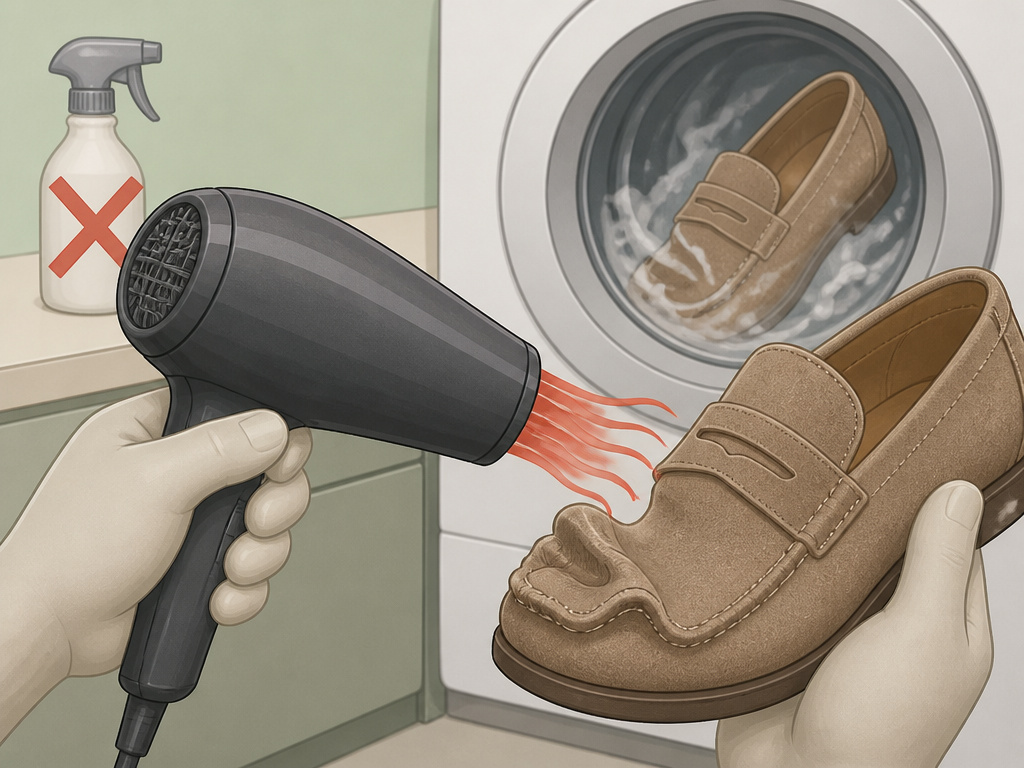 Some actions have no comeback. This is the predictable outcome of ignoring material science.
Never Apply Direct Heat. A hair dryer, radiator, or clothes dryer will shrink suede. It warps the shape and makes the leather brittle. The damage shows up as a misshapen toe box or permanent stiffness.
Never Soak or Machine Wash. Submerging suede strips its natural oils. The fibers swell, then dry hard and stiff. The agitation of a washer felts the nap into a weird, fuzzy mat.
Never Use Generic Cleaners or Polish. Household sprays, saddle soap, or leather polish will discolor the suede and clog the nap. You’ll be left with a blotchy, stiff mess.
Never Store Damp. This is the silent killer. A little residual moisture in a dark closet breeds mold in weeks. The first sign is a musty smell; the next is speckled rot.
Drying and Storage: Where Most Plans Fail
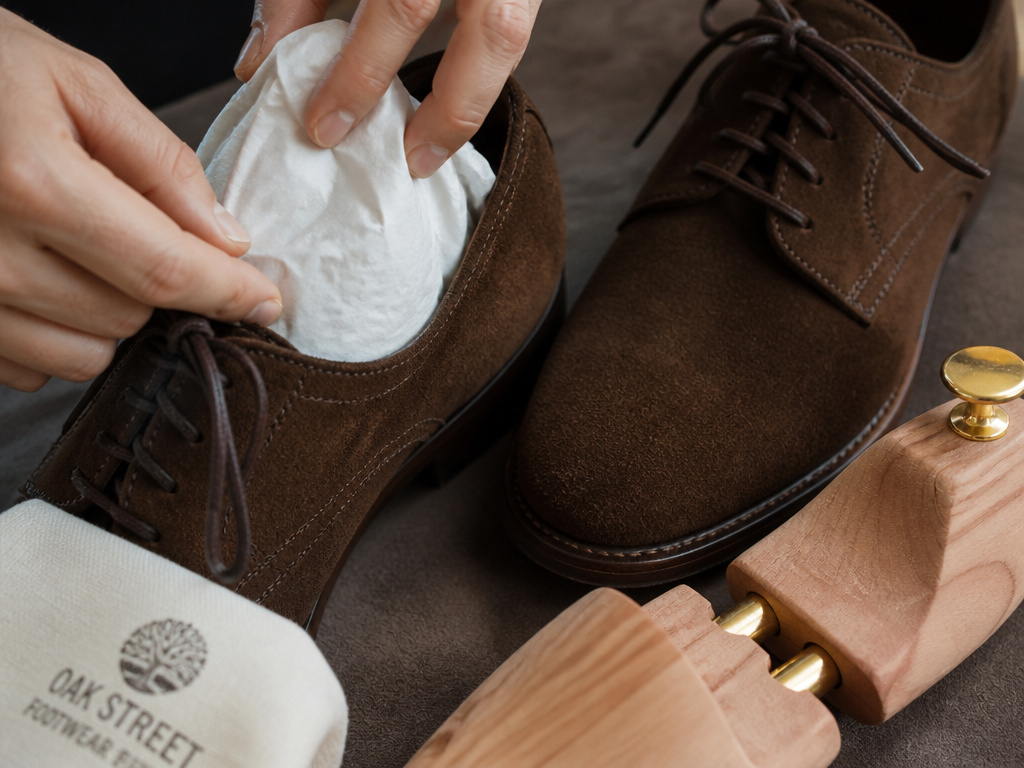 Drying is an active process, not passive waiting. After any cleaning that involved moisture, you must stuff the shoes. Use acid-free tissue paper or a cedar shoe tree. Newspaper can transfer ink if it gets damp, so I avoid it.
Place them in a well-ventilated area, away from sunlight and heat sources. A fan circulating air in the room is fine; a fan pointed directly at them is not. That 24-hour period is non-negotiable. Touch the inside lining, if it feels cool or damp at all, they’re not ready.
For storage, the rules are simple but absolute. Use a breathable cotton bag, not plastic. Plastic traps moisture. Include a silica gel packet to control humidity if you live in a damp climate. And always, always use those cedar shoe trees. They absorb moisture and help the shoe keep its form, which is the foundation of any long-term leather shoe care strategy.
Waterproofing: A Shield, Not a Cure-All
A waterproofing spray like Saphir’s Super Invulner or a generic silicone-free spray is a useful final step after cleaning and drying. It creates a barrier against light rain and spills.
It is not armor. You cannot hose down sprayed suede. The spray also alters the look and feel slightly, often darkening the color a shade. Test on a small, hidden area first.
Apply it in a well-ventilated space, hold the can 10 inches away, and use even, sweeping motions. Let the shoes dry another few hours after application. Reapply every few months if the shoes see regular wear.
How to Care for Suede Shoes FAQ
Can you fix suede that got soaked in the rain?
Yes, if you act correctly. Immediately blot, don’t rub, with a microfiber cloth. Stuff them densely with paper or a shoe tree. Let them dry at room temperature for a full 24-48 hours. Once bone-dry, use a suede brush and eraser to restore the nap. The key is avoiding heat and not manipulating them while wet.
Is there a difference between suede and nubuck care?
The principles are identical, both are delicate, napped leathers sensitive to water and heat. The tools are the same. However, nubuck has a finer, shorter nap, so use even lighter pressure with the brush and eraser to avoid damaging the surface. You can read more about the finer points in our guide on cleaning process for nubuck shoes.
How often should I brush my suede shoes?
Brush them after every wear. It takes 30 seconds. This prevents dirt from being ground into the nap and maintains the texture. It’s the single most effective habit for extending their life between deep cleans.
Can I use household items instead of specialty products?
For brushing, no, you need the right brush. For stain treatment, white vinegar (for salt, water marks) and cornstarch (for oil) are effective, science-backed household options. For overall cleaning suede properly, a dedicated cleaner like Saphir’s is more consistent and safer for the leather’s pH.
Why do my suede shoes look discolored after cleaning?
If you only cleaned a stained area, the cleaner may have lifted dirt uniformly, leaving that spot cleaner than the surrounding, untreated suede. This is why Saphir’s guide insists on cleaning the entire shoe. The color should even out as the shoe fully dries and is brushed. If a blotch remains, a professional may need to re-dye it.
The Bottom Line
Suede care is about discipline. Brush after every wear.Never introduce water or heat. Always dry completely, that full 24 hours, before you even think about storage.
When a stain hits, follow the sequence: dry brush, eraser, then a damp-dab of specialist cleaner. Your toolkit is small: a horsehair brush, a white vinyl eraser, microfiber cloths, and one good cleaner. Everything else is noise.
So, the real secret is patience. Letting suede dry on its own terms is what keeps it on your feet for years.Force it, and you’ll have a shrunken, stiff reminder of what happens when you rush. Take the time. The material rewards it.
