
How to Clean Suede | The One Thing That Sets a Stain
This post contains affiliate links. As an Amazon Associate, we earn from qualifying purchases.
This post contains affiliate links. As an Amazon Associate, we earn from qualifying purchases.
You clean suede by following a strict escalation protocol: start dry, stay gentle, and only introduce moisture as a last resort for specific stains. A dry suede brush removes 80% of dirt, a suede rubber handles scuffs, and a damp cloth with white vinegar or rubbing alcohol tackles set-in watermarks. Never clean suede when it’s wet, use heat to dry it, or soak the material.
That rule about wet suede isn’t just caution, it’s chemistry. Suede absorbs water like a sponge, which pulls dirt deeper into the fibers and can set a stain permanently if you brush before it’s bone-dry. The entire process hinges on managing moisture, from letting a mud splash air-dry completely to using a barely-damp cloth for spot treatment.
What follows is the exact step-by-step escalation I use, grounded in manufacturer manuals from Nike and Saphir. This guide explains the tools that actually work, the common moves that ruin the nap, and how to handle everything from salt stains to grease spots without a trip to the cobbler.
Key Takeaways
- Never clean suede while it’s wet or damp. Let moisture dry completely before any brushing or treatment to avoid grinding dirt into the fibers.
- Always start with the gentlest dry method, a suede brush, and only escalate to damp cloths or cleaners for stains that won’t budge.
- Avoid all heat sources for drying: no hair dryers, radiators, or clothes dryers. Heat warps suede and makes it stiff.
- For water stains or set-in marks, a cloth lightly dampened with white vinegar or rubbing alcohol is more effective than soap and water, which can leave residue.
- After any cleaning, use a suede protector spray before wearing the item again to guard against future spills and stains.
Understand What You’re Working With
Suede isn’t just fuzzy leather. It’s the underside of a hide, sanded to raise a soft nap. This nap is the whole game, it’s delicate, it traps dirt, and once it’s matted or worn down, it’s nearly impossible to restore completely. Nubuck is a close cousin; it’s made from the top grain of the leather, sanded to a velvety feel, but it’s slightly more durable. Treat them with the same gentle caution.
For deep cleaning of truly soiled suede or nubuck, Saphir Médaille d’Or recommends using a brass brush gently to avoid wearing down the fragile surface, paying particular attention to any sticky residue without over-brushing the same spot.
The fibers in this nap don’t have a protective topcoat. That’s why water is the enemy, it soaks in, swells the fibers, and any dirt present gets locked in as it dries. This is also why most “all-in-one” cleaner-conditioners are a bad fit; they often leave a greasy residue that attracts more dust.
Gather Your Arsenal (You Don’t Need Much)
You can handle most suede cleaning jobs with a shortlist of dedicated tools. Household items work in a pinch, but the right tool minimizes risk.
The Core Toolkit:
- A Suede Brush: This is essential. Look for one with brass or stiff natural bristles. It’s for dry brushing with the nap, not against it.
- A Suede Rubber/Eraser: This isn’t a pencil eraser. A suede rubber with a gritty texture, like the Saphir Gommadin, lifts scuffs and dirt from the nap without liquid.
- Soft, Clean Cloths: Microfiber is ideal. You need them for dabbing, not rubbing.
- White Vinegar or Rubbing Alcohol: Keep a small bottle on hand. Their acidity breaks down water-based stains without leaving a soapy film.
Optional but Helpful:
- A Crepe Brush: Made from natural rubber, it’s used after cleaning to re-lift and fluff the nap. It’s the final step for restoration.
- Suede Protector Spray: A preventative like Tarrago Nano Protector or Saphir’s offering. It doesn’t make suede waterproof, but it buys you time to blot a spill before it soaks in.
- Specialist Cleaner: For head-to-toe grime, a pH-neutral suede-specific cleaner like Saphir Omn’Nettoyant is safer than dish soap.
I keep it simple: a brass-bristle brush, a dedicated suede rubber, a spray bottle of distilled water, and a bottle of white vinegar cover 95% of situations. Buying a branded “suede cleaning kit” often just gets you smaller versions of these same basics.
The Correct Escalation Protocol for Cleaning Suede
This is the sequence. Skip a step, and you risk doing more harm than good. The goal is to apply the least amount of intervention necessary.
Step 1: Dry Brushing (Always First)
Before you even think about moisture, brush the entire item. Remove the laces from your suede shoes. Hold the brush flat and sweep gently in one direction, the direction the nap naturally lies. You’re dislodging loose dust and grit. For suede boots with heavy debris, tap them together lightly over a trash can first. * Consequence if skipped: Any subsequent damp cleaning will slurry that surface dirt into a paste and grind it into the base of the nap, creating a larger, darker stain.
Step 2: Attack Scuffs with the Rubber
For toe scuffs, dark marks, or spots that remain, use the suede rubber. Apply firm but controlled pressure, using a back-and-forth motion directly on the mark. You’ll see a small pile of rubber eraser crumbs form, that’s the dirt lifting out. * Consequence if skipped: You might escalate unnecessarily to a liquid cleaner for what is just surface grime, adding moisture where none was needed.
Step 3: Damp Cloth for Remaining Marks
If a stain persists after the rubber, you now move to moisture. Dampen a small corner of a microfiber cloth with distilled water. Wring it out completely, it should feel barely damp to the touch. Dab (don’t rub) the stained area. Let it dry fully, then brush again. This often resolves water spots. * Consequence if skipped: You might jump straight to harsh chemicals, which can strip color or leave a residue.
Common mistake: Using a sopping wet cloth. A sopping cloth floods the suede fibers, causing watermarks to spread and potentially shrinking the material. The cloth should pass the “touch test”, if you can feel obvious moisture, it’s too wet.
Step 4: Targeted Solvent for Stubborn Stains
For set-in water stains, ink, or other tough marks, use white vinegar or rubbing alcohol. Again, barely dampen a cloth corner. Gently dab the stain, working from the outside in to prevent ring formation. Allow to air-dry completely, this is critical. The area may darken while wet but should return to normal when dry. * Consequence if skipped: You might scrub aggressively with the brush or rubber, which can wear down the nap permanently in that spot.
Step 5: Restore and Protect
Once the item is completely clean and dry, brush the entire surface with a crepe brush or your dry suede brush to re-fluff the nap. Then, in a well-ventilated area, apply a thin, even coat of suede protector spray from about 6 inches away. Let it dry for the time specified on the can (usually 10-30 minutes) before wearing or storing.
| Stain Type | First Action | If It Persists | Never Use |
|---|---|---|---|
| Dust / Dry Mud | Let dry fully, then dry brush | Suede rubber | Water or soap |
| Water Spots | Damp cloth dab, air dry | White vinegar dab | Heat to dry |
| Oil / Grease | Cornstarch soak (12+ hrs), brush off | Specialist suede cleaner | Dish soap scrub |
| Salt Stains | Damp cloth dab, air dry | 1:1 vinegar/water dab | Brush while damp |
| Scuff Marks | Suede rubber | Fine-grit sandpaper (extreme care) | Magic Eraser |
What Not to Do: The Fastest Ways to Ruin Suede
 Some mistakes are irreversible. They come up every time in community discussions about suede care, and they’re worth their own section.
1. Introduce Heat
Hair dryers, radiators, clothes dryers, or hot sunlight will warp suede and make it stiff and brittle. Always air-dry at room temperature, stuffed with paper to hold shape.
2. Clean While Wet
Nike’s UK care guide is explicit: “Avoid cleaning suede shoes when they’re wet. It’s best to allow mud or other moisture to dry before brushing, otherwise a stain may inadvertently be caused.” Brushing wet suede is like using sandpaper on wet wood, it grinds the particles in.
3. Use Soap or General Cleaners
Dish soap, laundry detergent, and household sprays leave a residue that attracts more dirt and can discolor the suede. They also strip the natural oils. Stick to cleaners designed for suede leather.
4. Soak or Submerge
Never run suede under a tap or toss it in a sink of water. The inner materials (glues, cork footbeds) can disintegrate, and the suede itself can shrink and harden dramatically.
5. Store Improperly
Keep suede in a breathable cotton bag, never a plastic one. Plastic traps moisture and can lead to mold. Use cedar shoe trees for suede shoe maintenance to absorb ambient moisture and maintain form.
Handling Specific Stain Nightmares
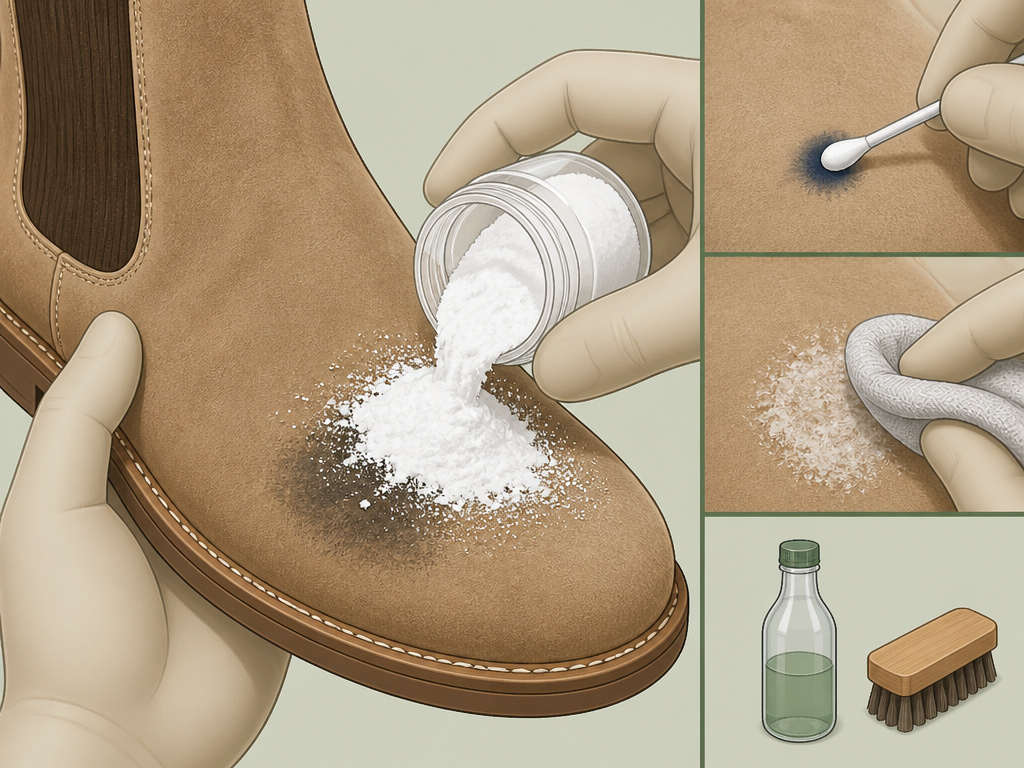 Sometimes basic protocol isn’t enough. Here’s how to tackle the big three offenders without panic.
Grease or Oil: Immediately cover the spot with a thick layer of cornstarch or talcum powder. Let it sit for at least 12 hours, the powder absorbs the oil. Brush it away thoroughly. If a shadow remains, use a tiny drop of a specialist suede cleaner on a cloth, dab, and air dry.
Salt Stains (Winter’s Curse): Mix equal parts white vinegar and water. Dampen a cloth corner, wring it out fiercely, and dab the white, crusty stain. The vinegar neutralizes the salt. Follow with a clean damp cloth to rinse the area, then air dry and brush.
Ink: This is a high-risk operation. Use a cotton swab dipped in rubbing alcohol. Touch it very lightly to the edge of the ink spot and see if it transfers to the swab. If it does, continue dabbing lightly, constantly moving to a clean part of the swab. You’re lifting the ink, not spreading it. Have low expectations, full removal is rare.
For stains you’re not confident tackling, especially on expensive items, take them to a professional cobbler. The cost is less than replacing a ruined pair of boots.
Suede vs. Nubuck: A Critical Distinction
They’re cleaned almost identically, but the texture difference matters. Nubuck’s nap is finer and more uniform, making it slightly more forgiving but also easier to polish into a flat spot if you brush too hard in one area.
- Brushing Pressure: Use even lighter pressure on nubuck. You’re realigning tiny fibers, not scrubbing.
- Product Choice: A dedicated nubuck care product is formulated for its specific surface tension. While a suede brush works, a nubuck brush is often softer.
- Visual Result: Well-cleaned nubuck should have a consistent, velvety matte finish. Suede can show more variation in the nap direction, which is part of its character.
If you’re ever unsure which material you have, check the label or the manufacturer’s website. The care approach for nubuck vs suede is similar, but using the wrong brush can subtly alter the finish.
When to Call a Professional
You can handle most cleaning, but a cobbler is your best bet for: * Dye Transfer: If a dark color from jeans or another garment has rubbed off. * Major Structural Damage: A torn seam or separated sole on a suede item. * Total Re-Coloring: When you want to change the color of the suede entirely. * Deep, Set-In Stains that have survived two careful rounds of home treatment.
A professional cleaner uses specialized solvents and tools for difficult stains. It’s a worthwhile investment for a favorite or expensive piece.
Frequently Asked Questions
Can you use water to clean suede?
You can use a barely damp cloth to dab at specific stains, but you should never soak, scrub, or run water over suede. The goal is to lightly dampen the very surface of the nap, not saturate the leather underneath. For general cleaning, always start dry.
Does a suede protector spray really work?
Yes, but with a caveat. A protector spray with a durable water repellent (DWR) finish causes liquids to bead up on the surface. It doesn’t make suede waterproof, and it needs reapplication every few months or after a thorough cleaning.
How do you dry suede shoes after they get wet?
Blot excess water immediately with a dry towel. Stuff the shoes tightly with crumpled newspaper or paper towels, this absorbs moisture from the inside and helps maintain shape. Let them air-dry naturally at room temperature, away from direct heat or sunlight. Replace the stuffing as it becomes damp.
Can you use a Magic Eraser on suede?
I don’t recommend it. Magic Erasers are essentially ultra-fine sandpaper. They work by abrasion and can flatten the nap or remove dye from the suede. A proper suede rubber is designed to lift dirt without this abrasive action and is a much safer choice.
Before You Go
Cleaning suede is about respecting the material’s limits. The nap is fragile, and every intervention carries a small risk. That’s why the escalation protocol exists, to make sure you never use a cannon when a feather duster will do.
The one rule to remember above all others: let moisture dry completely before you touch it with a brush. Everything else follows from that. Keep a suede brush and a dedicated eraser handy, and you’ll keep your suede looking sharp for years. If you’re curious about where this delicate material comes from, the process of making suede involves splitting and sanding leather hides to create that signature nap.
