
The Complete Guide on How to Condition Your Leather Wallet
This post contains affiliate links. As an Amazon Associate, we earn from qualifying purchases.
Condition a leather wallet by cleaning it, applying a thin layer of a leather-specific balm or cream with a soft cloth, letting it absorb fully, and buffing off the excess. Do this only when the leather looks dull or feels stiff, typically two to four times a year, and never when the wallet is damp. The goal is to replenish lost oils without saturating the fibers.
Forget the calendar. A wallet in your pocket flexes, warms, and dries on its own schedule. The leather will tell you when it’s thirsty. Your job is to recognize the signal and answer it with restraint, not enthusiasm.
What follows is the method I use on my own bench, built around reading the leather first. This guide explains the right products, the exact steps, and the mistakes that turn a five-minute maintenance task into a permanent repair job. By the end, you’ll know how to keep a full-grain wallet supple for a decade or more.
Key Takeaways
- Condition only when the leather looks dull or feels stiff, not on a rigid schedule. For most daily-carry wallets, this is two to four times a year.
- Never use kitchen oils like olive or coconut oil. They go rancid inside the fibers, darken unevenly, and attract dirt.
- Always let a wet wallet air-dry completely at room temperature before conditioning. Trapping moisture leads to mold and rot.
- Apply conditioner sparingly with a cloth. A pea-sized amount is enough for an entire wallet face. Over-saturation makes leather limp and tacky.
- For 95% of wallets, a simple leather balm or cream is the best choice. Save heavy oils like neatsfoot for rescue missions on parched, neglected leather.
What Does Conditioning Actually Do?
Leather is skin. It’s a fibrous network that needs natural oils to stay flexible. Heat from your body, friction from your pocket, and dry air slowly pull those oils to the surface where they evaporate.
Conditioning replenishes the oils that keep leather fibers bonded and supple. Without them, the fibers grind against each other with every fold, leading to tiny stress fractures that become visible cracks.
Think of it like a hand-rubbed oil finish on wood. You don’t slather it on. You work in thin, even coats, letting each one be fully absorbed. The wood, or in this case, the leather, only drinks what it needs. The rest just sits on top, gummy and useless.
This is why the type of leather matters so much. Full-grain leather, with its dense, intact fiber structure, absorbs slowly and needs less. Corrected or “genuine” leathers are more porous and can suck up product fast, which is why they’re more prone to over-conditioning. If you’re unsure about your wallet’s leather, our guide on how to choose wallet leather breaks down the key factors.
The Thirst Test: When Your Wallet Actually Needs It
Here’s the thing. Most people condition too often or not at all. Both are problems. A fixed schedule is the failure mode.
Don’t condition because it’s January. Condition because the leather signals it.
Your wallet is thirsty when:
- The surface looks flat and lifeless, losing its subtle sheen.
- Light-colored creases appear at the fold lines.
- The edges feel papery or rough to the touch.
- The whole piece has a general stiffness that wasn’t there when it was new.
You’ve overdone it when:
- The leather feels persistently tacky or greasy.
- It has darkened in uneven blotches.
- The wallet has gone limp and lost its crisp shape.
- It attracts dust and lint like a magnet.
For a daily-carry wallet in a temperate climate, passing the thirst test usually happens two to four times a year. In a dry, air-conditioned office, lean toward four. In a humid climate, you might only need it twice. A wallet that lives in a bag instead of a pocket may ask for it once. Let the leather decide. For more on finding that rhythm, see our deep dive on conditioning frequency.
What Conditioner Should You Use? (And What to Avoid)
The market is full of potions and promises. You need one product: a leather conditioner appropriate for vegetable-tanned, full-grain leather. Here’s a straightforward breakdown.
| Product Type | Best For | What It Does | The Risk |
|---|---|---|---|
| Leather Balm/Cream (beeswax & oil blend) | Default choice for 95% of wallets. | Penetrates with oils, leaves a light protective wax layer. Minimal darkening. | Almost none if applied thinly. |
| Oil-Forward (neatsfoot, mink oil) | Rescue missions on severely dried, stiff leather. | Penetrates very deeply, softens aggressively, darkens significantly. | Over-softens, can make leather floppy and bleed oil. |
| “Protector” Sprays (silicone-based) | Avoid for full-grain leather. | Seals the surface with a plastic-like film. | Prevents leather from breathing or absorbing conditioner later. |
I reach for a simple leather balm for almost everything. Brands like Popov Leather and Ashland Leather make excellent ones. The wax content is low enough to not clog pores but provides a hint of surface protection.
Common mistake: Reaching for kitchen oils. Olive oil, coconut oil, and even petroleum jelly will darken leather unevenly, turn rancid inside the fibers within weeks, and leave a greasy surface that attracts every speck of dirt in your pocket. A proper conditioner costs little and lasts years.
People ask about using mink oil for waterproofing. It can darken leather dramatically and is overkill for a wallet that just rides in your pocket. Save it for boots that see real weather. If you’re curious about heavier oils, our neatsfoot oil application guide covers their specific, limited use case.
The 5-Step Conditioning Method (No Guesswork)
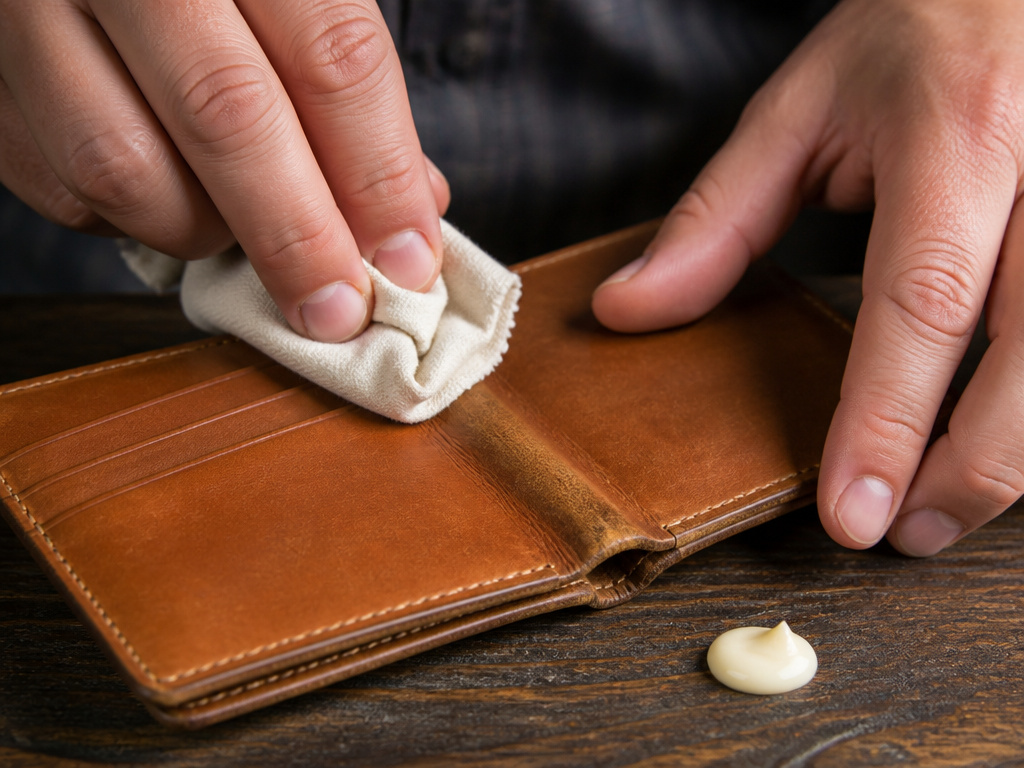 This isn’t complicated. You just need to slow down. Rushing is how you get blotches.
1. Empty and Clean.
Take everything out, cards, cash, receipts. A stretched wallet can’t absorb evenly. Give it a quick wipe with a dry, soft cloth to remove surface dust. If there’s grime, use a dedicated leather cleaner. Never start the complete leather conditioning guide on a dirty surface.
2. The Patch Test (Don’t Skip This).
Dab a tiny amount of conditioner inside a card slot or on another hidden spot. Wait fifteen minutes. This shows you how much the leather will darken as it absorbs. On black or chocolate brown leather, you’ll barely notice. On natural tan, expect a warmer, richer tone. If you hate the change, you’ve only experimented in a hidden spot.
3. Apply Thinly, With a Cloth.
Put a pea-sized amount of conditioner on a soft, clean cloth. Rub the cloth together to distribute it.
Load the cloth, not the leather. This is your dosing tool. It stops you from flooding one spot.
Work the cloth in light, circular motions over the entire wallet. Pay extra attention to the high-stress areas: the fold line, the corners, the edges. These spots dry out first. Two thin coats always beat one heavy one.
4. Let It Absorb.
Set the wallet aside, out of direct sunlight, for at least 30 minutes. If you applied a heavier coat for a very dry piece, leave it overnight. This is the step impatience ruins. Putting your cards back in too early presses wet conditioner into the leather, creating permanent dark spots.
5. Buff and Reassemble.
After the absorption time, take a fresh, dry part of your cloth and buff the entire surface. You’re removing any conditioner the leather didn’t drink. The wallet should feel supple, not slick. Now you can put your cards back in. For a visual on this process, check out our guide on step-by-step leather balm application.
Where This Goes Sideways: Edge Cases and Mistakes
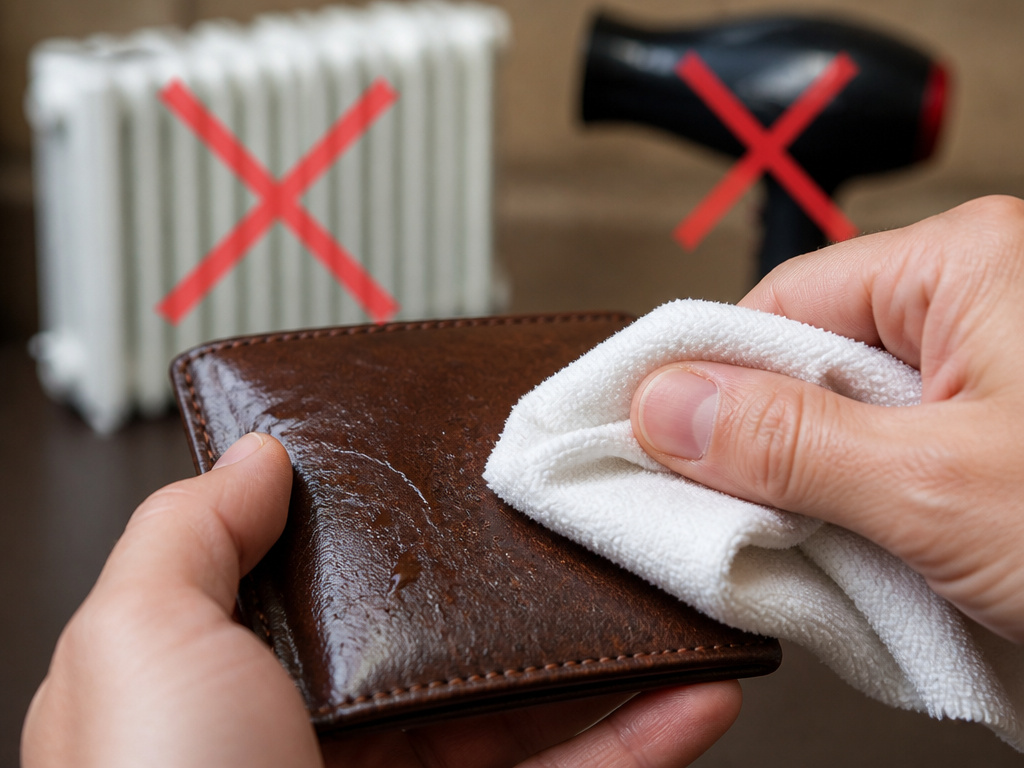 The standard method works for a Tuesday afternoon in a climate-controlled room. Real life isn’t always standard.
If the wallet gets wet: This is critical. Blot it with a dry cloth, reshape it, and let it air-dry completely at room temperature. This takes 12 to 24 hours. Never use a radiator, hair dryer, or dashboard. Heat cooks the oils out, causing the leather to stiffen and shrink. Only condition it once it’s fully dry. Trapping moisture guarantees mold. If water stains remain, our guide on water stain removal can help.
In humid climates: You’ll need to clean more often to prevent mold, but you may need to condition less. The ambient moisture keeps the leather from drying out as fast.
In dry climates: The thirst test will hit more frequently. You might be conditioning every three months. Watch for that papery feel on the edges.
Storage: If you’re putting a wallet away for a season, condition it first. Then store it in a cool, dry place, not in a plastic bag. Leather needs to breathe. A cotton pouch is perfect. Avoid attics or spots near heating vents.
The goal of all this is patina, the darkened fold lines and burnished corners that tell the story of your use. It’s the reason a five-year-old full-grain wallet looks better than a five-week-old one. Damage, like deep stains or cracks, is a different story. For those issues, our resource on common leather stain removal methods is a better starting point.
Frequently Asked Questions
Can I use saddle soap to clean my wallet first?
For a filthy saddle, yes. For a wallet, almost never. Saddle soap is a strong cleaner that strips oils. Using it routinely will dry your wallet out prematurely, forcing you to condition more often and increasing the risk of over-saturation. For regular gentle leather wallet cleaning, a dry cloth or a dedicated, pH-balanced leather cleaner is a safer bet.
Will conditioning change my wallet’s color?
Yes, slightly and permanently. All conditioners darken leather as they’re absorbed; it’s part of replenishing the oils. The patch test shows you how much. This darkening is the foundation of a rich patina. If you want your wallet to stay the exact factory color, conditioning isn’t for you, but the leather will eventually crack.
How do I fix a wallet that’s been over-conditioned and is now sticky?
Time and absorption. Wipe it down thoroughly with a dry cloth to remove surface residue. Then, leave it in a warm, dry room (not in direct heat) for a few days. The leather will slowly absorb the excess. If it’s still tacky, you can very lightly dust it with cornstarch, let it sit for an hour, and then brush it off. This soaks up residual oil.
Is it worth conditioning a cheap “genuine leather” wallet?
You can, but temper your expectations. “Genuine leather” is a bottom-tier classification where the top grain has been sanded away and often coated with a plastic finish. Conditioner may not penetrate well and won’t dramatically improve the lifespan. It’s more about practicing the technique on something you won’t cry over if it darkens unevenly.
Can I make my own leather conditioner?
You can, but should you? Homemade mixes of beeswax and oils require precise ratios and proper emulsifying. An off-balance blend can sit on the surface or go rancid. For the small amount you’ll use on a wallet over years, a purchased, stable product from a maker like Saddleback Leather is the wiser investment. It’s one less variable to worry about.
Before You Go
Conditioning isn’t a chore. It’s a five-minute conversation with a material that ages with you. Listen to it. Let the dullness of the surface or the stiffness at the fold be your guide, not a date on your phone.
The one rule that overrides all others: if your wallet gets wet, let it dry completely, no heat, no shortcuts, before you even think about conditioner. Everything else is adjustment. A well-made full-grain wallet, cared for with this level of attention, doesn’t have an expiration date. It just gets better.
So, pull your wallet out and look at it. Not as an accessory, but as a piece of preserved skin. Does it look thirsty? If it does, you now know exactly what to do.
